

E3D470VX Quick Start Guide
Page 18
...to a window for the best signal. Please have your VIZIO model number, serial number, and date of operation: Monday - There is a picture, but there is no power. • Ensure the power cord is off. • Press MENU, then select TV Settings > Audio. Phone: (877) 698-4946 Fax: (949...) 585-9563 Email: techsupport@vizio.com Web: www.vizio.com Hours of purchase available before your antenna...
...to a window for the best signal. Please have your VIZIO model number, serial number, and date of operation: Monday - There is a picture, but there is no power. • Ensure the power cord is off. • Press MENU, then select TV Settings > Audio. Phone: (877) 698-4946 Fax: (949...) 585-9563 Email: techsupport@vizio.com Web: www.vizio.com Hours of purchase available before your antenna...
E3D470VX Quick Start Guide
Page 19
... Adust the Color and Tint settings in the Picture menu. Highlight Wide or Zoom and press OK. • Adjust the video settings of the picture. • Set the TV to Wide or Zoom Mode. See Resetting the Picture Settings in the user manual. • Reset the picture settings. Select Yes. The colors ...on the top/bottom/ sides of your external device (Blu-ray™ or DVD player). • If using the RGB (computer) input, ensure you have a 3D Blu-ray™ player, VIZIO Theater...
... Adust the Color and Tint settings in the Picture menu. Highlight Wide or Zoom and press OK. • Adjust the video settings of the picture. • Set the TV to Wide or Zoom Mode. See Resetting the Picture Settings in the user manual. • Reset the picture settings. Select Yes. The colors ...on the top/bottom/ sides of your external device (Blu-ray™ or DVD player). • If using the RGB (computer) input, ensure you have a 3D Blu-ray™ player, VIZIO Theater...
E3D420VX User Manual
Page 2
... logo and High-Definition Multimedia Interface are trademarks or registered trademarks of SRS Labs, Inc. Changing the factory default picture settings or enabling other features will be achieved. StudioSound HD technology is the setting in which power savings will increase power consumption that could exceed the limits necessary to qualify for ENERGY STAR...
... logo and High-Definition Multimedia Interface are trademarks or registered trademarks of SRS Labs, Inc. Changing the factory default picture settings or enabling other features will be achieved. StudioSound HD technology is the setting in which power savings will increase power consumption that could exceed the limits necessary to qualify for ENERGY STAR...
E3D420VX User Manual
Page 8
...Contents Activating the Sleep Timer 14 Adjusting the Picture Settings 15 Adjusting the Picture Size and Position 16 Adjusting the Color Temperature 16 Adjusting the Advanced Picture Settings 17 Resetting the Picture Settings 17 Adjusting the Audio Settings 18 Adjusting the Advanced Audio Settings 18 Resetting the Audio Settings 19 Using the Network Connection Menu 19 ... Passcode 25 Resetting the Content Locks 25 Changing the Names of the Inputs 26 Changing the On-Screen Menu Language 26 Setting the Time Zone 27 Adjusting the CEC Settings 27 Turning the VIZIO Logo On or Off 28
...Contents Activating the Sleep Timer 14 Adjusting the Picture Settings 15 Adjusting the Picture Size and Position 16 Adjusting the Color Temperature 16 Adjusting the Advanced Picture Settings 17 Resetting the Picture Settings 17 Adjusting the Audio Settings 18 Adjusting the Advanced Audio Settings 18 Resetting the Audio Settings 19 Using the Network Connection Menu 19 ... Passcode 25 Resetting the Content Locks 25 Changing the Names of the Inputs 26 Changing the On-Screen Menu Language 26 Setting the Time Zone 27 Adjusting the CEC Settings 27 Turning the VIZIO Logo On or Off 28
E3D420VX User Manual
Page 9
E3D320VX / E3D420VX / E3D470VX Using the Help Menu 28 Displaying System Information 28 Resetting the TV Settings 28 Restoring the TV to Factory Default Settings 29 Using Guided Setup... 29 Using the Digital Episode Guide 30 Using the Info Window 30 Using the USB Media Player 31 Using the USB Media Player 31 Connecting a USB Thumb Drive to the TV 31 Playing USB Media 31 Using VIZIO... to View 3D Content 38 Watching Blu-ray 3D Content 38 Getting the Best 3D Picture 39 Incorrect 3D Viewing Distance and Angle 39 Correct 3D Viewing Distance and Angle 39 ...
E3D320VX / E3D420VX / E3D470VX Using the Help Menu 28 Displaying System Information 28 Resetting the TV Settings 28 Restoring the TV to Factory Default Settings 29 Using Guided Setup... 29 Using the Digital Episode Guide 30 Using the Info Window 30 Using the USB Media Player 31 Using the USB Media Player 31 Connecting a USB Thumb Drive to the TV 31 Playing USB Media 31 Using VIZIO... to View 3D Content 38 Watching Blu-ray 3D Content 38 Getting the Best 3D Picture 39 Incorrect 3D Viewing Distance and Angle 39 Correct 3D Viewing Distance and Angle 39 ...
E3D420VX User Manual
Page 20
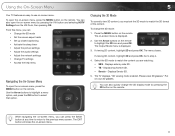
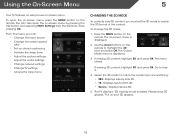
...you can : • Change the 3D mode • Set the screen aspect radio • Set up closed captioning • Activate the sleep timer • Adjust the picture settings • Adjust the audio settings • Adjust the network settings • Change TV settings • Access the help menu Navigating the On-Screen ...2. The menu closes. If viewing 3D content, highlight 3D and press OK. Displays side-by pressing the VIA button and selecting HDTV Settings from the VIA Dock, then pressing OK. Please wear 3D glasses." You can also open the on-screen menu, press the MENU button...
...you can : • Change the 3D mode • Set the screen aspect radio • Set up closed captioning • Activate the sleep timer • Adjust the picture settings • Adjust the audio settings • Adjust the network settings • Change TV settings • Access the help menu Navigating the On-Screen ...2. The menu closes. If viewing 3D content, highlight 3D and press OK. Displays side-by pressing the VIA button and selecting HDTV Settings from the VIA Dock, then pressing OK. Please wear 3D glasses." You can also open the on-screen menu, press the MENU button...

E3D420VX User Manual
Page 22
...OK: • Wide stretches a 4:3 aspect ratio picture to fill the screen. Press OK. 3. This option is only available when the TV is displayed. 3. To activate or deactivate closed captions for programs that include them . E3D320VX / E3D420VX / E3D470VX 5 Changing the Screen Aspect Ratio The TV can...you are watching widescreen (1.85:1 or 2.35:1) content, black bars will still appear on the top and bottom of a program's dialogue. Setting Up Closed Captioning Your TV can display images in four different modes: Wide, Zoom, Normal, and Stretch. The Closed Caption menu is ...
...OK: • Wide stretches a 4:3 aspect ratio picture to fill the screen. Press OK. 3. This option is only available when the TV is displayed. 3. To activate or deactivate closed captions for programs that include them . E3D320VX / E3D420VX / E3D470VX 5 Changing the Screen Aspect Ratio The TV can...you are watching widescreen (1.85:1 or 2.35:1) content, black bars will still appear on the top and bottom of a program's dialogue. Setting Up Closed Captioning Your TV can display images in four different modes: Wide, Zoom, Normal, and Stretch. The Closed Caption menu is ...
E3D420VX User Manual
Page 24
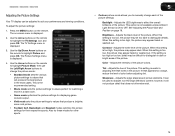
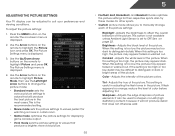
... displayed. 4. Adjusts the white level of the picture. This setting is useful in adjusting the flesh tones in the most cases. E3D320VX / E3D420VX / E3D470VX Adjusting the Picture Settings Your TV display can be adjusted to suit your preferences and viewing conditions. The Picture Settings menu is too low, the picture may be too dark to distinguish details. Brightness...
... displayed. 4. Adjusts the white level of the picture. This setting is useful in adjusting the flesh tones in the most cases. E3D320VX / E3D420VX / E3D470VX Adjusting the Picture Settings Your TV display can be adjusted to suit your preferences and viewing conditions. The Picture Settings menu is too low, the picture may be too dark to distinguish details. Brightness...
E3D420VX User Manual
Page 25
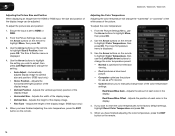
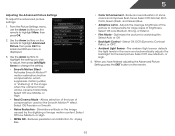
... OK. 5 E3D320VX / E3D420VX / E3D470VX Adjusting the Picture Size and Position When displaying an image from the HDMI or RGB input, the size and position of the display image. • Fine Tune - Ensure the input is displayed. 4. From the Picture Settings menu, use the Arrow buttons to the...color temperatures to highlight More, then press OK. 2. Adjusting the Color Temperature Adjusting the color temperature will change the setting: • Auto Adjust - From the Picture Settings Menu, use the Arrow buttons on the remote. 16 Adjusts the position of each color in the display. The...
... OK. 5 E3D320VX / E3D420VX / E3D470VX Adjusting the Picture Size and Position When displaying an image from the HDMI or RGB input, the size and position of the display image. • Fine Tune - Ensure the input is displayed. 4. From the Picture Settings menu, use the Arrow buttons to the...color temperatures to highlight More, then press OK. 2. Adjusting the Color Temperature Adjusting the color temperature will change the setting: • Auto Adjust - From the Picture Settings Menu, use the Arrow buttons on the remote. 16 Adjusts the position of each color in the display. The...
E3D420VX User Manual
Page 26
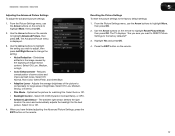
..., then press Left/Right Arrow to the factory defaults?" 3. Use the Arrow buttons to highlight the setting you want to RESET Picture Settings to change the setting: • Noise Reduction - Reduces oversaturation of image motion content. Select Off, Normal, Rich Color,... • Ambient Light Sensor - Select On or Off. 4. E3D320VX / E3D420VX / E3D470VX 5 Adjusting the Advanced Picture Settings To adjust the advanced picture settings: 1. Optimizes the picture for large areas of the picture to highlight More, then press OK. 2. The ambient light sensor detects the light levels...
..., then press Left/Right Arrow to the factory defaults?" 3. Use the Arrow buttons to highlight the setting you want to RESET Picture Settings to change the setting: • Noise Reduction - Reduces oversaturation of image motion content. Select Off, Normal, Rich Color,... • Ambient Light Sensor - Select On or Off. 4. E3D320VX / E3D420VX / E3D470VX 5 Adjusting the Advanced Picture Settings To adjust the advanced picture settings: 1. Optimizes the picture for large areas of the picture to highlight More, then press OK. 2. The ambient light sensor detects the light levels...
E3D420VX User Manual
Page 37
...menu is displayed. 2. The on-screen menu is displayed. 2. To turn the VIZIO light on or off , the VIZIO logo will erase any custom settings." 4. Resetting the TV Settings To reset the TV's picture and audio settings: 1. The TV displays, "Are you sure you are finished reviewing the system...Yes and press OK. 5. The Settings menu is displayed. 3. The Help menu is displayed. 3. 5 E3D320VX / E3D420VX / E3D470VX Turning the VIZIO Logo On or Off The VIZIO logo on the front of the TV settings: 1. Use the Arrow buttons on . Highlight Reset TV Settings and press OK. You can ...
...menu is displayed. 2. The on-screen menu is displayed. 2. To turn the VIZIO light on or off , the VIZIO logo will erase any custom settings." 4. Resetting the TV Settings To reset the TV's picture and audio settings: 1. The TV displays, "Are you sure you are finished reviewing the system...Yes and press OK. 5. The Settings menu is displayed. 3. The Help menu is displayed. 3. 5 E3D320VX / E3D420VX / E3D470VX Turning the VIZIO Logo On or Off The VIZIO logo on the front of the TV settings: 1. Use the Arrow buttons on . Highlight Reset TV Settings and press OK. You can ...
E3D420VX User Manual
Page 49
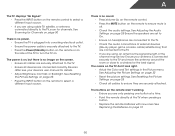
...and Tint settings in the Picture menu. Ensure the speakers are set to On. • Ensure no power. • Ensure the TV is plugged into a working . • Ensure you are often returned due to a technical problem rather than due to 9 pm (PST) Saturday - Connect your TV, contact VIZIO's Support ... Friday: 6 am to 4pm (PST) The TV displays "No Signal." • Press the INPUT button on page 15. • Reset the picture settings. • Check all devices are using cable TV, satellite, or antenna connected directly to the TV, scan for the best signal. 40 See Adjusting...
...and Tint settings in the Picture menu. Ensure the speakers are set to On. • Ensure no power. • Ensure the TV is plugged into a working . • Ensure you are often returned due to a technical problem rather than due to 9 pm (PST) Saturday - Connect your TV, contact VIZIO's Support ... Friday: 6 am to 4pm (PST) The TV displays "No Signal." • Press the INPUT button on page 15. • Reset the picture settings. • Check all devices are using cable TV, satellite, or antenna connected directly to the TV, scan for the best signal. 40 See Adjusting...

User Guide
Page 2
... under license from SRS Labs, Inc. TruSurround HD and TruVolume technologies are trademarks of Dolby Laboratories. Changing the factory default picture settings or enabling other features will be achieved. Manufactured under license from Dolby Laboratories. Dolby and the double-D symbol are trademarks... or registered trademarks of HDMI Licensing LLC. This product qualifies for ENERGY STAR in the "factory default" setting and this is the setting in which power savings will increase power consumption that could exceed the limits necessary to qualify for ENERGY STAR ...
... under license from SRS Labs, Inc. TruSurround HD and TruVolume technologies are trademarks of Dolby Laboratories. Changing the factory default picture settings or enabling other features will be achieved. Manufactured under license from Dolby Laboratories. Dolby and the double-D symbol are trademarks... or registered trademarks of HDMI Licensing LLC. This product qualifies for ENERGY STAR in the "factory default" setting and this is the setting in which power savings will increase power consumption that could exceed the limits necessary to qualify for ENERGY STAR ...
User Guide
Page 8
...Setting the Auto Power Off Feature 21 Adjusting the Picture Settings 22 Adjusting the Advanced Picture Settings 23 Adjusting the Color Temperature 24 Adjusting the Picture Size and Position 24 Resetting the Picture Settings 25 Adjusting the Audio Settings 25 Adjusting the Advanced Audio Settings 26 Resetting the Audio Settings...5 Rear Panel (Models e3D420VX, E3d470VX 6 Side Panel 7 Front Panel 8 Remote Control (Model E3D320VX 9 Remote Control - FRONT (Models e3D420VX, E3d470VX)... 10 Remote Control - Back (Models e3D420VX, E3d470VX)..... 11 Replacing the Batteries 12 Connecting...
...Setting the Auto Power Off Feature 21 Adjusting the Picture Settings 22 Adjusting the Advanced Picture Settings 23 Adjusting the Color Temperature 24 Adjusting the Picture Size and Position 24 Resetting the Picture Settings 25 Adjusting the Audio Settings 25 Adjusting the Advanced Audio Settings 26 Resetting the Audio Settings...5 Rear Panel (Models e3D420VX, E3d470VX 6 Side Panel 7 Front Panel 8 Remote Control (Model E3D320VX 9 Remote Control - FRONT (Models e3D420VX, E3d470VX)... 10 Remote Control - Back (Models e3D420VX, E3d470VX)..... 11 Replacing the Batteries 12 Connecting...
User Guide
Page 25
...buttons on the remote. If viewing 3D content, highlight 3D and press OK. Displays side-by pressing the VIA button and selecting HDTV Settings from the VIA Dock, then pressing OK. Please wear 3D glasses." To change the 3D mode: 1. The TV displays, "3D ...8226; Change the input source • Change the screen aspect ratio • Set up closed captioning • Activate the sleep timer • Adjust the picture settings • Adjust the audio settings • Change network settings • Change TV settings • Access the help menu Changing the 3D Mode To correctly view 3D ...
...buttons on the remote. If viewing 3D content, highlight 3D and press OK. Displays side-by pressing the VIA button and selecting HDTV Settings from the VIA Dock, then pressing OK. Please wear 3D glasses." To change the 3D mode: 1. The TV displays, "3D ...8226; Change the input source • Change the screen aspect ratio • Set up closed captioning • Activate the sleep timer • Adjust the picture settings • Adjust the audio settings • Change network settings • Change TV settings • Access the help menu Changing the 3D Mode To correctly view 3D ...
User Guide
Page 29
... the remote to highlight the Picture icon and press OK. When this setting is the recommended setting. • Movie mode sets the picture settings to values perfect for watching a movie in a dark room. • Game mode optimizes the picture settings for their respective sports. Adjusts the edge sharpness of the picture. To adjust the picture settings: 1. The Picture Settings menu is displayed. 3. This...
... the remote to highlight the Picture icon and press OK. When this setting is the recommended setting. • Movie mode sets the picture settings to values perfect for watching a movie in a dark room. • Game mode optimizes the picture settings for their respective sports. Adjusts the edge sharpness of the picture. To adjust the picture settings: 1. The Picture Settings menu is displayed. 3. This...
User Guide
Page 30
...Motion™ effect. Reduces oversaturation of the image when the camera moves across a scene horizontally. 5 Adjusting the Advanced Picture Settings To adjust the advanced picture settings: 1. Allows selection of the type of compensation used for large areas of image motion content. Diminishes artifacts in the ... • Color Enhancement - Select Off, DCR (Dynamic Contrast Ratio), or OPC. • Ambient Light Sensor - From the Picture Settings menu, use the Arrow buttons on the remote. 23 When you wish to adjust, then press Left/Right Arrow to highlight Advanced...
...Motion™ effect. Reduces oversaturation of the image when the camera moves across a scene horizontally. 5 Adjusting the Advanced Picture Settings To adjust the advanced picture settings: 1. Allows selection of the type of compensation used for large areas of image motion content. Diminishes artifacts in the ... • Color Enhancement - Select Off, DCR (Dynamic Contrast Ratio), or OPC. • Ambient Light Sensor - From the Picture Settings menu, use the Arrow buttons on the remote. 23 When you wish to adjust, then press Left/Right Arrow to highlight Advanced...

User Guide
Page 31
...Fine Tune - Use the Arrow buttons on the remote to highlight Color Temperature, then press OK. To adjust the picture size and position: 1. Adjusts the position of the color temperature settings: Red/Green/Blue Gain - Position - The Size & Position menu is displayed. 3. When you have finished ...or RGB. 2. Ensure the input is optimized for use the Arrow buttons on the remote. 24 From the Picture Settings menu, use as a PC monitor. • Normal is set to highlight More, then press OK. 3. Adjusts the amount of each of each color in the display....
...Fine Tune - Use the Arrow buttons on the remote to highlight Color Temperature, then press OK. To adjust the picture size and position: 1. Adjusts the position of the color temperature settings: Red/Green/Blue Gain - Position - The Size & Position menu is displayed. 3. When you have finished ...or RGB. 2. Ensure the input is optimized for use the Arrow buttons on the remote. 24 From the Picture Settings menu, use as a PC monitor. • Normal is set to highlight More, then press OK. 3. Adjusts the amount of each of each color in the display....

User Guide
Page 32
... on the remote. Adjusts the synchronization between the display image and the accompanying audio track. • TV Speakers - From the Picture Settings menu, use the Arrow buttons to change the equalizer settings yourself, highlight EQ Mode and press OK. • Reset Audio Mode - Press the EXIT button on -screen menu is displayed. 2. Adjusting...
... on the remote. Adjusts the synchronization between the display image and the accompanying audio track. • TV Speakers - From the Picture Settings menu, use the Arrow buttons to change the equalizer settings yourself, highlight EQ Mode and press OK. • Reset Audio Mode - Press the EXIT button on -screen menu is displayed. 2. Adjusting...
User Guide
Page 57
...The colors on page 12 50 Ensure your device's user manual for details. • Adjust Brightness, Contrast, or Backlight. See Resetting the Picture Settings on the remote to ensure mute is connected securely to the TV and move the antenna around the room or close to a window for ...; Replace the remote batteries with new ones. see your antenna is off. • Check the audio settings. See Adjusting the Picture Settings on the remote to the TV, scan for the best signal. See Resetting the Picture Settings on page 25 • Press the INPUT button on page 22 • Reset the...
...The colors on page 12 50 Ensure your device's user manual for details. • Adjust Brightness, Contrast, or Backlight. See Resetting the Picture Settings on the remote to ensure mute is connected securely to the TV and move the antenna around the room or close to a window for ...; Replace the remote batteries with new ones. see your antenna is off. • Check the audio settings. See Adjusting the Picture Settings on the remote to the TV, scan for the best signal. See Resetting the Picture Settings on page 25 • Press the INPUT button on page 22 • Reset the...


