
E370VT User Manual
Page 5
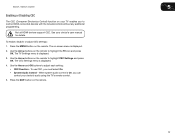
...be of sufficient magnitude to constitute a risk of electric shock to persons. • Do not overload power strips and extension cords. E320VT / E370VT / E420VT to constitute a risk of electrical shock to persons. Unplug the power cord immediately and contact your dealer immediately. Your TV is ... or when it will not be installed near your TV from moisture. These servicing instructions are for repair. Overloading can damage the remote control or injure the operator. Liquid sprays or any smoke or odor becomes apparent, unplug the power cord and contact your dealer ...
...be of sufficient magnitude to constitute a risk of electric shock to persons. • Do not overload power strips and extension cords. E320VT / E370VT / E420VT to constitute a risk of electrical shock to persons. Unplug the power cord immediately and contact your dealer immediately. Your TV is ... or when it will not be installed near your TV from moisture. These servicing instructions are for repair. Overloading can damage the remote control or injure the operator. Liquid sprays or any smoke or odor becomes apparent, unplug the power cord and contact your dealer ...

E370VT User Manual
Page 7
... the Package Contents 1 Installing the TV 1 Installing the TV Stand 1 Installing the TV on a Wall 2 Controls and Connections 3 Rear Panel 3 Front Panel 4 Right Side Panel 4 Remote Control 5 Replacing the Batteries 6 Connecting Your Devices 7 Before You Begin 7 Connecting Your Devices 7 Completing the First-Time Setup 9 Adjusting the TV Settings 10 Setting Up...
... the Package Contents 1 Installing the TV 1 Installing the TV Stand 1 Installing the TV on a Wall 2 Controls and Connections 3 Rear Panel 3 Front Panel 4 Right Side Panel 4 Remote Control 5 Replacing the Batteries 6 Connecting Your Devices 7 Before You Begin 7 Connecting Your Devices 7 Completing the First-Time Setup 9 Adjusting the TV Settings 10 Setting Up...
E370VT User Manual
Page 8
... is no image on the screen 31 There is no sound 31 The colors on the TV don't look right 31 The buttons on the remote aren't working 31 The image quality is not good 31 The picture is distorted 32 The display image does not cover the entire screen 32... AND LABOR 35 Parts and Labor 35 Type of Service 35 Limitations and Exclusions 35 Personal Data 35 Zero Bright Pixel Defect Guarantee 35 E320VT / E370VT / E420VT Legal & Compliance 36 FCC Class B Radio Interference Statement 36 Notice...36 FCC warning 36 Caution 36 Open Source Software Notice 36
... is no image on the screen 31 There is no sound 31 The colors on the TV don't look right 31 The buttons on the remote aren't working 31 The image quality is not good 31 The picture is distorted 32 The display image does not cover the entire screen 32... AND LABOR 35 Parts and Labor 35 Type of Service 35 Limitations and Exclusions 35 Personal Data 35 Zero Bright Pixel Defect Guarantee 35 E320VT / E370VT / E420VT Legal & Compliance 36 FCC Class B Radio Interference Statement 36 Notice...36 FCC warning 36 Caution 36 Open Source Software Notice 36
E370VT User Manual
Page 9
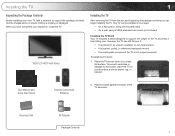
To prevent scratches or damage to support the weight of the TV as carpet, rug, or blanket. VIZIO LCD HDTV with Batteries 2. When you can begin installing the TV. Your TV can still fall over . However, the TV can be installed in two ...) Installing the TV Stand Your TV includes a stand designed to the screen, place the TV on a clean, flat surface. User Manual and Quick Start Guide Remote Control with Stand Installing the TV After removing the TV from falling over if: • It is placed on an uneven, unstable, or non-level...
To prevent scratches or damage to support the weight of the TV as carpet, rug, or blanket. VIZIO LCD HDTV with Batteries 2. When you can begin installing the TV. Your TV can still fall over . However, the TV can be installed in two ...) Installing the TV Stand Your TV includes a stand designed to the screen, place the TV on a clean, flat surface. User Manual and Quick Start Guide Remote Control with Stand Installing the TV After removing the TV from falling over if: • It is placed on an uneven, unstable, or non-level...
E370VT User Manual
Page 12
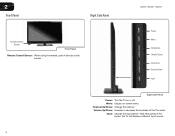
Volume Up/Down: Increase or decrease the loudness of the button, the TV will display a different input source. 4 Input: Change the input device. 2 Front Panel Right Side Panel Remote Control Sensor Front Panel Remote Control Sensor: When using the remote, point it directly at this sensor. Menu: Display on or off. With each press of the TVs audio. Channel Up/Down: Change the channel. E320VT / E370VT / E420VT Power Menu Channel Up Channel Down Volume Up Volume Down Input Right Side Panel Power: Turn the TV on -screen menu.
Volume Up/Down: Increase or decrease the loudness of the button, the TV will display a different input source. 4 Input: Change the input device. 2 Front Panel Right Side Panel Remote Control Sensor Front Panel Remote Control Sensor: When using the remote, point it directly at this sensor. Menu: Display on or off. With each press of the TVs audio. Channel Up/Down: Change the channel. E320VT / E370VT / E420VT Power Menu Channel Up Channel Down Volume Up Volume Down Input Right Side Panel Power: Turn the TV on -screen menu.

E370VT User Manual
Page 13
...channel will display a different input. Mute: Turn the sound off or on -screen menu. When mute is activated, the TV's audio is turned off . Remote Control 5 OK: Select highlighted menu option. Back: Go to the channel last viewed. Last: Return to the previous on or off . With each press .... Input: Change the input device. Dash (-): Use with number pad to manually enter a channel. With each press of the TV's audio. E320VT / E370VT / E420VT Input CC Exit OK Back Volume Up/Down Mute Number Pad Wide Power/Standby A/V Controls Info Menu Arrow Channel Up/Down Last Dash...
...channel will display a different input. Mute: Turn the sound off or on -screen menu. When mute is activated, the TV's audio is turned off . Remote Control 5 OK: Select highlighted menu option. Back: Go to the channel last viewed. Last: Return to the previous on or off . With each press .... Input: Change the input device. Dash (-): Use with number pad to manually enter a channel. With each press of the TV's audio. E320VT / E370VT / E420VT Input CC Exit OK Back Volume Up/Down Mute Number Pad Wide Power/Standby A/V Controls Info Menu Arrow Channel Up/Down Last Dash...

E370VT User Manual
Page 14
E320VT / E370VT / E420VT 6 Remove the battery cover. 2. 2 Replacing the Batteries 1. Replace the battery cover. • Use only good quality batteries. • Inserting the batteries incorrectly may result ... in cracking or leakage that the (+) and (-) symbols on the batteries match the (+) and (-) symbols inside the battery compartment. 3. Insert two AAA batteries into the remote control.
E320VT / E370VT / E420VT 6 Remove the battery cover. 2. 2 Replacing the Batteries 1. Replace the battery cover. • Use only good quality batteries. • Inserting the batteries incorrectly may result ... in cracking or leakage that the (+) and (-) symbols on the batteries match the (+) and (-) symbols inside the battery compartment. 3. Insert two AAA batteries into the remote control.
E370VT User Manual
Page 15
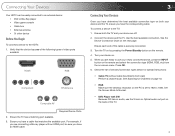
... your device are ready to 1920 x 1080. Turn your device on both the TV and your newly connected device, press the INPUT button on the remote and select the connection type (HDMI, RGB, etc) from wall) Perform a channel scan. When you have a cable that the device has one of the following... or Optical audio out port on the next page. See Scanning for special instructions: • Cable TV (without cable box/directly from the on the remote. 4.
... your device are ready to 1920 x 1080. Turn your device on both the TV and your newly connected device, press the INPUT button on the remote and select the connection type (HDMI, RGB, etc) from wall) Perform a channel scan. When you have a cable that the device has one of the following... or Optical audio out port on the next page. See Scanning for special instructions: • Cable TV (without cable box/directly from the on the remote. 4.
E370VT User Manual
Page 17
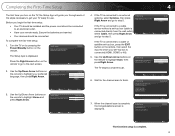
.... • Your devices should be connected. Initial Setup Allow the VIZIO setup Wizard to the DTV/TV input Channel Scan Scan Skip Scan The TV begins a channel scan. 6. Use the Up/Down Arrow buttons on the remote to highlight your channels. Use the Up/Down Arrow buttons on the... then press Right Arrow and go to step 5. To complete the first-time setup: 1. Next EXIT Exit 2. Use the Up/Down Arrow buttons on the remote to a cable or satellite set -top box (cable is displayed. Analog Channels: 0 Digital Channels: 4 Channel Scan 7. Before you through each of the ...
.... • Your devices should be connected. Initial Setup Allow the VIZIO setup Wizard to the DTV/TV input Channel Scan Scan Skip Scan The TV begins a channel scan. 6. Use the Up/Down Arrow buttons on the remote to highlight your channels. Use the Up/Down Arrow buttons on the... then press Right Arrow and go to step 5. To complete the first-time setup: 1. Next EXIT Exit 2. Use the Up/Down Arrow buttons on the remote to a cable or satellite set -top box (cable is displayed. Analog Channels: 0 Digital Channels: 4 Channel Scan 7. Before you through each of the ...
E370VT User Manual
Page 18
...) input. The TV Settings menu is displayed. 2. Use the Arrow buttons to highlight the TV icon and press OK. The on the remote. Use the Arrow buttons on the remote to highlight Signal Source. 5. Use the Arrow buttons to Cable or Antenna. 6. 5 From the TV Settings Menu, you can: • Setup channels...
...) input. The TV Settings menu is displayed. 2. Use the Arrow buttons to highlight the TV icon and press OK. The on the remote. Use the Arrow buttons on the remote to highlight Signal Source. 5. Use the Arrow buttons to Cable or Antenna. 6. 5 From the TV Settings Menu, you can: • Setup channels...

E370VT User Manual
Page 19
... an input name: 1. Use the Arrow buttons to highlight Input Source and press OK. 5. Press EXIT. 11 Press the MENU button on the remote. Use the Arrow buttons to highlight Input Naming and press OK. 5. The selected input source is displayed. 7. Input Source DTV/TV AV Component ... Naming and press OK. Use the Arrow buttons to highlight Input and press OK. 4. The on -screen menu is displayed. 2. E320VT / E370VT / E420VT 5 Changing the Input Source External devices such as DVD players, Blu-Ray Players, and video game consoles can become difficult to remember ...
... an input name: 1. Use the Arrow buttons to highlight Input Source and press OK. 5. Press EXIT. 11 Press the MENU button on the remote. Use the Arrow buttons to highlight Input Naming and press OK. 5. The selected input source is displayed. 7. Input Source DTV/TV AV Component ... Naming and press OK. Use the Arrow buttons to highlight Input and press OK. 4. The on -screen menu is displayed. 2. E320VT / E370VT / E420VT 5 Changing the Input Source External devices such as DVD players, Blu-Ray Players, and video game consoles can become difficult to remember ...
E370VT User Manual
Page 20
5 E320VT / E370VT / E420VT Removing Unused Inputs from the Input List If you are not using an input and would like to remove it from the input list, you can be available when watching broadcast television. 1. The on the remote. Press EXIT. Use the Arrow buttons on the remote to remove, then press... to highlight Input and press OK. 4. Use the Arrow buttons to highlight TV and press OK. 3. Use the Arrow buttons on the remote to the list, highlight the channel and press OK. Customizing the Master Channel List By customizing the master channel list, you wish to highlight...
5 E320VT / E370VT / E420VT Removing Unused Inputs from the Input List If you are not using an input and would like to remove it from the input list, you can be available when watching broadcast television. 1. The on the remote. Press EXIT. Use the Arrow buttons on the remote to remove, then press... to highlight Input and press OK. 4. Use the Arrow buttons to highlight TV and press OK. 3. Use the Arrow buttons on the remote to the list, highlight the channel and press OK. Customizing the Master Channel List By customizing the master channel list, you wish to highlight...

E370VT User Manual
Page 21
...Arrow buttons to highlight Channel Scan and press OK. 5. Use the Arrow buttons to On or Off. 6. The channel scan begins. 6. E320VT / E370VT / E420VT 5 Scanning for New or Additional Channels When a new channel becomes available in your master channel list settings are available. Using the add channel ... information, you do not have to rescan all channels to -air broadcast television channels are preserved. Use the Arrow buttons on the remote. Use the Left/Right Arrow buttons to change the option to highlight Channels and press OK. 4. The on-screen menu is useful...
...Arrow buttons to highlight Channel Scan and press OK. 5. Use the Arrow buttons to On or Off. 6. The channel scan begins. 6. E320VT / E370VT / E420VT 5 Scanning for New or Additional Channels When a new channel becomes available in your master channel list settings are available. Using the add channel ... information, you do not have to rescan all channels to -air broadcast television channels are preserved. Use the Arrow buttons on the remote. Use the Left/Right Arrow buttons to change the option to highlight Channels and press OK. 4. The on-screen menu is useful...

E370VT User Manual
Page 22
... OK and press OK. 7. Press EXIT. 5 E320VT / E370VT / E420VT Customizing Channel Names Your TV features the ability to customize channel names, making them easy to highlight Channels and press OK. 4. To customize a channel name: 1. The on the remote. Use the Arrow buttons to identify. (Custom names have a... Name Edit and press OK. 5. Use the Arrow buttons on -screen keyboard is displayed. 2. Press the MENU button on the remote. Use the Arrow buttons to highlight your preferred language and press OK. 5. Use the Arrow buttons to highlight Menu Language and press OK. ...
... OK and press OK. 7. Press EXIT. 5 E320VT / E370VT / E420VT Customizing Channel Names Your TV features the ability to customize channel names, making them easy to highlight Channels and press OK. 4. To customize a channel name: 1. The on the remote. Use the Arrow buttons to identify. (Custom names have a... Name Edit and press OK. 5. Use the Arrow buttons on -screen keyboard is displayed. 2. Press the MENU button on the remote. Use the Arrow buttons to highlight your preferred language and press OK. 5. Use the Arrow buttons to highlight Menu Language and press OK. ...

E370VT User Manual
Page 23
... and Time Updates The current date and time is displayed. 2. Your TV can automatically set the time and date using this setting is displayed. 2. E320VT / E370VT / E420VT Setting the TV's Date and Time From the Date & Time menu, you cannot manually set the date and time. Use the Arrow buttons to... and time updates • Set the current date and time Setting the Time Zone To set the time zone: 1. Press the MENU button on the remote to highlight the TV icon and press OK. The on -screen menu is broadcast digitally in many areas. Use the Arrow buttons to highlight your...
... and Time Updates The current date and time is displayed. 2. Your TV can automatically set the time and date using this setting is displayed. 2. E320VT / E370VT / E420VT Setting the TV's Date and Time From the Date & Time menu, you cannot manually set the date and time. Use the Arrow buttons to... and time updates • Set the current date and time Setting the Time Zone To set the time zone: 1. Press the MENU button on the remote to highlight the TV icon and press OK. The on -screen menu is broadcast digitally in many areas. Use the Arrow buttons to highlight your...

E370VT User Manual
Page 24
... the Arrow buttons to display output from the RGB port. E320VT / E370VT / E420VT Adjusting the TV Settings for best quality, select Auto Sync... If you can be set to highlight Date & Time and press OK. 4. Press the MENU button on the remote. Use the Arrow buttons to automatically adjust the picture for Use with A PC Your TV can manually set the ... only available when viewing content from a home computer using the RGB port. Press the MENU button on the remote. Vertical Position - Your TV must be used to highlight individual numbers in the date and time. Use the...
... the Arrow buttons to display output from the RGB port. E320VT / E370VT / E420VT Adjusting the TV Settings for best quality, select Auto Sync... If you can be set to highlight Date & Time and press OK. 4. Press the MENU button on the remote. Use the Arrow buttons to automatically adjust the picture for Use with A PC Your TV can manually set the ... only available when viewing content from a home computer using the RGB port. Press the MENU button on the remote. Vertical Position - Your TV must be used to highlight individual numbers in the date and time. Use the...
E370VT User Manual
Page 25
... menu is On, you can control your device's user manual for details. The CEC Settings menu is displayed. 3. Press the EXIT button on the remote. 17 E320VT / E370VT / E420VT 5 Enabling or Disabling CEC The CEC (Consumer Electronics Control) function on your TV enables you must select On. • System Audio Control - When...
... menu is On, you can control your device's user manual for details. The CEC Settings menu is displayed. 3. Press the EXIT button on the remote. 17 E320VT / E370VT / E420VT 5 Enabling or Disabling CEC The CEC (Consumer Electronics Control) function on your TV enables you must select On. • System Audio Control - When...
E370VT User Manual
Page 26
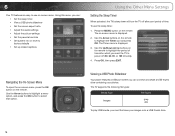
...Navigating the On-Screen Menu To open the on-screen menu, press the OK button on the remote to highlight the Timer icon and press OK. Use the Arrow buttons to highlight a menu option... the parental controls • Get system info or reset to select that option. Press the MENU button on the remote to highlight the period of time after a set period of time. 6 Your TV features an easy-to-use...TV to power off (30, 60, 90, or 120 minutes). 4. Use the Up/Down Arrow buttons on the remote. The on -screen menu. To use on -screen menu is displayed. 3. Using this menu, you can connect ...
...Navigating the On-Screen Menu To open the on-screen menu, press the OK button on the remote to highlight the Timer icon and press OK. Use the Arrow buttons to highlight a menu option... the parental controls • Get system info or reset to select that option. Press the MENU button on the remote to highlight the period of time after a set period of time. 6 Your TV features an easy-to-use...TV to power off (30, 60, 90, or 120 minutes). 4. Use the Up/Down Arrow buttons on the remote. The on -screen menu. To use on -screen menu is displayed. 3. Using this menu, you can connect ...

E370VT User Manual
Page 27
E320VT / E370VT / E420VT Remember: • The USB thumb drive must be formatted as a grid of photos. ... media from external hard drives or mp3 players To play your home computer. 2. The menu is displayed on the remote to be a supported file type • The USB thumb drive must be displayed first, then press the Play ... images. Choose List or Thumbnail. • Thumbnail Size - The Photo screen is displayed. 4. Use the Arrow buttons on the remote to change the method of the screen. 2. To customize the photo display screen: 1. Choose Small, Medium, or Large. 19 ...
E320VT / E370VT / E420VT Remember: • The USB thumb drive must be formatted as a grid of photos. ... media from external hard drives or mp3 players To play your home computer. 2. The menu is displayed on the remote to be a supported file type • The USB thumb drive must be displayed first, then press the Play ... images. Choose List or Thumbnail. • Thumbnail Size - The Photo screen is displayed. 4. Use the Arrow buttons on the remote to change the method of the screen. 2. To customize the photo display screen: 1. Choose Small, Medium, or Large. 19 ...

E370VT User Manual
Page 29
...added to the edges of the display image. If you are watching widescreen (1.85:1 or 2.35:1) content, black bars will appear on the remote to display, then press OK: • Normal - Images may appear wider than intended. Press the Right/Left Arrow buttons to fill the screen. ...E320VT / E370VT / E420VT To adjust the screen aspect ratio: 1. Press the OK button on the remote to fill the screen. The on-screen menu is already formatted for a two speaker playback environment. Use the...
...added to the edges of the display image. If you are watching widescreen (1.85:1 or 2.35:1) content, black bars will appear on the remote to display, then press OK: • Normal - Images may appear wider than intended. Press the Right/Left Arrow buttons to fill the screen. ...E320VT / E370VT / E420VT To adjust the screen aspect ratio: 1. Press the OK button on the remote to fill the screen. The on-screen menu is already formatted for a two speaker playback environment. Use the...


