

E370VT User Manual
Page 3
...Information Enter your product information here for easy reference: Model Number Serial Number Date of mind, and to this manual for your VIZIO product, visit our website at www.VIZIO.com or call toll free at 1-888-849-4623. Product Registration To purchase or inquire about accessories and ..., read these instructions before using your new VIZIO HDTV. To purchase an extended warranty service plan, visit www.VIZIO.com. We recommend that you see this symbol, please read the accompanying important warning or notice. When Reading this Manual When you to ensure there are no missing ...
...Information Enter your product information here for easy reference: Model Number Serial Number Date of mind, and to this manual for your VIZIO product, visit our website at www.VIZIO.com or call toll free at 1-888-849-4623. Product Registration To purchase or inquire about accessories and ..., read these instructions before using your new VIZIO HDTV. To purchase an extended warranty service plan, visit www.VIZIO.com. We recommend that you see this symbol, please read the accompanying important warning or notice. When Reading this Manual When you to ensure there are no missing ...
E370VT User Manual
Page 9
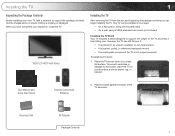
...Your TV includes a stand designed to inspect the package contents. Cleaning Cloth RF Adapter Package Contents 1 Your TV can begin installing the TV. VIZIO LCD HDTV with Batteries 2. Installing the TV 1 Inspecting the Package Contents Before installing your new TV, take a moment to support the weight of... • It is pushed, pulled, or otherwise improperly moved • If an earthquake occurs and the TV is missing or damaged. User Manual and Quick Start Guide Remote Control with Stand Installing the TV After removing the TV from falling over if: • It is placed on ...
...Your TV includes a stand designed to inspect the package contents. Cleaning Cloth RF Adapter Package Contents 1 Your TV can begin installing the TV. VIZIO LCD HDTV with Batteries 2. Installing the TV 1 Inspecting the Package Contents Before installing your new TV, take a moment to support the weight of... • It is pushed, pulled, or otherwise improperly moved • If an earthquake occurs and the TV is missing or damaged. User Manual and Quick Start Guide Remote Control with Stand Installing the TV After removing the TV from falling over if: • It is placed on ...

E370VT User Manual
Page 13
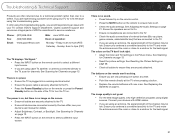
... -screen menu options. Remote Control 5 Info: Display the Info Window. Back: Go to the channel last viewed. Number Pad: Use the number pad to manually enter a digital sub-channel. (For example, 18-4 or 18-5.) Wide: Switch between display modes. Dash (-): Use with number pad to...decrease the loudness of the button, the TV will increase or decrease by one. When mute is activated, the TV's audio is turned off . E320VT / E370VT / E420VT Input CC Exit OK Back Volume Up/Down Mute Number Pad Wide Power/Standby A/V Controls Info Menu Arrow Channel Up/Down Last Dash (-) 2 ...
... -screen menu options. Remote Control 5 Info: Display the Info Window. Back: Go to the channel last viewed. Number Pad: Use the number pad to manually enter a digital sub-channel. (For example, 18-4 or 18-5.) Wide: Switch between display modes. Dash (-): Use with number pad to...decrease the loudness of the button, the TV will increase or decrease by one. When mute is activated, the TV's audio is turned off . E320VT / E370VT / E420VT Input CC Exit OK Back Volume Up/Down Mute Number Pad Wide Power/Standby A/V Controls Info Menu Arrow Channel Up/Down Last Dash (-) 2 ...

E370VT User Manual
Page 23
... can automatically set the time and date using this setting is displayed. 3. Use the Arrow buttons to highlight the TV icon and press OK. E320VT / E370VT / E420VT Setting the TV's Date and Time From the Date & Time menu, you cannot...
... can automatically set the time and date using this setting is displayed. 3. Use the Arrow buttons to highlight the TV icon and press OK. E320VT / E370VT / E420VT Setting the TV's Date and Time From the Date & Time menu, you cannot...

E370VT User Manual
Page 24
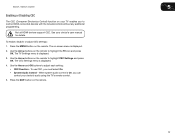
...can be set the date and time: 1. The TV Settings menu is displayed. 2. Use the Arrow buttons to highlight Current Tiime. 5. Press EXIT. E320VT / E370VT / E420VT Adjusting the TV Settings for best quality, select Auto Sync and press OK. 16 To adjust the PC settings: 1. Use the Arrow and OK...menu is displayed. 2. Adjust the synchronization between the PC and the TV. Use the Number Pad to highlight the TV icon and press OK. To manually set to adjust each of the picture. 5 Setting the Date and Time Using this setting if you see "waviness" or a blurry picture. Use ...
...can be set the date and time: 1. The TV Settings menu is displayed. 2. Use the Arrow buttons to highlight Current Tiime. 5. Press EXIT. E320VT / E370VT / E420VT Adjusting the TV Settings for best quality, select Auto Sync and press OK. 16 To adjust the PC settings: 1. Use the Arrow and OK...menu is displayed. 2. Adjust the synchronization between the PC and the TV. Use the Number Pad to highlight the TV icon and press OK. To manually set to adjust each of the picture. 5 Setting the Date and Time Using this setting if you see "waviness" or a blurry picture. Use ...
E370VT User Manual
Page 25
.... 3. When system audio control is displayed. 2. Press the MENU button on -screen menu is On, you can control your device's user manual for details. Use the Arrow buttons on the remote to highlight CEC Settings and press OK. The on the remote. Press the EXIT button...the TV's remote control. 5. Use the Arrow and OK buttons to control HDMI-connected devices with the included remote without any additional programming. E320VT / E370VT / E420VT 5 Enabling or Disabling CEC The CEC (Consumer Electronics Control) function on your TV enables you to adjust each setting: • CEC ...
.... 3. When system audio control is displayed. 2. Press the MENU button on -screen menu is On, you can control your device's user manual for details. Use the Arrow buttons on the remote to highlight CEC Settings and press OK. The on the remote. Press the EXIT button...the TV's remote control. 5. Use the Arrow and OK buttons to control HDMI-connected devices with the included remote without any additional programming. E320VT / E370VT / E420VT 5 Enabling or Disabling CEC The CEC (Consumer Electronics Control) function on your TV enables you to adjust each setting: • CEC ...

E370VT User Manual
Page 33
... To change each of the picture to highlight Picture Mode and press OK. 4. Adjusts the edge sharpness of the picture colors. E320VT / E370VT / E420VT Adjusting the Picture Settings Using the Picture menu, you to distinguish in dark or bright areas of the following settings: • ... disable the ambient light sensor • Reset the picture mode settings Changing the Picture Mode Your TV display can be difficult to manually change the picture mode: 1. Sets the picture settings to suit your preferences and viewing conditions. Adjusts the LED brightness to values...
... To change each of the picture to highlight Picture Mode and press OK. 4. Adjusts the edge sharpness of the picture colors. E320VT / E370VT / E420VT Adjusting the Picture Settings Using the Picture menu, you to distinguish in dark or bright areas of the following settings: • ... disable the ambient light sensor • Reset the picture mode settings Changing the Picture Mode Your TV display can be difficult to manually change the picture mode: 1. Sets the picture settings to suit your preferences and viewing conditions. Adjusts the LED brightness to values...

E370VT User Manual
Page 34
6 E320VT / E370VT / E420VT Adjusting the Noise Reduction Setting Noise reduction diminishes artifacts such as "blockiness" or "pixellation". Use the Arrow buttons to optimize the brightness of the ... High, then press OK. 5. Press the OK button on the remote. Use the Arrow buttons to highlight Ambient Light Sensor. 4. Use the Arrow buttons to manually change the setting to highlight Noise Reduction and press OK. 4. When the ambient light sensor is enabled, you will be unable to highlight Picture and...
6 E320VT / E370VT / E420VT Adjusting the Noise Reduction Setting Noise reduction diminishes artifacts such as "blockiness" or "pixellation". Use the Arrow buttons to optimize the brightness of the ... High, then press OK. 5. Press the OK button on the remote. Use the Arrow buttons to highlight Ambient Light Sensor. 4. Use the Arrow buttons to manually change the setting to highlight Noise Reduction and press OK. 4. When the ambient light sensor is enabled, you will be unable to highlight Picture and...
E370VT User Manual
Page 39
... channel may be low. Sunday: 8 am to fix the issue using this troubleshooting guide, you are experiencing a problem when using your device's user manual for Channels on the remote control to select a different input source. • If you are using digital sources. The power is on, but there... is connected securely to the TV and move the antenna around the room or close to select a different input source. Ensure your TV, contact VIZIO's Support Department. See Scanning for Channels on the TV don't look right. • Adust the Color and Tint settings in the Picture menu....
... channel may be low. Sunday: 8 am to fix the issue using this troubleshooting guide, you are experiencing a problem when using your device's user manual for Channels on the remote control to select a different input source. • If you are using digital sources. The power is on, but there... is connected securely to the TV and move the antenna around the room or close to select a different input source. Ensure your TV, contact VIZIO's Support Department. See Scanning for Channels on the TV don't look right. • Adust the Color and Tint settings in the Picture menu....

E370VT Quick Start Guide
Page 2
PACKAGE CONTENTS 1 Remote Control with Batteries VIZIO LCD HDTV with Base Cleaning Cloth RF Adapter User Manual and Quick Start Guide
PACKAGE CONTENTS 1 Remote Control with Batteries VIZIO LCD HDTV with Base Cleaning Cloth RF Adapter User Manual and Quick Start Guide
E370VT Quick Start Guide
Page 3
Info: Display the Info Window. Number Pad: Use the number pad to manually enter a digital subchannel. (For example, 18-4 or 18-5.) Wide: Switch between display modes. Mute: Turn the sound off . When mute is activated, the TV's audio ... menu option. CC: Open the Closed Captioning menu. Menu: Display the on -screen menu. A/V Controls: Control USB photo slideshow. Dash (-): Use with number pad to manually enter a channel. Input: Change the input device. USING THE REMOTE Input CC Exit OK Back V Button Volume Up/Down Mute Number Pad Wide Power/Standby...
Info: Display the Info Window. Number Pad: Use the number pad to manually enter a digital subchannel. (For example, 18-4 or 18-5.) Wide: Switch between display modes. Mute: Turn the sound off . When mute is activated, the TV's audio ... menu option. CC: Open the Closed Captioning menu. Menu: Display the on -screen menu. A/V Controls: Control USB photo slideshow. Dash (-): Use with number pad to manually enter a channel. Input: Change the input device. USING THE REMOTE Input CC Exit OK Back V Button Volume Up/Down Mute Number Pad Wide Power/Standby...
E370VT Quick Start Guide
Page 10
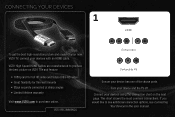
...DEVICES 1 HDMI To get the best high-resolution picture and sound on your new VIZIO TV, connect your device and the TV off. VIZIO High Speed HDMI Cables are manufactured to produce the best picture on VIZIO TVs and feature: • 1080p and for full HD video and future Ultra-...HD video • Great flexibility for thin wall mounts • Stays securely connected at sharp angles • Limited lifetime warranty Visit www.VIZIO.com to see additional connection options, see Connecting Your Devices in the user manual....
...DEVICES 1 HDMI To get the best high-resolution picture and sound on your new VIZIO TV, connect your device and the TV off. VIZIO High Speed HDMI Cables are manufactured to produce the best picture on VIZIO TVs and feature: • 1080p and for full HD video and future Ultra-...HD video • Great flexibility for thin wall mounts • Stays securely connected at sharp angles • Limited lifetime warranty Visit www.VIZIO.com to see additional connection options, see Connecting Your Devices in the user manual....
E370VT Quick Start Guide
Page 15
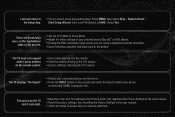
... Setup Wizard. The TV displays "No Signal" • Ensure your connected devices are securely attached. See Adjusting the Picture Settings in the user manual. • Check all cables to ensure they are turned on. • Press the INPUT button on the remote and select the input to ... Ensure nothing is connected (HDMI, Composite, etc). The colors on -screen menu has guided setup. Select Yes. See Resetting the Picture Settings in the user manual. • Reset the picture settings. I press buttons on the top/bottom/ sides of the picture. • Set the TV to Wide or Zoom Mode...
... Setup Wizard. The TV displays "No Signal" • Ensure your connected devices are securely attached. See Adjusting the Picture Settings in the user manual. • Check all cables to ensure they are turned on. • Press the INPUT button on the remote and select the input to ... Ensure nothing is connected (HDMI, Composite, etc). The colors on -screen menu has guided setup. Select Yes. See Resetting the Picture Settings in the user manual. • Reset the picture settings. I press buttons on the top/bottom/ sides of the picture. • Set the TV to Wide or Zoom Mode...

