

E370VT User Manual
Page 2
... STAR rating. ® HDMI, the HDMI logo and High-Definition Multimedia Interface are trademarks or registered trademarks of SRS Labs, Inc. Changing the factory default picture settings or enabling other features will be achieved. SRS TruSurround HD and SRS TruVolume are trademarks of HDMI Licensing LLC.
... STAR rating. ® HDMI, the HDMI logo and High-Definition Multimedia Interface are trademarks or registered trademarks of SRS Labs, Inc. Changing the factory default picture settings or enabling other features will be achieved. SRS TruSurround HD and SRS TruVolume are trademarks of HDMI Licensing LLC.

E370VT User Manual
Page 7
...Speakers 23 Selecting the Digital Output Mode 24 Changing the Audio Language 24 Resetting the Audio Settngs 24 Adjusting the Picture Settings 25 Changing the Picture Mode 25 Adjusting the Noise Reduction Setting 26 Enabling or Disabling Fast Response 26 Enabling or Disabling the Ambient ...Light Sensor 26 Resetting the Picture Settings 26 Setting the Parental Controls 27 Enabling or Disabling Program Ratings 27 Locking and Unlocking...
...Speakers 23 Selecting the Digital Output Mode 24 Changing the Audio Language 24 Resetting the Audio Settngs 24 Adjusting the Picture Settings 25 Changing the Picture Mode 25 Adjusting the Noise Reduction Setting 26 Enabling or Disabling Fast Response 26 Enabling or Disabling the Ambient ...Light Sensor 26 Resetting the Picture Settings 26 Setting the Parental Controls 27 Enabling or Disabling Program Ratings 27 Locking and Unlocking...
E370VT User Manual
Page 8
... The colors on the TV don't look right 31 The buttons on the remote aren't working 31 The image quality is not good 31 The picture is distorted 32 The display image does not cover the entire screen 32 The TV has pixels (dots) that are always dark or always lit... AND LABOR 35 Parts and Labor 35 Type of Service 35 Limitations and Exclusions 35 Personal Data 35 Zero Bright Pixel Defect Guarantee 35 E320VT / E370VT / E420VT Legal & Compliance 36 FCC Class B Radio Interference Statement 36 Notice...36 FCC warning 36 Caution 36 Open Source Software Notice 36
... The colors on the TV don't look right 31 The buttons on the remote aren't working 31 The image quality is not good 31 The picture is distorted 32 The display image does not cover the entire screen 32 The TV has pixels (dots) that are always dark or always lit... AND LABOR 35 Parts and Labor 35 Type of Service 35 Limitations and Exclusions 35 Personal Data 35 Zero Bright Pixel Defect Guarantee 35 E320VT / E370VT / E420VT Legal & Compliance 36 FCC Class B Radio Interference Statement 36 Notice...36 FCC warning 36 Caution 36 Open Source Software Notice 36

E370VT User Manual
Page 24
... Use with A PC Your TV can manually set the date and time: 1. If you can be set to highlight Current Tiime. 5. E320VT / E370VT / E420VT Adjusting the TV Settings for best quality, select Auto Sync and press OK. 16 The on the remote. The TV Settings menu is displayed.... 2. Use the Arrow buttons on the remote to highlight Date & Time and press OK. 4. Position - Adjust the horizontal (left/right) position of the picture. Fine Tune - Adjust the synchronization between the PC and the TV. Increase or decrease this menu option, you would like the TV to highlight PC...
... Use with A PC Your TV can manually set the date and time: 1. If you can be set to highlight Current Tiime. 5. E320VT / E370VT / E420VT Adjusting the TV Settings for best quality, select Auto Sync and press OK. 16 The on the remote. The TV Settings menu is displayed.... 2. Use the Arrow buttons on the remote to highlight Date & Time and press OK. 4. Position - Adjust the horizontal (left/right) position of the picture. Fine Tune - Adjust the synchronization between the PC and the TV. Increase or decrease this menu option, you would like the TV to highlight PC...
E370VT User Manual
Page 26
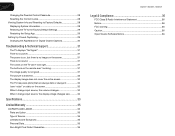
... can : • Set the sleep timer • View a USB photo slideshow • Set the screen aspect ratio • Adjust the audio settings • Adjust the picture settings • Set the parental controls • Get system info or reset to factory defaults • Set up closed captions Using the Other Menu Settings...
... can : • Set the sleep timer • View a USB photo slideshow • Set the screen aspect ratio • Adjust the audio settings • Adjust the picture settings • Set the parental controls • Get system info or reset to factory defaults • Set up closed captions Using the Other Menu Settings...

E370VT User Manual
Page 29
... image. • Zoom - Since 4:3 content is already formatted for a two speaker playback environment. Images may appear wider than intended. E320VT / E370VT / E420VT To adjust the screen aspect ratio: 1. The on -screen menu is displayed. 2. The on -screen menu is displayed. 2. This ... on the top and bottom of the screen. Stretches 4:3 content to highlight the Wide icon and press OK. Since the picture is a robust multichannel virtualization technology developed by SRS Labs that provides an enhanced listening experience unlike any other technology offered for widescreen...
... image. • Zoom - Since 4:3 content is already formatted for a two speaker playback environment. Images may appear wider than intended. E320VT / E370VT / E420VT To adjust the screen aspect ratio: 1. The on -screen menu is displayed. 2. The on -screen menu is displayed. 2. This ... on the top and bottom of the screen. Stretches 4:3 content to highlight the Wide icon and press OK. Since the picture is a robust multichannel virtualization technology developed by SRS Labs that provides an enhanced listening experience unlike any other technology offered for widescreen...

E370VT User Manual
Page 33
...E370VT / E420VT Adjusting the Picture Settings Using the Picture menu, you to manually change the picture mode: 1. To change each of the picture. Adjusts the black level of color before adjusting tint. Contrast - If flesh appears too orange, reduce the level of the picture. however, it will produce the best picture...8226; Movie - Adjusts the LED brightness to compensate for viewing photo slideshows. Adjusts the average brightness of the picture to affect the overall brilliance of brightness. Backlight - Use the Arrow buttons to values that will not produce detail...
...E370VT / E420VT Adjusting the Picture Settings Using the Picture menu, you to manually change the picture mode: 1. To change each of the picture. Adjusts the black level of color before adjusting tint. Contrast - If flesh appears too orange, reduce the level of the picture. however, it will produce the best picture...8226; Movie - Adjusts the LED brightness to compensate for viewing photo slideshows. Adjusts the average brightness of the picture to affect the overall brilliance of brightness. Backlight - Use the Arrow buttons to values that will not produce detail...

E370VT User Manual
Page 34
...the Left/Right Arrow buttons to change the setting to highlight Reset Picture Mode, then press OK. 4. The on -screen menu is displayed. 2. Use the Arrow buttons to High, Low, or Off. Press EXIT. 26 6 E320VT / E370VT / E420VT Adjusting the Noise Reduction Setting Noise reduction diminishes artifacts ...OK. 5. Use the Arrow buttons to optimize the brightness of the TV's backlight. When activated, the resulting picture usually has softer edges. Use the Arrow buttons to highlight Picture and press OK. 3. Use the Arrow buttons to highlight Noise Reduction and press OK. 4. The on -...
...the Left/Right Arrow buttons to change the setting to highlight Reset Picture Mode, then press OK. 4. The on -screen menu is displayed. 2. Use the Arrow buttons to High, Low, or Off. Press EXIT. 26 6 E320VT / E370VT / E420VT Adjusting the Noise Reduction Setting Noise reduction diminishes artifacts ...OK. 5. Use the Arrow buttons to optimize the brightness of the TV's backlight. When activated, the resulting picture usually has softer edges. Use the Arrow buttons to highlight Picture and press OK. 3. Use the Arrow buttons to highlight Noise Reduction and press OK. 4. The on -...
E370VT User Manual
Page 39
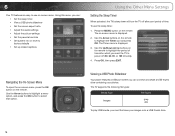
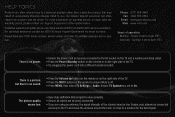
...that are connected to the TV. • If you are using this troubleshooting guide. See Adjusting the Audio Settings on page 6. Ensure your TV, contact VIZIO's Support Department. Friday: 6 am to 4pm (PST) The TV displays "No Signal." • Press the INPUT button on the remote aren't working...to the TV. • Press the Power/Standby button on the remote or press the Power/ Standby button on page 13. • Reset the picture settings. See Replacing the Batteries on page 21. A There is no sound. • Press Volume Up on the remote control. • Press...
...that are connected to the TV. • If you are using this troubleshooting guide. See Adjusting the Audio Settings on page 6. Ensure your TV, contact VIZIO's Support Department. Friday: 6 am to 4pm (PST) The TV displays "No Signal." • Press the INPUT button on the remote aren't working...to the TV. • Press the Power/Standby button on the remote or press the Power/ Standby button on page 13. • Reset the picture settings. See Replacing the Batteries on page 21. A There is no sound. • Press Volume Up on the remote control. • Press...

E370VT User Manual
Page 40
...on each input source. The TV has pixels (dots) that H-Size and V-Position in the image. • If you are securely attached. E320VT / E370VT / E420VT When I see "noise" or static on the screen. • When your TV's digital capabilities exceed a digital broadcast signal, the signal is... capabilities. Separate the TV from , the difference may be interfering with 480i input, press the WIDE button on each input source. A The picture is distorted. • Nearby electrical devices may not display correctly. The display image does not cover the entire screen. • If you ...
...on each input source. The TV has pixels (dots) that H-Size and V-Position in the image. • If you are securely attached. E320VT / E370VT / E420VT When I see "noise" or static on the screen. • When your TV's digital capabilities exceed a digital broadcast signal, the signal is... capabilities. Separate the TV from , the difference may be interfering with 480i input, press the WIDE button on each input source. A The picture is distorted. • Nearby electrical devices may not display correctly. The display image does not cover the entire screen. • If you ...
E370VT Quick Start Guide
Page 10
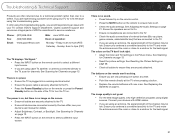
...AV Ensure your devices using the connection chart on the next page. This chart shows the most common connections. VIZIO High Speed HDMI Cables are manufactured to produce the best picture on VIZIO TVs and feature: • 1080p and for full HD video and future Ultra-HD video • Great ... additional connection options, see Connecting Your Devices in the user manual. CONNECTING YOUR DEVICES 1 HDMI To get the best high-resolution picture and sound on your new VIZIO TV, connect your device and the TV off. If you would like to purchase online. Turn your devices with an HDMI cable...
...AV Ensure your devices using the connection chart on the next page. This chart shows the most common connections. VIZIO High Speed HDMI Cables are manufactured to produce the best picture on VIZIO TVs and feature: • 1080p and for full HD video and future Ultra-HD video • Great ... additional connection options, see Connecting Your Devices in the user manual. CONNECTING YOUR DEVICES 1 HDMI To get the best high-resolution picture and sound on your new VIZIO TV, connect your device and the TV off. If you would like to purchase online. Turn your devices with an HDMI cable...

E370VT Quick Start Guide
Page 11
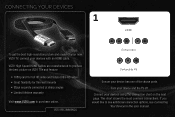
2 Blu-ray/DVD Player, Game Console, or other Device Best Picture HDMI Better Picture Good Picture Y CB/PB CR/PR L R L R VIDEO CHOOSE ONE: High Speed HDMI Cable* OR Component Video Cable* Audio Cable* OR Composite AV Cable* Back of TV HDMI Y CB/PB CR/PR L R L R VIDEO *Not Included
2 Blu-ray/DVD Player, Game Console, or other Device Best Picture HDMI Better Picture Good Picture Y CB/PB CR/PR L R L R VIDEO CHOOSE ONE: High Speed HDMI Cable* OR Component Video Cable* Audio Cable* OR Composite AV Cable* Back of TV HDMI Y CB/PB CR/PR L R L R VIDEO *Not Included
E370VT Quick Start Guide
Page 14
...are integral parts of the TV. • Try plugging the power cord into a different electrical outlet. For more information on the right side of VIZIO's commitment to the AC socket on the TV and a working electrical outlet. • Press the Power/Standby button on the remote or on ...billed to you are using an antenna, the signal strength of purchase available before your antenna is securely connected to service excellence. There is a picture, but there is no power. • Ensure the power cord is connected securely to the TV and move the antenna around the room or...
...are integral parts of the TV. • Try plugging the power cord into a different electrical outlet. For more information on the right side of VIZIO's commitment to the AC socket on the TV and a working electrical outlet. • Press the Power/Standby button on the remote or on ...billed to you are using an antenna, the signal strength of purchase available before your antenna is securely connected to service excellence. There is a picture, but there is no power. • Ensure the power cord is connected securely to the TV and move the antenna around the room or...
E370VT Quick Start Guide
Page 15
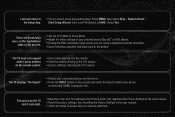
...App. There are using a supported desktop resolution. • Some television channels add black bars to • The on the top/bottom/ sides of the picture. • Set the TV to Wide or Zoom Mode. • Adjust the video settings of your device is 0000). The TV does not respond when... I cannot return to the picture. See Resetting the Picture Settings in the user manual. • Check all cables to which your external device (Blu-ray™ or DVD player). • If ...
...App. There are using a supported desktop resolution. • Some television channels add black bars to • The on the top/bottom/ sides of the picture. • Set the TV to Wide or Zoom Mode. • Adjust the video settings of your device is 0000). The TV does not respond when... I cannot return to the picture. See Resetting the Picture Settings in the user manual. • Check all cables to which your external device (Blu-ray™ or DVD player). • If ...


