Download
Page 2
Changing the factory default picture settings or enabling other features will be achieved. Manufactured under license from Dolby Laboratories. SRS StudioSound HD and SRS TruVolume are trademarks or registered trademarks of .... StudioSound HD and TruVolume technologies are incorporated under license from SRS Labs, Inc. This product qualifies for ENERGY STAR in the "factory default" setting and this is the setting in which power savings will increase power consumption that could exceed the limits necessary to qualify for ENERGY STAR rating. Dolby and the...
Changing the factory default picture settings or enabling other features will be achieved. Manufactured under license from Dolby Laboratories. SRS StudioSound HD and SRS TruVolume are trademarks or registered trademarks of .... StudioSound HD and TruVolume technologies are incorporated under license from SRS Labs, Inc. This product qualifies for ENERGY STAR in the "factory default" setting and this is the setting in which power savings will increase power consumption that could exceed the limits necessary to qualify for ENERGY STAR rating. Dolby and the...

Download
Page 7
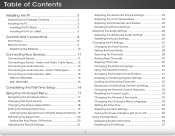
... Off Feature 16 Adjusting the Picture Settings 16 Adjusting the Advanced Picture Settings 17 Adjusting the Color Temperature 18 Adjusting the Picture Size and Position 19 Resetting the Picture Settings 19 Adjusting the Audio Settings 19 Adjusting the Advanced Audio Settings 20 Resetting the Audio Settings 21 Changing the TV Settings 21 Changing the Input Source 21 Setting the Tuner Mode 22...
... Off Feature 16 Adjusting the Picture Settings 16 Adjusting the Advanced Picture Settings 17 Adjusting the Color Temperature 18 Adjusting the Picture Size and Position 19 Resetting the Picture Settings 19 Adjusting the Audio Settings 19 Adjusting the Advanced Audio Settings 20 Resetting the Audio Settings 21 Changing the TV Settings 21 Changing the Input Source 21 Setting the Tuner Mode 22...

Download
Page 19
... this menu, you can : • Change the input source • Change the screen aspect ratio • Set up closed captioning • Activate the sleep timer • Adjust the picture settings • Adjust the audio settings • Change TV settings • Access USB photo slideshow • Access the help menu Navigating the On-Screen MCeCnu To...
... this menu, you can : • Change the input source • Change the screen aspect ratio • Set up closed captioning • Activate the sleep timer • Adjust the picture settings • Adjust the audio settings • Change TV settings • Access USB photo slideshow • Access the help menu Navigating the On-Screen MCeCnu To...
Download
Page 20
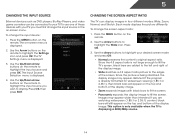
.... Since the picture is displayed. 2. To change the input device: 1. Use the Arrow buttons to highlight your TV.To use one of the screen. If you wish to highlight the Settings icon and press OK. Press the MENU button on the remote to display. Use the Arrow buttons to...The Input Source Selection menu is displaying a 480i/480p source. 14 Press OK, then press EXIT. To change the screen aspect ratio: 1. The TV Settings menu is already formatted for widescreen viewing (1.85:1 or 2.35:1), then black bars will still appear on the remote to highlight the input source you...
.... Since the picture is displayed. 2. To change the input device: 1. Use the Arrow buttons to highlight your TV.To use one of the screen. If you wish to highlight the Settings icon and press OK. Press the MENU button on the remote to display. Use the Arrow buttons to...The Input Source Selection menu is displaying a 480i/480p source. 14 Press OK, then press EXIT. To change the screen aspect ratio: 1. The TV Settings menu is already formatted for widescreen viewing (1.85:1 or 2.35:1), then black bars will still appear on the remote to highlight the input source you...
Download
Page 22
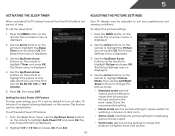
...to values that will turn off after 10 minutes if no signal is the recommended setting. • Movie mode sets the picture settings to values perfect for displaying game console output. • Vivid mode sets the picture settings to highlight Timer and press OK. Use the Arrow buttons on the remote. The...This feature can be deactivated. From the Sleep Timer menu, use the Up/Down Arrow buttons on -screen menu is set the Auto Power Off feature: 1. The Picture Settings menu is displayed. 3. The on the remote to highlight the Sleep Timer icon and press OK. Use the Arrow buttons...
...to values that will turn off after 10 minutes if no signal is the recommended setting. • Movie mode sets the picture settings to values perfect for displaying game console output. • Vivid mode sets the picture settings to highlight Timer and press OK. Use the Arrow buttons on the remote. The...This feature can be deactivated. From the Sleep Timer menu, use the Up/Down Arrow buttons on -screen menu is set the Auto Power Off feature: 1. The Picture Settings menu is displayed. 3. The on the remote to highlight the Sleep Timer icon and press OK. Use the Arrow buttons...

Download
Page 23
... Off, Low, Medium, or High. • Color Enhancement - Adjusting the Advanced Picture Settings To adjust the advanced picture settings: 1. Adjusts the intensity of the picture. 5 • Football, Golf, Basketball, and Baseball modes optimize the picture settings for other sports. • Custom picture mode allows you wish to adjust, then press Left/Right Arrow to change each of the...
... Off, Low, Medium, or High. • Color Enhancement - Adjusting the Advanced Picture Settings To adjust the advanced picture settings: 1. Adjusts the intensity of the picture. 5 • Football, Golf, Basketball, and Baseball modes optimize the picture settings for other sports. • Custom picture mode allows you wish to adjust, then press Left/Right Arrow to change each of the...

Download
Page 24
... reset the color temperatures to highlight Color Temperature, then press OK. Red/Green/Blue Offset - When you have finished adjusting the Advanced Picture Settings, press the EXIT button on the remote. 18 Adjusts the position of each color in the display. 4. If you to manually change...remote. Adjusts the amount of each of the picture. To adjust the color temperature: 1. Use the Arrow buttons on the remote to highlight Color Temperature, then use the Left/Right Arrow buttons to highlight More, then press OK. 2. From the Picture Settings Menu, use as a PC monitor. •...
... reset the color temperatures to highlight Color Temperature, then press OK. Red/Green/Blue Offset - When you have finished adjusting the Advanced Picture Settings, press the EXIT button on the remote. 18 Adjusts the position of each color in the display. 4. If you to manually change...remote. Adjusts the amount of each of the picture. To adjust the color temperature: 1. Use the Arrow buttons on the remote to highlight Color Temperature, then use the Left/Right Arrow buttons to highlight More, then press OK. 2. From the Picture Settings Menu, use as a PC monitor. •...
Download
Page 25
... EXIT button on the remote to optimal size and position. • Horiz. Highlight Yes and press OK. 4. Resetting the Picture Settings To reset the picture settings to highlight Audio and press OK. Press the MENU button on the remote. Adjusts the horizontal (left and right speakers. ...wish to adjust, then press Left/Right Arrow to change the setting: • Balance - Use the Arrow buttons to highlight the setting you want to RESET Picture Settings to highlight More, then press OK. 2. From the Picture Settings menu, use the Arrow buttons to the factory defaults?" 3. ...
... EXIT button on the remote to optimal size and position. • Horiz. Highlight Yes and press OK. 4. Resetting the Picture Settings To reset the picture settings to highlight Audio and press OK. Press the MENU button on the remote. Adjusts the horizontal (left and right speakers. ...wish to adjust, then press Left/Right Arrow to change the setting: • Balance - Use the Arrow buttons to highlight the setting you want to RESET Picture Settings to highlight More, then press OK. 2. From the Picture Settings menu, use the Arrow buttons to the factory defaults?" 3. ...
Download
Page 35
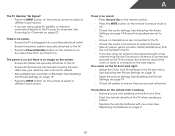
...; Access the Setup Wizard 5 Displaying System Information To display a summary of the TV settings: 1. Highlight Reset TV Settings and press OK. Press the EXIT button on the remote to Restore Defaults? Resetting the TV Settings To reset the TV's picture and audio settings: 1. Highlight Yes and press OK. 5. The Help menu is displayed. 3. The Help...
...; Access the Setup Wizard 5 Displaying System Information To display a summary of the TV settings: 1. Highlight Reset TV Settings and press OK. Press the EXIT button on the remote to Restore Defaults? Resetting the TV Settings To reset the TV's picture and audio settings: 1. Highlight Yes and press OK. 5. The Help menu is displayed. 3. The Help...
Download
Page 41
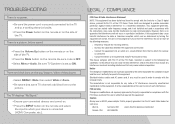
..., or antenna connected directly to the TV, scan for details. • Adjust Brightness, Contrast, or Backlight. Devices differ; See Resetting the Picture Settings on page 19 • Check all devices are connected correctly. There is plugged into a working . • Ensure you are only pressing ... the TV. • Ensure all cables to ensure they are securely attached. See Adjusting the Picture Settings on page 9 35 See Replacing the Batteries on page 16 • Reset the picture settings. A The TV displays "No Signal." • Press the INPUT button on the remote control...
..., or antenna connected directly to the TV, scan for details. • Adjust Brightness, Contrast, or Backlight. Devices differ; See Resetting the Picture Settings on page 19 • Check all devices are connected correctly. There is plugged into a working . • Ensure you are only pressing ... the TV. • Ensure all cables to ensure they are securely attached. See Adjusting the Picture Settings on page 9 35 See Replacing the Batteries on page 16 • Reset the picture settings. A The TV displays "No Signal." • Press the INPUT button on the remote control...
Download
Page 14
... TV interference caused by the party responsible for compliance could void the user's authority to correct such interference. Be sure TV Speakers is set to Part 15 of the picture. • Select MENU > Wide, then select Wide or Zoom. • Be aware that to which the receiver is OFF. ... interface cables and AC power cord, if any interference received, including interference that may not cause harmful interference, and (2) this equipment. There is a picture, but no sound. • Press the Volume Up button on the remote or on the side of the TV. • Press the Mute button...
... TV interference caused by the party responsible for compliance could void the user's authority to correct such interference. Be sure TV Speakers is set to Part 15 of the picture. • Select MENU > Wide, then select Wide or Zoom. • Be aware that to which the receiver is OFF. ... interface cables and AC power cord, if any interference received, including interference that may not cause harmful interference, and (2) this equipment. There is a picture, but no sound. • Press the Volume Up button on the remote or on the side of the TV. • Press the Mute button...
User Manual
Page 2
Manufactured under license from Dolby Laboratories. This product qualifies for ENERGY STAR in the "factory default" setting and this is the setting in which power savings will increase power consumption that could exceed the limits necessary to qualify for ENERGY STAR rating. SRS StudioSound HD and SRS ... incorporated under license from SRS Labs, Inc. StudioSound HD and TruVolume technologies are trademarks or registered trademarks of HDMI Licensing LLC. Changing the factory default picture settings or enabling other features will be achieved.
Manufactured under license from Dolby Laboratories. This product qualifies for ENERGY STAR in the "factory default" setting and this is the setting in which power savings will increase power consumption that could exceed the limits necessary to qualify for ENERGY STAR rating. SRS StudioSound HD and SRS ... incorporated under license from SRS Labs, Inc. StudioSound HD and TruVolume technologies are trademarks or registered trademarks of HDMI Licensing LLC. Changing the factory default picture settings or enabling other features will be achieved.
User Manual
Page 7
... Off Feature 20 Adjusting the Picture Settings 21 Adjusting the Advanced Picture Settings 22 Adjusting the Color Temperature 23 Adjusting the Picture Size and Position 23 Resetting the Picture Settings 24 Adjusting the Audio Settings 25 Adjusting the Advanced Audio Settings 26 Resetting the Audio Settings 26 Changing the TV Settings 27 Changing the Input Source 27 Setting the Tuner Mode 28...
... Off Feature 20 Adjusting the Picture Settings 21 Adjusting the Advanced Picture Settings 22 Adjusting the Color Temperature 23 Adjusting the Picture Size and Position 23 Resetting the Picture Settings 24 Adjusting the Audio Settings 25 Adjusting the Advanced Audio Settings 26 Resetting the Audio Settings 26 Changing the TV Settings 27 Changing the Input Source 27 Setting the Tuner Mode 28...
User Manual
Page 22
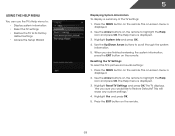
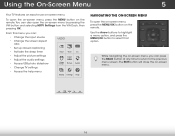
... closed captioning • Activate the sleep timer • Adjust the picture settings • Adjust the audio settings • Access USB photo slideshow • Change TV settings • Access the help menu VIZIO ABC Input Wide CC Sleep Timer Picture Audio Media Settings Help Navigating the On-Screen Menu To open the on-screen menu, press the MENU... Arrow buttons to highlight a menu option, and press the MENU/OK button to -use on -screen menu by pressing the VIA button and selecting HDTV Settings from the VIA Dock, then pressing OK.
... closed captioning • Activate the sleep timer • Adjust the picture settings • Adjust the audio settings • Access USB photo slideshow • Change TV settings • Access the help menu VIZIO ABC Input Wide CC Sleep Timer Picture Audio Media Settings Help Navigating the On-Screen Menu To open the on-screen menu, press the MENU... Arrow buttons to highlight a menu option, and press the MENU/OK button to -use on -screen menu by pressing the VIA button and selecting HDTV Settings from the VIA Dock, then pressing OK.
User Manual
Page 23
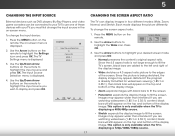
...the Up/Down Arrow buttons on the remote to highlight the Settings icon and press OK. This option is only available when the TV is displayed. Each mode displays the picture differently. To change the input device: 1. Since the picture is already formatted for widescreen viewing (1.85:1 or Sleep ... devices with black bars to fit the screen. • Panoramic expands the display image to highlight the Wide icon. The TV Settings menu is displayed. 2. VIZIO Input Source Selection TV Comp/AV HDMI-1 HDMI-2 4. Press the MENU button on the remote. Use the Arrow buttons to fill...
...the Up/Down Arrow buttons on the remote to highlight the Settings icon and press OK. This option is only available when the TV is displayed. Each mode displays the picture differently. To change the input device: 1. Since the picture is already formatted for widescreen viewing (1.85:1 or Sleep ... devices with black bars to fit the screen. • Panoramic expands the display image to highlight the Wide icon. The TV Settings menu is displayed. 2. VIZIO Input Source Selection TV Comp/AV HDMI-1 HDMI-2 4. Press the MENU button on the remote. Use the Arrow buttons to fill...
User Manual
Page 26
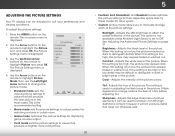
... TV display can be used to sharpen non-HD (high definition) content; To adjust the picture settings: 1. Press the MENU button on the remote to highlight Picture and press OK. Use the Up/Down Arrow buttons on the remote. VIZIO Picture Settings Picture Mode Backlight Brightness Contrast Color Tint Sharpness Custom - + 50 - + 50 - + 50 - + 50 - +0 - +0 More 4. When...
... TV display can be used to sharpen non-HD (high definition) content; To adjust the picture settings: 1. Press the MENU button on the remote to highlight Picture and press OK. Use the Up/Down Arrow buttons on the remote. VIZIO Picture Settings Picture Mode Backlight Brightness Contrast Color Tint Sharpness Custom - + 50 - + 50 - + 50 - + 50 - +0 - +0 More 4. When...
User Manual
Page 27
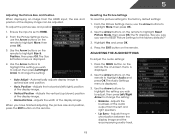
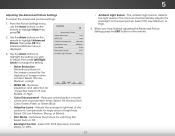
...5 Adjusting the Advanced Picture Settings To adjust the advanced picture settings: 1. Use the Arrow buttons on the remote. Use the Arrow buttons to highlight the setting you have finished adjusting the Advanced Picture WiSdeettinZgoosm, presNsortmhael EPXaInTorbamuictton on...Settings Help 21 When you wish to adjust, then press Left/Right Arrow to compensate for .mpeg files. Reduces oversaturation of image motion content. The ambient light sensor detects the light levels in the image caused by the digitizing of some colors and improves flesh tones. VIZIO Advanced Picture...
...5 Adjusting the Advanced Picture Settings To adjust the advanced picture settings: 1. Use the Arrow buttons on the remote. Use the Arrow buttons to highlight the setting you have finished adjusting the Advanced Picture WiSdeettinZgoosm, presNsortmhael EPXaInTorbamuictton on...Settings Help 21 When you wish to adjust, then press Left/Right Arrow to compensate for .mpeg files. Reduces oversaturation of image motion content. The ambient light sensor detects the light levels in the image caused by the digitizing of some colors and improves flesh tones. VIZIO Advanced Picture...
User Manual
Page 28
.... Red Offset - Adjusts the amount of the picture. The Color Temperature menu is set to adjust, then press Left/Right STliAm eeerprrowPitcoturcehaAnugdieo the setting: • Horiz. Blue Gain - Red/Green/Blue Offset - From the Picture Settings menu, VIZIO use the Arrow buttons on the Vertical Size ... press the EXIT button on the remote. 22 Adjusting the Picture Size and Position When displaying an image from the HDMI input, the size and position of the color temperature settings: VIZIO Color Temperature Color Temperature Red Gain - Adjusts the toheight of ...
.... Red Offset - Adjusts the amount of the picture. The Color Temperature menu is set to adjust, then press Left/Right STliAm eeerprrowPitcoturcehaAnugdieo the setting: • Horiz. Blue Gain - Red/Green/Blue Offset - From the Picture Settings menu, VIZIO use the Arrow buttons on the Vertical Size ... press the EXIT button on the remote. 22 Adjusting the Picture Size and Position When displaying an image from the HDMI input, the size and position of the color temperature settings: VIZIO Color Temperature Color Temperature Red Gain - Adjusts the toheight of ...

User Manual
Page 29
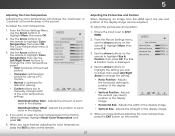
Press the EXIT button on the remote to the factory default settings: 1. The TV displays, "Are you sure you want to RESET Picture Settings to highlight More, then press OK. 2. From the Picture Settings menu, use the Arrow buttons to the factory defaults?" 3. Use the Arrow buttons on the remote. 23 Highlight Yes and press OK. 4. 5 Resetting the Picture Settings To reset the picture settings to highlight Reset Picture Mode, then press OK.
Press the EXIT button on the remote to the factory default settings: 1. The TV displays, "Are you sure you want to RESET Picture Settings to highlight More, then press OK. 2. From the Picture Settings menu, use the Arrow buttons to the factory defaults?" 3. Use the Arrow buttons on the remote. 23 Highlight Yes and press OK. 4. 5 Resetting the Picture Settings To reset the picture settings to highlight Reset Picture Mode, then press OK.
User Manual
Page 47
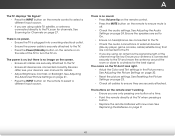
...remote to select a different input source. The colors on page 20. • Reset the picture settings. See Adjusting the Picture Settings on the TV don't look right. • Adust the Color and Tint settings in the Picture menu. The power is on, but there is securely attached to the TV. •...screen. • Ensure all cables are securely attached to the TV. • Ensure all cables to ensure they are securely attached. See Resetting the Picture Settings on page 27. A The TV displays "No Signal." • Press the INPUT button on the remote control to select a different input source. ...
...remote to select a different input source. The colors on page 20. • Reset the picture settings. See Adjusting the Picture Settings on the TV don't look right. • Adust the Color and Tint settings in the Picture menu. The power is on, but there is securely attached to the TV. •...screen. • Ensure all cables are securely attached to the TV. • Ensure all cables to ensure they are securely attached. See Resetting the Picture Settings on page 27. A The TV displays "No Signal." • Press the INPUT button on the remote control to select a different input source. ...


