
User Manual (English)
Page 3
...ensure there are provided for your safety. To purchase an extended warranty service plan, visit www.vizio.com. IMPORTANT SAFETY INSTRUCTIONS Your TV is designed and manufactured to protect your new VIZIO product, read these instructions. • Heed all warnings. • Follow all instructions. ... for future reference. • To reduce the risk of your investment beyond the standard warranty, VIZIO offers on-site extended warranty service plans. To prevent your TV from being walked on your outlet, consult an electrician for the installation, use, and maintenance of...
...ensure there are provided for your safety. To purchase an extended warranty service plan, visit www.vizio.com. IMPORTANT SAFETY INSTRUCTIONS Your TV is designed and manufactured to protect your new VIZIO product, read these instructions. • Heed all warnings. • Follow all instructions. ... for future reference. • To reduce the risk of your investment beyond the standard warranty, VIZIO offers on-site extended warranty service plans. To prevent your TV from being walked on your outlet, consult an electrician for the installation, use, and maintenance of...

User Manual (English)
Page 4
...the apparatus. Overloading can be used for long periods of time. • Refer all servicing to qualified service personnel. Wait before cleaning your TV. • When moving the cart/apparatus combination to avoid injury from tip-over. • Unplug this apparatus during a lightning storm or when... be operated only from overheating, be sure these openings are not blocked or covered. Never spill liquids on your TV. • Your TV should be installed near your TV and easily accessible. • Only power of the marked voltage can result in a bookcase or cabinet unless proper...
...the apparatus. Overloading can be used for long periods of time. • Refer all servicing to qualified service personnel. Wait before cleaning your TV. • When moving the cart/apparatus combination to avoid injury from tip-over. • Unplug this apparatus during a lightning storm or when... be operated only from overheating, be sure these openings are not blocked or covered. Never spill liquids on your TV. • Your TV should be installed near your TV and easily accessible. • Only power of the marked voltage can result in a bookcase or cabinet unless proper...

User Manual (English)
Page 5
...splashing and no objects filled with heavy dust or high humidity may function abnormally. Continued use by qualified service personnel only. When your TV will not be exposed to repair your dealer immediately. Do not expose batteries to constitute a risk of the following occurs, contact the ...and any servicing other moisture. - These servicing instructions are qualified to do not perform any other cables are unplugged before moving your TV in environments with liquids, such as vases, shall be of sufficient magnitude to excessive heat such as the disconnect device, the ...
...splashing and no objects filled with heavy dust or high humidity may function abnormally. Continued use by qualified service personnel only. When your TV will not be exposed to repair your dealer immediately. Do not expose batteries to constitute a risk of the following occurs, contact the ...and any servicing other moisture. - These servicing instructions are qualified to do not perform any other cables are unplugged before moving your TV in environments with liquids, such as vases, shall be of sufficient magnitude to excessive heat such as the disconnect device, the ...
User Manual (English)
Page 6
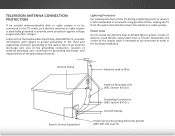
...H) Power Lines Do not locate the antenna near overhead light or power circuits, or where it is intended to be connected to the TV, make sure that the antenna or cable system is electrically grounded to earth in wire to an antenna discharge unit, size of the grounding... conductors, location of antenna discharge unit, connection to grounding electrodes, and requirements of time, unplug the TV from the wall outlet and disconnect the antenna or cable system. Lightning Protection For added protection of the lead-in the building installation. Article...
...H) Power Lines Do not locate the antenna near overhead light or power circuits, or where it is intended to be connected to the TV, make sure that the antenna or cable system is electrically grounded to earth in wire to an antenna discharge unit, size of the grounding... conductors, location of antenna discharge unit, connection to grounding electrodes, and requirements of time, unplug the TV from the wall outlet and disconnect the antenna or cable system. Lightning Protection For added protection of the lead-in the building installation. Article...
User Manual (English)
Page 7
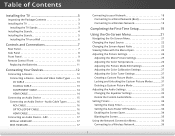
... HDMI CABLE 14 Connecting an Audio Device 15 Connecting an Audio Device - Table of Contents Installing the TV 3 Inspecting the Package Contents 3 Installing the TV 3 Installing the TV Stands 3 Installing the Stands 4 Installing the Stands 5 Installing the TV on a Wall 6 Controls and Connections 7 Rear Panel 7 Side Panel 8 Front Panel 9 Remote Control Front 10 Replacing...
... HDMI CABLE 14 Connecting an Audio Device 15 Connecting an Audio Device - Table of Contents Installing the TV 3 Inspecting the Package Contents 3 Installing the TV 3 Installing the TV Stands 3 Installing the Stands 4 Installing the Stands 5 Installing the TV on a Wall 6 Controls and Connections 7 Rear Panel 7 Side Panel 8 Front Panel 9 Remote Control Front 10 Replacing...
User Manual (English)
Page 8
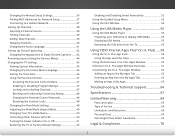
... 36 Finding MAC Addresses for Network Setup 37 Connecting to display USB Media 55 Displaying USB Media 55 Removing the USB drive from the TV 55 Using VIZIO Internet Apps Plus® (V.I .A. Plus App Dock 59 Using the App Launcher Keys 59 Using the Fullscreen V.I .A. Plus)......59 Using the V.I ...67 Limited Warranty 69 Parts and Labor 69 Type of Digital Closed Captions........ 42 Renaming Inputs (Using the Devices Menu 44 Changing the TV Settings 45 Viewing System Information 45 Changing the On-Screen Menu Language 46 Setting the Time Zone 46 Using the Parental Controls 47 ...
... 36 Finding MAC Addresses for Network Setup 37 Connecting to display USB Media 55 Displaying USB Media 55 Removing the USB drive from the TV 55 Using VIZIO Internet Apps Plus® (V.I .A. Plus App Dock 59 Using the App Launcher Keys 59 Using the Fullscreen V.I .A. Plus)......59 Using the V.I ...67 Limited Warranty 69 Parts and Labor 69 Type of Digital Closed Captions........ 42 Renaming Inputs (Using the Devices Menu 44 Changing the TV Settings 45 Viewing System Information 45 Changing the On-Screen Menu Language 46 Setting the Time Zone 46 Using the Parental Controls 47 ...
User Manual (English)
Page 9
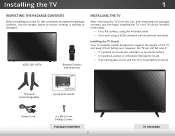
... (interchangeable) Quick Start Guide Power Cord 4 x M4 32 mm Phillips Screws PACKAGE CONTENTS 3 TV ON STAND However, the TV can begin installing the TV. VIZIO LED HDTV Remote Control with Batteries INSTALLING THE TV After removing the TV from falling over if: • It is placed on an uneven, unstable, or non-level surface • It...
... (interchangeable) Quick Start Guide Power Cord 4 x M4 32 mm Phillips Screws PACKAGE CONTENTS 3 TV ON STAND However, the TV can begin installing the TV. VIZIO LED HDTV Remote Control with Batteries INSTALLING THE TV After removing the TV from falling over if: • It is placed on an uneven, unstable, or non-level surface • It...
User Manual (English)
Page 10
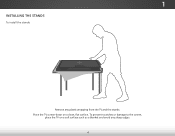
1 INSTALLING THE STANDS To install the stands: Remove any sharp edges. 4 Place the TV screen-down on a soft surface such as a blanket and avoid any plastic wrapping from the TV and the stands. To prevent scratches or damage to the screen, place the TV on a clean, flat surface.
1 INSTALLING THE STANDS To install the stands: Remove any sharp edges. 4 Place the TV screen-down on a soft surface such as a blanket and avoid any plastic wrapping from the TV and the stands. To prevent scratches or damage to the screen, place the TV on a clean, flat surface.

User Manual (English)
Page 11
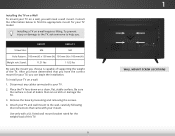
Insert the screws into the base of the TV and tighten them using a Phillips screwdriver. 1 INSTALLING THE STANDS Insert the left and right stands into the back of the TV (the stands are finished, place the TV on a stable, level surface. 5 Secure each stand to the TV with two (2) M4 32 mm Phillips screws (included). When you are identical).
Insert the screws into the base of the TV and tighten them using a Phillips screwdriver. 1 INSTALLING THE STANDS Insert the left and right stands into the back of the TV (the stands are finished, place the TV on a stable, level surface. 5 Secure each stand to the TV with two (2) M4 32 mm Phillips screws (included). When you are identical).
User Manual (English)
Page 12
... have the correct mount for the weight/load of the TV. Disconnect any cables connected to find the appropriate mount for your TV on a wall: 1. Installing the TV on a Wall To mount your TV on a wall, you . E32-C1 E32h-C1 Screw Size: M4 M4 Hole Pattern: 100 mm (V) x 100 mm (H) 100 mm (V) x 100 mm (H) Weight w/o Stand...
... have the correct mount for the weight/load of the TV. Disconnect any cables connected to find the appropriate mount for your TV on a wall: 1. Installing the TV on a Wall To mount your TV on a wall, you . E32-C1 E32h-C1 Screw Size: M4 M4 Hole Pattern: 100 mm (V) x 100 mm (H) 100 mm (V) x 100 mm (H) Weight w/o Stand...
User Manual (English)
Page 13
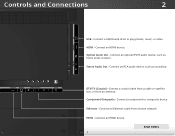
Connect an RCA audio device, such as home audio receiver. Connect an Ethernet cable from an antenna. HDMI - Connect a coaxial cable from a cable or satellite box, or from a home network. Connect a component or composite device. Ethernet - Optical Audio Out - Component/Composite - HDMI - Connect an HDMI device. REAR PANEL 7 Connect a USB thumb drive to play photos, music, or video. Controls and Connections 2 REAR PANEL USB - Connect an HDMI device. Stereo Audio Out - Connect an optical/SPDIF audio device, such as sound bar. DTV/TV (Coaxial) -
Connect an RCA audio device, such as home audio receiver. Connect an Ethernet cable from an antenna. HDMI - Connect a coaxial cable from a cable or satellite box, or from a home network. Connect a component or composite device. Ethernet - Optical Audio Out - Component/Composite - HDMI - Connect an HDMI device. REAR PANEL 7 Connect a USB thumb drive to play photos, music, or video. Controls and Connections 2 REAR PANEL USB - Connect an HDMI device. Stereo Audio Out - Connect an optical/SPDIF audio device, such as sound bar. DTV/TV (Coaxial) -

User Manual (English)
Page 14
Press and hold to change the input source. 8 SIDE PANEL INPUT Press to turn the TV on. 2 SIDE PANEL POWER Press to turn the TV off.
Press and hold to change the input source. 8 SIDE PANEL INPUT Press to turn the TV on. 2 SIDE PANEL POWER Press to turn the TV off.
User Manual (English)
Page 15
To keep the power indicator on as long as the TV is on, see Turning the Power Indicator On or Off on , then goes out after several seconds. 2 FRONT PANEL REMOTE SENSOR & POWER INDICATOR When using the remote, point it directly at this sensor. The power indicator flashes on when the TV turns on page 51. 9 FRONT PANEL
To keep the power indicator on as long as the TV is on, see Turning the Power Indicator On or Off on , then goes out after several seconds. 2 FRONT PANEL REMOTE SENSOR & POWER INDICATOR When using the remote, point it directly at this sensor. The power indicator flashes on when the TV turns on page 51. 9 FRONT PANEL

User Manual (English)
Page 16
... media player and video streaming playback. APP LAUNCHER Quickly launch the pictured App. (Also turns on the TV if it is off.) POWER Turn TV on or off or on -screen menu. V BUTTON Open the VIZIO Internet Apps Plus® (V.I.A. DASH Use with number pad to the channel last viewed. WIDE Change the...
... media player and video streaming playback. APP LAUNCHER Quickly launch the pictured App. (Also turns on the TV if it is off.) POWER Turn TV on or off or on -screen menu. V BUTTON Open the VIZIO Internet Apps Plus® (V.I.A. DASH Use with number pad to the channel last viewed. WIDE Change the...

User Manual (English)
Page 18
... appropriate cable (not included) to display output from most devices. 1. Connecting Your Devices CONNECTING A DEVICE Your TV can be used (HDMI-1, HDMI-2, Comp, etc.). 3 Cable/Satellite Box DVD/Blu-ray Player Game Console BACK OF TV HDMI CABLE* BEST • DIGITAL • HD VIDEO (1080p)** • HD AUDIO COMPONENT CABLE* • ANALOG...; HD VIDEO (1080i)** • STEREO AUDIO AV CABLE* GOOD • ANALOG • VIDEO (480i)** • STEREO AUDIO 12 * Cables not included. ** Maximum resolution. Set the TV's input to match the connection you used to the...
... appropriate cable (not included) to display output from most devices. 1. Connecting Your Devices CONNECTING A DEVICE Your TV can be used (HDMI-1, HDMI-2, Comp, etc.). 3 Cable/Satellite Box DVD/Blu-ray Player Game Console BACK OF TV HDMI CABLE* BEST • DIGITAL • HD VIDEO (1080p)** • HD AUDIO COMPONENT CABLE* • ANALOG...; HD VIDEO (1080i)** • STEREO AUDIO AV CABLE* GOOD • ANALOG • VIDEO (480i)** • STEREO AUDIO 12 * Cables not included. ** Maximum resolution. Set the TV's input to match the connection you used to the...

User Manual (English)
Page 19
... TYPES AV CABLE AV cables (or Composite cables) are the traditional way of connecting antennas and cable television signals to your TV. Video signals are the traditional way of connecting your TV. Coaxial cables carry both audio and video signals through a single connector. • Video resolutions up to 480i • Analog connection...
... TYPES AV CABLE AV cables (or Composite cables) are the traditional way of connecting antennas and cable television signals to your TV. Video signals are the traditional way of connecting your TV. Coaxial cables carry both audio and video signals through a single connector. • Video resolutions up to 480i • Analog connection...

User Manual (English)
Page 21
CONNECTING AN AUDIO DEVICE Your TV can output sound to the TV and the device. 4. Turn the TV and your device has an audio port that matches an available port on . 3 Home Audio Receiver VIZIO Sound Bar HDMI CABLE* BEST • ARC 2-WAY COMMUNICATION • 2.0-5.1 DIGITAL AUDIO • PCM, DTS, DOLBY DIGITAL OPTICAL/SPDIF CABLE...; 2.0 CHANNEL * Cables not included. 15 Connect the appropriate cable to an audio device, such as a receiver or sound bar. 1. Verify that your device on the TV (HDMI, Optical, or RCA). 2. Turn the TV and your audio device off. 3.
CONNECTING AN AUDIO DEVICE Your TV can output sound to the TV and the device. 4. Turn the TV and your device has an audio port that matches an available port on . 3 Home Audio Receiver VIZIO Sound Bar HDMI CABLE* BEST • ARC 2-WAY COMMUNICATION • 2.0-5.1 DIGITAL AUDIO • PCM, DTS, DOLBY DIGITAL OPTICAL/SPDIF CABLE...; 2.0 CHANNEL * Cables not included. 15 Connect the appropriate cable to an audio device, such as a receiver or sound bar. 1. Verify that your device on the TV (HDMI, Optical, or RCA). 2. Turn the TV and your audio device off. 3.

User Manual (English)
Page 22
... BETTER 16 BEST OPTICAL/SPDIF CABLE Optical/SPDIF cables transmit audio signals as pulses of light through a single HDMI cable. Audio Return Channel-enabled (ARC) TVs allow audio to your devices to be sent over the red and white connectors. AUDIO CABLE TYPES RCA CABLE RCA cables (or composite cables) are...
... BETTER 16 BEST OPTICAL/SPDIF CABLE Optical/SPDIF cables transmit audio signals as pulses of light through a single HDMI cable. Audio Return Channel-enabled (ARC) TVs allow audio to your devices to be sent over the red and white connectors. AUDIO CABLE TYPES RCA CABLE RCA cables (or composite cables) are...

User Manual (English)
Page 23
... (Audio) HDMI Your Home Audio Receiver HDMI 3 With HDMI ARC Built-in Tuner VIZIO Internet Apps Plus® Without an HDMI ARC setup, your TV needs an extra cable to connect it to your TV. Your Home Audio Receiver HDMI Your Blu-ray Player Your Blu-ray Player 17 ARC Without HDMI ARC... Built-in Tuner Your TV HDMI VIZIO Internet Apps Plus® HDMI ARC transmits all-digital...
... (Audio) HDMI Your Home Audio Receiver HDMI 3 With HDMI ARC Built-in Tuner VIZIO Internet Apps Plus® Without an HDMI ARC setup, your TV needs an extra cable to connect it to your TV. Your Home Audio Receiver HDMI Your Blu-ray Player Your Blu-ray Player 17 ARC Without HDMI ARC... Built-in Tuner Your TV HDMI VIZIO Internet Apps Plus® HDMI ARC transmits all-digital...

User Manual (English)
Page 24
... (Best) 1. Connect an Ethernet cable to the Ethernet port on the back of the TV. It can be connected to your router and to your home network with a Wired or Wireless connection. Connecting to configure the TV. See Using the Guided Setup Menu on page 53. See Using the Guided Setup Menu... on page 53. 3 Connecting to configure the TV. Ethernet Cable Router / Modem 18 See below. 2. Ensure you have a router or modem broadcasting as high-speed wireless signal (802.11n recommended). 2. Use the Guided ...
... (Best) 1. Connect an Ethernet cable to the Ethernet port on the back of the TV. It can be connected to your router and to your home network with a Wired or Wireless connection. Connecting to configure the TV. See Using the Guided Setup Menu on page 53. See Using the Guided Setup Menu... on page 53. 3 Connecting to configure the TV. Ethernet Cable Router / Modem 18 See below. 2. Ensure you have a router or modem broadcasting as high-speed wireless signal (802.11n recommended). 2. Use the Guided ...


