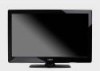

E321MV User Manual
Page 4
...and the point where they exit from the apparatus. • Only use attachments/accessories specified by the manufacturer. • Use only with the cart, stand, tripod, bracket, or table specified by the manufacturer, or sold with a third grounding pin). A polarized plug has two blades and a third grounding...cleaning your TV safely. If your outlet does not accommodate the three-pronged, have fallen into the apparatus, the apparatus has been exposed E321MV to an area of your dealer. • Your TV is required when the apparatus has been damaged in electric shock or fire. ...
...and the point where they exit from the apparatus. • Only use attachments/accessories specified by the manufacturer. • Use only with the cart, stand, tripod, bracket, or table specified by the manufacturer, or sold with a third grounding pin). A polarized plug has two blades and a third grounding...cleaning your TV safely. If your outlet does not accommodate the three-pronged, have fallen into the apparatus, the apparatus has been exposed E321MV to an area of your dealer. • Your TV is required when the apparatus has been damaged in electric shock or fire. ...

E321MV User Manual
Page 7
Table of Contents Table of Contents 7 Installing the TV 1 Inspecting the Package Contents 1 Installing the TV 1 Installing the TV Stand 1 Installing the TV on a Wall 2 Controls and Connections 4 Rear Panel 4 Right Side Panel 5 Front Panel 5 Remote Control 6 Replacing the Batteries 7 Connecting Your Devices 8 ... Disabling Automatic Date and Time Updates 17 Setting the Date and Time 17 Adjusting the TV Settings for Use with A PC 18 Turning the VIZIO Light On or Off 18 Using the Other Menu Settings 19 Navigating the On-Screen Menu 19 Setting the Sleep Timer 19 Viewing a USB ...
Table of Contents Table of Contents 7 Installing the TV 1 Inspecting the Package Contents 1 Installing the TV 1 Installing the TV Stand 1 Installing the TV on a Wall 2 Controls and Connections 4 Rear Panel 4 Right Side Panel 5 Front Panel 5 Remote Control 6 Replacing the Batteries 7 Connecting Your Devices 8 ... Disabling Automatic Date and Time Updates 17 Setting the Date and Time 17 Adjusting the TV Settings for Use with A PC 18 Turning the VIZIO Light On or Off 18 Using the Other Menu Settings 19 Navigating the On-Screen Menu 19 Setting the Sleep Timer 19 Viewing a USB ...

E321MV User Manual
Page 9
... a wall, using a VESA-standard wall mount (not included) Installing the TV Stand Your TV includes a stand designed to the screen, place the TV on a clean, flat surface. VIZIO LCD HDTV with the stand neck. Align the base with Stand Installing the TV After removing the TV from falling over if: • It is... the TV can begin installing the TV. If the base is missing or damaged. User Manual and Quick Start Guide Remote Control with the stand neck, you may have it from the box and inspecting the package contents you have completed your new TV, take a moment to ensure nothing...
... a wall, using a VESA-standard wall mount (not included) Installing the TV Stand Your TV includes a stand designed to the screen, place the TV on a clean, flat surface. VIZIO LCD HDTV with the stand neck. Align the base with Stand Installing the TV After removing the TV from falling over if: • It is... the TV can begin installing the TV. If the base is missing or damaged. User Manual and Quick Start Guide Remote Control with the stand neck, you may have it from the box and inspecting the package contents you have completed your new TV, take a moment to ensure nothing...

E321MV User Manual
Page 10
... the mount you . Turn the attached thumbscrew until it is completely tightened. To install your TV model: Screw Size: Screw Length: Screw Pitch: Hole Pattern: E321MV M6 15mm 1mm 200mm x 200mm Installing a TV on a wall: 1. To prevent injury or damage to the TV, ask someone to your TV on a wall..., you can scratch or damage the TV. 2 After you have determined that can begin the installation. Move the TV with attached stand into an upright position and place on a clean, flat, stable surface. Be sure the surface is capable of supporting the weight of debris that ...
... the mount you . Turn the attached thumbscrew until it is completely tightened. To install your TV model: Screw Size: Screw Length: Screw Pitch: Hole Pattern: E321MV M6 15mm 1mm 200mm x 200mm Installing a TV on a wall: 1. To prevent injury or damage to the TV, ask someone to your TV on a wall..., you can scratch or damage the TV. 2 After you have determined that can begin the installation. Move the TV with attached stand into an upright position and place on a clean, flat, stable surface. Be sure the surface is capable of supporting the weight of debris that ...
E321MV User Manual
Page 11
Use only with your mount. See Appendix A - Turn the attached thumbscrew until it is completely loosened. 4. Attach your TV and wall mount to the wall, carefully following the instructions that came with a UL-listed wall mount bracket rated for the weight of this TV. 3 E321MV 1 3. Gently remove the stand neck. 5. Specifications for the weight/load of this TV.
Use only with your mount. See Appendix A - Turn the attached thumbscrew until it is completely loosened. 4. Attach your TV and wall mount to the wall, carefully following the instructions that came with a UL-listed wall mount bracket rated for the weight of this TV. 3 E321MV 1 3. Gently remove the stand neck. 5. Specifications for the weight/load of this TV.
E321MV User Manual
Page 43
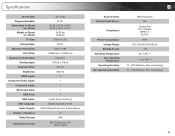
Specifications Screen Size: Diagonal Viewable: Dimensions w/ Stand: w/o Stand: Weight w/ Stand: w/o Stand: TV Type: Refresh Rate: Maximum Resolution: Pixel Pitch: Dynamic Contrast Ratio: Viewing Angle: Response Time: Brightness: HDMI Inputs: Component Video Inputs: Composite Inputs: RF/Coaxial ...
Specifications Screen Size: Diagonal Viewable: Dimensions w/ Stand: w/o Stand: Weight w/ Stand: w/o Stand: TV Type: Refresh Rate: Maximum Resolution: Pixel Pitch: Dynamic Contrast Ratio: Viewing Angle: Response Time: Brightness: HDMI Inputs: Component Video Inputs: Composite Inputs: RF/Coaxial ...

E321MV Quick Start Guide
Page 4
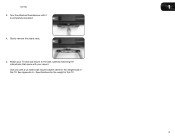
Align the base with the stand neck, you may have it facing backwards. If the base is not joining with the stand neck. To prevent scratches or damage to the screen, place the TV on a clean, flat surface. Gently push the base onto the stand neck. INSTALLING THE BASE 1 2 Place the TV screen-down on a soft surface, such as carpet, rug, or blanket.
Align the base with the stand neck, you may have it facing backwards. If the base is not joining with the stand neck. To prevent scratches or damage to the screen, place the TV on a clean, flat surface. Gently push the base onto the stand neck. INSTALLING THE BASE 1 2 Place the TV screen-down on a soft surface, such as carpet, rug, or blanket.

E321MV Quick Start Guide
Page 5
Move the TV with attached stand into an upright position and place on a flat, level, and stable surface. Fold down the thumbscrew tab so it is flat against the bottom of the base. 3 4 Turn the attached thumbscrew until it is completely tightened.
Move the TV with attached stand into an upright position and place on a flat, level, and stable surface. Fold down the thumbscrew tab so it is flat against the bottom of the base. 3 4 Turn the attached thumbscrew until it is completely tightened.


