
E320i-A0 User Manual
Page 1
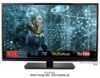
USER GUIDE MMODDEELLS // E3D320VX // E3ED34220V0Xi-A0 // E3D470VX INSTALLING YOUR new TV CONTROLS & CONNECTIONS CONNECTING YOUR DEVICES USING THE ON-SCREEN MENU USING THE USB MEDIA PLAYER USING VIZIO INTERNET APPS TROUBLESHOOTING & SUPPORT Help, SPECs, warranty & LEGAL
USER GUIDE MMODDEELLS // E3D320VX // E3ED34220V0Xi-A0 // E3D470VX INSTALLING YOUR new TV CONTROLS & CONNECTIONS CONNECTING YOUR DEVICES USING THE ON-SCREEN MENU USING THE USB MEDIA PLAYER USING VIZIO INTERNET APPS TROUBLESHOOTING & SUPPORT Help, SPECs, warranty & LEGAL
E320i-A0 User Manual
Page 3
... the enclosed registration card Extended Warranties For peace of mind, and to protect your investment beyond the standard warranty, VIZIO offers on your new VIZIO HDTV. These plans provide additional coverage during the standard warranty period. It is designed and manufactured to operate within defined...the accompanying helpful tip. Misuse may result in a safe place for Choosing VIZIO And congratulations on -site extended warranty service plans. Keep these instructions in electric shock or fire.To prevent your TV from the apparatus. • Only use this symbol, please read these ...
... the enclosed registration card Extended Warranties For peace of mind, and to protect your investment beyond the standard warranty, VIZIO offers on your new VIZIO HDTV. These plans provide additional coverage during the standard warranty period. It is designed and manufactured to operate within defined...the accompanying helpful tip. Misuse may result in a safe place for Choosing VIZIO And congratulations on -site extended warranty service plans. Keep these instructions in electric shock or fire.To prevent your TV from the apparatus. • Only use this symbol, please read these ...
E320i-A0 User Manual
Page 4
... three-pronged, have fallen into the slots and openings on the label. Any other voltage than the voltage specified. This will fit only into your TV close to a power outlet, power is a safety feature. This is always flowing into a grounded power outlet. Do not defeat the safety purpose ...marked voltage can result in fire or electric shock. • The wall socket should be maintained between your TV. Do not install your TV. Never spill liquids on the top of your TV that may cause fire or electric shock. • Do not touch the power cord during lightning storms ...
... three-pronged, have fallen into the slots and openings on the label. Any other voltage than the voltage specified. This will fit only into your TV close to a power outlet, power is a safety feature. This is always flowing into a grounded power outlet. Do not defeat the safety purpose ...marked voltage can result in fire or electric shock. • The wall socket should be maintained between your TV. Do not install your TV. Never spill liquids on the top of your TV that may cause fire or electric shock. • Do not touch the power cord during lightning storms ...
E320i-A0 User Manual
Page 5
... Opening or removing the back cover may expose you are qualified to do so. When your TV away from moisture. If your TV is dropped and the housing is required, contact your TV, hold the AC/DC power adapter, not the cord. To reduce the risk of electric shock, ... Insert batteries in accordance with arrowhead symbol within the product's enclosure that the power cord and any servicing other cables are unplugged before moving your TV yourself. • Avoid using dropped or damaged appliances. The power cord fails or frays. - If repair is damaged, the internal components may...
... Opening or removing the back cover may expose you are qualified to do so. When your TV away from moisture. If your TV is dropped and the housing is required, contact your TV, hold the AC/DC power adapter, not the cord. To reduce the risk of electric shock, ... Insert batteries in accordance with arrowhead symbol within the product's enclosure that the power cord and any servicing other cables are unplugged before moving your TV yourself. • Avoid using dropped or damaged appliances. The power cord fails or frays. - If repair is damaged, the internal components may...

E320i-A0 User Manual
Page 6
... 810-21) Ground Clamps Power Service Grounding Electrode System (NEC ART 250, part H) Lightning Protection For added protection of time, unplug the TV from the wall outlet and disconnect the antenna or cable system. Article 810 of the National Electrical Code, ANSI/NFPSA 70, provides information with..., location of antenna discharge unit, connection to grounding electrodes, and requirements of the coaxial cable is intended to be connected to the TV, make sure that the antenna or cable system is electrically grounded to earth in the building installation. Power Lines Do not locate the...
... 810-21) Ground Clamps Power Service Grounding Electrode System (NEC ART 250, part H) Lightning Protection For added protection of time, unplug the TV from the wall outlet and disconnect the antenna or cable system. Article 810 of the National Electrical Code, ANSI/NFPSA 70, provides information with..., location of antenna discharge unit, connection to grounding electrodes, and requirements of the coaxial cable is intended to be connected to the TV, make sure that the antenna or cable system is electrically grounded to earth in the building installation. Power Lines Do not locate the...
E320i-A0 User Manual
Page 7
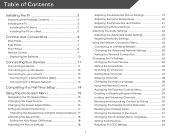
Table of Contents Installing the TV 3 Inspecting the Package Contents 3 Installing the TV 3 Installing the TV Stand 3 Installing the TV on a Wall 5 Controls and Connections 6 Rear Panel 6 Side Panel 7 Front Panel 8 Remote Control 9 Replacing the Batteries 10 Connecting Your Devices 11... Network Connection Menu 24 Connecting to a Wireless Network 24 Changing the Advanced Network Settings 25 Testing Your Network Connection 25 Changing the TV Settings 26 Changing the Input Source 26 Setting the Tuner Mode 26 Scanning for Channels 26 Adding New Channels 27 Skipping Channels 28...
Table of Contents Installing the TV 3 Inspecting the Package Contents 3 Installing the TV 3 Installing the TV Stand 3 Installing the TV on a Wall 5 Controls and Connections 6 Rear Panel 6 Side Panel 7 Front Panel 8 Remote Control 9 Replacing the Batteries 10 Connecting Your Devices 11... Network Connection Menu 24 Connecting to a Wireless Network 24 Changing the Advanced Network Settings 25 Testing Your Network Connection 25 Changing the TV Settings 26 Changing the Input Source 26 Setting the Tuner Mode 26 Scanning for Channels 26 Adding New Channels 27 Skipping Channels 28...
E320i-A0 User Manual
Page 8
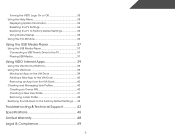
Turning the VIZIO Logo On or Off 33 Using the Help Menu 33 Displaying System Information 34 Resetting the TV Settings 34 Restoring the TV to Factory Default Settings 34 Using Guided Setup 35 Using the Info Window 36 Using the USB Media Player 37 Using the USB Media Player ...37 Connecting a USB Thumb Drive to the TV 37 Playing USB Media 37 Using VIZIO Internet Apps 39 Using the VIA Shortcut Buttons 39 Using the VIA Dock 39 Moving an App on the VIA Dock 39...
Turning the VIZIO Logo On or Off 33 Using the Help Menu 33 Displaying System Information 34 Resetting the TV Settings 34 Restoring the TV to Factory Default Settings 34 Using Guided Setup 35 Using the Info Window 36 Using the USB Media Player 37 Using the USB Media Player ...37 Connecting a USB Thumb Drive to the TV 37 Playing USB Media 37 Using VIZIO Internet Apps 39 Using the VIA Shortcut Buttons 39 Using the VIA Dock 39 Moving an App on the VIA Dock 39...
E320i-A0 User Manual
Page 9
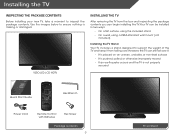
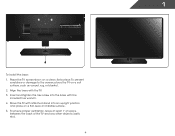
VIZIO LED LCD HDTV Installing the TV After removing the TV from falling over if: • It is placed on Stand Your TV can be installed in two ways: • On a flat surface, using the included stand • On a wall, using a VESA-standard wall mount (not included) Installing the TV Stand Your TV ... pulled, or otherwise improperly moved • If an earthquake occurs and the TV is missing or damaged. However, the TV can begin installing the TV. Use the images below to support the weight of the TV and keep it from the box and inspecting the package contents you can still ...
VIZIO LED LCD HDTV Installing the TV After removing the TV from falling over if: • It is placed on Stand Your TV can be installed in two ways: • On a flat surface, using the included stand • On a wall, using a VESA-standard wall mount (not included) Installing the TV Stand Your TV ... pulled, or otherwise improperly moved • If an earthquake occurs and the TV is missing or damaged. However, the TV can begin installing the TV. Use the images below to support the weight of the TV and keep it from the box and inspecting the package contents you can still ...
E320i-A0 User Manual
Page 10
Insert and tighten the hex screw into an upright position and place on a clean, flat surface. Align the base with the included hex wrench. 4. 1 To install the base: 1. To ensure proper ventilation, leave at least 1" of space between the back of the TV and any other objects (walls, etc). 4 Move the TV with attached stand into the base with the TV. 3. Place the TV screen-down on a flat, level, and stable surface. 5. To prevent scratches or damage to the screen, place the TV on a soft surface, such as carpet, rug, or blanket. 2.
Insert and tighten the hex screw into an upright position and place on a clean, flat surface. Align the base with the included hex wrench. 4. 1 To install the base: 1. To ensure proper ventilation, leave at least 1" of space between the back of the TV and any other objects (walls, etc). 4 Move the TV with attached stand into the base with the TV. 3. Place the TV screen-down on a flat, level, and stable surface. 5. To prevent scratches or damage to the screen, place the TV on a soft surface, such as carpet, rug, or blanket. 2.
E320i-A0 User Manual
Page 11
..., you . Disconnect any cables connected to your TV model: Installing a TV on a wall requires lifting. Place the TV face-down on a wall: 1. Remove the base by loosening and removing the screws. 4. Screw Size: Screw Pitch: Screw Length: Hole Pattern: E320i-A0 M4 0.70mm 12mm 100mm (V) x 100mm (H)... Be sure the mount you choose is clear of this TV. Use only with your mount. Consult the information below to find the appropriate mount for...
..., you . Disconnect any cables connected to your TV model: Installing a TV on a wall requires lifting. Place the TV face-down on a wall: 1. Remove the base by loosening and removing the screws. 4. Screw Size: Screw Pitch: Screw Length: Hole Pattern: E320i-A0 M4 0.70mm 12mm 100mm (V) x 100mm (H)... Be sure the mount you choose is clear of this TV. Use only with your mount. Consult the information below to find the appropriate mount for...
E320i-A0 User Manual
Page 13
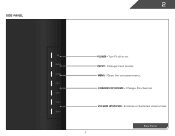
Open the on . Turn TV off or on -screen menu. Change the channel. Increase or decrease volume level. VOLUME UP/DOWN - 2 Side Panel INPUT MENU CH ^ CH VOL ^ VOL ^ ^ POWER - MENU - CHANNEL UP/DOWN - INPUT - Change input source. Side Panel 7
Open the on . Turn TV off or on -screen menu. Change the channel. Increase or decrease volume level. VOLUME UP/DOWN - 2 Side Panel INPUT MENU CH ^ CH VOL ^ VOL ^ ^ POWER - MENU - CHANNEL UP/DOWN - INPUT - Change input source. Side Panel 7
E320i-A0 User Manual
Page 15
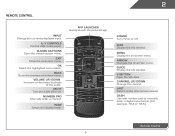
Mute Turn the audio off . Power Turn TV on or off or on. Arrow Navigate the on -screen menu. Guide Display the info window. A/V Controls Control USB media player. Volume Up/Down Increase ...
Mute Turn the audio off . Power Turn TV on or off or on. Arrow Navigate the on -screen menu. Guide Display the info window. A/V Controls Control USB media player. Volume Up/Down Increase ...
E320i-A0 User Manual
Page 17
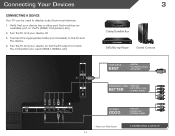
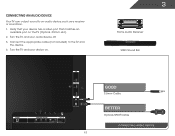
Verify that matches an available port on . Turn the TV and your device has a video port that your device on the TV (HDMI, Component, etc). 2. Turn the TV and your device off. 3. SIDE 3 Cable/Satellite Box DVD/Blu-ray Player Game Console HDMI CABLE BEST • DIGITAL • HD ...CABLE GOOD • ANALOG • VIDEO (480i)* • STEREO AUDIO * Maximum Resolution 11 CONNECTING A DEVICE Connecting Your Devices Connecting A Device Your TV can be used (HDMI-1, HDMI-2, etc). Connect the appropriate cable (not included) to display output from most devices. 1. Set the...
Verify that matches an available port on . Turn the TV and your device has a video port that your device on the TV (HDMI, Component, etc). 2. Turn the TV and your device off. 3. SIDE 3 Cable/Satellite Box DVD/Blu-ray Player Game Console HDMI CABLE BEST • DIGITAL • HD ...CABLE GOOD • ANALOG • VIDEO (480i)* • STEREO AUDIO * Maximum Resolution 11 CONNECTING A DEVICE Connecting Your Devices Connecting A Device Your TV can be used (HDMI-1, HDMI-2, etc). Connect the appropriate cable (not included) to display output from most devices. 1. Set the...
E320i-A0 User Manual
Page 18
Turn the TV and your device on the TV (Optical, 3.5mm, etc). 2. Verify that your device has a video port that matches an available port on . 3 Home Audio Receiver VIZIO Sound Bar SIDE 12 GOOD 3.5mm Cable BETTER Optical/SPDIF Cable CONNECTING AUDIO DEVICE Connect the appropriate cable (not included) to an audio device, such as a receiver or sound bar. 1. Turn the TV and your audio device off. 3. Connecting an audio device Your TV can output sound to the TV and the device. 4.
Turn the TV and your device on the TV (Optical, 3.5mm, etc). 2. Verify that your device has a video port that matches an available port on . 3 Home Audio Receiver VIZIO Sound Bar SIDE 12 GOOD 3.5mm Cable BETTER Optical/SPDIF Cable CONNECTING AUDIO DEVICE Connect the appropriate cable (not included) to an audio device, such as a receiver or sound bar. 1. Turn the TV and your audio device off. 3. Connecting an audio device Your TV can output sound to the TV and the device. 4.

E320i-A0 User Manual
Page 19
...CONNECTING TO A WIRED NETWORK 13 Connecting to a Wireless Network 1. Connect an ethernet cable to your network Your TV is internet-ready. Connecting to your network on the back of the TV. Ensure you have a router or modem broadcasting as high-speed wireless signal (802.11n recommended). 2. Use ...the Guided Network Setup to configure the TV. It can be connected to your home network with a Wired or ...
...CONNECTING TO A WIRED NETWORK 13 Connecting to a Wireless Network 1. Connect an ethernet cable to your network Your TV is internet-ready. Connecting to your network on the back of the TV. Ensure you have a router or modem broadcasting as high-speed wireless signal (802.11n recommended). 2. Use ...the Guided Network Setup to configure the TV. It can be connected to your home network with a Wired or ...
E320i-A0 User Manual
Page 20
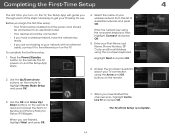
... cable, connect it to highlight Home Mode Setup and press OK. 3. Enter the network key using the on and the Setup App starts. 2. Enter your TV connection using the on-screen keyboard. Answer the on-screen questions about your First Name, Last Name, Phone Number, ZIP Code, and E-mail Address using... network key ready. • If you are finished, highlight Next and press OK. 4. Completing the First-Time Setup 4 The first time you turn on the TV, the Setup App will guide you through each of the steps necessary to get your wireless network from the list of available networks and press...
... cable, connect it to highlight Home Mode Setup and press OK. 3. Enter the network key using the on and the Setup App starts. 2. Enter your TV connection using the on-screen keyboard. Answer the on-screen questions about your First Name, Last Name, Phone Number, ZIP Code, and E-mail Address using... network key ready. • If you are finished, highlight Next and press OK. 4. Completing the First-Time Setup 4 The first time you turn on the TV, the Setup App will guide you through each of the steps necessary to get your wireless network from the list of available networks and press...
E320i-A0 User Manual
Page 21
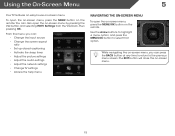
... up closed captioning • Activate the sleep timer • Adjust the picture settings • Adjust the audio settings • Adjust the network settings • Change TV settings • Access the help menu Navigating the On-Screen Menu To open the on-screen menu, press the MENU/OK button on -screen menu... to select that option. To open the on the remote. The EXIT button will close the on -screen menu. Using the On-Screen Menu 5 Your TV features an easy-to-use on -screen menu. 15
... up closed captioning • Activate the sleep timer • Adjust the picture settings • Adjust the audio settings • Adjust the network settings • Change TV settings • Access the help menu Navigating the On-Screen Menu To open the on-screen menu, press the MENU/OK button on -screen menu... to select that option. To open the on the remote. The EXIT button will close the on -screen menu. Using the On-Screen Menu 5 Your TV features an easy-to-use on -screen menu. 15

E320i-A0 User Manual
Page 22
... the Settings icon and press OK. Use the Arrow buttons to highlight the input source and press OK. This option is only available when the TV is displayed. 4. If you are added to the left and right of the display image. • Wide stretches a 4:3 aspect ratio picture to display. Use the... widescreen (1.85:1 or 2.35:1) content, black bars will still appear on the top and bottom of the display image. • Zoom expands images with your TV.To use one of these devices with black bars to fit the screen. • Panoramic expands the display image to fill the screen. To change...
... the Settings icon and press OK. Use the Arrow buttons to highlight the input source and press OK. This option is only available when the TV is displayed. 4. If you are added to the left and right of the display image. • Wide stretches a 4:3 aspect ratio picture to display. Use the... widescreen (1.85:1 or 2.35:1) content, black bars will still appear on the top and bottom of the display image. • Zoom expands images with your TV.To use one of these devices with black bars to fit the screen. • Panoramic expands the display image to fill the screen. To change...
E320i-A0 User Manual
Page 23
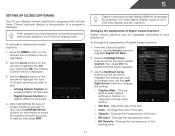
... settings or Custom to manually change the appearance of digital closed captions you wish to see : • Analog Closed Caption for analog (NTSC) TV channels. • Digital Closed Caption for programs that include them . After highlighting the type of closed captions: 1. The Digital CC Style menu ...select Custom, then press OK. To activate or deactivate closed captions for digital (ATSC) TV channels. 4. Use the Arrow buttons on the remote to highlight the type of closed captions, the TV will not display them . The on the remote to select the caption channel you ...
... settings or Custom to manually change the appearance of digital closed captions you wish to see : • Analog Closed Caption for analog (NTSC) TV channels. • Digital Closed Caption for programs that include them . After highlighting the type of closed captions: 1. The Digital CC Style menu ...select Custom, then press OK. To activate or deactivate closed captions for digital (ATSC) TV channels. 4. Use the Arrow buttons on the remote to highlight the type of closed captions, the TV will not display them . The on the remote to select the caption channel you ...
E320i-A0 User Manual
Page 24
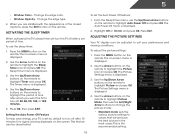
... the remote to highlight the period of time after which you are satisfied with the appearance of time. Activating the Sleep Timer When activated, the TV's sleep timer will produce the best picture in the most cases. Use the Up/Down Arrow buttons on the remote to highlight Picture Mode, then... the sleep timer: 1. Press OK, then press EXIT. To adjust the picture settings: 1. Highlight Off or 10 min and press OK. When you want the TV to values that will turn off after 10 minutes if no signal is set by default to suit your preferences and viewing conditions. Use the...
... the remote to highlight the period of time after which you are satisfied with the appearance of time. Activating the Sleep Timer When activated, the TV's sleep timer will produce the best picture in the most cases. Use the Up/Down Arrow buttons on the remote to highlight Picture Mode, then... the sleep timer: 1. Press OK, then press EXIT. To adjust the picture settings: 1. Highlight Off or 10 min and press OK. When you want the TV to values that will turn off after 10 minutes if no signal is set by default to suit your preferences and viewing conditions. Use the...


