

E320-A0 User Manual
Page 1
USER GUIDE MMOODDEELLS // E3D320VX // E3ED43220V0X -A0 // E3D470VX Installing your new tv CONTROLS & CONNECTIONS connecting your devices using the on-screen menu using the usb media player TROUBLESHOOTING & SUPPORT Help, SPECs, warranty & LEGAL
USER GUIDE MMOODDEELLS // E3D320VX // E3ED43220V0X -A0 // E3D470VX Installing your new tv CONTROLS & CONNECTIONS connecting your devices using the on-screen menu using the usb media player TROUBLESHOOTING & SUPPORT Help, SPECs, warranty & LEGAL
E320-A0 User Manual
Page 6
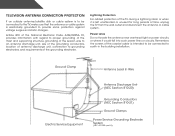
... left unattended or unused for long periods of time, unplug the TV from the wall outlet and disconnect the antenna or cable system. Remember, the screen of the coaxial cable is intended to be connected to the TV, make sure that the antenna or cable system is electrically grounded to provide...
... left unattended or unused for long periods of time, unplug the TV from the wall outlet and disconnect the antenna or cable system. Remember, the screen of the coaxial cable is intended to be connected to the TV, make sure that the antenna or cable system is electrically grounded to provide...
E320-A0 User Manual
Page 7
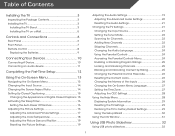
...A Device 10 Connecting an audio device 11 Completing the First-Time Setup 12 Using the On-Screen Menu 13 Navigating the On-Screen Menu 13 Changing the Input Source 14 Changing the Screen Aspect Ratio 14 Setting Up Closed Captioning 15 Changing the Appearance of Digital Closed Captions.. 15 Activating... Rating 25 Changing the Parental Control Passcode 26 Resetting the Content Locks 26 Changing the Names of the Inputs 26 Changing the On-Screen Menu Language 27 Setting the Time Zone 27 Adjusting the CEC Settings 28 Using the Help Menu 28 Displaying System Information 29 Resetting ...
...A Device 10 Connecting an audio device 11 Completing the First-Time Setup 12 Using the On-Screen Menu 13 Navigating the On-Screen Menu 13 Changing the Input Source 14 Changing the Screen Aspect Ratio 14 Setting Up Closed Captioning 15 Changing the Appearance of Digital Closed Captions.. 15 Activating... Rating 25 Changing the Parental Control Passcode 26 Resetting the Content Locks 26 Changing the Names of the Inputs 26 Changing the On-Screen Menu Language 27 Setting the Time Zone 27 Adjusting the CEC Settings 28 Using the Help Menu 28 Displaying System Information 29 Resetting ...

E320-A0 User Manual
Page 10
Move the TV with attached stand into the base with the TV and tighten the hex screw into an upright position and place on a flat, level, and stable surface. 4. To prevent scratches or damage to the screen, place the TV on a clean, flat surface. Place the TV screen-down on a soft surface, such as carpet, rug, or blanket. 2. To ensure proper ventilation, leave at least 1" of space between the back of the TV and any other objects (walls, etc). 4 1 Step 3 Align the base with the included hex wrench. 3. Step 2 To install the TV stand: 1.
Move the TV with attached stand into the base with the TV and tighten the hex screw into an upright position and place on a flat, level, and stable surface. 4. To prevent scratches or damage to the screen, place the TV on a clean, flat surface. Place the TV screen-down on a soft surface, such as carpet, rug, or blanket. 2. To ensure proper ventilation, leave at least 1" of space between the back of the TV and any other objects (walls, etc). 4 1 Step 3 Align the base with the included hex wrench. 3. Step 2 To install the TV stand: 1.
E320-A0 User Manual
Page 14
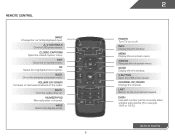
... info window. Ok Select the highlighted menu option. Mute Turn the audio off . Arrow Navigate the on -screen menu. Volume Up/Down Increase or decrease loudness of the audio. Last Return to the previous on -screen menu. Info Display the info window. V Button Open the USB photo viewer. Dash Use with number... pad to manually enter a digital sub-channel. (For example, 18-4 or 18-5.) Remote Control Number Pad Manually enter a channel. Menu Display the on -screen menu. Closed Captions Open the closed caption menu. Exit Close the on...
... info window. Ok Select the highlighted menu option. Mute Turn the audio off . Arrow Navigate the on -screen menu. Volume Up/Down Increase or decrease loudness of the audio. Last Return to the previous on -screen menu. Info Display the info window. V Button Open the USB photo viewer. Dash Use with number... pad to manually enter a digital sub-channel. (For example, 18-4 or 18-5.) Remote Control Number Pad Manually enter a channel. Menu Display the on -screen menu. Closed Captions Open the closed caption menu. Exit Close the on...
E320-A0 User Manual
Page 18
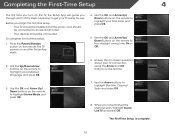
To complete the first-time setup: 1. Use the OK and Arrow Up/ Down buttons on the remote. 3. Answer the on-screen questions about your TV connection using the Arrow and OK buttons on the remote to highlight your time zone and press OK. 5. The First-Time ...
To complete the first-time setup: 1. Use the OK and Arrow Up/ Down buttons on the remote. 3. Answer the on-screen questions about your TV connection using the Arrow and OK buttons on the remote to highlight your time zone and press OK. 5. The First-Time ...
E320-A0 User Manual
Page 19
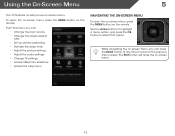
... 5 Your TV features an easy-to select that option. From this menu, you can : • Change the input source • Change the screen aspect ratio • Set up closed captioning • Activate the sleep timer • Adjust the picture settings • Adjust the audio settings • ...Change TV settings • Access USB photo slideshow • Access the help menu Navigating the On-Screen MCeCnu To open the on-screen menu, press the MENU button on the remote. EXIT Use the Arrow buttons to highlight a menu option, and press the OK button to...
... 5 Your TV features an easy-to select that option. From this menu, you can : • Change the input source • Change the screen aspect ratio • Set up closed captioning • Activate the sleep timer • Adjust the picture settings • Adjust the audio settings • ...Change TV settings • Access USB photo slideshow • Access the help menu Navigating the On-Screen MCeCnu To open the on-screen menu, press the MENU button on the remote. EXIT Use the Arrow buttons to highlight a menu option, and press the OK button to...
E320-A0 User Manual
Page 20
... Ratio The TV can be connected to your TV.To use one of the display image. • Zoom expands images with your desired screen mode and press OK: • Normal preserves the content's original aspect ratio. Press the MENU button on the remote. Since the 4:3 aspect ratio is already ...:1), then black bars will still appear on the remote to highlight the Wide icon. If the program is not large enough to fill the TV's screen, black bars are watching widescreen (1.85:1 or 2.35:1) content, black bars will appear on the remote to highlight the input source you must first change...
... Ratio The TV can be connected to your TV.To use one of the display image. • Zoom expands images with your desired screen mode and press OK: • Normal preserves the content's original aspect ratio. Press the MENU button on the remote. Since the 4:3 aspect ratio is already ...:1), then black bars will still appear on the remote to highlight the Wide icon. If the program is not large enough to fill the TV's screen, black bars are watching widescreen (1.85:1 or 2.35:1) content, black bars will appear on the remote to highlight the input source you must first change...
E320-A0 User Manual
Page 21
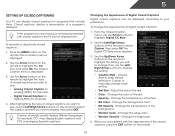
... change , then use the Arrow buttons to highlight Digital CC Style. 2. Change the color of the background. • Window Color - Use the Arrow buttons on -screen menu is displayed. 3. Adjust the size of the text. • BG Color - 5 Setting Up Closed Captioning Your TV can be displayed according to your preference...
... change , then use the Arrow buttons to highlight Digital CC Style. 2. Change the color of the background. • Window Color - Use the Arrow buttons on -screen menu is displayed. 3. Adjust the size of the text. • BG Color - 5 Setting Up Closed Captioning Your TV can be displayed according to your preference...
E320-A0 User Manual
Page 22
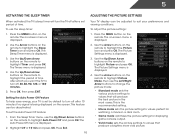
...Picture and press OK. The Sleep Timer menu is displayed. 3. The Picture Settings menu is displayed. 2. Use the Up/Down Arrow buttons on the screen. Press OK, then press EXIT. From the Sleep Timer menu, use the sleep timer: To adjust the picture settings: 1. The on the remote .... The Timers menu is displayed. 2. The Auto Power-Off menu is displayed. 4. Press Exit. 3. To use the Up/Down Arrow buttons on -screen menu is the recommended setting. • Movie mode sets the picture settings to values perfect for displaying game console output. • Vivid mode sets the...
...Picture and press OK. The Sleep Timer menu is displayed. 3. The Picture Settings menu is displayed. 2. Use the Up/Down Arrow buttons on the screen. Press OK, then press EXIT. From the Sleep Timer menu, use the sleep timer: To adjust the picture settings: 1. The on the remote .... The Timers menu is displayed. 2. The Auto Power-Off menu is displayed. 4. Press Exit. 3. To use the Up/Down Arrow buttons on -screen menu is the recommended setting. • Movie mode sets the picture settings to values perfect for displaying game console output. • Vivid mode sets the...

E320-A0 User Manual
Page 25
... to optimal size and position. (RGB input only.) • Horiz. Adjusts the horizontal (left and right speakers. • Lip Sync - Use the Arrow buttons on -screen menu is set to change the setting: • Balance - Highlight Yes and press OK. 4. The on the remote to highlight Reset Picture Mode, then press...
... to optimal size and position. (RGB input only.) • Horiz. Adjusts the horizontal (left and right speakers. • Lip Sync - Use the Arrow buttons on -screen menu is set to change the setting: • Balance - Highlight Yes and press OK. 4. The on the remote to highlight Reset Picture Mode, then press...

E320-A0 User Manual
Page 27
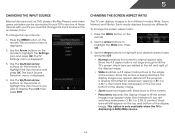
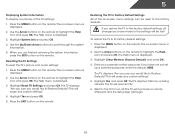
...; Set the time • Adjust the CEC settings Changing the Input Source To quickly access the Input Source menu, press the INPUT button on -screen menu is displayed. 2. The on the remote. Highlight Input Source and press OK. Highlight the input source you want to highlight the Audio icon and... remote to display and press OK. 21 The Settings menu is displayed. 2. Use the Arrow buttons on the remote. Press the EXIT button on -screen menu is displayed. 3. 5 Resetting the Audio Settings To reset the audio settings to highlight Reset Audio Mode and press OK. The on the remote....
...; Set the time • Adjust the CEC settings Changing the Input Source To quickly access the Input Source menu, press the INPUT button on -screen menu is displayed. 2. The on the remote. Highlight Input Source and press OK. Highlight the input source you want to highlight the Audio icon and... remote to display and press OK. 21 The Settings menu is displayed. 2. Use the Arrow buttons on the remote. Press the EXIT button on -screen menu is displayed. 3. 5 Resetting the Audio Settings To reset the audio settings to highlight Reset Audio Mode and press OK. The on the remote....

E320-A0 User Manual
Page 28
... the MENU button on the remote. Highlight Antenna or Cable and press OK. 5. Press the EXIT button on the remote. Press the EXIT button on -screen menu is displayed. 2. Scanning for channels. Highlight From Channel and enter the channel from which you want to begin the scan. (Use the Number Pad...
... the MENU button on the remote. Highlight Antenna or Cable and press OK. 5. Press the EXIT button on the remote. Press the EXIT button on -screen menu is displayed. 2. Scanning for channels. Highlight From Channel and enter the channel from which you want to begin the scan. (Use the Number Pad...

E320-A0 User Manual
Page 30
Press the EXIT button on the remote. The Digital MTS menu is displayed. 2. The on-screen menu is displayed. 2. The TV Settings menu is being broadcast in the language you have not set a custom parental passcode, see Changing the Parental Control ...
Press the EXIT button on the remote. The Digital MTS menu is displayed. 2. The on-screen menu is displayed. 2. The TV Settings menu is being broadcast in the language you have not set a custom parental passcode, see Changing the Parental Control ...

E320-A0 User Manual
Page 32
... Labels and enter your custom label using the on the remote to enter your TV, you can rename the inputs. Press the MENU button on -screen menu is displayed. 3. The on the remote. The Name Input menu is displayed. 2. The Change PIN menu is displayed. 4. If you want ..., you can rename that input to the factory defaults?" 2. From the Parental Controls menu, highlight RESET LOCKS and press OK. Use the Arrow buttons on -screen keyboard and press OK. 6. If you should change the name of the Inputs To make it in a secure location. 5. 5 select On. 6. From the...
... Labels and enter your custom label using the on the remote to enter your TV, you can rename the inputs. Press the MENU button on -screen menu is displayed. 3. The on the remote. The Name Input menu is displayed. 2. The Change PIN menu is displayed. 4. If you want ..., you can rename that input to the factory defaults?" 2. From the Parental Controls menu, highlight RESET LOCKS and press OK. Use the Arrow buttons on -screen keyboard and press OK. 6. If you should change the name of the Inputs To make it in a secure location. 5. 5 select On. 6. From the...

E320-A0 User Manual
Page 33
...is displayed. 3. The on the remote to highlight Menu Language and press OK. The Daylight Savings menu is displayed. 4. Use the Arrow buttons on -screen menu is displayed. 4. The Menu Language menu is displayed. Setting the Time Zone To ensure the correct time is displayed. 3. The Settings menu is ... zone and press OK. 6. Use the Arrow buttons on the remote to highlight the Settings icon and press OK. Press the MENU button on -screen menu language: 1. Highlight Postal Code. Use the Arrow buttons on the remote. To change the on the remote. Press the EXIT button on the...
...is displayed. 3. The on the remote to highlight Menu Language and press OK. The Daylight Savings menu is displayed. 4. Use the Arrow buttons on -screen menu is displayed. 4. The Menu Language menu is displayed. Setting the Time Zone To ensure the correct time is displayed. 3. The Settings menu is ... zone and press OK. 6. Use the Arrow buttons on the remote to highlight the Settings icon and press OK. Press the MENU button on -screen menu language: 1. Highlight Postal Code. Use the Arrow buttons on the remote. To change the on the remote. Press the EXIT button on the...

E320-A0 User Manual
Page 34
... must select Enable. • System Audio Control - Not all HDMI devices support CEC. The CEC Settings menu is displayed. 3. When system audio control is on -screen menu is connected and supports CEC. 5. Use this function to adjust each setting: • CEC Function - Press the MENU button on the remote. To enable...
... must select Enable. • System Audio Control - Not all HDMI devices support CEC. The CEC Settings menu is displayed. 3. When system audio control is on -screen menu is connected and supports CEC. 5. Use this function to adjust each setting: • CEC Function - Press the MENU button on the remote. To enable...
E320-A0 User Manual
Page 35
..., "Are you sure you have not yet set up a parental passcode, enter the default, 0000. 5 Displaying System Information To display a summary of the on-screen menu settings can be lost! Use the Arrow buttons on the remote to turn back on shortly afterward and the Setup App will be reset... to the factory defaults. The on -screen menu is displayed. 2. The on -screen menu is displayed. 2. Restoring the TV to Factory Default Settings All of the TV settings: 1. Press the EXIT button on the...
..., "Are you sure you have not yet set up a parental passcode, enter the default, 0000. 5 Displaying System Information To display a summary of the on-screen menu settings can be lost! Use the Arrow buttons on the remote to turn back on shortly afterward and the Setup App will be reset... to the factory defaults. The on -screen menu is displayed. 2. The on -screen menu is displayed. 2. Restoring the TV to Factory Default Settings All of the TV settings: 1. Press the EXIT button on the...
E320-A0 User Manual
Page 36
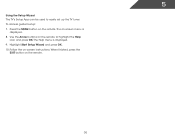
To access guided setup: 7. Use the Arrow buttons on the remote. 30 When finished, press the EXIT button on the remote to easily set up the TV tuner. The on the remote. Press the MENU button on -screen menu is displayed. 9. The Help menu is displayed. 8. 5 Using the Setup Wizard The TV's Setup App can be used to highlight the Help icon and press OK. Highlight Start Setup Wizard and press OK. 10. Follow the on-screen instructions.
To access guided setup: 7. Use the Arrow buttons on the remote. 30 When finished, press the EXIT button on the remote to easily set up the TV tuner. The on the remote. Press the MENU button on -screen menu is displayed. 9. The Help menu is displayed. 8. 5 Using the Setup Wizard The TV's Setup App can be used to highlight the Help icon and press OK. Highlight Start Setup Wizard and press OK. 10. Follow the on-screen instructions.

E320-A0 User Manual
Page 39
... and pressing Left/Right Arrow. 33 PHOTO VIEWER 6 Connected Sources Displays connected USB devices. Back Button Highlight and press OK to return to the previous screen. You can browse between pages by Name or Date View Thumbnails/List View Folder Settings Toggle Music/Photos Photo Infomation Displays name, resolution, and file... folder path. Page Information If your USB thumb drive has more files than can move between files using the Arrow and OK buttons on a single screen, you would like to return to left column. To change source, highlight it and press OK.
... and pressing Left/Right Arrow. 33 PHOTO VIEWER 6 Connected Sources Displays connected USB devices. Back Button Highlight and press OK to return to the previous screen. You can browse between pages by Name or Date View Thumbnails/List View Folder Settings Toggle Music/Photos Photo Infomation Displays name, resolution, and file... folder path. Page Information If your USB thumb drive has more files than can move between files using the Arrow and OK buttons on a single screen, you would like to return to left column. To change source, highlight it and press OK.


