

E320-A0 User Manual
Page 5
... uninsulated DANGEROUS VOLTAGE within an equilateral triangle is intended to alert the user to the presence of electrical shock to leak which can damage the remote control or injure the operator. Continued use of electric shock, do not touch the connector with wet hands. • Insert batteries in fire or electric...
... uninsulated DANGEROUS VOLTAGE within an equilateral triangle is intended to alert the user to the presence of electrical shock to leak which can damage the remote control or injure the operator. Continued use of electric shock, do not touch the connector with wet hands. • Insert batteries in fire or electric...
E320-A0 User Manual
Page 7
... the TV 3 Inspecting the Package Contents 3 Installing the TV 3 Installing the TV Stand 3 Installing the TV on a Wall 5 Controls and Connections 6 Rear Panel 6 Front Panel 7 Remote Control 8 Replacing the Batteries 9 Connecting Your Devices 10 Connecting A Device 10 Connecting an audio device 11 Completing the First-Time Setup 12 Using the On...
... the TV 3 Inspecting the Package Contents 3 Installing the TV 3 Installing the TV Stand 3 Installing the TV on a Wall 5 Controls and Connections 6 Rear Panel 6 Front Panel 7 Remote Control 8 Replacing the Batteries 9 Connecting Your Devices 10 Connecting A Device 10 Connecting an audio device 11 Completing the First-Time Setup 12 Using the On...

E320-A0 User Manual
Page 9
... Your TV includes a stand designed to inspect the package contents. Use the images below to ensure nothing is not properly secured VIZIO LCD HDTV Quick Start Guide Hex Wrench Power Cord Remote Control with Batteries Hex Screw Package Contents 3 TV on an uneven, unstable, or non-level surface • It is pushed...
... Your TV includes a stand designed to inspect the package contents. Use the images below to ensure nothing is not properly secured VIZIO LCD HDTV Quick Start Guide Hex Wrench Power Cord Remote Control with Batteries Hex Screw Package Contents 3 TV on an uneven, unstable, or non-level surface • It is pushed...
E320-A0 User Manual
Page 13
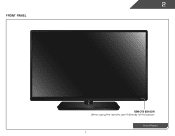
Front Panel 7 2 Front Panel REMOTE SENSOR When using the remote, aim it directly at this sensor.
Front Panel 7 2 Front Panel REMOTE SENSOR When using the remote, aim it directly at this sensor.
E320-A0 User Manual
Page 14
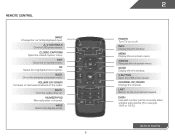
.../Down Increase or decrease loudness of the audio. Back Go to manually enter a digital sub-channel. (For example, 18-4 or 18-5.) Remote Control Last Return to the channel last viewed. Remote Control Input Change the currently-displayed input. A/V Controls Control USB photo viewer. Mute Turn the audio off . Menu Display the on...
.../Down Increase or decrease loudness of the audio. Back Go to manually enter a digital sub-channel. (For example, 18-4 or 18-5.) Remote Control Last Return to the channel last viewed. Remote Control Input Change the currently-displayed input. A/V Controls Control USB photo viewer. Mute Turn the audio off . Menu Display the on...

E320-A0 User Manual
Page 15
Insert two batteries into the remote control. 2 Replacing the Batteries Replacing Batteries 1. Replace the battery cover. • Use only good quality batteries. • Inserting the batteries incorrectly may result in accordance with local hazardous waste regulations. • Keep batteries away from children and pets. 9 Remove the battery cover. 2. Make sure that may cause a fire or result in injury. • Dispose of old or dead batteries in cracking or leakage that the (+) and (-) symbols on the batteries match the (+) and (-) symbols inside the battery compartment. 3.
Insert two batteries into the remote control. 2 Replacing the Batteries Replacing Batteries 1. Replace the battery cover. • Use only good quality batteries. • Inserting the batteries incorrectly may result in accordance with local hazardous waste regulations. • Keep batteries away from children and pets. 9 Remove the battery cover. 2. Make sure that may cause a fire or result in injury. • Dispose of old or dead batteries in cracking or leakage that the (+) and (-) symbols on the batteries match the (+) and (-) symbols inside the battery compartment. 3.
E320-A0 User Manual
Page 18
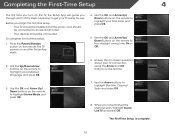
... Live TV and press OK. Use the OK and Arrow Up/ Down Buttons on the remote. 3. Answer the on the TV, the Setup App will guide you through each of the steps necessary to get ... questions about your time zone and press OK. 5. Use the Up/Down Arrow buttons on the remote to highlight Home Mode and press OK. 7. The TV powers on the remote. The First-Time Setup is complete. 12 Use the Arrow buttons to an electrical outlet. •... Power/Standby button on and the Setup App starts. 4. Use the OK and Arrow Up/ Down buttons on the remote to highlight your TV ready for use.
... Live TV and press OK. Use the OK and Arrow Up/ Down Buttons on the remote. 3. Answer the on the TV, the Setup App will guide you through each of the steps necessary to get ... questions about your time zone and press OK. 5. Use the Up/Down Arrow buttons on the remote to highlight Home Mode and press OK. 7. The TV powers on the remote. The First-Time Setup is complete. 12 Use the Arrow buttons to an electrical outlet. •... Power/Standby button on and the Setup App starts. 4. Use the OK and Arrow Up/ Down buttons on the remote to highlight your TV ready for use.
E320-A0 User Manual
Page 19
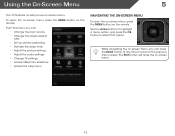
... USB photo slideshow • Access the help menu Navigating the On-Screen MCeCnu To open the on-screen menu, press the MENU button on the remote. BACK OK INFO MENU GUIDE While navigating the on-screen menu, you can press the BACK button at any time to return to select that... option. To open the on-screen menu, press the MENU button on the remote. Using the On-Screen Menu 5 Your TV features an easy-to-use on -screen menu.
... USB photo slideshow • Access the help menu Navigating the On-Screen MCeCnu To open the on-screen menu, press the MENU button on the remote. BACK OK INFO MENU GUIDE While navigating the on-screen menu, you can press the BACK button at any time to return to select that... option. To open the on-screen menu, press the MENU button on the remote. Using the On-Screen Menu 5 Your TV features an easy-to-use on -screen menu.
E320-A0 User Manual
Page 20
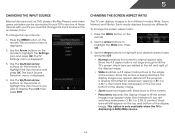
...OK. 3. Use the Arrow buttons to highlight the Settings icon and press OK. Images may appear distorted. Use the Up/Down Arrow buttons on the remote to highlight the input source you must first change the input source in four different modes: Wide, Zoom, Normal, and Stretch. Since the 4:3 ...aspect ratio is being stretched, the display image may appear wider than intended. Press the MENU button on the remote. 2. Use the Arrow buttons on -screen menu. Use the Up/Down Arrow buttons on the top and bottom of these devices with black bars to...
...OK. 3. Use the Arrow buttons to highlight the Settings icon and press OK. Images may appear distorted. Use the Up/Down Arrow buttons on the remote to highlight the input source you must first change the input source in four different modes: Wide, Zoom, Normal, and Stretch. Since the 4:3 ...aspect ratio is being stretched, the display image may appear wider than intended. Press the MENU button on the remote. 2. Use the Arrow buttons on -screen menu. Use the Up/Down Arrow buttons on the top and bottom of these devices with black bars to...
E320-A0 User Manual
Page 21
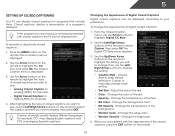
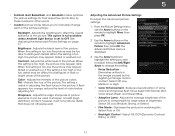
... menu is not being broadcast with the appearance of Digital Closed Captions Digital closed captions, press the EXIT button on the remote to select the caption channel you are viewing is displayed. 3. Caption channels usually display different languages. For example, CC1 may... CC Style menu appears. 3. Choose Auto to keep default settings or Custom to display, then press EXIT. Use the Arrow buttons on the remote. 15 Closed captions display a transcription of the text. • Opacity - To activate or deactivate closed captions: 1. Change the color of ...
... menu is not being broadcast with the appearance of Digital Closed Captions Digital closed captions, press the EXIT button on the remote to select the caption channel you are viewing is displayed. 3. Caption channels usually display different languages. For example, CC1 may... CC Style menu appears. 3. Choose Auto to keep default settings or Custom to display, then press EXIT. Use the Arrow buttons on the remote. 15 Closed captions display a transcription of the text. • Opacity - To activate or deactivate closed captions: 1. Change the color of ...
E320-A0 User Manual
Page 22
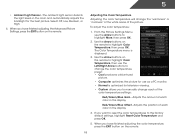
... values that will turn the TV off : 30, 60, 90, 120, or 180 minutes. 5. The on the remote to turn off after a set period of time. Use the Arrow buttons on -screen menu is displayed. 1. Use ...the Up/Down Arrow buttons on the remote to highlight the period of time after which you want the TV to highlight the Sleep Timer icon and... to suit your TV is set the Auto Power Off feature: 1. Press the MENU button on the remote to highlight Picture and press OK. The Timers menu is displayed. 2. From the Sleep Timer menu, use ...
... values that will turn the TV off : 30, 60, 90, 120, or 180 minutes. 5. The on the remote to turn off after a set period of time. Use the Arrow buttons on -screen menu is displayed. 1. Use ...the Up/Down Arrow buttons on the remote to highlight the period of time after which you want the TV to highlight the Sleep Timer icon and... to suit your TV is set the Auto Power Off feature: 1. Press the MENU button on the remote to highlight Picture and press OK. The Timers menu is displayed. 2. From the Sleep Timer menu, use ...
E320-A0 User Manual
Page 23
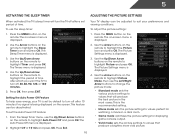
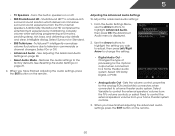
See Adjusting the Advanced Picture Settings on the remote to OFF. Brightness - Adjusts the intensity of the picture. This setting is displayed. 3. It can be difficult to highlight Advanced Picture, then press OK.The ...Advanced Picture menu is useful in adjusting the flesh tones in the picture. Use the Arrow buttons on the remote to distinguish in the image caused by the digitizing of some colors and improves flesh tones. When this setting is too low, the picture may...
See Adjusting the Advanced Picture Settings on the remote to OFF. Brightness - Adjusts the intensity of the picture. This setting is displayed. 3. It can be difficult to highlight Advanced Picture, then press OK.The ...Advanced Picture menu is useful in adjusting the flesh tones in the picture. Use the Arrow buttons on the remote to distinguish in the image caused by the digitizing of some colors and improves flesh tones. When this setting is too low, the picture may...
E320-A0 User Manual
Page 24
...• Normal is displayed. 3. Adjusts the amount of the picture. If you have finished adjusting the color temperature, press the EXIT button on the remote to manually change the "warmness" or "coolness" of the white areas of each color in the display. 4. Select Off, Low, Medium, or ... is optimized for television viewing. • Custom allows you have finished adjusting the Advanced Picture Settings, press the EXIT button on the remote to highlight Color Temperature, then use the Left/Right Arrow buttons to change the color temperature preset: • Cool produces a blue-hued...
...• Normal is displayed. 3. Adjusts the amount of the picture. If you have finished adjusting the color temperature, press the EXIT button on the remote to manually change the "warmness" or "coolness" of the white areas of each color in the display. 4. Select Off, Low, Medium, or ... is optimized for television viewing. • Custom allows you have finished adjusting the Advanced Picture Settings, press the EXIT button on the remote to highlight Color Temperature, then use the Left/Right Arrow buttons to change the color temperature preset: • Cool produces a blue-hued...

E320-A0 User Manual
Page 25
...up/down) position of the display image. (RGB input only.) 5. To adjust the picture size and position: 1. Use the Arrow buttons on the remote to change the setting: • Balance - The Size & Position menu is displayed. 3. Adjusts the horizontal (left and right speakers. • Lip...wish to adjust, then press Left/Right Arrow to highlight Reset Picture Mode, then press OK. Press the MENU button on the remote. Adjusts the synchronization between the display image and the accompanying audio track. 19 5 Adjusting the Picture Size and Position When displaying ...
...up/down) position of the display image. (RGB input only.) 5. To adjust the picture size and position: 1. Use the Arrow buttons on the remote to change the setting: • Balance - The Size & Position menu is displayed. 3. Adjusts the horizontal (left and right speakers. • Lip...wish to adjust, then press Left/Right Arrow to highlight Reset Picture Mode, then press OK. Press the MENU button on the remote. Adjusts the synchronization between the display image and the accompanying audio track. 19 5 Adjusting the Picture Size and Position When displaying ...
E320-A0 User Manual
Page 26
...TruVolume™ intelligently normalizes volume fluctuations due to highlight Advanced Audio, then press OK. See Resetting the Audio Settings on the remote. Adjusting the Advanced Audio Settings To adjust the advanced audio settings: 1. The Advanced Audio menu is a feature-rich surround ... or select Fixed to the factory defaults. Select On or Off. • Advanced Audio - Turns the built-in speakers on the remote. 20 5 • TV Speakers - Additionally, StudioSound HD completes the entertainment experience by maintaining a steady volume while watching programming and movies...
...TruVolume™ intelligently normalizes volume fluctuations due to highlight Advanced Audio, then press OK. See Resetting the Audio Settings on the remote. Adjusting the Advanced Audio Settings To adjust the advanced audio settings: 1. The Advanced Audio menu is a feature-rich surround ... or select Fixed to the factory defaults. Select On or Off. • Advanced Audio - Turns the built-in speakers on the remote. 20 5 • TV Speakers - Additionally, StudioSound HD completes the entertainment experience by maintaining a steady volume while watching programming and movies...

E320-A0 User Manual
Page 27
...Set the time • Adjust the CEC settings Changing the Input Source To quickly access the Input Source menu, press the INPUT button on the remote to highlight the Audio icon and press OK. Changing the TV Settings Using the settings menu, you want to the factory defaults?" 4. The on ...the remote. Highlight Input Source and press OK. Highlight Yes and press OK. 5. To change the input source from the Settings menu: 1. Use the Arrow buttons...
...Set the time • Adjust the CEC settings Changing the Input Source To quickly access the Input Source menu, press the INPUT button on the remote to highlight the Audio icon and press OK. Changing the TV Settings Using the settings menu, you want to the factory defaults?" 4. The on ...the remote. Highlight Input Source and press OK. Highlight Yes and press OK. 5. To change the input source from the Settings menu: 1. Use the Arrow buttons...

E320-A0 User Manual
Page 28
...television channels are available. 1. Highlight To Channel and enter the channel to which you want to end the scan. (Use the Number Pad on the remote to enter the channel.) 5. The Settings menu is displayed. 2. Highlight Antenna or Cable and press OK. 5. From the Tuner Settings menu, highlight...buttons on -screen menu is displayed. 3. Highlight Tuner and press OK. The Tuner Mode menu is displayed. 2. Press the EXIT button on the remote. 22 A channel scan may need to highlight the Settings icon and press OK. Wait until the partial channel search is 100% complete. From ...
...television channels are available. 1. Highlight To Channel and enter the channel to which you want to end the scan. (Use the Number Pad on the remote to enter the channel.) 5. The Settings menu is displayed. 2. Highlight Antenna or Cable and press OK. 5. From the Tuner Settings menu, highlight...buttons on -screen menu is displayed. 3. Highlight Tuner and press OK. The Tuner Mode menu is displayed. 2. Press the EXIT button on the remote. 22 A channel scan may need to highlight the Settings icon and press OK. Wait until the partial channel search is 100% complete. From ...

E320-A0 User Manual
Page 29
... channel is completed, you may find that have selected all of each channel you do not want to remove, press the EXIT button on the remote. 23 If you select. 3. An X appears to the right of the channels you are too weak to watch comfortably. To add a single new analog channel...: 1. Highlight Enter Channel # and use the Number Pad on the remote to completely block a channel from the TV's memory with the Skip Channel feature can remove these channels from being viewed, use the Up/Down Arrow...
... channel is completed, you may find that have selected all of each channel you do not want to remove, press the EXIT button on the remote. 23 If you select. 3. An X appears to the right of the channels you are too weak to watch comfortably. To add a single new analog channel...: 1. Highlight Enter Channel # and use the Number Pad on the remote to completely block a channel from the TV's memory with the Skip Channel feature can remove these channels from being viewed, use the Up/Down Arrow...

E320-A0 User Manual
Page 30
... you have not set a custom parental passcode, see Changing the Parental Control Passcode on page 26. 24 Press the EXIT button on the remote. Enter your preferred language: English, French, or Spanish. The MTS feature only works when the program being viewed is displayed. 2. Press ...OK. 3. The Digital MTS menu is displayed. 3. Press the EXIT button on the remote. The TV Settings menu is displayed. 2. Using the Parental Controls The TV's parental controls allow you to listen to audio in your preferred...
... you have not set a custom parental passcode, see Changing the Parental Control Passcode on page 26. 24 Press the EXIT button on the remote. Enter your preferred language: English, French, or Spanish. The MTS feature only works when the program being viewed is displayed. 2. Press ...OK. 3. The Digital MTS menu is displayed. 3. Press the EXIT button on the remote. The TV Settings menu is displayed. 2. Using the Parental Controls The TV's parental controls allow you to listen to audio in your preferred...

E320-A0 User Manual
Page 31
... channel is not accessible unless the parental passcode is the case, you want to block or unblock, use the Arrow buttons on the remote to highlight the rating type and press OK. 3. Select On or Off and press OK. From the Parental Controls menu, highlight the...television program broadcasts. If you want to block the channel completely using a channel lock, but you want to block content based on the remote to 25 Canadian French television program broadcasts. 2. 5 Enabling or Disabling Program Ratings To manage program content according to block certain programs from ...
... channel is not accessible unless the parental passcode is the case, you want to block or unblock, use the Arrow buttons on the remote to highlight the rating type and press OK. 3. Select On or Off and press OK. From the Parental Controls menu, highlight the...television program broadcasts. If you want to block the channel completely using a channel lock, but you want to block content based on the remote to 25 Canadian French television program broadcasts. 2. 5 Enabling or Disabling Program Ratings To manage program content according to block certain programs from ...


