User Manual
Page 2
...lightning storms or when unused for the installation, use this symbol, please read the accompanying important warning or notice. WHEN READING THIS MANUAL registers, stoves, or other . Never grounding-type plug. The manufacturer's warranty does not cover user abuse or improper installations. &#...on your TV. For more information, contact your product and retain them for ventilation. Safety & Certification THANK YOU FOR CHOOSING VIZIO IMPORTANT SAFETY INSTRUCTIONS • Refer all instructions. Be sure to inspect the package contents to avoid causing fire, electric To ...
...lightning storms or when unused for the installation, use this symbol, please read the accompanying important warning or notice. WHEN READING THIS MANUAL registers, stoves, or other . Never grounding-type plug. The manufacturer's warranty does not cover user abuse or improper installations. &#...on your TV. For more information, contact your product and retain them for ventilation. Safety & Certification THANK YOU FOR CHOOSING VIZIO IMPORTANT SAFETY INSTRUCTIONS • Refer all instructions. Be sure to inspect the package contents to avoid causing fire, electric To ...

User Manual
Page 12
...5 6 7 8 9 17. Mute - Number Pad - For more information please visit: www.vizio.com/environment WARNING: keep the remote control batteries away from children. Replace only with number pad to manually enter a digital sub-channel. (For example, 18-4 or 18-5) Replacing the Batteries 1. Input ... 19 1 INPUT 1. Select the highlighted menu option and play or pause content CC 8. V Button - Turn the audio on -screen menu EXIT OK MENU 5. Manually enter a channel 0 18. Wide - Find the notch on -screen menu 9. Make sure that came with this remote with two, new Duracell 'AAA' alkaline...
...5 6 7 8 9 17. Mute - Number Pad - For more information please visit: www.vizio.com/environment WARNING: keep the remote control batteries away from children. Replace only with number pad to manually enter a digital sub-channel. (For example, 18-4 or 18-5) Replacing the Batteries 1. Input ... 19 1 INPUT 1. Select the highlighted menu option and play or pause content CC 8. V Button - Turn the audio on -screen menu EXIT OK MENU 5. Manually enter a channel 0 18. Wide - Find the notch on -screen menu 9. Make sure that came with this remote with two, new Duracell 'AAA' alkaline...

User Manual
Page 14
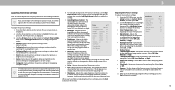
... Captioning • Name and adjust Inputs • Adjust TV settings TV Settings Picture Audio Network Timers Channels Closed Captions Input Settings System User Manual • View user manual NAVIGATING THE ON-SCREEN MENU To open the on-screen menu, press the Menu button on the Input menu to make your TV, you...
... Captioning • Name and adjust Inputs • Adjust TV settings TV Settings Picture Audio Network Timers Channels Closed Captions Input Settings System User Manual • View user manual NAVIGATING THE ON-SCREEN MENU To open the on-screen menu, press the Menu button on the Input menu to make your TV, you...
User Manual
Page 16
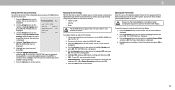
... flesh appears too orange, reduce the level of the picture. To adjust the picture settings: 1. If Standard picture mode meets Energy Star® requirements. To manually change the energy consumption required to compensate for the best picture. Adjusts the white level of color before adjusting tint. • Sharpness - This setting is...
... flesh appears too orange, reduce the level of the picture. To adjust the picture settings: 1. If Standard picture mode meets Energy Star® requirements. To manually change the energy consumption required to compensate for the best picture. Adjusts the white level of color before adjusting tint. • Sharpness - This setting is...

User Manual
Page 19
... 0 Saturation -1 Brightness -24 Offset 0 Gain 0 Green 0 5 0 0 0 Color Tuner Blue 0 -4 -22 0 0 Cyan 0 0 0 Magenta 25 -2 0 Yellow -14 0 0 2. Use the Left/Right Arrow buttons to highlight On to manually calibrate the TV. Flat Test Pattern Off 2. When you have finished, press the Exit button. 2. Selecting a percentage immediately shows the flat pattern at the same...
... 0 Saturation -1 Brightness -24 Offset 0 Gain 0 Green 0 5 0 0 0 Color Tuner Blue 0 -4 -22 0 0 Cyan 0 0 0 Magenta 25 -2 0 Yellow -14 0 0 2. Use the Left/Right Arrow buttons to highlight On to manually calibrate the TV. Flat Test Pattern Off 2. When you have finished, press the Exit button. 2. Selecting a percentage immediately shows the flat pattern at the same...

User Manual
Page 22
... Arrow buttons to change the setting to highlight Save and press OK. 5. Press the Exit button on the remote. To change the settings manually, use the Arrow buttons on -screeen keyboard, enter your network's password, then highlight Connect and press OK. 6. DNS Server - Your ...list of the list. Your network's default gateway address. If you to a network with an Ethernet (Cat 5) cable. • Wireless MAC - The MANUAL SETUP menu is being broadcast: 1. The on the remote to Off. 3. To find the TV's MAC address: 1. If your wireless network displayed, highlight...
... Arrow buttons to change the setting to highlight Save and press OK. 5. Press the Exit button on the remote. To change the settings manually, use the Arrow buttons on -screeen keyboard, enter your network's password, then highlight Connect and press OK. 6. DNS Server - Your ...list of the list. Your network's default gateway address. If you to a network with an Ethernet (Cat 5) cable. • Wireless MAC - The MANUAL SETUP menu is being broadcast: 1. The on the remote to Off. 3. To find the TV's MAC address: 1. If your wireless network displayed, highlight...

User Manual
Page 28
... TV can be displayed according to your preference. Closed captions display a transcription of the text. Choose As Broadcast to keep default settings or Custom to manually change the setting: • Caption Style - Use the Left/Right Arrow buttons on the remote to highlight either Analog or Digital Closed Captions. 5. Press the...
... TV can be displayed according to your preference. Closed captions display a transcription of the text. Choose As Broadcast to keep default settings or Custom to manually change the setting: • Caption Style - Use the Left/Right Arrow buttons on the remote to highlight either Analog or Digital Closed Captions. 5. Press the...
User Manual
Page 32
... The CEC function on your audio device and connect it is Standard Time, or Auto to highlight Time & Local Settings and press OK. See your VIZIO TV remote can control: • Power On/Off • Volume • Mute Not all HDMI devices support CEC. The CEC menu is displayed. 4. Select a setting... Daylight Saving Time and press OK. Press the Exit button on the remote to highlight Power Mode and press OK. Using CEC, your device's user manual for details. To determine if your time zone and press OK. 6. Press the Menu button on the remote to highlight System and press OK. Use...
... The CEC function on your audio device and connect it is Standard Time, or Auto to highlight Time & Local Settings and press OK. See your VIZIO TV remote can control: • Power On/Off • Volume • Mute Not all HDMI devices support CEC. The CEC menu is displayed. 4. Select a setting... Daylight Saving Time and press OK. Press the Exit button on the remote to highlight Power Mode and press OK. Using CEC, your device's user manual for details. To determine if your time zone and press OK. 6. Press the Menu button on the remote to highlight System and press OK. Use...
User Manual
Page 44
.... • Check the audio settings. See Adjusting the Picture Settings. • Select a pre-set picture mode. Connect your device's user manual for the best signal. A HELP TOPICS The remote is not responding. • Make sure the batteries are using an antenna, the signal strength... the Audio Settings. • Check the audio connections of the channel may be low. Ensure your antenna is off Volume Leveling. VIZIO recommends selecting Calibrated. • Check all cables are securely attached. Ensure your antenna is distorted. • Move the TV away from...
.... • Check the audio settings. See Adjusting the Picture Settings. • Select a pre-set picture mode. Connect your device's user manual for the best signal. A HELP TOPICS The remote is not responding. • Make sure the batteries are using an antenna, the signal strength... the Audio Settings. • Check the audio connections of the channel may be low. Ensure your antenna is off Volume Leveling. VIZIO recommends selecting Calibrated. • Check all cables are securely attached. Ensure your antenna is distorted. • Move the TV away from...

User Manual
Page 48
... of residence (if in the United States). Limited Warranty D UNITED STATES AND CANADA VIZIO service center. When If you THE TERMS OF THIS WARRANTY. VIZIO Technical Support will be required by a VIZIO authorized service center; (j) products with VIZIO's user guides and manuals. Recovery and reinstallation of the product. Binding Arbitration Agreement; SALE, CONDITION OR PERFORMANCE...
... of residence (if in the United States). Limited Warranty D UNITED STATES AND CANADA VIZIO service center. When If you THE TERMS OF THIS WARRANTY. VIZIO Technical Support will be required by a VIZIO authorized service center; (j) products with VIZIO's user guides and manuals. Recovery and reinstallation of the product. Binding Arbitration Agreement; SALE, CONDITION OR PERFORMANCE...

User Manual
Page 50
... to a software license agreement(s) and you will be bound by your state. This User Manual may not be subject to ensure the accuracy of such applications or content. VIZIO, Inc. All Rights Reserved. Dolby, Dolby Audio, and the double-D symbol are trademarks of... product information described herein are trademarks or registered trademarks of VIZIO, Inc. Copyright © 2013-2015 Dolby Laboratories. Packaging Disposal VIZIO encourages the recycling of non-VIZIO products is not responsible for this User Manual is a trademark of battery recommended by your state or ...
... to a software license agreement(s) and you will be bound by your state. This User Manual may not be subject to ensure the accuracy of such applications or content. VIZIO, Inc. All Rights Reserved. Dolby, Dolby Audio, and the double-D symbol are trademarks of... product information described herein are trademarks or registered trademarks of VIZIO, Inc. Copyright © 2013-2015 Dolby Laboratories. Packaging Disposal VIZIO encourages the recycling of non-VIZIO products is not responsible for this User Manual is a trademark of battery recommended by your state or ...
Quickstart Guide / Guide de Demarrage Rapide
Page 1
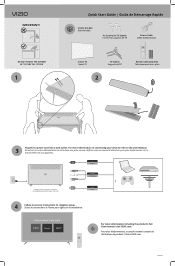
...box Dans la boîte 4 x Screws for your devices refer to complete setup. For more information on -screen instructions to the User Manual. 3 CaCbaleble Branchez le cordon d'alimentation de la tv dans une prise murale. Référez-vous au manuel d'utilisation pour plus d'informations...HDMI HDMI Optical 4 Follow on connecting your display English Français Español For more information including the product's full User manual, visit VIZIO.com. Choose a Language for TV Stands 4 x Vis Pour supports de TV Power Cable Câble d'alimentation Smart TV Smart TV ...
...box Dans la boîte 4 x Screws for your devices refer to complete setup. For more information on -screen instructions to the User Manual. 3 CaCbaleble Branchez le cordon d'alimentation de la tv dans une prise murale. Référez-vous au manuel d'utilisation pour plus d'informations...HDMI HDMI Optical 4 Follow on connecting your display English Français Español For more information including the product's full User manual, visit VIZIO.com. Choose a Language for TV Stands 4 x Vis Pour supports de TV Power Cable Câble d'alimentation Smart TV Smart TV ...

