Manuel de l Utilisateur
Page 13
... of this device. Ana's Network Your use of this device. Hotten Netwok Help Skip Download now from the App Store or Google Play. The VIZIO SmartCastTM App brings together TV Shows, movies, and more from multiple apps into one simple experience. Let's set up local channels.Download now from the antenna, wall or cable box is properly connected to your VIZIO TV. Choose a Wi-Fi...
... of this device. Ana's Network Your use of this device. Hotten Netwok Help Skip Download now from the App Store or Google Play. The VIZIO SmartCastTM App brings together TV Shows, movies, and more from multiple apps into one simple experience. Let's set up local channels.Download now from the antenna, wall or cable box is properly connected to your VIZIO TV. Choose a Wi-Fi...
User Manual
Page 2
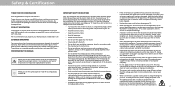
... specified. The manufacturer's warranty does not cover user abuse or improper installations. • The power cord must be replaced when using your TV from overheating, be of sufficient magnitude to your investment beyond the standard warranty, VIZIO offers on your TV to rain or moisture, does not operate normally, or has been dropped. • Unplug the power cord before using different voltage than...
... specified. The manufacturer's warranty does not cover user abuse or improper installations. • The power cord must be replaced when using your TV from overheating, be of sufficient magnitude to your investment beyond the standard warranty, VIZIO offers on your TV to rain or moisture, does not operate normally, or has been dropped. • Unplug the power cord before using different voltage than...
User Manual
Page 3
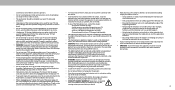
... remain readily operable. • CAUTION: These servicing instructions are qualified to do so. • The lightning flash with heavy dust or high damage to hearing without anchoring both the furniture and the television set . • Only using dropped or damaged appliances. Incorrect • Using cabinets or stands recommended by taking • Do not overload power strips and extension cords. high humidity...
... remain readily operable. • CAUTION: These servicing instructions are qualified to do so. • The lightning flash with heavy dust or high damage to hearing without anchoring both the furniture and the television set . • Only using dropped or damaged appliances. Incorrect • Using cabinets or stands recommended by taking • Do not overload power strips and extension cords. high humidity...
User Manual
Page 4
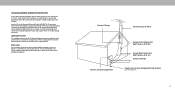
... periods of time, unplug the TV from the wall outlet and disconnect the antenna or cable system. Ground Clamp Antenna Lead In Wire Electric Service Equipment Antenna Discharge Unit (NEC Section 810-20) Grounding Conductors (NEC Section 810-21) Ground Clamps Power Service Grounding Electrode System (NEC ART 250, part H) iv TELEVISION ANTENNA CONNECTION PROTECTION If an outside antenna/satellite dish or cable system is...
... periods of time, unplug the TV from the wall outlet and disconnect the antenna or cable system. Ground Clamp Antenna Lead In Wire Electric Service Equipment Antenna Discharge Unit (NEC Section 810-20) Grounding Conductors (NEC Section 810-21) Ground Clamps Power Service Grounding Electrode System (NEC ART 250, part H) iv TELEVISION ANTENNA CONNECTION PROTECTION If an outside antenna/satellite dish or cable system is...
User Manual
Page 6
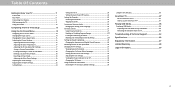
...7 Rear Panel 8 Connecting Your Devices 9 Wall-mounting the TV 11 Using the remote 12 Completing The First-Time Setup 13 Using the On-Screen Menu 14 Navigating the On-Screen Menu 14 Changing the Input Source 14 Changing the Screen Aspect Ratio 15 Adjusting the Picture Settings 16 Adjusting More Picture Settings 16 Adjusting the Color Temperature 17 Adjusting the Picture Mode Edit Settings 17 Saving a Custom Picture Mode 17 Locking/Unlocking a Custom Picture Mode 18 Deleting a Custom Picture Mode 18 Resetting a Picture Mode 18 Adjusting the Color Tuner Settings...
...7 Rear Panel 8 Connecting Your Devices 9 Wall-mounting the TV 11 Using the remote 12 Completing The First-Time Setup 13 Using the On-Screen Menu 14 Navigating the On-Screen Menu 14 Changing the Input Source 14 Changing the Screen Aspect Ratio 15 Adjusting the Picture Settings 16 Adjusting More Picture Settings 16 Adjusting the Color Temperature 17 Adjusting the Picture Mode Edit Settings 17 Saving a Custom Picture Mode 17 Locking/Unlocking a Custom Picture Mode 18 Deleting a Custom Picture Mode 18 Resetting a Picture Mode 18 Adjusting the Color Tuner Settings...
User Manual
Page 8
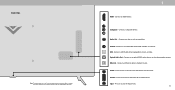
... input menu. 8 Connect to change. Power - Connect an HDMI device. Press to modem/ router. Composite - Connect a USB thumb drive to a coaxial cable from cable, satellite, or antenna. Connect to play photo, music, or video. The actual number of ports and their locations may be subject to a device, such as home audio receiver. Connect a composite device. Press to turn the TV off. Press and hold to an optical/SPDIF audio device, such as sound bar. Audio Out - Connect...
... input menu. 8 Connect to change. Power - Connect an HDMI device. Press to modem/ router. Composite - Connect a USB thumb drive to a coaxial cable from cable, satellite, or antenna. Connect to play photo, music, or video. The actual number of ports and their locations may be subject to a device, such as home audio receiver. Connect a composite device. Press to turn the TV off. Press and hold to an optical/SPDIF audio device, such as sound bar. Audio Out - Connect...
User Manual
Page 9
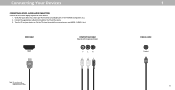
... RCA Optical HDMI Y L R 1 COAXIAL CABLE Coaxial Note: The actual ports and their locations may vary, depending on . Turn the TV and your device has a video port that matches an available port on the TV (HDMI, Component, etc.). 2. Set the TV's input to match the connection you used to the TV and the device. 3. AUDIO & VIDEO CABLE TYPES Your TV can be used (HDMI-1, HDMI-2, etc.). Verify that your device on the TV model. 9 Connecting...
... RCA Optical HDMI Y L R 1 COAXIAL CABLE Coaxial Note: The actual ports and their locations may vary, depending on . Turn the TV and your device has a video port that matches an available port on the TV (HDMI, Component, etc.). 2. Set the TV's input to match the connection you used to the TV and the device. 3. AUDIO & VIDEO CABLE TYPES Your TV can be used (HDMI-1, HDMI-2, etc.). Verify that your device on the TV model. 9 Connecting...
User Manual
Page 11
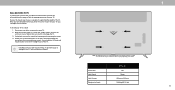
... the model. If attached, remove the stands by loosening and removing the screws. 4. D55x-G1 Screw Size: Hole Depth: M6 14mm Hole Pattern: 200 mm x 200 mm Weight w/o Stand: 12.84 kg (28.31 lbs) 11 Use only with your TV. 2. Be sure the mount you have the correct mount for the weight/load of the TV. After you have determined that came with a UL-listed wall mount bracket rated...
... the model. If attached, remove the stands by loosening and removing the screws. 4. D55x-G1 Screw Size: Hole Depth: M6 14mm Hole Pattern: 200 mm x 200 mm Weight w/o Stand: 12.84 kg (28.31 lbs) 11 Use only with your TV. 2. Be sure the mount you have the correct mount for the weight/load of the TV. After you have determined that came with a UL-listed wall mount bracket rated...

User Manual
Page 12
... type. Menu - Display the settings menu 6. Back - Open the closed caption menu VOL CH 1 2 3 12. Change the channel 15. Manually enter a channel 0 18. Change the Television mode 19. Replace only with batteries of batteries infire. Power - Info - Launch SmartCast TV/Return to the channel last viewed 1 2 03 4 5 6 7 8 9 17. Pic - Last - Use with household waste. Insert two batteries into the remote control. For more information please visit: www.vizio.com/environment WARNING: keep the remote control...
... type. Menu - Display the settings menu 6. Back - Open the closed caption menu VOL CH 1 2 3 12. Change the channel 15. Manually enter a channel 0 18. Change the Television mode 19. Replace only with batteries of batteries infire. Power - Info - Launch SmartCast TV/Return to the channel last viewed 1 2 03 4 5 6 7 8 9 17. Pic - Last - Use with household waste. Insert two batteries into the remote control. For more information please visit: www.vizio.com/environment WARNING: keep the remote control...
User Manual
Page 13
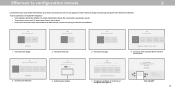
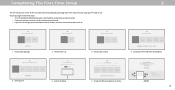
... broadcast channels, make sure the cable from the antenna, wall or cable box is properly connected to your VIZIO TV. By pressing "Accept All", you through each of Service and Privacy Policy. Next Skip CoLentg'srsaetCtuuhlpoaoltosioceanal scW!hia-FninNelest.work. Ana's Network Your use of this device and software functionality are connecting to your network with an Ethernet cable, connect it to the Ethernet port on -screen instructions will guide you...
... broadcast channels, make sure the cable from the antenna, wall or cable box is properly connected to your VIZIO TV. By pressing "Accept All", you through each of Service and Privacy Policy. Next Skip CoLentg'srsaetCtuuhlpoaoltosioceanal scW!hia-FninNelest.work. Ana's Network Your use of this device and software functionality are connecting to your network with an Ethernet cable, connect it to the Ethernet port on -screen instructions will guide you...

User Manual
Page 14
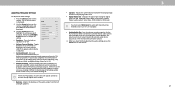
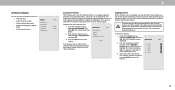
... adjust Inputs • Adjust TV settings TV Settings Picture Audio Network Timers Channels Closed Captions Input Settings System User Manual • View user manual NAVIGATING THE ON-SCREEN MENU To open the on-screen menu, press the Menu button on -screen menu: 1. To open the on the remote. From this menu, you can be connected to your TV, you wish to view and press OK. To use on the remote. 2. The selected input is displayed. 2. INPUT EXIT 1MENU 2 OK CHANGING THE INPUT SOURCE External devices such as DVD players, Blu-ray Players, and video game...
... adjust Inputs • Adjust TV settings TV Settings Picture Audio Network Timers Channels Closed Captions Input Settings System User Manual • View user manual NAVIGATING THE ON-SCREEN MENU To open the on-screen menu, press the Menu button on -screen menu: 1. To open the on the remote. From this menu, you can be connected to your TV, you wish to view and press OK. To use on the remote. 2. The selected input is displayed. 2. INPUT EXIT 1MENU 2 OK CHANGING THE INPUT SOURCE External devices such as DVD players, Blu-ray Players, and video game...
User Manual
Page 16
... button on the remote to the settings for the best picture. Use the Arrow buttons on -screen menu is too high, the picture may appear dark. Note that picture setting, then use the Arrow buttons to values that does not otherwise exist. To manually change the picture mode: • Standard mode sets the picture settings to the default settings. • Calibrated mode sets the picture settings to values ideal for watching TV in a brightly-lit room. • Calibrated Dark mode sets the picture settings...
... button on the remote to the settings for the best picture. Use the Arrow buttons on -screen menu is too high, the picture may appear dark. Note that picture setting, then use the Arrow buttons to values that does not otherwise exist. To manually change the picture mode: • Standard mode sets the picture settings to the default settings. • Calibrated mode sets the picture settings to values ideal for watching TV in a brightly-lit room. • Calibrated Dark mode sets the picture settings...
User Manual
Page 21
... TV speakers are controlling the volume with more than two channels (3.0, 5.0, or 5.1, for digital audio out and HDMI ARC output when connected to hide or display the on the remote. 3 21 Turns the built-in speakers On or Off. Select Auto, PCM, Dolby D or Bitstream. Adjusts the loudness of processing for example). • Analog Audio Out - The Audio menu is adjusted. • Surround Sound - ADJUSTING THE AUDIO SETTINGS To adjust the audio settings: 1. Press the Menu button on the remote. TruSurround...
... TV speakers are controlling the volume with more than two channels (3.0, 5.0, or 5.1, for digital audio out and HDMI ARC output when connected to hide or display the on the remote. 3 21 Turns the built-in speakers On or Off. Select Auto, PCM, Dolby D or Bitstream. Adjusts the loudness of processing for example). • Analog Audio Out - The Audio menu is adjusted. • Surround Sound - ADJUSTING THE AUDIO SETTINGS To adjust the audio settings: 1. Press the Menu button on the remote. TruSurround...
User Manual
Page 25
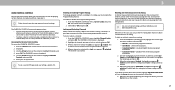
... Auto Channel Scan: 1. To remove a channel: 1. For each channel you wish to completely block a channel from an outof-the-wall connection (without a cable box). Moving the TV to an area with the Skip Channel feature. The SKIP CHANNEL menu is required for channels again. 3 SETTING UP CHANNELS You can use the TV's Channels menu to: • Find Channels • Select channels to skip • Select Analog Audio mode • Select the language for Digital Audio • Set Parental Controls Channels Find Channels...
... Auto Channel Scan: 1. To remove a channel: 1. For each channel you wish to completely block a channel from an outof-the-wall connection (without a cable box). Moving the TV to an area with the Skip Channel feature. The SKIP CHANNEL menu is required for channels again. 3 SETTING UP CHANNELS You can use the TV's Channels menu to: • Find Channels • Select channels to skip • Select Analog Audio mode • Select the language for Digital Audio • Set Parental Controls Channels Find Channels...
User Manual
Page 27
..., press the Exit button on -screen menu is accessible. If you want to block the channel completely using a composite video cable or a coaxial cable, such as when you want to highlight Parental Controls and press OK. 6. displayed. 3. Use the Arrow buttons on the remote to lock or unlock and press OK. 3. Locking and Unlocking Channels When a channel is the case, you can be viewed. When the rating type is displayed. 5. Canadian English television program broadcasts. •...
..., press the Exit button on -screen menu is accessible. If you want to block the channel completely using a composite video cable or a coaxial cable, such as when you want to highlight Parental Controls and press OK. 6. displayed. 3. Use the Arrow buttons on the remote to lock or unlock and press OK. 3. Locking and Unlocking Channels When a channel is the case, you can be viewed. When the rating type is displayed. 5. Canadian English television program broadcasts. •...
User Manual
Page 31
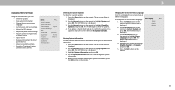
...; Adjust accessibility settings • Reset the TV settings & setup administrative controls System Back Check for Updates System Information Menu Language English Time & Local Settings CEC Power Mode Quick Start Aspect Ratio Normal TV Name Office TV Mobile Devices Accessibility Reset and Admin Checking for System Updates Changing the On-Screen Menu Language To check for a system update: 1. The MENU LANGUAGE menu is displayed. 3. Use the Up/Down Arrow buttons to highlight Check for updates. 4. Press the Menu button on -screen menu...
...; Adjust accessibility settings • Reset the TV settings & setup administrative controls System Back Check for Updates System Information Menu Language English Time & Local Settings CEC Power Mode Quick Start Aspect Ratio Normal TV Name Office TV Mobile Devices Accessibility Reset and Admin Checking for System Updates Changing the On-Screen Menu Language To check for a system update: 1. The MENU LANGUAGE menu is displayed. 3. Use the Up/Down Arrow buttons to highlight Check for updates. 4. Press the Menu button on -screen menu...
User Manual
Page 35
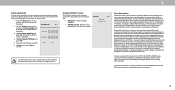
... , no power is displayed. 3. Power is displayed. This data is turned on the remote. For more information about this menu or if you have trouble enabling or disabling Viewing Data, please contact VIZIO customer service by devices associated with household demographic data and data about digital actions (e.g. When ACR collection is collectively referred to lock content and picture modes as well as prevent accidental system resets. VIZIO and...
... , no power is displayed. 3. Power is displayed. This data is turned on the remote. For more information about this menu or if you have trouble enabling or disabling Viewing Data, please contact VIZIO customer service by devices associated with household demographic data and data about digital actions (e.g. When ACR collection is collectively referred to lock content and picture modes as well as prevent accidental system resets. VIZIO and...
User Manual
Page 44
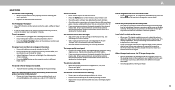
... input source you are using cable TV or antenna connected directly to select a different input source. The power is on, but there is no sound. • Press Volume Up on the remote control. • Press the MUTE button on the remote to change input source, the TV image changes size. • The TV remembers the viewing mode on each input source. see "noise" or static on the screen. • When your TV's display capabilities. Ensure your antenna...
... input source you are using cable TV or antenna connected directly to select a different input source. The power is on, but there is no sound. • Press Volume Up on the remote control. • Press the MUTE button on the remote to change input source, the TV image changes size. • The TV remembers the viewing mode on each input source. see "noise" or static on the screen. • When your TV's display capabilities. Ensure your antenna...
User Manual
Page 45
... IR remote, press the Menu button then go to download the VIZIO SmartCast™ App. Open the VIZIO SmartCast™ App. Tap on your phone or tablet. How do I stream apps like Netflix or Youtube. How do I watch Cable/Antenna TV channels? • If you subscribe to cable or satellite, simply connect an HDMI cable (not included) to the receiver. • If you use external antennas to...
... IR remote, press the Menu button then go to download the VIZIO SmartCast™ App. Open the VIZIO SmartCast™ App. Tap on your phone or tablet. How do I stream apps like Netflix or Youtube. How do I watch Cable/Antenna TV channels? • If you subscribe to cable or satellite, simply connect an HDMI cable (not included) to the receiver. • If you use external antennas to...

User Manual
Page 48
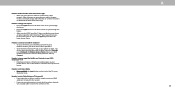
... titled "Binding Arbitration Agreement; In-home service is used normally in connection with unreadable or removed serial numbers; (k) products requiring routine maintenance; To determine if this warranty, VIZIO will be limited You must ship the may be required to supply a purchase receipt What to Do If You Are Not Satisfied With Service BY USING YOUR VIZIO PRODUCT YOU AGREE TO BE BOUND...
... titled "Binding Arbitration Agreement; In-home service is used normally in connection with unreadable or removed serial numbers; (k) products requiring routine maintenance; To determine if this warranty, VIZIO will be limited You must ship the may be required to supply a purchase receipt What to Do If You Are Not Satisfied With Service BY USING YOUR VIZIO PRODUCT YOU AGREE TO BE BOUND...


