User Manual English
Page 12
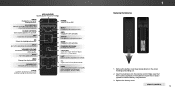
... streaming video playback. BACK Go to manually enter a digital sub-channel. (For example, 18-4 or 18-5.) 1 Replacing the Batteries 1. NUMBER PAD Manually enter a channel. V BUTTON Open the VIZIO Internet Apps Plus® (V.I.A. Replace the battery cover. Make sure that the (+) and (-) symbols on . Insert two batteries into the remote control. LAST Return...
... streaming video playback. BACK Go to manually enter a digital sub-channel. (For example, 18-4 or 18-5.) 1 Replacing the Batteries 1. NUMBER PAD Manually enter a channel. V BUTTON Open the VIZIO Internet Apps Plus® (V.I.A. Replace the battery cover. Make sure that the (+) and (-) symbols on . Insert two batteries into the remote control. LAST Return...

User Manual English
Page 19
...pour la Démo en Magasin. Select Store Demo for use . Store Demo Home Use Use the Arrow buttons on the remote to highlight Home Use and press OK. 3 3 Use the Arrow buttons on the remote to highlight your country, and then press OK. 19 The TV powers on the TV. Select.... • If you have a wireless network, have the network password ready. • If you through each of preference and press OK. 4 Use the Arrow buttons on the remote. Seleccione "Home Use" para Modo de Casa o "Store Demo" para Demostración en la Tienda. Completing The First-Time Setup The first...
...pour la Démo en Magasin. Select Store Demo for use . Store Demo Home Use Use the Arrow buttons on the remote to highlight Home Use and press OK. 3 3 Use the Arrow buttons on the remote to highlight your country, and then press OK. 19 The TV powers on the TV. Select.... • If you have a wireless network, have the network password ready. • If you through each of preference and press OK. 4 Use the Arrow buttons on the remote. Seleccione "Home Use" para Modo de Casa o "Store Demo" para Demostración en la Tienda. Completing The First-Time Setup The first...

User Manual English
Page 20
Highlight Next and press OK. 20 Enter your wireless network from the list of available networks and press OK. When you are finished, highlight I Accept and press OK. 8 Enter the network password using the on-screen keyboard. 5 Select your time zone and press OK. 3 6 7 Select the name of your E-mail Address, First Name, Last Name, and Zip Code using the on-screen keyboard, then highlight Connect and press OK. Use the Arrow and OK buttons on the remote to review the Terms Of Service and Privacy Policy.
Highlight Next and press OK. 20 Enter your wireless network from the list of available networks and press OK. When you are finished, highlight I Accept and press OK. 8 Enter the network password using the on-screen keyboard. 5 Select your time zone and press OK. 3 6 7 Select the name of your E-mail Address, First Name, Last Name, and Zip Code using the on-screen keyboard, then highlight Connect and press OK. Use the Arrow and OK buttons on the remote to review the Terms Of Service and Privacy Policy.

User Manual English
Page 21
... . The First-Time Setup is connected to scan for channels, which takes several minutes. Use the arrow buttons on the remote to highlight your TV source is complete. 3 21 Otherwise, use the Arrow and OK buttons on the remote to a cable from the wall. When you connect the TV directly to select... the input your TV source and press OK. 9 10 Use the Arrow buttons on the remote to highlight Begin Scan and press OK. If...
... . The First-Time Setup is connected to scan for channels, which takes several minutes. Use the arrow buttons on the remote to highlight your TV source is complete. 3 21 Otherwise, use the Arrow and OK buttons on the remote to a cable from the wall. When you connect the TV directly to select... the input your TV source and press OK. 9 10 Use the Arrow buttons on the remote to highlight Begin Scan and press OK. If...

User Manual English
Page 22
...the Input menu to make your TV. Use the Up/Down Arrow buttons or the INPUT button on the remote to view and press OK. HDMI-3 available only on model D50-D1 You can also open the on-screen menu, press the MENU button on the remote. You can change the input source: 1. The... settings • Set up Closed Captioning • Name Inputs • Adjust TV settings • Access the Guided Setup • View the User Manual VIZIO TV SETTINGS Picture Audio Timers Network Channels CC Closed Captions Devices System Guided Setup User Manual NAVIGATING THE ON-SCREEN MENU To open the on...
...the Input menu to make your TV. Use the Up/Down Arrow buttons or the INPUT button on the remote to view and press OK. HDMI-3 available only on model D50-D1 You can also open the on-screen menu, press the MENU button on the remote. You can change the input source: 1. The... settings • Set up Closed Captioning • Name Inputs • Adjust TV settings • Access the Guided Setup • View the User Manual VIZIO TV SETTINGS Picture Audio Timers Network Channels CC Closed Captions Devices System Guided Setup User Manual NAVIGATING THE ON-SCREEN MENU To open the on...

User Manual English
Page 23
Examples include wide-screen movies and older television programs. To change the screen aspect ratio: 1. Press the WIDE button on the top or sides of the picture so that the picture keeps its original shape. Figures appear tall and thin. • Standard Definition - With .... If the program is already formatted for widescreen viewing (1.85:1 or 2.35:1), then black bars will fill a 1080p screen. • Standard Definition - Use the Arrow buttons to highlight the aspect ratio you wish to the left and right edges of the image is being stretched, the display image may vary by...
Examples include wide-screen movies and older television programs. To change the screen aspect ratio: 1. Press the WIDE button on the top or sides of the picture so that the picture keeps its original shape. Figures appear tall and thin. • Standard Definition - With .... If the program is already formatted for widescreen viewing (1.85:1 or 2.35:1), then black bars will fill a 1080p screen. • Standard Definition - Use the Arrow buttons to highlight the aspect ratio you wish to the left and right edges of the image is being stretched, the display image may vary by...

User Manual English
Page 24
... opens, it covers the left-hand portion of the menu • Overlay - VIZIO Network Settings PICTURE Help Picture Mode Standard Auto Brightness Control Backlight - Tint - Press the Up Arrow button on the remote to the menu, so that the right and left -hand portion... normal postion and theABC menu covers the left edges are cut off. Use the Arrow buttons on the remote to cycle through the three display methods. 3. The picture is full-sized) Input Wide CC VIZIO PICTURE Picture Mode Standard Auto Brightness Control Backlight - ZoomSharpness Norm- P i c t...
... opens, it covers the left-hand portion of the menu • Overlay - VIZIO Network Settings PICTURE Help Picture Mode Standard Auto Brightness Control Backlight - Tint - Press the Up Arrow button on the remote to the menu, so that the right and left -hand portion... normal postion and theABC menu covers the left edges are cut off. Use the Arrow buttons on the remote to cycle through the three display methods. 3. The picture is full-sized) Input Wide CC VIZIO PICTURE Picture Mode Standard Auto Brightness Control Backlight - ZoomSharpness Norm- P i c t...

User Manual English
Page 25
... Adjusts the edge sharpness of the picture. It can be difficult to distinguish in a dark room. The on the remote. 25 VIZIO PICTURE Picture Mode Auto Brightness Control Backlight - Adjusts the LED brightness to affect the overall brilliance of color before adjusting tint. •... + 50 + 59 +0 +9 • Vivid mode sets the picture settings to values that picture setting, then use the Left/Right Arrow buttons to adjust the WsideettingZo:om Normal Panoramic • Auto Brightness Control - The auto brightness control detects the light levels in the picture. Input...
... Adjusts the edge sharpness of the picture. It can be difficult to distinguish in a dark room. The on the remote. 25 VIZIO PICTURE Picture Mode Auto Brightness Control Backlight - Adjusts the LED brightness to affect the overall brilliance of color before adjusting tint. •... + 50 + 59 +0 +9 • Vivid mode sets the picture settings to values that picture setting, then use the Left/Right Arrow buttons to adjust the WsideettingZo:om Normal Panoramic • Auto Brightness Control - The auto brightness control detects the light levels in the picture. Input...

User Manual English
Page 26
...Cool Normal Computer 2. Wide Zoom Exit 2D Input Wid Sleep Timer Pict Network Setti 26 From the PICTURE menu, use the Arrow buttons to change the setting: • Color Temperature See Adjusting the Color Temperature on the remote. Adjusts the average brightness of the ... the displayed picture. Reduces pixelation and distortion for watching film. Select Off, Low, Medium, or High. • Game Low Latency - VIZIO MORE PICTURE Color Temperature Black Detail Active LED Zones Clear Action Reduce Noise Game Low Latency Picture Size & Position Film Mode Gamma Cool Medium ...
...Cool Normal Computer 2. Wide Zoom Exit 2D Input Wid Sleep Timer Pict Network Setti 26 From the PICTURE menu, use the Arrow buttons to change the setting: • Color Temperature See Adjusting the Color Temperature on the remote. Adjusts the average brightness of the ... the displayed picture. Reduces pixelation and distortion for watching film. Select Off, Low, Medium, or High. • Game Low Latency - VIZIO MORE PICTURE Color Temperature Black Detail Active LED Zones Clear Action Reduce Noise Game Low Latency Picture Size & Position Film Mode Gamma Cool Medium ...

User Manual English
Page 27
... exit the menu screens. Vivid* Save Picture Mode Lock Picture Mode Reset Picture Mode - WFridoem tZhoeomPICTNUorRmEal MPOanDorEamEicDIT menu, use the Arrow buttons to highlight Picture Mode Edit, and then press OK. VIZIO SAVE PICTURE MODE Custom1_ abc def ghi j k l mn o p q r s t u v wx y z 0 123456789 .@#...Calibrated picture mode. (Available after a custom picture mode is displayed. To lock all custom picture modes. Press the EXIT button to their settings. Vivid* VIZIO PICTURE MODE EDIT - Highlight Save and press OK. 4. The LOCK PICTURE MODE menu is locked) • Delete ...
... exit the menu screens. Vivid* Save Picture Mode Lock Picture Mode Reset Picture Mode - WFridoem tZhoeomPICTNUorRmEal MPOanDorEamEicDIT menu, use the Arrow buttons to highlight Picture Mode Edit, and then press OK. VIZIO SAVE PICTURE MODE Custom1_ abc def ghi j k l mn o p q r s t u v wx y z 0 123456789 .@#...Calibrated picture mode. (Available after a custom picture mode is displayed. To lock all custom picture modes. Press the EXIT button to their settings. Vivid* VIZIO PICTURE MODE EDIT - Highlight Save and press OK. 4. The LOCK PICTURE MODE menu is locked) • Delete ...

User Manual English
Page 28
... menu screens. 4 28 Delete Cancel 2. To reset a customized preset picture mode: 1. Reset Cancel 2. Use the Left/Right Arrow buttons to factory defaults. Select Reset to restore Standard picture mode to highlight Delete and press OK. 3. The DELETE PICTURE MODE window is displayed... PICTURE MODE window is displayed. From the PICTURE MODE EDIT menu, use the Arrow buttons to the factory default settings. To delete the user created Custom 1 picture mode, select the Delete button. To delete a custom picture mode: 1. Resetting a Picture Mode A preset picture ...
... menu screens. 4 28 Delete Cancel 2. To reset a customized preset picture mode: 1. Reset Cancel 2. Use the Left/Right Arrow buttons to factory defaults. Select Reset to restore Standard picture mode to highlight Delete and press OK. 3. The DELETE PICTURE MODE window is displayed... PICTURE MODE window is displayed. From the PICTURE MODE EDIT menu, use the Arrow buttons to the factory default settings. To delete the user created Custom 1 picture mode, select the Delete button. To delete a custom picture mode: 1. Resetting a Picture Mode A preset picture ...

User Manual English
Page 29
...-22 0 0 0 Offset 0 0 0 Gain 0 0 0 2. Calibration requires specialized training, an input with the color channels, press the EXIT button. When you are finished adjusting the color tuner settings, press the EXIT button. When you to adjust the HSB color and 11 point white balance, turn off for testing, and display color...or Gain of the color you wish to adjust. From the Color Tuner menu, use the Left/Right Arrow buttons to adjust the value. Use the Arrow buttons on the remote to highlight Red, Green, or Blue. 3. 4 Adjusting the Color Tuner Settings The Color...
...-22 0 0 0 Offset 0 0 0 Gain 0 0 0 2. Calibration requires specialized training, an input with the color channels, press the EXIT button. When you are finished adjusting the color tuner settings, press the EXIT button. When you to adjust the HSB color and 11 point white balance, turn off for testing, and display color...or Gain of the color you wish to adjust. From the Color Tuner menu, use the Left/Right Arrow buttons to adjust the value. Use the Arrow buttons on the remote to highlight Red, Green, or Blue. 3. 4 Adjusting the Color Tuner Settings The Color...

User Manual English
Page 30
... From the Color Tuner menu, use the Left/Right Arrow buttons to select the color for the flat test pattern. When you are finished, press the EXIT button. 2. When you are finished, press the EXIT button. 30 Use the Left/Right Arrow buttons to highlight Off. 3. 4 To show or hide the ...Flat Test Pattern: 1. From the Color Tuner menu, use the Left/Right Arrow buttons to select the percentage brightness for the ramp test pattern. Selecting a percentage immediately shows the flat pattern at that color ramp. -or- Selecting...
... From the Color Tuner menu, use the Left/Right Arrow buttons to select the color for the flat test pattern. When you are finished, press the EXIT button. 2. When you are finished, press the EXIT button. 30 Use the Left/Right Arrow buttons to highlight Off. 3. 4 To show or hide the ...Flat Test Pattern: 1. From the Color Tuner menu, use the Left/Right Arrow buttons to select the percentage brightness for the ramp test pattern. Selecting a percentage immediately shows the flat pattern at that color ramp. -or- Selecting...

User Manual English
Page 31
...displayed. 3. The AUDIO menu is displayed. 3. If this occurs, turn volume leveling off. • Balance - Use the Arrow buttons to maintain consistent volume levels during transitions between the display image and the accompanying audio track. • Digital Audio Out - Volume leveling... Use the Left and Right Arrow buttons to highlight Audio and press OK. The Audio Mode and equalizer settings screen appears. 4. 4 ADJUSTING THE AUDIO SETTINGS To adjust the audio settings: 1. Select PCM or Bitstream. VIZIO AUDIO TV Speakers Surround Sound Volume Leveling...
...displayed. 3. The AUDIO menu is displayed. 3. If this occurs, turn volume leveling off. • Balance - Use the Arrow buttons to maintain consistent volume levels during transitions between the display image and the accompanying audio track. • Digital Audio Out - Volume leveling... Use the Left and Right Arrow buttons to highlight Audio and press OK. The Audio Mode and equalizer settings screen appears. 4. 4 ADJUSTING THE AUDIO SETTINGS To adjust the audio settings: 1. Select PCM or Bitstream. VIZIO AUDIO TV Speakers Surround Sound Volume Leveling...

User Manual English
Page 32
Highlight Delete and press OK. 5. The AUDIO menu is displayed. 2. Use the Arrow buttons to highlight Audio and press OK. Press the EXIT button on -screen menu is displayed. 3. The TV displays, "To delete the user created custom audio mode, select the Delete button." 4. The on the remote. 4 32 Press the MENU button on the remote to highlight Delete Audio Mode and press OK. Use the Arrow buttons on the remote. Deleting the Custom Audio Mode To delete the custom audio mode that has been created: 1.
Highlight Delete and press OK. 5. The AUDIO menu is displayed. 2. Use the Arrow buttons to highlight Audio and press OK. Press the EXIT button on -screen menu is displayed. 3. The TV displays, "To delete the user created custom audio mode, select the Delete button." 4. The on the remote. 4 32 Press the MENU button on the remote to highlight Delete Audio Mode and press OK. Use the Arrow buttons on the remote. Deleting the Custom Audio Mode To delete the custom audio mode that has been created: 1.

User Manual English
Page 33
...to change the setting to exit the screen saver. 33 To Exit the Screen Saver Press any button other than the Volume and Mute buttons on the remote to exit the blank screen. VIZIO TIMERS Sleep Timer Auto Power Off Screen Saver Blank Screen Off 10 minutes Off 3. Press the... MENU button on -screen content or static content when audio is streaming, the backlight is no on the remote. WUidsee thZoeom Left/NRorimgahl t ...
...to change the setting to exit the screen saver. 33 To Exit the Screen Saver Press any button other than the Volume and Mute buttons on the remote to exit the blank screen. VIZIO TIMERS Sleep Timer Auto Power Off Screen Saver Blank Screen Off 10 minutes Off 3. Press the... MENU button on -screen content or static content when audio is streaming, the backlight is no on the remote. WUidsee thZoeom Left/NRorimgahl t ...

User Manual English
Page 34
... you have connected Exit the 2TDV to set up your wireless network displayed, highlight More Access Points and press OK. Press the EXIT button on the remote to Off. 3. The MANUAL SETUP MANUAL SETUP menu is displayed. 2. The IP address assigned to set up a ... is displayed. 2. Using the on -screen menu is displayed. 4. From the NETWORK menu, highlight Manual Setup and VIZIO press OK. Use the Arrow and OK buttons to highlight Save and press OK. Your network's dAeBfCault gateway address. •InputPrefW.idDeNS SCeCrver - Your preferred domain name...
... you have connected Exit the 2TDV to set up your wireless network displayed, highlight More Access Points and press OK. Press the EXIT button on the remote to Off. 3. The MANUAL SETUP MANUAL SETUP menu is displayed. 2. The IP address assigned to set up a ... is displayed. 2. Using the on -screen menu is displayed. 4. From the NETWORK menu, highlight Manual Setup and VIZIO press OK. Use the Arrow and OK buttons to highlight Save and press OK. Your network's dAeBfCault gateway address. •InputPrefW.idDeNS SCeCrver - Your preferred domain name...

User Manual English
Page 35
... the connection WmideethoZodo,mnetwNoormrkal naPamnoera, msiicgnal strength, and download speed of your access point name. VIZIO ENTER ACCESS POINT NAME Enter your network connection. 3. Press the EXIT button on -screen keyboard, enter your network's name (SSID), then highlight Connect and press OK...CC Sleep Timer Picture Audio Network Settings Help 4 35 From the NETWORK menu, highlight Test Connection and press OK. 2. Press the EXIT button on -screen keyboard, enter your network connection: 1. This is used to connect to a wireless network whose network name (SSID) is displayed...
... the connection WmideethoZodo,mnetwNoormrkal naPamnoera, msiicgnal strength, and download speed of your access point name. VIZIO ENTER ACCESS POINT NAME Enter your network connection. 3. Press the EXIT button on -screen keyboard, enter your network's name (SSID), then highlight Connect and press OK...CC Sleep Timer Picture Audio Network Settings Help 4 35 From the NETWORK menu, highlight Test Connection and press OK. 2. Press the EXIT button on -screen keyboard, enter your network connection: 1. This is used to connect to a wireless network whose network name (SSID) is displayed...

User Manual English
Page 36
...scan is displayed. 2. The auto channel scan begins. 2. NeWtwaoirtk uSnetttiilngths e cHhelapnnel scan is quicker than scanning all channels. Press the EXIT button on the remote. Highlight Done and press OK. 7. Scanning for free over-the-air channels (using an antenna) and cable channels from .... To add a range of channel you want to begin the scan. (Use the Left Arrow button to backspace. Press EXIT. CC To perform an Auto Channel Scan: VIZIO 1. Highlight Done and press OK. Cancel the channel scan. From the CHANNELS menu, highlight Partial Channel...
...scan is displayed. 2. The auto channel scan begins. 2. NeWtwaoirtk uSnetttiilngths e cHhelapnnel scan is quicker than scanning all channels. Press the EXIT button on the remote. Highlight Done and press OK. 7. Scanning for free over-the-air channels (using an antenna) and cable channels from .... To add a range of channel you want to begin the scan. (Use the Left Arrow button to backspace. Press EXIT. CC To perform an Auto Channel Scan: VIZIO 1. Highlight Done and press OK. Cancel the channel scan. From the CHANNELS menu, highlight Partial Channel...

User Manual English
Page 37
The TV scans for the channel, press the EXIT button on the remote. VIZIO ADD ANALOG CHANNEL Enter Channel Add Channel Skipping Channels After a channel scan is displayed. 2. You can still be some channels are adding. 3. Input...find that have selected all of the channel you do not want to watch comfortably. VIZIO SKIP CHANNEL 1 Test 0 1 Test 1 P 1-2 Test 2 P 2 Test 3 2-2 Test 4 P 2-3 Test 5 3. For each channel you wish to remove, press the EXIT button on the remote. Wide Zoom Normal Panoramic Exit 2D 3D ABC Input Wide CC Sleep...
The TV scans for the channel, press the EXIT button on the remote. VIZIO ADD ANALOG CHANNEL Enter Channel Add Channel Skipping Channels After a channel scan is displayed. 2. You can still be some channels are adding. 3. Input...find that have selected all of the channel you do not want to watch comfortably. VIZIO SKIP CHANNEL 1 Test 0 1 Test 1 P 1-2 Test 2 P 2 Test 3 2-2 Test 4 P 2-3 Test 5 3. For each channel you wish to remove, press the EXIT button on the remote. Wide Zoom Normal Panoramic Exit 2D 3D ABC Input Wide CC Sleep...


