User Manual English
Page 2
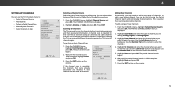
... 27 Restoring the TV to Play USB Media 45 Displaying USB Media 45 Removing the USB Drive from the TV 45 Troubleshooting & Technical Support 47 Remote Control Front 12 Replacing the Batteries 12 Connecting Your Devices 13 Connecting A Device 13 Connecting A Device - ARC 18 Scanning for Channels 32 Adding New Channels...
... 27 Restoring the TV to Play USB Media 45 Displaying USB Media 45 Removing the USB Drive from the TV 45 Troubleshooting & Technical Support 47 Remote Control Front 12 Replacing the Batteries 12 Connecting Your Devices 13 Connecting A Device 13 Connecting A Device - ARC 18 Scanning for Channels 32 Adding New Channels...
User Manual English
Page 4
...contact your TV qualified service personnel only. Ensure that contained in accordance with wet hands. Pulling on the apparatus. • Store the accessories (remote, batteries, etc.) in environments with liquids, such as vases, shall be used as sunshine, fire or the like. • If any ...years of voltage than the specified voltage may expose you are unplugged before • WARNING: Exposure to loud sounds can damage the remote control or injure the operator. The manufacturer's or odor becomes apparent, unplug the power cord and disconnect device, the disconnect device ...
...contact your TV qualified service personnel only. Ensure that contained in accordance with wet hands. Pulling on the apparatus. • Store the accessories (remote, batteries, etc.) in environments with liquids, such as vases, shall be used as sunshine, fire or the like. • If any ...years of voltage than the specified voltage may expose you are unplugged before • WARNING: Exposure to loud sounds can damage the remote control or injure the operator. The manufacturer's or odor becomes apparent, unplug the power cord and disconnect device, the disconnect device ...
User Manual English
Page 7
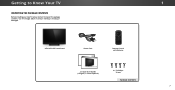
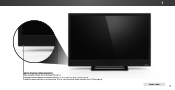
Getting to Know Your TV INSPECTING THE PACKAGE CONTENTS Before installing your new TV, take a moment to ensure nothing is missing or damaged. Use the images below to inspect the package contents. Remote Control with Stand Power Cord INPUT EXIT BACK OK VOL VOL 1 2 4 5 7 8 WIDE 0 MENU GUIDE CH CH 3 6 9 - VIZIO LED HDTV with Batteries 2 x Quick Start Guides (1 English, 1 French-Spanish) 4 x T4 Phillips Screws PACKAGE CONTENTS 1 7
Getting to Know Your TV INSPECTING THE PACKAGE CONTENTS Before installing your new TV, take a moment to ensure nothing is missing or damaged. Use the images below to inspect the package contents. Remote Control with Stand Power Cord INPUT EXIT BACK OK VOL VOL 1 2 4 5 7 8 WIDE 0 MENU GUIDE CH CH 3 6 9 - VIZIO LED HDTV with Batteries 2 x Quick Start Guides (1 English, 1 French-Spanish) 4 x T4 Phillips Screws PACKAGE CONTENTS 1 7
User Manual English
Page 10
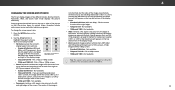
FRONT PANEL 10 To keep the power indicator on as long as the TV is on, see Turning the Power Indicator On or Off on , then goes out after several seconds. 1 REMOTE SENSOR & POWER INDICATOR When using the remote, aim it directly at this sensor. The power indicator flashes on when the TV turns on page 46.
FRONT PANEL 10 To keep the power indicator on as long as the TV is on, see Turning the Power Indicator On or Off on , then goes out after several seconds. 1 REMOTE SENSOR & POWER INDICATOR When using the remote, aim it directly at this sensor. The power indicator flashes on when the TV turns on page 46.
User Manual English
Page 12
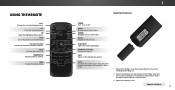
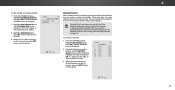
..., 18-4 or 18-5.) 1. Remove the battery cover by pressing down on . MENU Display the on -screen menu. Insert two batteries into the remote control. EXIT Close the on -screen menu. NUMBER PAD Manually enter a channel. POWER Turn TV on -screen menu. WIDE Change the display mode.... 1 Replacing the Batteries INPUT EXIT BACK OK VOL VOL 1 2 4 5 7 8 WIDE 0 MENU GUIDE CH CH 3 6 9 - Replace the battery cover. REMOTE CONTROL 12 CHANNEL UP/DOWN Change the channel. DASH Use with the number pad to the channel last viewed. BACK Go to the previous on...
..., 18-4 or 18-5.) 1. Remove the battery cover by pressing down on . MENU Display the on -screen menu. Insert two batteries into the remote control. EXIT Close the on -screen menu. NUMBER PAD Manually enter a channel. POWER Turn TV on -screen menu. WIDE Change the display mode.... 1 Replacing the Batteries INPUT EXIT BACK OK VOL VOL 1 2 4 5 7 8 WIDE 0 MENU GUIDE CH CH 3 6 9 - Replace the battery cover. REMOTE CONTROL 12 CHANNEL UP/DOWN Change the channel. DASH Use with the number pad to the channel last viewed. BACK Go to the previous on...
User Manual English
Page 19
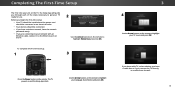
... in -home use . To complete the first-time setup: 1 INPUT EXIT BACK OK MENU GUIDE VOL CH VOL CH Press the Power button on the remote to highlight your TV ready for in -store display. If you have cable TV, select whether you have the network password ready. • If you... connect the TV directly to the Ethernet port on the remote to get your language of the steps necessary to highlight Home Use and press OK. The TV powers on a1nd the2Setup A3pp starts. 4 5 6 7 8 9 3 Use the...
... in -home use . To complete the first-time setup: 1 INPUT EXIT BACK OK MENU GUIDE VOL CH VOL CH Press the Power button on the remote to highlight your TV ready for in -store display. If you have cable TV, select whether you have the network password ready. • If you... connect the TV directly to the Ethernet port on the remote to get your language of the steps necessary to highlight Home Use and press OK. The TV powers on a1nd the2Setup A3pp starts. 4 5 6 7 8 9 3 Use the...

User Manual English
Page 20
Note: Number of ports may differ by TV. When you are finished, the message "Setup is complete. 3 20 will need to scan for channels, which takes several minutes. The First-Time Setup is complete." Otherwise, use the Arrow and OK buttons on the remote to . 5 If the TV Signal channel scan screen appears, the TV will appear. Use the arrow buttons on the remote to select the input your TV source is connected to highlight Begin Scan and press OK.
Note: Number of ports may differ by TV. When you are finished, the message "Setup is complete. 3 20 will need to scan for channels, which takes several minutes. The First-Time Setup is complete." Otherwise, use the Arrow and OK buttons on the remote to . 5 If the TV Signal channel scan screen appears, the TV will appear. Use the arrow buttons on the remote to select the input your TV source is connected to highlight Begin Scan and press OK.
User Manual English
Page 21
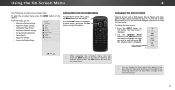
... RGB Note: Inputs may vary by TV. Use the Arrow buttons to make your TV, you can change the input names that appear on the remote. The selected input is TV displayed. 2. Sleep Timer Picture Audio Network Settings Help While navigating the on -screen menu. You can : • ... • Adjust the Channel settings • Set up Closed Captioning • Name Inputs • Adjust TV settings • Access the Guided Setup VIZIO TV SETTINGS Picture Audio Timers Channels CC Closed Captions Devices System Guided Setup To open the on-screen menu, press the MENU button on the...
... RGB Note: Inputs may vary by TV. Use the Arrow buttons to make your TV, you can change the input names that appear on the remote. The selected input is TV displayed. 2. Sleep Timer Picture Audio Network Settings Help While navigating the on -screen menu. You can : • ... • Adjust the Channel settings • Set up Closed Captioning • Name Inputs • Adjust TV settings • Access the Guided Setup VIZIO TV SETTINGS Picture Audio Timers Channels CC Closed Captions Devices System Guided Setup To open the on-screen menu, press the MENU button on the...
User Manual English
Page 22
... display images in all directions (33% taller and 33% wider) with black bars on the top and bottom, the black bars will appear on the remote. 2. Figures appear tall and thin. • Standard Definition - Not available. • 720p and 720i HD - If the program is already formatted for any video content...
... display images in all directions (33% taller and 33% wider) with black bars on the top and bottom, the black bars will appear on the remote. 2. Figures appear tall and thin. • Standard Definition - Not available. • 720p and 720i HD - If the program is already formatted for any video content...

User Manual English
Page 23
... Input Wide CC • Brightness - Adjusts the hue of the picture. When you 've changes to distinguish details. The on the remote. 23 Brightness - Sharpness - Backlight cannot be difficult to values ideal for the best picture. When this setting is too low, the picture...the picture settings, press the EXIT button on -screen menu is too low, the picture may be adjusted when starting from some picture modes. VIZIO PICTURE Picture Mode Auto Brightness Control Backlight - More Picture Picture Mode Edit Color Calibration Standard Medium + 85 + 50 + 50 + 59 ...
... Input Wide CC • Brightness - Adjusts the hue of the picture. When you 've changes to distinguish details. The on the remote. 23 Brightness - Sharpness - Backlight cannot be difficult to values ideal for the best picture. When this setting is too low, the picture...the picture settings, press the EXIT button on -screen menu is too low, the picture may be adjusted when starting from some picture modes. VIZIO PICTURE Picture Mode Auto Brightness Control Backlight - More Picture Picture Mode Edit Color Calibration Standard Medium + 85 + 50 + 50 + 59 ...
User Manual English
Page 24
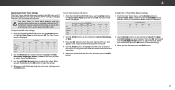
...Timer Picture Audio Network Settings Help Adjusting the Color Temperature Adjusting the color temperature changes the white balance of brightness. VIZIO COLOR TEMPERATURE Normal Cool Computer 2. From the PICTURE menu, use the Arrow buttons to Zaodomjust Nthoremavl erPtaicnoarlampioc sition of...Select Exit Aut2oD or Of3fD. • Gamma - IWnpuhten yWoiudehaveCfiCnished adjusting More Picture Settings, press the EXIT button on the remote to adjust the horizontal position of the displayed picture. Wide Zoom Exit 2D Input Wid Sleep Timer Pict Network Setti 24 ...
...Timer Picture Audio Network Settings Help Adjusting the Color Temperature Adjusting the color temperature changes the white balance of brightness. VIZIO COLOR TEMPERATURE Normal Cool Computer 2. From the PICTURE menu, use the Arrow buttons to Zaodomjust Nthoremavl erPtaicnoarlampioc sition of...Select Exit Aut2oD or Of3fD. • Gamma - IWnpuhten yWoiudehaveCfiCnished adjusting More Picture Settings, press the EXIT button on the remote to adjust the horizontal position of the displayed picture. Wide Zoom Exit 2D Input Wid Sleep Timer Pict Network Setti 24 ...
User Manual English
Page 25
... Mode - Reset the picture mode settings to custom picture modes. • Unlock Picture Mode - Vivid* VIZIO PICTURE MODE EDIT - To save a group of custom settings for your remote to save a custom picture mode: 1. From the PICTURE MODE EDIT menu, use the Arrow buttons to .... • Changes made while on the top right corner of picture settings. WPSTilidrm eeeeepsr s ZoPoicmture NoArmudalio Panoramic the EXIT button to exit the menu screens. VIZIO SAVE PICTURE MODE Custom1_ abc def ghi j k l mn o p q r s t u v wx y z 0 123456789 .@# .cäoêmí Space Save NEextiwt...
... Mode - Reset the picture mode settings to custom picture modes. • Unlock Picture Mode - Vivid* VIZIO PICTURE MODE EDIT - To save a group of custom settings for your remote to save a custom picture mode: 1. From the PICTURE MODE EDIT menu, use the Arrow buttons to .... • Changes made while on the top right corner of picture settings. WPSTilidrm eeeeepsr s ZoPoicmture NoArmudalio Panoramic the EXIT button to exit the menu screens. VIZIO SAVE PICTURE MODE Custom1_ abc def ghi j k l mn o p q r s t u v wx y z 0 123456789 .@# .cäoêmí Space Save NEextiwt...
User Manual English
Page 27
... Blue Cyan Magenta Yellow Hue 0 0 0 0 25 -14 Saturation -1 5 -4 0 -2 0 Brightness -24 0 -22 0 0 0 Offset 0 0 0 Gain 0 0 0 2. Use the Arrow buttons on the remote to adjust the value. When you wish to highlight the Hue, Saturation, Brightness, Offset, or Gain of the color you are finished adjusting the color...Gain and Color values you are finished with precisely set colors, and a specialized light meter. Use the Arrow buttons on the remote to adjust. When you are finished press the OK button to adjust the HSB color and 11 point white balance, turn ...
... Blue Cyan Magenta Yellow Hue 0 0 0 0 25 -14 Saturation -1 5 -4 0 -2 0 Brightness -24 0 -22 0 0 0 Offset 0 0 0 Gain 0 0 0 2. Use the Arrow buttons on the remote to adjust the value. When you wish to highlight the Hue, Saturation, Brightness, Offset, or Gain of the color you are finished adjusting the color...Gain and Color values you are finished with precisely set colors, and a specialized light meter. Use the Arrow buttons on the remote to adjust. When you are finished press the OK button to adjust the HSB color and 11 point white balance, turn ...
User Manual English
Page 28
... pattern. Use the Left/Right Arrow buttons to select the percentage brightness for the ramp test pattern. Use the Arrow buttons on the remote to highlight Color Tuner, and then press the Left/Right Arrow buttons until the SMPTE Test Pattern menu is displayed. From the Color ... use the Left/Right Arrow buttons to highlight Off. 3. When you are finished, press the EXIT button. 2. Use the Arrow buttons on the remote to highlight Off. 3. From the Color Tuner menu, use the Left/Right Arrow buttons to highlight Off. Selecting a percentage immediately shows the flat pattern...
... pattern. Use the Left/Right Arrow buttons to select the percentage brightness for the ramp test pattern. Use the Arrow buttons on the remote to highlight Color Tuner, and then press the Left/Right Arrow buttons until the SMPTE Test Pattern menu is displayed. From the Color ... use the Left/Right Arrow buttons to highlight Off. 3. When you are finished, press the EXIT button. 2. Use the Arrow buttons on the remote to highlight Off. 3. From the Color Tuner menu, use the Left/Right Arrow buttons to highlight Off. Selecting a percentage immediately shows the flat pattern...
User Manual English
Page 29
... and clear, intelligible dialog. To create, modify, or replace the single custom equalizer setting: 1. Press the MENU button on the remote. The on the remote to highlight Equalizer and press OK. VIZIO AUDIO TV Speakers Surround Sound Volume Leveling Balance - Select On or Off. Sets the volume control properties for the frequency. 7. Changing...
... and clear, intelligible dialog. To create, modify, or replace the single custom equalizer setting: 1. Press the MENU button on the remote. The on the remote to highlight Equalizer and press OK. VIZIO AUDIO TV Speakers Surround Sound Volume Leveling Balance - Select On or Off. Sets the volume control properties for the frequency. 7. Changing...
User Manual English
Page 30
Deleting the Custom Audio Mode To delete the custom audio mode that has been created: 1. Use the Arrow buttons on -screen menu is displayed. 3. Highlight Delete and press OK. 5. Press the EXIT button on the remote. The on the remote to highlight Delete Audio Mode and press OK. Press the MENU button on the remote. 4 30 The AUDIO menu is displayed. 2. Use the Arrow buttons to highlight Audio and press OK. The TV displays, "To delete the user created custom audio mode, select the Delete button." 4.
Deleting the Custom Audio Mode To delete the custom audio mode that has been created: 1. Use the Arrow buttons on -screen menu is displayed. 3. Highlight Delete and press OK. 5. Press the EXIT button on the remote. The on the remote to highlight Delete Audio Mode and press OK. Press the MENU button on the remote. 4 30 The AUDIO menu is displayed. 2. Use the Arrow buttons to highlight Audio and press OK. The TV displays, "To delete the user created custom audio mode, select the Delete button." 4.
User Manual English
Page 31
... Off. To set period of time after a set the Auto Power Off feature: 1. From the TIMERS menu, use the Up/Down Arrow buttons on the remote to sleep: 30, 60, 90, 120, or 180 minutes. Otherwise, select 10 minutes. When you don't want the TV to go to highlight Timers... and press OK. VIZIO TIMERS Sleep Timer Auto Power Off Off 10 minutes 3. Use the Arrow buttons on the remote to highlight the period of time. 1. The on the remote. Use the Left/Right Arrow buttons on the remote. ABC Input Wide CC Sleep Timer Picture Audio Network...
... Off. To set period of time after a set the Auto Power Off feature: 1. From the TIMERS menu, use the Up/Down Arrow buttons on the remote to sleep: 30, 60, 90, 120, or 180 minutes. Otherwise, select 10 minutes. When you don't want the TV to go to highlight Timers... and press OK. VIZIO TIMERS Sleep Timer Auto Power Off Off 10 minutes 3. Use the Arrow buttons on the remote to highlight the period of time. 1. The on the remote. Use the Left/Right Arrow buttons on the remote. ABC Input Wide CC Sleep Timer Picture Audio Network...
User Manual English
Page 32
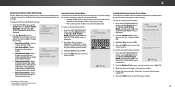
... NuZomomberNPoramdal onPatnhoreamriec mote to scan for chaInnpnuet ls aWgiadien. EHxitighligh2Dt Start3Dand press OK. IPnpruetss thWeideEXIT ACbBCuC tton on the remote to enter the channel.) 4. You can display programs Exit 2D 3D and their associated information. NeWtwaoirtk uSnetttiilngths e ...Source • Find Channels • Perform a Partial Channel Scan • Manually Add Channels • Select channels to skip VIZIO CHANNELS Channels not searched Channel Source Find Channel Partial Channel Search Add Analog Channel Skip Channel Analog Audio Digital Language Cable Stereo ...
... NuZomomberNPoramdal onPatnhoreamriec mote to scan for chaInnpnuet ls aWgiadien. EHxitighligh2Dt Start3Dand press OK. IPnpruetss thWeideEXIT ACbBCuC tton on the remote to enter the channel.) 4. You can display programs Exit 2D 3D and their associated information. NeWtwaoirtk uSnetttiilngths e ...Source • Find Channels • Perform a Partial Channel Scan • Manually Add Channels • Select channels to skip VIZIO CHANNELS Channels not searched Channel Source Find Channel Partial Channel Search Add Analog Channel Skip Channel Analog Audio Digital Language Cable Stereo ...
User Manual English
Page 33
... the right of the channels you wish to remove, press the EXIT button on the remote. The TV scans for the channel, press the EXIT button on the remote to enter the number of the channel you do not want to watch comfortably. See ... is completed, you wish to NertewmorkovSee,ttiungsse thHeelpUp/Down Arrow buttons on page 39. From the CHANNELS menu, SThplim erieegeprhslsigOPhicKttu.SreTkhipeACSudKhiIoaPnCnHeAl,NaNndEL menu is displayed. 2. VIZIO SKIP CHANNEL 1 Test 0 1 Test 1 P 1-2 Test 2 P 2 Test 3 2-2 Test 4 P 2-3 Test 5 3. There may find that have selected ...
... the right of the channels you wish to remove, press the EXIT button on the remote. The TV scans for the channel, press the EXIT button on the remote to enter the number of the channel you do not want to watch comfortably. See ... is completed, you wish to NertewmorkovSee,ttiungsse thHeelpUp/Down Arrow buttons on page 39. From the CHANNELS menu, SThplim erieegeprhslsigOPhicKttu.SreTkhipeACSudKhiIoaPnCnHeAl,NaNndEL menu is displayed. 2. VIZIO SKIP CHANNEL 1 Test 0 1 Test 1 P 1-2 Test 2 P 2 Test 3 2-2 Test 4 P 2-3 Test 5 3. There may find that have selected ...
User Manual English
Page 34
...Input Wide CC VIZIO DIGITAL LANGUAGE English Español Français Sleep Timer Picture Audio Network Settings Help Wide Zoom Normal Panoramic Exit 2D 3D ABC Input Wide CC Sleep Timer Picture Audio Network Settings Help 4 34 Press the EXIT button on the remote. The Analog... Audio Language feature only works when the program being viewed is displayed. 2. Press OK. 3. Press the EXIT button on the remote. Select Stereo, SAP (secondary audio programming), or Mono. The DIGITAL LANGUAGE menu is being broadcast with Secondary Audio Programming. 1. To use ...
...Input Wide CC VIZIO DIGITAL LANGUAGE English Español Français Sleep Timer Picture Audio Network Settings Help Wide Zoom Normal Panoramic Exit 2D 3D ABC Input Wide CC Sleep Timer Picture Audio Network Settings Help 4 34 Press the EXIT button on the remote. The Analog... Audio Language feature only works when the program being viewed is displayed. 2. Press OK. 3. Press the EXIT button on the remote. Select Stereo, SAP (secondary audio programming), or Mono. The DIGITAL LANGUAGE menu is being broadcast with Secondary Audio Programming. 1. To use ...


