
User Manual (English)
Page 8
... Settings 45 Using the Guided Setup Menu 45 Using the Info Window 46 Using the USB Media Player 47 Using the USB Media Player 47 Preparing your USB drive to display USB Media 47 Displaying USB Media 47 Removing the USB drive from the TV 47 Specifications 52 Limited Warranty 54 Parts and Labor 54 Type...
... Settings 45 Using the Guided Setup Menu 45 Using the Info Window 46 Using the USB Media Player 47 Using the USB Media Player 47 Preparing your USB drive to display USB Media 47 Displaying USB Media 47 Removing the USB drive from the TV 47 Specifications 52 Limited Warranty 54 Parts and Labor 54 Type...
User Manual (English)
Page 13
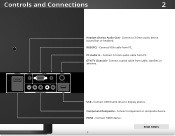
PC Audio In - Component/Composite - Connect HDMI device. Controls and Connections 2 REAR PANEL Headset (Stereo Audio Out) - Connect a 3.5mm audio device (sound bar or headset). RGB (PC) - DTV/TV (Coaxial) - Connect component or composite device. Connect VGA cable from PC. USB - REAR PANEL 7 HDMI - Connect 3.5 mm audio cable from PC. Connect coaxial cable from cable, satellite, or antenna. Connect USB thumb drive to display photos.
PC Audio In - Component/Composite - Connect HDMI device. Controls and Connections 2 REAR PANEL Headset (Stereo Audio Out) - Connect a 3.5mm audio device (sound bar or headset). RGB (PC) - DTV/TV (Coaxial) - Connect component or composite device. Connect VGA cable from PC. USB - REAR PANEL 7 HDMI - Connect 3.5 mm audio cable from PC. Connect coaxial cable from cable, satellite, or antenna. Connect USB thumb drive to display photos.

User Manual (English)
Page 16
... enters a channel. ARROW Navigates the on -screen menu. BACK Goes to the previous on -screen menu. MENU Displays the on -screen menu. V BUTTON Opens the USB photo viewer. EXIT Closes the on -screen menu. VOLUME UP/DOWN Increases or decreases the loudness of the audio. WIDE Switches the display mode. 2 INPUT...
... enters a channel. ARROW Navigates the on -screen menu. BACK Goes to the previous on -screen menu. MENU Displays the on -screen menu. V BUTTON Opens the USB photo viewer. EXIT Closes the on -screen menu. VOLUME UP/DOWN Increases or decreases the loudness of the audio. WIDE Switches the display mode. 2 INPUT...

User Manual (English)
Page 53
...Use the Arrow buttons to highlight Photo and press OK. 5. Removing the USB drive from the TV: 1. The photo displays. Preparing your photos onto a USB thumb drive: • The USB thumb drive must be formatted as FAT32. • Files on the USB thumb drive must end in a supported file extension (.jpg or .jpeg.).... player is on the side of the TV. 2. Use the Arrow buttons to highlight the photo you must first save your USB drive to display USB Media To display USB media, you want to display. Select the photo, press OK, then highlight Fullscreen and press OK. Turn off the TV. 2....
...Use the Arrow buttons to highlight Photo and press OK. 5. Removing the USB drive from the TV: 1. The photo displays. Preparing your photos onto a USB thumb drive: • The USB thumb drive must be formatted as FAT32. • Files on the USB thumb drive must end in a supported file extension (.jpg or .jpeg.).... player is on the side of the TV. 2. Use the Arrow buttons to highlight the photo you must first save your USB drive to display USB Media To display USB media, you want to display. Select the photo, press OK, then highlight Fullscreen and press OK. Turn off the TV. 2....

User Manual (English)
Page 54
Back Button Highlight this button and press OK to return to left column. To change source, highlight it and press OK. VIZIO Photo USB1: Back Button Highlight and press OK to return to the previous screen. Current Folder Start Fullscreen Slideshow Sort by Name or Date ...F.jpg G.jpg H.jpg Page 1 of the currently selected folder. VIZIO_2GB\Photo\root Folder Contents This area displays the contents of 1 I.jpg Page Information If your USB thumb drive has more files than can browse files and folders using the Arrow and OK buttons on a single screen, the page information is displayed...
Back Button Highlight this button and press OK to return to left column. To change source, highlight it and press OK. VIZIO Photo USB1: Back Button Highlight and press OK to return to the previous screen. Current Folder Start Fullscreen Slideshow Sort by Name or Date ...F.jpg G.jpg H.jpg Page 1 of the currently selected folder. VIZIO_2GB\Photo\root Folder Contents This area displays the contents of 1 I.jpg Page Information If your USB thumb drive has more files than can browse files and folders using the Arrow and OK buttons on a single screen, the page information is displayed...

User Manual (English)
Page 58
...: Refresh Rate: Maximum Resolution: Pixel Pitch: Viewing Angle: HDMI Inputs: Component Video Inputs: Composite Inputs: RF Antenna Input: VGA w/Stereo Audio: USB 2.0 Ports: Audio Outputs: OSD Language: Remote Control Model: D24h-C1 24" Class 23.54" 21.96" x 14.98" x 4.39" 21.96" x 14.25" x 2.11" 7.21 lbs 6.97 lbs Razor LEDTM 60...
...: Refresh Rate: Maximum Resolution: Pixel Pitch: Viewing Angle: HDMI Inputs: Component Video Inputs: Composite Inputs: RF Antenna Input: VGA w/Stereo Audio: USB 2.0 Ports: Audio Outputs: OSD Language: Remote Control Model: D24h-C1 24" Class 23.54" 21.96" x 14.98" x 4.39" 21.96" x 14.25" x 2.11" 7.21 lbs 6.97 lbs Razor LEDTM 60...

Quickstart Guide (English)
Page 7
... mode. DASH Use with the number pad to the channel last viewed. MUTE Turn the audio off . GUIDE Display the info window. V BUTTON Open the USB media player. NUMBER PAD Manually enter a channel. POWER Turn TV on or off or on. OK Select the highlighted menu option. CHANNEL UP/DOWN Change...
... mode. DASH Use with the number pad to the channel last viewed. MUTE Turn the audio off . GUIDE Display the info window. V BUTTON Open the USB media player. NUMBER PAD Manually enter a channel. POWER Turn TV on or off or on. OK Select the highlighted menu option. CHANNEL UP/DOWN Change...


