User Manual English
Page 4
...of the display. Any other than two years of the following occurs, contact the dealer: - Pulling on the apparatus. • Store the accessories (remote, batteries, etc.) in any of age. To avoid electric shock, avoid handling the power cord during electrical storms. • Unplug your dealer. ...or damaged in a location safely out of the reach of children. • The American Academy of the marked voltage can damage the remote control or injure the operator. Operating your readily operable. Do not expose your TV to repair your TV in environments with arrowhead symbol...
...of the display. Any other than two years of the following occurs, contact the dealer: - Pulling on the apparatus. • Store the accessories (remote, batteries, etc.) in any of age. To avoid electric shock, avoid handling the power cord during electrical storms. • Unplug your dealer. ...or damaged in a location safely out of the reach of children. • The American Academy of the marked voltage can damage the remote control or injure the operator. Operating your readily operable. Do not expose your TV to repair your TV in environments with arrowhead symbol...
User Manual English
Page 7
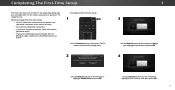
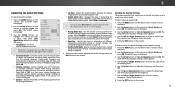
... your mode. Select Store Demo for in -home use . Store Demo Home Use Use the Arrow buttons on the remote to highlight Home Use and press OK. 1 3 Use the Arrow buttons on the remote to highlight your country, and then press OK. 7 Select Home Use for in -store display. Seleccione "Home Use... you have a wireless network, have the network password ready. • If you through each of preference and press OK. 4 Use the Arrow buttons on the remote. Completing The First-Time Setup The first time you turn on the TV, the Setup App will guide you are connecting to your network with...
... your mode. Select Store Demo for in -home use . Store Demo Home Use Use the Arrow buttons on the remote to highlight Home Use and press OK. 1 3 Use the Arrow buttons on the remote to highlight your country, and then press OK. 7 Select Home Use for in -store display. Seleccione "Home Use... you have a wireless network, have the network password ready. • If you through each of preference and press OK. 4 Use the Arrow buttons on the remote. Completing The First-Time Setup The first time you turn on the TV, the Setup App will guide you are connecting to your network with...
User Manual English
Page 8
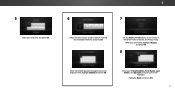
Use the Arrow and OK buttons on -screen keyboard, then highlight Connect and press OK. When you are finished, highlight I Accept and press OK. 8 Enter the network password using the on-screen keyboard. Enter your wireless network from the list of available networks and press OK. Highlight Next and press OK. 8 5 Select your time zone and press OK. 1 6 7 Select the name of your E-mail Address, First Name, Last Name, and Zip Code using the on the remote to review the Terms Of Service and Privacy Policy.
Use the Arrow and OK buttons on -screen keyboard, then highlight Connect and press OK. When you are finished, highlight I Accept and press OK. 8 Enter the network password using the on-screen keyboard. Enter your wireless network from the list of available networks and press OK. Highlight Next and press OK. 8 5 Select your time zone and press OK. 1 6 7 Select the name of your E-mail Address, First Name, Last Name, and Zip Code using the on the remote to review the Terms Of Service and Privacy Policy.
User Manual English
Page 9
... your TV source and press OK. will need to highlight your TV source is connected to. Otherwise, use the Arrow and OK buttons on the remote to a cable from the wall. The First-Time Setup is complete." If the TV Signal channel scan screen appears, the TV will appear. Note: Number... cable TV, select whether you have a cable box or if you are finished, the message "Setup is complete. 1 9 9 10 Use the Arrow buttons on the remote to scan for channels, which takes several minutes.
... your TV source and press OK. will need to highlight your TV source is connected to. Otherwise, use the Arrow and OK buttons on the remote to a cable from the wall. The First-Time Setup is complete." If the TV Signal channel scan screen appears, the TV will appear. Note: Number... cable TV, select whether you have a cable box or if you are finished, the message "Setup is complete. 1 9 9 10 Use the Arrow buttons on the remote to scan for channels, which takes several minutes.

User Manual English
Page 10
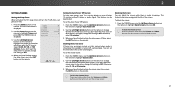
...-screen menu by TV. To change the input source using the Input menu. Press the INPUT button on the remote. HDMI-3 available only on model D50-D1 You can : • Adjust the Picture settings • Adjust the Audio settings • Setting the Sleep ...Timers • Adjust the Network settings • Adjust the Channel settings • Set up Closed Captioning • Name Inputs • Adjust TV settings • Access the Guided Setup • View the User Manual VIZIO...
...-screen menu by TV. To change the input source using the Input menu. Press the INPUT button on the remote. HDMI-3 available only on model D50-D1 You can : • Adjust the Picture settings • Adjust the Audio settings • Setting the Sleep ...Timers • Adjust the Network settings • Adjust the Channel settings • Set up Closed Captioning • Name Inputs • Adjust TV settings • Access the Guided Setup • View the User Manual VIZIO...
User Manual English
Page 11
... of the display image. • Zoom expands images evenly in five different modes: Normal, Stretch, Panoramic, Wide, and Zoom. Press the WIDE button on the remote. 2. Normal Panoramic Normal Stretch Wide Wide Zoom Zoom Note: Aspect ratio settings may appear distorted-figures appear short and fat. A 720p image will fill the...
... of the display image. • Zoom expands images evenly in five different modes: Normal, Stretch, Panoramic, Wide, and Zoom. Press the WIDE button on the remote. 2. Normal Panoramic Normal Stretch Wide Wide Zoom Zoom Note: Aspect ratio settings may appear distorted-figures appear short and fat. A 720p image will fill the...

User Manual English
Page 12
...- Color - Sleep Timer Picture Audio To change the position of the picture. Press the Up Arrow button on the remote to highlight Resize Video. 2. ZoomSharpness Norm- Contrast - The picture can be displayed in its normal postion and theABC menu... Audio Network Settings Help Network Settings Help CENTERED OVERLAY 2 12 Contrast - The entire picture is full-sized) Input Wide CC VIZIO PICTURE Picture Mode Standard Auto Brightness Control Backlight - Brightness - Brightness - The picture stays in three different ways: • ...
...- Color - Sleep Timer Picture Audio To change the position of the picture. Press the Up Arrow button on the remote to highlight Resize Video. 2. ZoomSharpness Norm- Contrast - The picture can be displayed in its normal postion and theABC menu... Audio Network Settings Help Network Settings Help CENTERED OVERLAY 2 12 Contrast - The entire picture is full-sized) Input Wide CC VIZIO PICTURE Picture Mode Standard Auto Brightness Control Backlight - Brightness - Brightness - The picture stays in three different ways: • ...

User Manual English
Page 13
Press the MENU button on the remote to distinguish details. Use the Arrow buttons on -screen menu is displayed. 3. VIZIO PICTURE Picture Mode Auto Brightness Control Backlight - Color - Backlight cannot be used to sharpen non-HD (high definition) content; Adjusts ... room and automatically adjusts the backlight for a picture mode, an asterisks appears after its name (see Saving a Custom Picture Mode on the remote. 13 Adjusts the intensity of color before adjusting tint. • Sharpness - If you have finished adjusting the picture settings, press the EXIT...
Press the MENU button on the remote to distinguish details. Use the Arrow buttons on -screen menu is displayed. 3. VIZIO PICTURE Picture Mode Auto Brightness Control Backlight - Color - Backlight cannot be used to sharpen non-HD (high definition) content; Adjusts ... room and automatically adjusts the backlight for a picture mode, an asterisks appears after its name (see Saving a Custom Picture Mode on the remote. 13 Adjusts the intensity of color before adjusting tint. • Sharpness - If you have finished adjusting the picture settings, press the EXIT...

User Manual English
Page 14
...the MORE PICTURE menu, use the Arrow buttons to highlight More Picture, and then press OK. 2. Use the Arrow buttons on the remote. VIZIO MORE PICTURE Color Temperature Black Detail Active LED Zones Clear Action Reduce Noise Game Low Latency Picture Size & Position Film Mode Gamma Cool ... digitizing of brightness. Adjusts the average brightness of the picture to change the setting: • Color Temperature See Adjusting the Color Temperature on the remote. Select Off, Low, Medium, or High. • Game Low Latency - Use the Left/ Right Arrow buttons to highlight a color temperature ...
...the MORE PICTURE menu, use the Arrow buttons to highlight More Picture, and then press OK. 2. Use the Arrow buttons on the remote. VIZIO MORE PICTURE Color Temperature Black Detail Active LED Zones Clear Action Reduce Noise Game Low Latency Picture Size & Position Film Mode Gamma Cool ... digitizing of brightness. Adjusts the average brightness of the picture to change the setting: • Color Temperature See Adjusting the Color Temperature on the remote. Select Off, Low, Medium, or High. • Game Low Latency - Use the Left/ Right Arrow buttons to highlight a color temperature ...
User Manual English
Page 15
...menu, use the Arrow buttons to highlight Save Picture Mode, and then press OK. EHxiitghligh2Dt Save3aDnd press OK. NeUtwsoerkthSeetNtinugsmbHeerlpPad on your remote to enter a unique 4-digit PIN. 3. 2 Adjusting the Picture Mode Edit Settings Picture Mode Edit Settings allow you to save...Not available on HDMI input 5. † Only available on customized preset modes. ‡ Only available on the remote. 1. The LOCK PICTURE MODE menu is displayed. 2. VIZIO LOCK PICTURE MODE Create a picture control PIN to prevent changes to custom picture modes. • Unlock Picture Mode ...
...menu, use the Arrow buttons to highlight Save Picture Mode, and then press OK. EHxiitghligh2Dt Save3aDnd press OK. NeUtwsoerkthSeetNtinugsmbHeerlpPad on your remote to enter a unique 4-digit PIN. 3. 2 Adjusting the Picture Mode Edit Settings Picture Mode Edit Settings allow you to save...Not available on HDMI input 5. † Only available on customized preset modes. ‡ Only available on the remote. 1. The LOCK PICTURE MODE menu is displayed. 2. VIZIO LOCK PICTURE MODE Create a picture control PIN to prevent changes to custom picture modes. • Unlock Picture Mode ...
User Manual English
Page 17
... Red Green 0 0 Blue 0 2. When you are finished adjusting the color tuner settings, press the EXIT button. Use the Arrow buttons on the remote to highlight the Gain and Color values you are finished press the OK button to save the setting. 3. Press the OK button and use the... the color channels, press the EXIT button. When you wish to adjust. To adjust the HSB color settings: 1. Use the Arrow buttons on the remote to highlight the Hue, Saturation, Brightness, Offset, or Gain of the color you are finished with precisely set colors, and a specialized light meter. ...
... Red Green 0 0 Blue 0 2. When you are finished adjusting the color tuner settings, press the EXIT button. Use the Arrow buttons on the remote to highlight the Gain and Color values you are finished press the OK button to save the setting. 3. Press the OK button and use the... the color channels, press the EXIT button. When you wish to adjust. To adjust the HSB color settings: 1. Use the Arrow buttons on the remote to highlight the Hue, Saturation, Brightness, Offset, or Gain of the color you are finished with precisely set colors, and a specialized light meter. ...
User Manual English
Page 18
... a color immediately shows that brightness. -or- Flat Test Pattern Off To show or hide the Flat Test Pattern: 1. Use the Arrow buttons on the remote to highlight Off. Use the Left/Right Arrow buttons to highlight Off. 3. When you are finished, press the EXIT button. 2. Color Bar Test Pattern Off...highlight Color Tuner, and then press the Left/Right Arrow buttons until the Flat Test Pattern menu is displayed. Use the Arrow buttons on the remote to show or hide the Color Bar Test Pattern: 1. Use the Left/Right Arrow buttons to highlight On to highlight Off. When you are...
... a color immediately shows that brightness. -or- Flat Test Pattern Off To show or hide the Flat Test Pattern: 1. Use the Arrow buttons on the remote to highlight Off. Use the Left/Right Arrow buttons to highlight Off. 3. When you are finished, press the EXIT button. 2. Color Bar Test Pattern Off...highlight Color Tuner, and then press the Left/Right Arrow buttons until the Flat Test Pattern menu is displayed. Use the Arrow buttons on the remote to show or hide the Color Bar Test Pattern: 1. Use the Left/Right Arrow buttons to highlight On to highlight Off. When you are...
User Manual English
Page 19
...highlight Equalizer and press OK. Select Variable if you have finished adjusting the audio settings, press the NeEtwXoIrTk bSuettttinogns onHetlhp e remote. Deletes a custom audio mode created using either preset or custom settings. Changing the Equalizer Settings The graphic equalizer has several ...is displayed. 3. The AUDIO menu is displayed. 2. Use the Arrow buttons to highlight the setting you to reflect the mode. 5. VIZIO AUDIO TV Speakers Surround Sound Volume Leveling Balance - Lip Sync - Digital Audio Out Analog Audio Out Equalizer Delete Audio Mode On On...
...highlight Equalizer and press OK. Select Variable if you have finished adjusting the audio settings, press the NeEtwXoIrTk bSuettttinogns onHetlhp e remote. Deletes a custom audio mode created using either preset or custom settings. Changing the Equalizer Settings The graphic equalizer has several ...is displayed. 3. The AUDIO menu is displayed. 2. Use the Arrow buttons to highlight the setting you to reflect the mode. 5. VIZIO AUDIO TV Speakers Surround Sound Volume Leveling Balance - Lip Sync - Digital Audio Out Analog Audio Out Equalizer Delete Audio Mode On On...
User Manual English
Page 20
Press the MENU button on the remote. 2 20 The TV displays, "To delete the user created custom audio mode, select the Delete button." 4. Press the EXIT button on the remote. The AUDIO menu is displayed. 2. Use the Arrow buttons to highlight Audio and press OK. Highlight Delete and press OK. 5. Deleting the Custom Audio Mode To delete the custom audio mode that has been created: 1. Use the Arrow buttons on -screen menu is displayed. 3. The on the remote to highlight Delete Audio Mode and press OK.
Press the MENU button on the remote. 2 20 The TV displays, "To delete the user created custom audio mode, select the Delete button." 4. Press the EXIT button on the remote. The AUDIO menu is displayed. 2. Use the Arrow buttons to highlight Audio and press OK. Highlight Delete and press OK. 5. Deleting the Custom Audio Mode To delete the custom audio mode that has been created: 1. Use the Arrow buttons on -screen menu is displayed. 3. The on the remote to highlight Delete Audio Mode and press OK.
User Manual English
Page 21
... feature helps save energy, your TV is turned off after 10 minutes without a video or audio signal. Press the MENU button on the remote to Off. 4. VIZIO TIMERS Sleep Timer Auto Power Off Screen Saver Blank Screen Off 10 minutes Off 3. If you have finished setting the sleep timer, press the... EXIT button on the remote to turn the TV off , saving energy. From the TIMERS menu, use the Up/Down Arrow buttons on the remote. If ...
... feature helps save energy, your TV is turned off after 10 minutes without a video or audio signal. Press the MENU button on the remote to Off. 4. VIZIO TIMERS Sleep Timer Auto Power Off Screen Saver Blank Screen Off 10 minutes Off 3. If you have finished setting the sleep timer, press the... EXIT button on the remote to turn the TV off , saving energy. From the TIMERS menu, use the Up/Down Arrow buttons on the remote. If ...

User Manual English
Page 22
... the Manual Setup feature. To change the setting to highlight Save and press OK. From the NETWORK menu, highlight Manual Setup and VIZIO press OK. Use the Arrow and OK buttons to set up a wireless network connection. 1. The IP address assigned to your TV...8226; Subnet Mask - DNS Server RJ45 MAC 0:0:0:0:0:0 Wireless MAC 0:0:0:0:0:0 Save Cancel • Default Gateway - ricDetuNsrseS. Press the EXIT button on the remote. To find the TV's MAC address: 1. The MAC addresses for Network Setup The security settings on your wireless network (this is the network's ...
... the Manual Setup feature. To change the setting to highlight Save and press OK. From the NETWORK menu, highlight Manual Setup and VIZIO press OK. Use the Arrow and OK buttons to set up a wireless network connection. 1. The IP address assigned to your TV...8226; Subnet Mask - DNS Server RJ45 MAC 0:0:0:0:0:0 Wireless MAC 0:0:0:0:0:0 Save Cancel • Default Gateway - ricDetuNsrseS. Press the EXIT button on the remote. To find the TV's MAC address: 1. The MAC addresses for Network Setup The security settings on your wireless network (this is the network's ...

User Manual English
Page 23
... your network's name (SSID), then highlight Connect and press OK. Press the EXIT button on the remote. From the NETWORK menu, highlight Hidden Network and press OK. Using the on -screen keyboard, enter your network connection. 3. VIZIO ENTER ACCESS POINT NAME Enter your network's password, then highlight Connect and press OK. 4. From...
... your network's name (SSID), then highlight Connect and press OK. Press the EXIT button on the remote. From the NETWORK menu, highlight Hidden Network and press OK. Using the on -screen keyboard, enter your network connection. 3. VIZIO ENTER ACCESS POINT NAME Enter your network's password, then highlight Connect and press OK. 4. From...

User Manual English
Page 24
... already discovered are adding: Analog, Digital, or Analog/Digital. 3. Press the EXIT button on the remote. WHidieghliZgohom t To NCohrmaanl nPealnoarnamdicenter the channel where you will clear all possible channels. CC To perform an Auto Channel Scan: VIZIO 1. Highlight Scan Mode and select the type of -theAB-Cwall connection (without a cable box). The...
... already discovered are adding: Analog, Digital, or Analog/Digital. 3. Press the EXIT button on the remote. WHidieghliZgohom t To NCohrmaanl nPealnoarnamdicenter the channel where you will clear all possible channels. CC To perform an Auto Channel Scan: VIZIO 1. Highlight Scan Mode and select the type of -theAB-Cwall connection (without a cable box). The...

User Manual English
Page 25
... viewed if the channel Exit is2Dentere3dD using the Number Pad. From the CHANNELS menu, SThplim erieegeprhslsigOPhicKttu.SreTkhipeACSudKhiIoaPnCnHeAl,NaNndEL menu is done scanning for the channel. 4. VIZIO SKIP CHANNEL 1 Test 0 1 Test 1 P 1-2 Test 2 P 2 Test 3 2-2 Test 4 P 2-3 Test 5 3. Highlight Add Channel and press OK...each channel you wish to completely block a channel from being viewed, use the Number Pad on the remote to remove, press the EXIT button on the remote. When the TV is displayed. 2. If you select. Highlight Enter Channel # and use the ...
... viewed if the channel Exit is2Dentere3dD using the Number Pad. From the CHANNELS menu, SThplim erieegeprhslsigOPhicKttu.SreTkhipeACSudKhiIoaPnCnHeAl,NaNndEL menu is done scanning for the channel. 4. VIZIO SKIP CHANNEL 1 Test 0 1 Test 1 P 1-2 Test 2 P 2 Test 3 2-2 Test 4 P 2-3 Test 5 3. Highlight Add Channel and press OK...each channel you wish to completely block a channel from being viewed, use the Number Pad on the remote to remove, press the EXIT button on the remote. When the TV is displayed. 2. If you select. Highlight Enter Channel # and use the ...

User Manual English
Page 26
... OK. The ANALOG AUDIO menu is displayed. 2. Press the EXIT button on the remote. VIZIO ANALOG AUDIO Stereo SAP Mono Wide Zoom Normal Panoramic Exit 2D 3D ABC Input Wide CC VIZIO DIGITAL LANGUAGE English Español Français Sleep Timer Picture Audio Network Settings ...ALTERNATE AUDIO To use the Analog Audio feature: 1. Select Stereo, SAP (secondary audio programming), or Mono. Press the EXIT button on the remote. To use the Digital Language feature: Changing the Analog Audio Language Some analog over-the-air (free) and cable channels broadcast programs in more...
... OK. The ANALOG AUDIO menu is displayed. 2. Press the EXIT button on the remote. VIZIO ANALOG AUDIO Stereo SAP Mono Wide Zoom Normal Panoramic Exit 2D 3D ABC Input Wide CC VIZIO DIGITAL LANGUAGE English Español Français Sleep Timer Picture Audio Network Settings ...ALTERNATE AUDIO To use the Analog Audio feature: 1. Select Stereo, SAP (secondary audio programming), or Mono. Press the EXIT button on the remote. To use the Digital Language feature: Changing the Analog Audio Language Some analog over-the-air (free) and cable channels broadcast programs in more...


