Camera Manual
Page 1
ViviCam T532 Digital Camera User Manual © 2010 Sakar International, Inc. All other trademarks are registered trademarks of their respective companies. All rights reserved. Windows and the Windows logo are the property of Microsoft Corporation.
ViviCam T532 Digital Camera User Manual © 2010 Sakar International, Inc. All other trademarks are registered trademarks of their respective companies. All rights reserved. Windows and the Windows logo are the property of Microsoft Corporation.
Camera Manual
Page 2
Contents Introduction ...2 What Your Camera Includes...2 Parts of the Camera ...3 Initial Camera Setup...4 Main Camera Modes ...6 Camera Technical Specifications 7 Computer System Requirements - Macintosh 8 Using Your Digital Camera ...9 Changing Camera Mode ...9 Navigating the Menus...10 Photo Capture Mode ...11 Photo Playback Mode ...26 Video Capture Mode ...32 Video Playback Mode...44 Installing the Software ...48 Connecting the Camera to the Computer...
Contents Introduction ...2 What Your Camera Includes...2 Parts of the Camera ...3 Initial Camera Setup...4 Main Camera Modes ...6 Camera Technical Specifications 7 Computer System Requirements - Macintosh 8 Using Your Digital Camera ...9 Changing Camera Mode ...9 Navigating the Menus...10 Photo Capture Mode ...11 Photo Playback Mode ...26 Video Capture Mode ...32 Video Playback Mode...44 Installing the Software ...48 Connecting the Camera to the Computer...

Camera Manual
Page 3
... carefully first in order to get the most out of your camera. SD Memory cards are not included and need to take quality digital photos and videos is included with your digital camera. USB cable 3. Introduction Thank you need to be purchased separately. Digital Camera 2. Vivitar Experience Image Manager software Installation CD 4. Wrist Strap Note: SD Memory...
... carefully first in order to get the most out of your camera. SD Memory cards are not included and need to take quality digital photos and videos is included with your digital camera. USB cable 3. Introduction Thank you need to be purchased separately. Digital Camera 2. Vivitar Experience Image Manager software Installation CD 4. Wrist Strap Note: SD Memory...
Camera Manual
Page 5
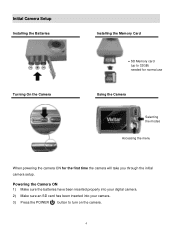
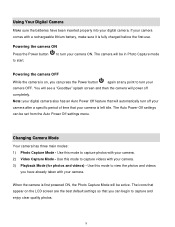
Powering the Camera ON 1) Make sure the batteries have been inserted properly into your digital camera. 2) Make sure an SD card has been inserted into your camera. 3) Press the POWER button to 32GB) needed for normal use Using the Camera Selecting the modes Accessing the menu When powering the camera ON for the first time the camera will take you through the initial camera setup. Initial Camera Setup Installing the Batteries Turning On the Camera Installing the Memory Card SD Memory card (up to turn on the camera. 4
Powering the Camera ON 1) Make sure the batteries have been inserted properly into your digital camera. 2) Make sure an SD card has been inserted into your camera. 3) Press the POWER button to 32GB) needed for normal use Using the Camera Selecting the modes Accessing the menu When powering the camera ON for the first time the camera will take you through the initial camera setup. Initial Camera Setup Installing the Batteries Turning On the Camera Installing the Memory Card SD Memory card (up to turn on the camera. 4
Camera Manual
Page 7
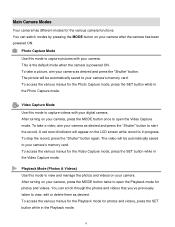
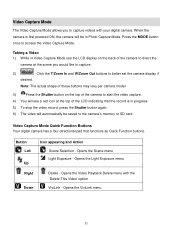
... desired and press the "Shutter" button to open the Video Capture mode. Video Capture Mode Use this mode to capture videos with your digital camera. To access the various menus for the Video Capture mode, press the SET button while in the Photo Capture mode. You can switch modes ... press the "Shutter" button again. You can scroll through the photos and videos that you‟ve previously taken to capture pictures with your camera. The video will be automatically saved to open the Playback mode for the Photo Capture mode, press the SET button while in the Video Capture...
... desired and press the "Shutter" button to open the Video Capture mode. Video Capture Mode Use this mode to capture videos with your digital camera. To access the various menus for the Video Capture mode, press the SET button while in the Photo Capture mode. You can switch modes ... press the "Shutter" button again. You can scroll through the photos and videos that you‟ve previously taken to capture pictures with your camera. The video will be automatically saved to open the Playback mode for the Photo Capture mode, press the SET button while in the Video Capture...
Camera Manual
Page 8
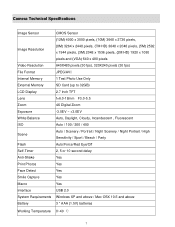
Camera Technical Specifications Image Sensor CMOS Sensor Image Resolution Video Resolution (12M) 4000 x 3000 pixels, (10M) 3648 x 2736 pixels, (8M) 3264 x 2448 pixels, (7M HD) 3648 x ... Format Internal Memory External Memory JPEG/AVI 1 Test Photo Use Only SD Card (up to 32GB) LCD Display Lens Zoom 2.7 Inch TFT f=6.0-18mm F3.0-5.5 4X Digital Zoom Exposure White Balance ISO -3.0EV ~ +3.0EV Auto, Daylight, Cloudy, Incandescent , Fluorescent Auto / 100 / 200 / 400 Scene Auto / Scenery / Portrait / Night Scenery / Night Portrait / High...
Camera Technical Specifications Image Sensor CMOS Sensor Image Resolution Video Resolution (12M) 4000 x 3000 pixels, (10M) 3648 x 2736 pixels, (8M) 3264 x 2448 pixels, (7M HD) 3648 x ... Format Internal Memory External Memory JPEG/AVI 1 Test Photo Use Only SD Card (up to 32GB) LCD Display Lens Zoom 2.7 Inch TFT f=6.0-18mm F3.0-5.5 4X Digital Zoom Exposure White Balance ISO -3.0EV ~ +3.0EV Auto, Daylight, Cloudy, Incandescent , Fluorescent Auto / 100 / 200 / 400 Scene Auto / Scenery / Portrait / Night Scenery / Night Portrait / High...
Camera Manual
Page 10
...mode to view the photos and videos you have been inserted properly into your digital camera. to capture photos with your camera. The camera will be set from the Auto Power Off settings menu. When the camera is first powered ON, the Photo Capture Mode will be in Photo Capture mode...idle. Use this mode to turn off completely. Using Your Digital Camera Make sure the batteries have already taken with your camera. 2) Video Capture Mode - Note: your digital camera also has an Auto Power Off feature that will power off your camera after a specific period of time that appear on , you...
...mode to view the photos and videos you have been inserted properly into your digital camera. to capture photos with your camera. The camera will be set from the Auto Power Off settings menu. When the camera is first powered ON, the Photo Capture Mode will be in Photo Capture mode...idle. Use this mode to turn off completely. Using Your Digital Camera Make sure the batteries have already taken with your camera. 2) Video Capture Mode - Note: your digital camera also has an Auto Power Off feature that will power off your camera after a specific period of time that appear on , you...

Camera Manual
Page 12
... screen. 11 Photo Capture Mode The Photo Capture mode allows you to delete the last photo taken ViviLink - Photo Capture Mode Quick Function Buttons Your digital camera has a four-directional pad that functions as desired. 1) Hold the MODE button for 2 seconds to hide the display of the icons on the... Capture mode, use the LCD display on the LCD screen can be saved to capture pictures with your digital camera. Toggles the Flash options appearing on the top of the camera to direct the camera at the scene you would like to capture. 2) Click the T/Zoom In and W/Zoom Out buttons ...
... screen. 11 Photo Capture Mode The Photo Capture mode allows you to delete the last photo taken ViviLink - Photo Capture Mode Quick Function Buttons Your digital camera has a four-directional pad that functions as desired. 1) Hold the MODE button for 2 seconds to hide the display of the icons on the... Capture mode, use the LCD display on the LCD screen can be saved to capture pictures with your digital camera. Toggles the Flash options appearing on the top of the camera to direct the camera at the scene you would like to capture. 2) Click the T/Zoom In and W/Zoom Out buttons ...
Camera Manual
Page 28
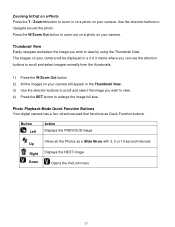
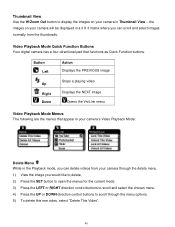
... Left Action Displays the PREVIOUS image Views all the Photos as Quick Function buttons. Photo Playback Mode Quick Function Buttons Your digital camera has a four-directional pad that functions as a Slide Show with 3, 5 or 10 second intervals Up Right Displays the NEXT image Down Opens the ViviLink menu ...buttons to view by using the Thumbnail View. Zooming In/Out on a Photo Press the T / Zoom In button to zoom in on a photo on your camera will be displayed in the Thumbnail View. 3) Use the direction buttons to scroll and select the image you wish to view. 4) Press the SET button...
... Left Action Displays the PREVIOUS image Views all the Photos as Quick Function buttons. Photo Playback Mode Quick Function Buttons Your digital camera has a four-directional pad that functions as a Slide Show with 3, 5 or 10 second intervals Up Right Displays the NEXT image Down Opens the ViviLink menu ...buttons to view by using the Thumbnail View. Zooming In/Out on a Photo Press the T / Zoom In button to zoom in on a photo on your camera will be displayed in the Thumbnail View. 3) Use the direction buttons to scroll and select the image you wish to view. 4) Press the SET button...
Camera Manual
Page 33
... Out buttons to better set the camera display if desired. Opens the Video Playback Delete menu with your digital camera. Video Capture Mode Quick Function Buttons Your digital camera has a four-directional pad that the record is first powered ON, the camera will automatically be in Video Capture ...Mode use the LCD display on the top of the camera to start the video ...
... Out buttons to better set the camera display if desired. Opens the Video Playback Delete menu with your digital camera. Video Capture Mode Quick Function Buttons Your digital camera has a four-directional pad that the record is first powered ON, the camera will automatically be in Video Capture ...Mode use the LCD display on the top of the camera to start the video ...
Camera Manual
Page 46
...display the images on your camera in the Playback mode, you can delete videos from your camera through the delete menu. 1) View the image you can scroll and select images normally from the thumbnails. Video Playback Mode Quick Function Buttons Your digital camera has a four-directional ...pad that appear in your camera‟s Video Playback Mode: Delete Menu While in Thumbnail View - Button Left Up Right Down Action Displays ...
...display the images on your camera in the Playback mode, you can delete videos from your camera through the delete menu. 1) View the image you can scroll and select images normally from the thumbnails. Video Playback Mode Quick Function Buttons Your digital camera has a four-directional ...pad that appear in your camera‟s Video Playback Mode: Delete Menu While in Thumbnail View - Button Left Up Right Down Action Displays ...
Camera Manual
Page 53
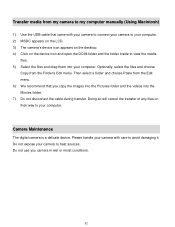
...the videos into your computer. Transfer media from my camera to my computer manually (Using Macintosh) 1) Use the USB cable that you camera in wet or moist conditions. 52 Please handle your camera to avoid damaging it. Optionally, select the files...camera with your camera to connect your camera to your computer. 2) MSDC appears on the LCD. 3) The camera‟s device icon appears on the desktop. 4) Click on their way to view the media files. 5) Select the files and drag them into the Movies folder. 7) Do not disconnect the cable during transfer. Camera Maintenance The digital camera...
...the videos into your computer. Transfer media from my camera to my computer manually (Using Macintosh) 1) Use the USB cable that you camera in wet or moist conditions. 52 Please handle your camera to avoid damaging it. Optionally, select the files...camera with your camera to connect your camera to your computer. 2) MSDC appears on the LCD. 3) The camera‟s device icon appears on the desktop. 4) Click on their way to view the media files. 5) Select the files and drag them into the Movies folder. 7) Do not disconnect the cable during transfer. Camera Maintenance The digital camera...

