DVR 980 Camera Manual
Page 1
All rights reserved. Windows and the Windows logo are the property of Microsoft Corporation. All other trademarks are registered trademarks of their respective companies. High Definition Digital Video Camera 980HD User's Manual © 2010 Sakar International, Inc.
All rights reserved. Windows and the Windows logo are the property of Microsoft Corporation. All other trademarks are registered trademarks of their respective companies. High Definition Digital Video Camera 980HD User's Manual © 2010 Sakar International, Inc.
DVR 980 Camera Manual
Page 3
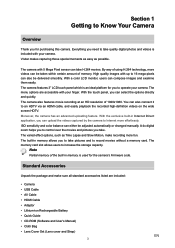
... camera's Firmware code. The memory card slot allows users to an HDTV via an HDMI cable, and easily playback the recorded high-definition videos on the wide screen HDTV. The varied effect options, such as possible. The menu options are included: • Camera • USB Cable • AV Cable • HDMI Cable • Adaptor • Lithium-ion Rechargeable Battery • Quick Guide • CD-ROM (Software and User's Manual) • Cloth Bag • Lens Cover Set (Lens...
... camera's Firmware code. The memory card slot allows users to an HDTV via an HDMI cable, and easily playback the recorded high-definition videos on the wide screen HDTV. The varied effect options, such as possible. The menu options are included: • Camera • USB Cable • AV Cable • HDMI Cable • Adaptor • Lithium-ion Rechargeable Battery • Quick Guide • CD-ROM (Software and User's Manual) • Cloth Bag • Lens Cover Set (Lens...

DVR 980 Camera Manual
Page 6
... ( + or -). 3. No pictures or movies can expand the memory capacity by using the camera, users must load the Lithium-ion rechargeable battery come within the package. 1. Insert the battery according to release it. 3. Insert the memory card into the slot. You can be recorded when the SD card is on the writeable position before recording any media. When the card pops out, gently remove it is...
... ( + or -). 3. No pictures or movies can expand the memory capacity by using the camera, users must load the Lithium-ion rechargeable battery come within the package. 1. Insert the battery according to release it. 3. Insert the memory card into the slot. You can be recorded when the SD card is on the writeable position before recording any media. When the card pops out, gently remove it is...
DVR 980 Camera Manual
Page 8
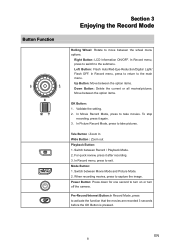
...Movie Mode and Picture Mode. 2. Tele Button : Zoom In Wide Button : Zoom out Playback Button: 1. Switch between the option items. Down Button: Delete the current or all movies/pictures. EN 8 In Picture Record Mode, press to exit. In Record menu, press to take movies. For quick review, press it again. 3. Mode Button: 1. Left Button: Flash Auto/Red-Eye-Reduction/Digital Light/ Flash OFF. Validate the setting. 2. Pre-Record/Internet Button:In Record Mode, press to take pictures. In Movie Record Mode, press to activate the function that the movies are recorded...
...Movie Mode and Picture Mode. 2. Tele Button : Zoom In Wide Button : Zoom out Playback Button: 1. Switch between the option items. Down Button: Delete the current or all movies/pictures. EN 8 In Picture Record Mode, press to exit. In Record menu, press to take movies. For quick review, press it again. 3. Mode Button: 1. Left Button: Flash Auto/Red-Eye-Reduction/Digital Light/ Flash OFF. Validate the setting. 2. Pre-Record/Internet Button:In Record Mode, press to take pictures. In Movie Record Mode, press to activate the function that the movies are recorded...

DVR 980 Camera Manual
Page 9
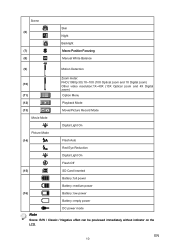
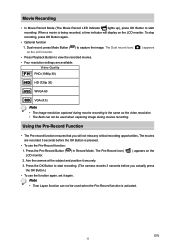
LCD Monitor Information The indicators shown below may display on LCD when movies and pictures are recorded: Movie Resolution (1) Picture Resolution (2) (3) (4) (5) FHD (1080p 30) HD (720p 30) WVGA 60 VGA (4:3) Slow Motion (Record movies at 320x240 resolution.) High (16 MP) Standard (5 MP) Low (3 MP) Recording time of the movie that can still be taken at current resolution Number of images that can still be taken at current resolution Self-timer enabled Dual Record Stabilization Pre-Record Mode Time Lapse EN 9
LCD Monitor Information The indicators shown below may display on LCD when movies and pictures are recorded: Movie Resolution (1) Picture Resolution (2) (3) (4) (5) FHD (1080p 30) HD (720p 30) WVGA 60 VGA (4:3) Slow Motion (Record movies at 320x240 resolution.) High (16 MP) Standard (5 MP) Low (3 MP) Recording time of the movie that can still be taken at current resolution Number of images that can still be taken at current resolution Self-timer enabled Dual Record Stabilization Pre-Record Mode Time Lapse EN 9
DVR 980 Camera Manual
Page 10
... Skin Night Backlight Macro Position Focusing Manual White Balance (9) Motion Detection Zoom meter: (10) FHD (1080p 30):1X~10X (10X Optical zoom and 1X Digital zoom) Other video resolution:1X~40X (10X Optical zoom and 4X Digital zoom) (11) Option Menu (12) Playback Mode (13) Movie/Picture Record Mode Movie Mode Digital Light On Picture Mode (14) Flash Auto Red Eye Reduction Digital Light On Flash Off (15) SD Card Inserted Battery: full power Battery: medium power (16) Battery: low power Battery: empty power DC power mode Note Scene: B/W / Classic / Negative effect...
... Skin Night Backlight Macro Position Focusing Manual White Balance (9) Motion Detection Zoom meter: (10) FHD (1080p 30):1X~10X (10X Optical zoom and 1X Digital zoom) Other video resolution:1X~40X (10X Optical zoom and 4X Digital zoom) (11) Option Menu (12) Playback Mode (13) Movie/Picture Record Mode Movie Mode Digital Light On Picture Mode (14) Flash Auto Red Eye Reduction Digital Light On Flash Off (15) SD Card Inserted Battery: full power Battery: medium power (16) Battery: low power Battery: empty power DC power mode Note Scene: B/W / Classic / Negative effect...
DVR 980 Camera Manual
Page 11
... • Time Lapse function can not be used when capturing image during movies recording is the same as the video resolution. • The flash can not be used when the Pre-Record function is activated. Movie Recording • In Movie Record Mode (The Movie Record LED Indicator lights up), press OK Button to start recording. (The camera records 3 seconds before the OK Button is pressed. • To use the function again, set it securely. 3. The Dual record icon( on...
... • Time Lapse function can not be used when capturing image during movies recording is the same as the video resolution. • The flash can not be used when the Pre-Record function is activated. Movie Recording • In Movie Record Mode (The Movie Record LED Indicator lights up), press OK Button to start recording. (The camera records 3 seconds before the OK Button is pressed. • To use the function again, set it securely. 3. The Dual record icon( on...
DVR 980 Camera Manual
Page 12
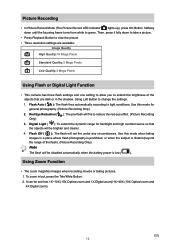
...:3 Mega Pixels Using Flash or Digital Light Function • This camera has three flash settings and one setting to allow you to reduce the red-eye effect. (Picture Recording 3. Using Zoom Function • The zoom magnifies images when recording movies or taking images in a place where flash photography is prohibited, or when the subject is low ( ). It can be disabled automatically when the battery power is distant (beyond the range of the flash). (Picture Recording Only) Note...
...:3 Mega Pixels Using Flash or Digital Light Function • This camera has three flash settings and one setting to allow you to reduce the red-eye effect. (Picture Recording 3. Using Zoom Function • The zoom magnifies images when recording movies or taking images in a place where flash photography is prohibited, or when the subject is low ( ). It can be disabled automatically when the battery power is distant (beyond the range of the flash). (Picture Recording Only) Note...
DVR 980 Camera Manual
Page 15
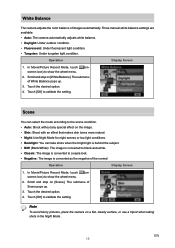
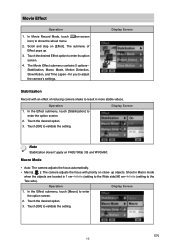
... images automatically. White Balance The camera adjusts the color balance of the normal Operation Display Screen 1. Scene You can select the mode according to the scene condition. • Auto: Shoot without any special effect on [Scene]. Touch [OK] to a sepia look. • Negative: The image is converted to validate the setting. Touch [OK] to show the wheel menu. 2. In Movie/Picture Record Mode, touch (onscreen icon) to validate the setting. In Movie/Picture Record Mode...
... images automatically. White Balance The camera adjusts the color balance of the normal Operation Display Screen 1. Scene You can select the mode according to the scene condition. • Auto: Shoot without any special effect on [Scene]. Touch [OK] to a sepia look. • Negative: The image is converted to validate the setting. Touch [OK] to show the wheel menu. 2. In Movie/Picture Record Mode, touch (onscreen icon) to validate the setting. In Movie/Picture Record Mode...
DVR 980 Camera Manual
Page 16
... videos. Touch [OK] to adjust the camera's settings. up . 3. The Movie Effect submenu contains 5 options-Stabilization, Macro Mode, Motion Detection, Slow Motion, and Time Lapse --for you to validate the setting. Macro Mode • Auto: The camera adjusts the focus automatically. • Macro( ): The camera adjusts the focus with an effect of Effect pops up objects. EN 16 Movie Effect Operation 1. In Movie Record Mode, touch icon) to validate the setting. Scroll and stop on -screen 2. Display Screen Stabilization Record...
... videos. Touch [OK] to adjust the camera's settings. up . 3. The Movie Effect submenu contains 5 options-Stabilization, Macro Mode, Motion Detection, Slow Motion, and Time Lapse --for you to validate the setting. Macro Mode • Auto: The camera adjusts the focus automatically. • Macro( ): The camera adjusts the focus with an effect of Effect pops up objects. EN 16 Movie Effect Operation 1. In Movie Record Mode, touch icon) to validate the setting. Scroll and stop on -screen 2. Display Screen Stabilization Record...

DVR 980 Camera Manual
Page 17
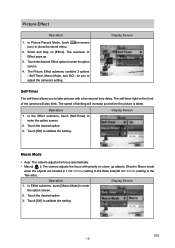
... setting. 4. Touch the desired option. 3. Stop recording if it detects a movement. Note • Stabilization function can set and play them as one movie file. • Off: Disable Time Lapse. • 1 Sec.: Record one frame per second. • 3 Sec.: Record one frame every 3 seconds. • 5 Sec.: Record one frame every 5 seconds. Display Screen Slow Motion Record videos with slow motion effect. Motion Detection Record videos automatically when the camera detects a movement. In the Effect submenu, touch [Slow Motion...
... setting. 4. Touch the desired option. 3. Stop recording if it detects a movement. Note • Stabilization function can set and play them as one movie file. • Off: Disable Time Lapse. • 1 Sec.: Record one frame per second. • 3 Sec.: Record one frame every 3 seconds. • 5 Sec.: Record one frame every 5 seconds. Display Screen Slow Motion Record videos with slow motion effect. Motion Detection Record videos automatically when the camera detects a movement. In the Effect submenu, touch [Slow Motion...
DVR 980 Camera Manual
Page 18
... menu. (on close- for you to adjust the camera's setting. The speed of Effect pops up objects. In the Effect submenu, touch [Self-Timer] to enter its option screen. 4. Display Screen Self-Timer The self-timer allows you to take pictures with priority on -screen 2. up . 3. Display Screen Macro Mode • Auto: The camera adjusts the focus automatically. • Macro( ): The camera adjusts the focus with a ten-second time delay. Picture Effect Operation 1. Operation...
... menu. (on close- for you to adjust the camera's setting. The speed of Effect pops up objects. In the Effect submenu, touch [Self-Timer] to enter its option screen. 4. Display Screen Self-Timer The self-timer allows you to take pictures with priority on -screen 2. up . 3. Display Screen Macro Mode • Auto: The camera adjusts the focus automatically. • Macro( ): The camera adjusts the focus with a ten-second time delay. Picture Effect Operation 1. Operation...

DVR 980 Camera Manual
Page 27
... change between the pages. Touch / on the screen. 2. Touch the desired option. 3. Section 5 Setting Your Camera Setting Menu Operation 1. Touch [OK] to enter the option screen. 2. Display Screen Sound Enable or disable the keypad tone and the operation sound. In the Setting submenu, touch [Sound] to validate the setting. The submenu of Setting pops up. 3. They are Sound (operation sound), TV, Language, Time Setting, Format, and Default Setting. 4. Touch (on [Setting]. Scroll and stop on -screen icon) when in Record Mode...
... change between the pages. Touch / on the screen. 2. Touch the desired option. 3. Section 5 Setting Your Camera Setting Menu Operation 1. Touch [OK] to enter the option screen. 2. Display Screen Sound Enable or disable the keypad tone and the operation sound. In the Setting submenu, touch [Sound] to validate the setting. The submenu of Setting pops up. 3. They are Sound (operation sound), TV, Language, Time Setting, Format, and Default Setting. 4. Touch (on [Setting]. Scroll and stop on -screen icon) when in Record Mode...
DVR 980 Camera Manual
Page 29
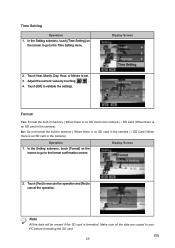
...-in memory ( When there is no SD card in the camera ) / SD Card (When there is an SD card in the camera). Touch [OK] to cancel the operation. Note All the data will be erased if the SD card is an SD card in the camera). In the Setting submenu, touch [Format] on the screen to go to the Time Setting menu. Make sure all the data are copied to set. 3. Operation 1. Display Screen...
...-in memory ( When there is no SD card in the camera ) / SD Card (When there is an SD card in the camera). Touch [OK] to cancel the operation. Note All the data will be erased if the SD card is an SD card in the camera). In the Setting submenu, touch [Format] on the screen to go to the Time Setting menu. Make sure all the data are copied to set. 3. Operation 1. Display Screen...

DVR 980 Camera Manual
Page 31
... pause. 2. In the Picture Playback mode, use Direction Buttons to navigate the magnified picture. Press OK Button to play movies and press it again to stop. 3. Connect one end of your TV to a non-high-definition 4:3 TV 1. Section 6 Viewing Pictures and Movies on the TV. Press OK Button to adjust the volume. 4. Connect the HDMI cable to your camera's HDMI Out port. 2. Use direction button to view stored pictures and movie on a TV. ( 4 : 3 ) Note The LCD Panel does not display...
... pause. 2. In the Picture Playback mode, use Direction Buttons to navigate the magnified picture. Press OK Button to play movies and press it again to stop. 3. Connect one end of your TV to a non-high-definition 4:3 TV 1. Section 6 Viewing Pictures and Movies on the TV. Press OK Button to adjust the volume. 4. Connect the HDMI cable to your camera's HDMI Out port. 2. Use direction button to view stored pictures and movie on a TV. ( 4 : 3 ) Note The LCD Panel does not display...
DVR 980 Camera Manual
Page 32
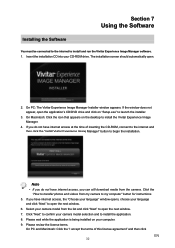
... on "Setup.exe" to install the Vivitar Experience Image Manager. 4. Insert the installation CD into your camera model from my camera to confirm your computer. 9. If you do not have internet access at the time of this license agreement" and then click EN 32 On PC: The Vivitar Experience Image Manager Installer window appears. Select your CD-ROM drive. Section 7 Using the Software Installing the Software You must be connected to...
... on "Setup.exe" to install the Vivitar Experience Image Manager. 4. Insert the installation CD into your camera model from my camera to confirm your computer. 9. If you do not have internet access at the time of this license agreement" and then click EN 32 On PC: The Vivitar Experience Image Manager Installer window appears. Select your CD-ROM drive. Section 7 Using the Software Installing the Software You must be connected to...

DVR 980 Camera Manual
Page 34
... offline and online albums • Edit images using automatic and manual tools • Use automatic "Geotagging" with built in Google Maps For more details on the bottom left showing the number of media files downloading to albums if desired. 7. You can : • Upload and manage photos and videos to the selected folder and albums ready for your camera (removable disk) from device" window opens. 3. The "Get Images from the device window. 2.
... offline and online albums • Edit images using automatic and manual tools • Use automatic "Geotagging" with built in Google Maps For more details on the bottom left showing the number of media files downloading to albums if desired. 7. You can : • Upload and manage photos and videos to the selected folder and albums ready for your camera (removable disk) from device" window opens. 3. The "Get Images from the device window. 2.

DVR 980 Camera Manual
Page 35
... menu. Transfer media: Using Macintosh To transfer media from your camera to your computer manually using Macintosh: 1. Use the USB cable that you copy the images into the Pictures folder and the videos into your computer. MSDC appears on their way to your computer. 2. Doing so will cancel the transfer of any files on the device icon and open the DCIM folder and the folder inside to view the media files. 5. EN 35 A window...
... menu. Transfer media: Using Macintosh To transfer media from your camera to your computer manually using Macintosh: 1. Use the USB cable that you copy the images into the Pictures folder and the videos into your computer. MSDC appears on their way to your computer. 2. Doing so will cancel the transfer of any files on the device icon and open the DCIM folder and the folder inside to view the media files. 5. EN 35 A window...
DVR 980 Camera Manual
Page 37
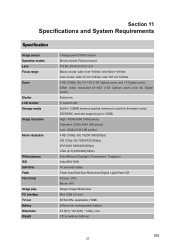
... VGA (4:3) 640X480(30fps) Auto/Manual (Daylight, Fluorescent, Tungsten) Auto/800/1600 10 seconds delay Flash Auto/Red-Eye-Reduction/Digital Light/Flash Off Picture: JPG Movie: AVI Single image/Slideshow Mini USB 2.0 port NTSC/PAL selectable, HDMI Lithium-ion rechargeable battery 67.5(H) * 62.3(W) * 122(L) mm 270 g (without battery) EN 37 Section 11 Specifications and System Requirements Specification Image sensor Operation modes Lens Focus range Zoom Shutter LCD monitor Storage media Image resolution Movie resolution White balance ISO Self-timer Flash File format Image play PC interface TV...
... VGA (4:3) 640X480(30fps) Auto/Manual (Daylight, Fluorescent, Tungsten) Auto/800/1600 10 seconds delay Flash Auto/Red-Eye-Reduction/Digital Light/Flash Off Picture: JPG Movie: AVI Single image/Slideshow Mini USB 2.0 port NTSC/PAL selectable, HDMI Lithium-ion rechargeable battery 67.5(H) * 62.3(W) * 122(L) mm 270 g (without battery) EN 37 Section 11 Specifications and System Requirements Specification Image sensor Operation modes Lens Focus range Zoom Shutter LCD monitor Storage media Image resolution Movie resolution White balance ISO Self-timer Flash File format Image play PC interface TV...

DVR 980 Camera Manual
Page 39
... charging Mode). 7. The camera must use the supplied AC charger or the USB cable. With test photos if the camera powers off . blinking light confirms charging, and the light becomes constant when the charging has been completed. marking. in fact taken photos. The battery power is not clear while shooting, how can the focus be turned OFF; Then, the light will sound when pictures are not stored in Section 5). 4. Section 12 Troubleshooting Troubleshooting 1. In the flash auto mode, the camera flash...
... charging Mode). 7. The camera must use the supplied AC charger or the USB cable. With test photos if the camera powers off . blinking light confirms charging, and the light becomes constant when the charging has been completed. marking. in fact taken photos. The battery power is not clear while shooting, how can the focus be turned OFF; Then, the light will sound when pictures are not stored in Section 5). 4. Section 12 Troubleshooting Troubleshooting 1. In the flash auto mode, the camera flash...


