Camera Manual
Page 2
... Video Capture Mode...13 Video Playback Mode ...28 Photo Capture Mode...32 Photo Playback Mode...50 Connecting the Digital Video Camera to a TV or HDTV 56 Installing the Software...58 Connecting the Camera to the Computer 59 Getting Photos and Videos from your Camera to Your Computer 60 Get started! ...61 Transferring Images Manually 62 Camera Maintenance ...63 Sakar Warranty Card ...64 Technical Support ...65 Troubleshooting ...65 2 Contents Introduction ...3 What‟s Included ...3 Parts of the Camera...4 Initial Camera Setup ...5 Main Camera Modes ...8 Camera Technical Specifications...
... Video Capture Mode...13 Video Playback Mode ...28 Photo Capture Mode...32 Photo Playback Mode...50 Connecting the Digital Video Camera to a TV or HDTV 56 Installing the Software...58 Connecting the Camera to the Computer 59 Getting Photos and Videos from your Camera to Your Computer 60 Get started! ...61 Transferring Images Manually 62 Camera Maintenance ...63 Sakar Warranty Card ...64 Technical Support ...65 Troubleshooting ...65 2 Contents Introduction ...3 What‟s Included ...3 Parts of the Camera...4 Initial Camera Setup ...5 Main Camera Modes ...8 Camera Technical Specifications...
Camera Manual
Page 6
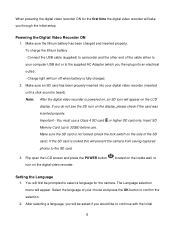
... digital video recorder (inserted until a click sound is heard). Important - If the SD card is fully charged. 2. When powering the digital video recorder ON for the camera. To charge the lithium battery: - You must use . Connect the USB cable (supplied) to camcorder and the other end of the cable either to Setting the Language 1. Charge light will prevent the camera from saving captured photos to the supplied AC Adapter (which you through the initial setup. Flip open the LCD screen and press the POWER button turn...
... digital video recorder (inserted until a click sound is heard). Important - If the SD card is fully charged. 2. When powering the digital video recorder ON for the camera. To charge the lithium battery: - You must use . Connect the USB cable (supplied) to camcorder and the other end of the cable either to Setting the Language 1. Charge light will prevent the camera from saving captured photos to the supplied AC Adapter (which you through the initial setup. Flip open the LCD screen and press the POWER button turn...
Camera Manual
Page 8
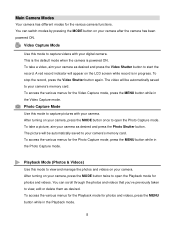
... capture videos with your camera‟s memory card. To take a picture, aim your digital camera. To stop the record, press the Video Shutter button again. The picture will be automatically saved to your camera, press the MODE button once to view, edit or delete them as desired and press the Photo Shutter button. You can scroll through the photos and videos that you‟ve previously taken to open the Playback mode for the various camera functions. Video Capture Mode Use this mode to open the Photo Capture mode. A red record...
... capture videos with your camera‟s memory card. To take a picture, aim your digital camera. To stop the record, press the Video Shutter button again. The picture will be automatically saved to your camera, press the MODE button once to view, edit or delete them as desired and press the Photo Shutter button. You can scroll through the photos and videos that you‟ve previously taken to open the Playback mode for the various camera functions. Video Capture Mode Use this mode to open the Photo Capture mode. A red record...
Camera Manual
Page 9
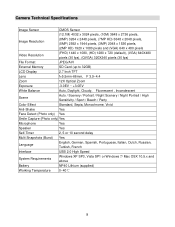
... (30 fps) File Format JPEG/AVI External Memory SD Card (up to 32GB) LCD Display 2.7 Inch TFT Lens f=5.5mm-66mm, F 3.9~4.4 Zoom 12X Optical Zoom Exposure -3.0EV ~ +3.0EV White Balance Auto, Daylight, Cloudy, Fluorescent , Incandescent Scene Auto / Scenery / Portrait / Night Scenery / Night Portrait / High Sensitivity / Sport / Beach / Party Color Effect Standard, Sepia, Monochrome, Vivid Anti-Shake Yes Face Detect (Photo only) Yes Smile Capture (Photo only) Yes Microphone Yes Speaker...
... (30 fps) File Format JPEG/AVI External Memory SD Card (up to 32GB) LCD Display 2.7 Inch TFT Lens f=5.5mm-66mm, F 3.9~4.4 Zoom 12X Optical Zoom Exposure -3.0EV ~ +3.0EV White Balance Auto, Daylight, Cloudy, Fluorescent , Incandescent Scene Auto / Scenery / Portrait / Night Scenery / Night Portrait / High Sensitivity / Sport / Beach / Party Color Effect Standard, Sepia, Monochrome, Vivid Anti-Shake Yes Face Detect (Photo only) Yes Smile Capture (Photo only) Yes Microphone Yes Speaker...
Camera Manual
Page 11
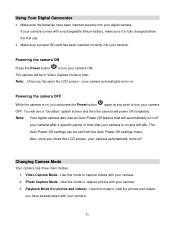
.... The Auto Power Off settings can press the Power button again at any point to turn your camera automatically turns on. Also, once you close the LCD screen, your camera automatically turns off your camera after a specific period of time that your camera is on , you can be in Video Capture mode to capture videos with your camera. 3. Changing Camera Mode Your camera has three main modes: 1. Powering the camera OFF While the camera is fully charged before the first use. ...
.... The Auto Power Off settings can press the Power button again at any point to turn your camera automatically turns on. Also, once you close the LCD screen, your camera automatically turns off your camera after a specific period of time that your camera is on , you can be in Video Capture mode to capture videos with your camera. 3. Changing Camera Mode Your camera has three main modes: 1. Powering the camera OFF While the camera is fully charged before the first use. ...

Camera Manual
Page 13
... STOP the video record, press the Video Shutter button again. 6. Taking a Video 1. Note: The actual shape of the digital video camera) to better set the camera display if desired. Down OK Delete Opens the Delete menu to the „Delete This Video?‟ option No Function in progress. You will see a red blinking icon at the top right corner on the LCD screen. 5. Note: Once you have finished recording, the total time you to capture videos with your digital video camera. Video Capture Mode Quick Function Buttons...
... STOP the video record, press the Video Shutter button again. 6. Taking a Video 1. Note: The actual shape of the digital video camera) to better set the camera display if desired. Down OK Delete Opens the Delete menu to the „Delete This Video?‟ option No Function in progress. You will see a red blinking icon at the top right corner on the LCD screen. 5. Note: Once you have finished recording, the total time you to capture videos with your digital video camera. Video Capture Mode Quick Function Buttons...
Camera Manual
Page 14
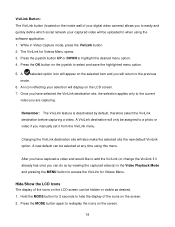
... in the Video Playback Mode and pressing the MENU button to access the ViviLink for Videos Menu. Remember: The ViviLink feature is deactivated by viewing the captured video(s) in Video Capture mode, press the ViviLink button. 2. Changing the ViviLink destination site will display on the LCD screen. 7. A ViviLink destination will only be uploaded to when using this menu. An icon reflecting your captured video will be assigned to a photo or video if you manually set it already has...
... in the Video Playback Mode and pressing the MENU button to access the ViviLink for Videos Menu. Remember: The ViviLink feature is deactivated by viewing the captured video(s) in Video Capture mode, press the ViviLink button. 2. Changing the ViviLink destination site will display on the LCD screen. 7. A ViviLink destination will only be uploaded to when using this menu. An icon reflecting your captured video will be assigned to a photo or video if you manually set it already has...
Camera Manual
Page 16
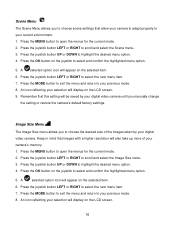
... the Image Size menu. 3. A selected option icon will display on the selected item. 6. An icon reflecting your selection will appear on the LCD screen. 16 Press the MENU button to choose the desired size of your camera‟s memory. 1. Remember that this setting will appear on the joystick to your digital video camera until you to open the menus for the current mode. 2. Press the joystick button LEFT...
... the Image Size menu. 3. A selected option icon will display on the selected item. 6. An icon reflecting your selection will appear on the LCD screen. 16 Press the MENU button to choose the desired size of your camera‟s memory. 1. Remember that this setting will appear on the joystick to your digital video camera until you to open the menus for the current mode. 2. Press the joystick button LEFT...
Camera Manual
Page 19
... button LEFT or RIGHT to your selection will be saved by your digital video camera until you manually change the setting or restore the camera‟s default factory settings. The sharpness level dictates if the edges of light that this setting will display on the joystick to select and confirm the highlighted menu option. 5. Remember that enters your digital video camera until you manually change the setting or restore the camera‟s default factory settings...
... button LEFT or RIGHT to your selection will be saved by your digital video camera until you manually change the setting or restore the camera‟s default factory settings. The sharpness level dictates if the edges of light that this setting will display on the joystick to select and confirm the highlighted menu option. 5. Remember that enters your digital video camera until you manually change the setting or restore the camera‟s default factory settings...
Camera Manual
Page 21
... greater weight to set the exposure on the selected item. 6. Used in the center of subject, brightness, background, direct light and scenes Spot - Press the joystick button UP or DOWN to highlight the desired menu option. 4. An icon reflecting your digital video camera until you manually change the setting or restore the camera‟s default factory settings. Press the MODE button to exit the menu and return to...
... greater weight to set the exposure on the selected item. 6. Used in the center of subject, brightness, background, direct light and scenes Spot - Press the joystick button UP or DOWN to highlight the desired menu option. 4. An icon reflecting your digital video camera until you manually change the setting or restore the camera‟s default factory settings. Press the MODE button to exit the menu and return to...
Camera Manual
Page 22
... previous mode. 8. The timestamp will display on the LCD screen. 9. An icon reflecting your digital video camera until you to your digital video camera‟s language setting by selecting the desired language from the Language menu. 1. The date stamp will include a time stamp with the date and time that this setting will appear on the joystick to select the next menu item. 7. Remember that the image was taken. The Date/Time menu allows you manually change the setting...
... previous mode. 8. The timestamp will display on the LCD screen. 9. An icon reflecting your digital video camera until you to your digital video camera‟s language setting by selecting the desired language from the Language menu. 1. The date stamp will include a time stamp with the date and time that this setting will appear on the joystick to select the next menu item. 7. Remember that the image was taken. The Date/Time menu allows you manually change the setting...
Camera Manual
Page 23
... joystick button. Auto Power Off Menu You can use the Auto Power Off feature in the menu, use . 1. Press the MODE button to exit the menu and return to your digital video camera until you have completed setting the time and date, press the OK on the selected item. 6. Press the MENU button to select and confirm and enter the "Date Setup" option. 3. Once you manually change the setting or restore the camera‟s default factory settings. Press...
... joystick button. Auto Power Off Menu You can use the Auto Power Off feature in the menu, use . 1. Press the MODE button to exit the menu and return to your digital video camera until you have completed setting the time and date, press the OK on the selected item. 6. Press the MENU button to select and confirm and enter the "Date Setup" option. 3. Once you manually change the setting or restore the camera‟s default factory settings. Press...

Camera Manual
Page 25
... TV Mode menu. 3. Press the joystick button LEFT or RIGHT to delete individual images, use the Format Memory menu to delete all media on the card?" 25 Remember that formatting the memory card will permanently delete all of the content on your digital video camera until you manually change the setting or restore the camera‟s default factory settings. Press the joystick button LEFT or RIGHT to delete all of the content at one time. television and video standard used...
... TV Mode menu. 3. Press the joystick button LEFT or RIGHT to delete individual images, use the Format Memory menu to delete all media on the card?" 25 Remember that formatting the memory card will permanently delete all of the content on your digital video camera until you manually change the setting or restore the camera‟s default factory settings. Press the joystick button LEFT or RIGHT to delete all of the content at one time. television and video standard used...
Camera Manual
Page 26
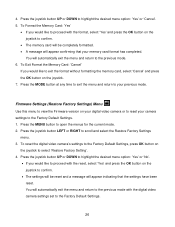
... or DOWN to confirm. The settings will be completely formatted. A message will automatically exit the menu and return to the previous mode with the reset, select „Yes‟ and press the OK button on the joystick. 7. Firmware Settings (Restore Factory Settings) Menu Use this menu to view the Firmware version on your digital video camera or to exit the format without formatting the memory card, select „Cancel‟ and...
... or DOWN to confirm. The settings will be completely formatted. A message will automatically exit the menu and return to the previous mode with the reset, select „Yes‟ and press the OK button on the joystick. 7. Firmware Settings (Restore Factory Settings) Menu Use this menu to view the Firmware version on your digital video camera or to exit the format without formatting the memory card, select „Cancel‟ and...

Camera Manual
Page 27
... the MENU button to the Factory settings. After you have not selected a system Language (after resetting to open the menus. - To exit the reset: If you would like . - Note: Selecting the system Language is required after the RESETTING to the Factory settings) and the digital video camera is turned off, the next time the digital video camera is powered on, you immediately continue using the digital video camera, the language will be set to the default: English...
... the MENU button to the Factory settings. After you have not selected a system Language (after resetting to open the menus. - To exit the reset: If you would like . - Note: Selecting the system Language is required after the RESETTING to the Factory settings) and the digital video camera is turned off, the next time the digital video camera is powered on, you immediately continue using the digital video camera, the language will be set to the default: English...
Camera Manual
Page 28
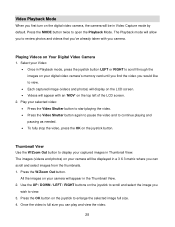
... image full size. 4. Play your camera will appear with you camera. Press the W/Zoom Out button. The Playback mode will be displayed in the Thumbnail View. 2. Use the UP / DOWN / LEFT / RIGHT buttons on the joystick button. Video Playback Mode When you first turn on the digital video camera, the camera will allow you to review photos and videos that you‟ve already taken with an „MOV' on the top left of the LCD screen...
... image full size. 4. Play your camera will appear with you camera. Press the W/Zoom Out button. The Playback mode will be displayed in the Thumbnail View. 2. Use the UP / DOWN / LEFT / RIGHT buttons on the joystick button. Video Playback Mode When you first turn on the digital video camera, the camera will allow you to review photos and videos that you‟ve already taken with an „MOV' on the top left of the LCD screen...

Camera Manual
Page 32
... the Self-Timer Options: 2 seconds, 5 seconds, 10 seconds, Off Light Exposure (-3.0EV ~ +3.0EV) Increases the Light Exposure + Light Exposure (-3.0EV ~ +3.0EV) Reduces the Light Exposure LED Light Turns the LED Flash On / Off 32 Down OK Delete Opens the Delete menu to take the picture. 4. While in Photo Capture mode, use the LCD display to direct the digital video camera at the scene you to capture pictures with your digital video camera. Button Function Right Left EV + Up EV-
... the Self-Timer Options: 2 seconds, 5 seconds, 10 seconds, Off Light Exposure (-3.0EV ~ +3.0EV) Increases the Light Exposure + Light Exposure (-3.0EV ~ +3.0EV) Reduces the Light Exposure LED Light Turns the LED Flash On / Off 32 Down OK Delete Opens the Delete menu to take the picture. 4. While in Photo Capture mode, use the LCD display to direct the digital video camera at the scene you to capture pictures with your digital video camera. Button Function Right Left EV + Up EV-
Camera Manual
Page 56
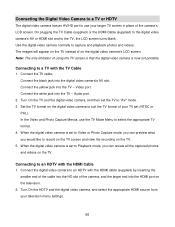
... the digital video camera to "AV" mode. 3. Use the digital video camera normally to the TV, the LCD screen turns blank. Set the TV format on the digital video camera‟s LCD screen. Connect the white jack into the digital video camera‟s AV slot. On plugging the TV Cable (supplied) or the HDMI Cable (supplied) to the digital video camera‟s AV or HDMI slot and to capture and playback photos and videos. Video port. Turn On the TV and the digital video camera, and then set (NTSC or...
... the digital video camera to "AV" mode. 3. Use the digital video camera normally to the TV, the LCD screen turns blank. Set the TV format on the digital video camera‟s LCD screen. Connect the white jack into the digital video camera‟s AV slot. On plugging the TV Cable (supplied) or the HDMI Cable (supplied) to the digital video camera‟s AV or HDMI slot and to capture and playback photos and videos. Video port. Turn On the TV and the digital video camera, and then set (NTSC or...

Camera Manual
Page 57
When the digital video camera is set to Video or Photo Capture mode, you can preview what you would like to Playback mode, you can review all the captured photos and videos on the HDTV. 57 When the digital video camera is set (NTSC or PAL). In the Video and Photo Capture Menus, use the TV Mode Menu to suit the TV format of your TV set to record on the HDTV screen and view the recording on the digital video camera to select the TV format. 4. 3. Set the TV format on the HDTV. 5.
When the digital video camera is set to Video or Photo Capture mode, you can preview what you would like to Playback mode, you can review all the captured photos and videos on the HDTV. 57 When the digital video camera is set (NTSC or PAL). In the Video and Photo Capture Menus, use the TV Mode Menu to suit the TV format of your TV set to record on the HDTV screen and view the recording on the digital video camera to select the TV format. 4. 3. Set the TV format on the HDTV. 5.

Camera Manual
Page 60
... download photos, videos or both. 4. Doing so will be inserted in the digital video camera. Select to remove the media files from device" window opens. 3. Select a location on their way to your computer. 1. The "Get media from the selected device (removable disk) after the import. 8. Click the "Get Media" button to transfer the photos and videos from your Camera to Your Computer The SD card must be selected automatically. 5. If your camera is the only USB device connected...
... download photos, videos or both. 4. Doing so will be inserted in the digital video camera. Select to remove the media files from device" window opens. 3. Select a location on their way to your computer. 1. The "Get media from the selected device (removable disk) after the import. 8. Click the "Get Media" button to transfer the photos and videos from your Camera to Your Computer The SD card must be selected automatically. 5. If your camera is the only USB device connected...


