
Camera Manual
Page 1
Windows and the Windows logo are the property of Microsoft Corporation. All other trademarks are registered trademarks of their respective companies. DVR 740HD Digital Video Camera User Manual © 2009-2011 Sakar International, Inc. All rights reserved.
Windows and the Windows logo are the property of Microsoft Corporation. All other trademarks are registered trademarks of their respective companies. DVR 740HD Digital Video Camera User Manual © 2009-2011 Sakar International, Inc. All rights reserved.

Camera Manual
Page 2
Macintosh 4 Parts of the Camera ...5 Initial Camera Setup ...6 Powering ON/OFF Your Digital Video Camera 8 Changing DVR Mode ...8 Video Capture Mode ...9 Photo Capture Mode ...12 Playback Mode ...15 Setup Mode...18 Connecting the Digital Video Camera to a TV and HDTV 21 Installing the Software...23 Connecting the Camera to the Computer 24 Getting Photos and Videos from Your Camera to Your Computer 25 Get started! ...26 Transfer media from my camera to my computer manually 26 Camera Maintenance...28 Sakar Warranty Card ...28 Technical Support ...29 Troubleshooting ...29 1 Contents ...
Macintosh 4 Parts of the Camera ...5 Initial Camera Setup ...6 Powering ON/OFF Your Digital Video Camera 8 Changing DVR Mode ...8 Video Capture Mode ...9 Photo Capture Mode ...12 Playback Mode ...15 Setup Mode...18 Connecting the Digital Video Camera to a TV and HDTV 21 Installing the Software...23 Connecting the Camera to the Computer 24 Getting Photos and Videos from Your Camera to Your Computer 25 Get started! ...26 Transfer media from my camera to my computer manually 26 Camera Maintenance...28 Sakar Warranty Card ...28 Technical Support ...29 Troubleshooting ...29 1 Contents ...

Camera Manual
Page 3
...;s Included 1) Digital Video Camera 2) USB cable 3) TV Cable 4) Vivitar Experience Image Manager Software Installation CD Note: Class 4 (or higher) SD Memory card not included. 2 SD Memory cards are not included and need to take quality digital photos and videos is included with your digital video camera. Vivitar makes capturing those special moments as easy as possible. Important: You must use . Please read this digital video camera. Introduction Thank you need to be purchased separately. Note: Your digital video camera needs an SD Memory card (up...
...;s Included 1) Digital Video Camera 2) USB cable 3) TV Cable 4) Vivitar Experience Image Manager Software Installation CD Note: Class 4 (or higher) SD Memory card not included. 2 SD Memory cards are not included and need to take quality digital photos and videos is included with your digital video camera. Vivitar makes capturing those special moments as easy as possible. Important: You must use . Please read this digital video camera. Introduction Thank you need to be purchased separately. Note: Your digital video camera needs an SD Memory card (up...

Camera Manual
Page 4
... f=6.1mm, F2.8 4X Digital Zoom -3.0EV ~ +3.0EV Auto Auto Auto English / French / Spanish / Portuguese / German / Dutch / Italian / Russian / Turkish 2 LED Flash lamps Yes USB 2.0 High Speed Windows XP (SP 3), Vista (SP1) and 7 / Mac OSX v10.5.x and above Yes Yes 4 * AAA (1.5V) batteries 0~40C 3 Camera Technical Specifications Image Sensor Image Resolution Video Resolution File Format External Memory LCD Display Lens Zoom Exposure White Balance ISO Scene Language Flash Face Detect Interface System Requirements Microphone Speaker Battery Working Temperature CMOS Sensor 1280X1024...
... f=6.1mm, F2.8 4X Digital Zoom -3.0EV ~ +3.0EV Auto Auto Auto English / French / Spanish / Portuguese / German / Dutch / Italian / Russian / Turkish 2 LED Flash lamps Yes USB 2.0 High Speed Windows XP (SP 3), Vista (SP1) and 7 / Mac OSX v10.5.x and above Yes Yes 4 * AAA (1.5V) batteries 0~40C 3 Camera Technical Specifications Image Sensor Image Resolution Video Resolution File Format External Memory LCD Display Lens Zoom Exposure White Balance ISO Scene Language Flash Face Detect Interface System Requirements Microphone Speaker Battery Working Temperature CMOS Sensor 1280X1024...

Camera Manual
Page 7
... camera features (Flash) will not work if the battery power level is low. When the battery power is low the battery icon turns red and the camera will automatically turn off a few seconds later. The energy status of the power is displayed on LCD as shown below: Full battery power Medium battery power Low battery power 2) Installing the SD Memory Card IMPORTANT: You must use a Class 4 SD card or higher SD card only. 6 Initial Camera Setup Powering the Camera ON 1) Installing the Batteries...
... camera features (Flash) will not work if the battery power level is low. When the battery power is low the battery icon turns red and the camera will automatically turn off a few seconds later. The energy status of the power is displayed on LCD as shown below: Full battery power Medium battery power Low battery power 2) Installing the SD Memory Card IMPORTANT: You must use a Class 4 SD card or higher SD card only. 6 Initial Camera Setup Powering the Camera ON 1) Installing the Batteries...

Camera Manual
Page 8
... 4 (or higher) SD card (up to turn on the side of the SD card). To properly insert the SD Card: - Note: After the camera is powered on, an SD icon will prevent the camera from saving captured photos to the SD card. 3) Powering ON the camera Press the POWER button to 32GB) has been properly inserted into the slot in the direction shown on the LCD display.
... 4 (or higher) SD card (up to turn on the side of the SD card). To properly insert the SD Card: - Note: After the camera is powered on, an SD icon will prevent the camera from saving captured photos to the SD card. 3) Powering ON the camera Press the POWER button to 32GB) has been properly inserted into the slot in the direction shown on the LCD display.

Camera Manual
Page 9
... into your camera. (SD card up to capture photos with your camera OFF. Use this mode to capture and view your camera ON. Note: Your digital video camera also has an Auto Power Off feature that will be active. 8 Changing DVR Mode Your digital video camera has three main modes to capture videos with your camcorder settings. The camera will automatically turn your images: 1) Video Capture Mode - Use this mode to turn off your camera after 3 minutes that your camera is first powered ON, the Video Capture Mode will power off completely...
... into your camera. (SD card up to capture photos with your camera OFF. Use this mode to capture and view your camera ON. Note: Your digital video camera also has an Auto Power Off feature that will be active. 8 Changing DVR Mode Your digital video camera has three main modes to capture videos with your camcorder settings. The camera will automatically turn your images: 1) Video Capture Mode - Use this mode to turn off your camera after 3 minutes that your camera is first powered ON, the Video Capture Mode will power off completely...

Camera Manual
Page 10
... video will automatically be in Playback Mode, this icon will be saved to capture videos with your digital video camera. Taking a Video 1) While in Video Capture Mode use the LCD display to direct the camera at the top of the LCD screen indicating that the record is first powered ON, the camcorder will display on the item as you exit the Mode List and the selected mode option opens. 5) NOTE: Alternatively, if you to the camera‟s SD memory card. 9 T/Zoom...
... video will automatically be in Playback Mode, this icon will be saved to capture videos with your digital video camera. Taking a Video 1) While in Video Capture Mode use the LCD display to direct the camera at the top of the LCD screen indicating that the record is first powered ON, the camcorder will display on the item as you exit the Mode List and the selected mode option opens. 5) NOTE: Alternatively, if you to the camera‟s SD memory card. 9 T/Zoom...
Camera Manual
Page 11
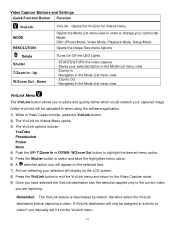
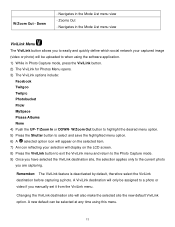
... icon reflecting your captured image (video or photo) will only be uploaded to when using the software application. 1) While in Video Capture mode, press the ViviLink button. 2) The ViviLink for Videos menu Opens the Mode List menu view in order to change your selected option in the Mode List menu view - Remember: The ViviLink feature is deactivated by default, therefore select the ViviLink destination before capturing a video. Saves your camcorder Mode: DSC (Photo) Mode, Video Mode, Playback Mode, Setup Mode Opens the Image Size menu options Delete Shutter T/Zoom In - A ViviLink...
... icon reflecting your captured image (video or photo) will only be uploaded to when using the software application. 1) While in Video Capture mode, press the ViviLink button. 2) The ViviLink for Videos menu Opens the Mode List menu view in order to change your selected option in the Mode List menu view - Remember: The ViviLink feature is deactivated by default, therefore select the ViviLink destination before capturing a video. Saves your camcorder Mode: DSC (Photo) Mode, Video Mode, Playback Mode, Setup Mode Opens the Image Size menu options Delete Shutter T/Zoom In - A ViviLink...

Camera Manual
Page 12
... display of the icons on the LCD screen can be selected at any time using this setting will also make the selected site the new default ViviLink option. After you have captured a video and would like to add the ViviLink (or change the setting or restore the camera‟s default factory settings. LED Flash Option To increase the lighting in mind that this menu. W/Zoom Out button...
... display of the icons on the LCD screen can be selected at any time using this setting will also make the selected site the new default ViviLink option. After you have captured a video and would like to add the ViviLink (or change the setting or restore the camera‟s default factory settings. LED Flash Option To increase the lighting in mind that this menu. W/Zoom Out button...

Camera Manual
Page 13
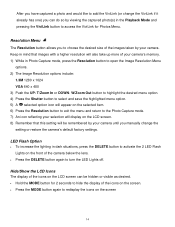
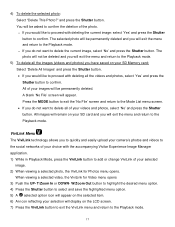
... a Picture 1) While in Photo Capture Mode use the LCD display to direct the camera at the scene you to change your camcorder Mode: DSC (Photo) Mode, Video Mode, Playback Mode, Setup Mode Opens the Image Resolution menu options Delete Shutter T/Zoom In - W/Zoom Out button to better set the camera display if desired. 3) Press the Shutter button to capture your photo. 4) The photo will automatically be saved to capture. 2) Push the UP- When the DVR is powered on the item and the selected mode option, DSC, opens. Opens the ViviLink for Photos menu Opens the Mode List menu view...
... a Picture 1) While in Photo Capture Mode use the LCD display to direct the camera at the scene you to change your camcorder Mode: DSC (Photo) Mode, Video Mode, Playback Mode, Setup Mode Opens the Image Resolution menu options Delete Shutter T/Zoom In - W/Zoom Out button to better set the camera display if desired. 3) Press the Shutter button to capture your photo. 4) The photo will automatically be saved to capture. 2) Push the UP- When the DVR is powered on the item and the selected mode option, DSC, opens. Opens the ViviLink for Photos menu Opens the Mode List menu view...
Camera Manual
Page 14
... applies only to a photo or video if you are capturing. A ViviLink destination will also make the selected site the new default ViviLink option. Changing the ViviLink destination site will only be selected at any time using the software application. 1) While in the Mode List menu view - W/Zoom Out - A new default can be assigned to the current photo you manually set it from the ViviLink...
... applies only to a photo or video if you are capturing. A ViviLink destination will also make the selected site the new default ViviLink option. Changing the ViviLink destination site will only be selected at any time using the software application. 1) While in the Mode List menu view - W/Zoom Out - A new default can be assigned to the current photo you manually set it from the ViviLink...
Camera Manual
Page 15
...- LED Flash Option To increase the lighting in the Playback Mode and pressing the ViviLink button to access the ViviLink for 2 seconds to hide the display of the camera below the lens. Press the DELETE button again to turn the LED Lights off. After you have captured a photo and would like to add the ViviLink (or change the setting or restore the camera‟s default factory settings. T/Zoom In...
...- LED Flash Option To increase the lighting in the Playback Mode and pressing the ViviLink button to access the ViviLink for 2 seconds to hide the display of the camera below the lens. Press the DELETE button again to turn the LED Lights off. After you have captured a photo and would like to add the ViviLink (or change the setting or restore the camera‟s default factory settings. T/Zoom In...

Camera Manual
Page 16
... DOWN-W/Zoom Out button down to highlight the PLAYBACK mode selection. 3) Press the Shutter button to STOP the video playback. If there are no images stored, a message (No File) appears. Playback Mode Buttons and Settings Quick Function Button Function ViviLink MODE ViviLink - Playback Mode The Playback Mode allows you to change your camcorder 15 Opens the ViviLink for Photos menu Opens the Mode List menu view in Video Capture mode by default. When you first turn on the top left of the LCD screen. 2) Playing your selected Video: Once you camera. Videos appear...
... DOWN-W/Zoom Out button down to highlight the PLAYBACK mode selection. 3) Press the Shutter button to STOP the video playback. If there are no images stored, a message (No File) appears. Playback Mode Buttons and Settings Quick Function Button Function ViviLink MODE ViviLink - Playback Mode The Playback Mode allows you to change your camcorder 15 Opens the ViviLink for Photos menu Opens the Mode List menu view in Video Capture mode by default. When you first turn on the top left of the LCD screen. 2) Playing your selected Video: Once you camera. Videos appear...
Camera Manual
Page 18
... press the Shutter button. Press the MODE button to exit the „No File‟ screen and return to the Mode List menu screen. If you do not want to the Playback mode. 17 4) To delete the selected photo: Select "Delete This Photo?" and press the Shutter button. All of your images will be permanently deleted and you will appear. When viewing a selected video, the ViviLink for Photos menu opens. T/Zoom In or DOWN...
... press the Shutter button. Press the MODE button to exit the „No File‟ screen and return to the Mode List menu screen. If you do not want to the Playback mode. 17 4) To delete the selected photo: Select "Delete This Photo?" and press the Shutter button. All of your images will be permanently deleted and you will appear. When viewing a selected video, the ViviLink for Photos menu opens. T/Zoom In or DOWN...
Camera Manual
Page 21
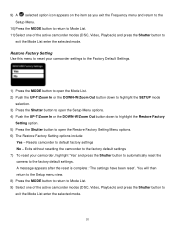
... the Shutter button to open the Setup Menu options. 4) Push the UP-T/Zoom In or the DOWN-W/Zoom Out button down to highlight the Restore Factory Setting option. 5) Press the Shutter button to the factory default settings. You will then return to the Setup menu view. 8) Press the MODE button to return to Mode List. 9) Select one of the active camcorder modes (DSC, Video, Playback) and press the Shutter button to default factory settings No - A message appears after the reset...
... the Shutter button to open the Setup Menu options. 4) Push the UP-T/Zoom In or the DOWN-W/Zoom Out button down to highlight the Restore Factory Setting option. 5) Press the Shutter button to the factory default settings. You will then return to the Setup menu view. 8) Press the MODE button to return to Mode List. 9) Select one of the active camcorder modes (DSC, Video, Playback) and press the Shutter button to default factory settings No - A message appears after the reset...

Camera Manual
Page 22
... separately). Use the camera as per the format of the TV set you are using and press the SET button. 6) When the camera is set to record mode, you can review all the photos and videos stored in place of using the TV screen is that the camera is set to Playback mode, you would to capture and playback photos and videos. The images will need to set to the correct TV Output setting. The images will turns blank. Connecting the Digital Video Camera to...
... separately). Use the camera as per the format of the TV set you are using and press the SET button. 6) When the camera is set to record mode, you can review all the photos and videos stored in place of using the TV screen is that the camera is set to Playback mode, you would to capture and playback photos and videos. The images will need to set to the correct TV Output setting. The images will turns blank. Connecting the Digital Video Camera to...
Camera Manual
Page 24
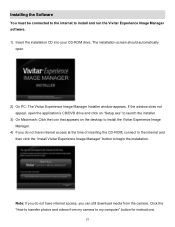
..." button for instructions. 23 Click the "How to transfer photos and videos from the camera. Note: If you can still download media from my camera to install and run the Vivitar Experience Image Manager software. 1) Insert the installation CD into your CD-ROM drive. If the window does not appear, open . 2) On PC: The Vivitar Experience Image Manager Installer window appears. The installation screen should automatically open the application‟s CD/DVD drive and click on "Setup.exe...
..." button for instructions. 23 Click the "How to transfer photos and videos from the camera. Note: If you can still download media from my camera to install and run the Vivitar Experience Image Manager software. 1) Insert the installation CD into your CD-ROM drive. If the window does not appear, open . 2) On PC: The Vivitar Experience Image Manager Installer window appears. The installation screen should automatically open the application‟s CD/DVD drive and click on "Setup.exe...
Camera Manual
Page 28
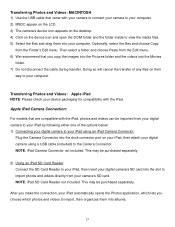
... the folder inside to import photos and videos directly from your camera's SD card. This may be purchased separately. Apple iPad Camera Connection: For models that you copy the images into the Pictures folder and the videos into albums. 27 This may be imported from your digital camera to your iPad by following either one of any files on your iPad, then attach your digital camera using a USB cable (included) to your...
... the folder inside to import photos and videos directly from your camera's SD card. This may be purchased separately. Apple iPad Camera Connection: For models that you copy the images into the Pictures folder and the videos into albums. 27 This may be imported from your digital camera to your iPad by following either one of any files on your iPad, then attach your digital camera using a USB cable (included) to your...

Camera Manual
Page 29
..., modification or accident. Do not expose your digital video camera with care to defects in material or workmanship will be repaired at no charge for parts or labor for service, your package should include: 1) Copy of original bill of sale 2) A detailed written description of one year. Products that fail to function properly UNDER NORMAL USAGE, due to avoid damaging...
..., modification or accident. Do not expose your digital video camera with care to defects in material or workmanship will be repaired at no charge for parts or labor for service, your package should include: 1) Copy of original bill of sale 2) A detailed written description of one year. Products that fail to function properly UNDER NORMAL USAGE, due to avoid damaging...


