
Camera Manual
Page 1
All other trademarks are registered trademarks of their respective companies. All rights reserved. Windows and the Windows logo are the property of Microsoft Corporation. DVR 650 Digital Video Camera User Manual © 2010 Sakar International, Inc.
All other trademarks are registered trademarks of their respective companies. All rights reserved. Windows and the Windows logo are the property of Microsoft Corporation. DVR 650 Digital Video Camera User Manual © 2010 Sakar International, Inc.
Camera Manual
Page 3
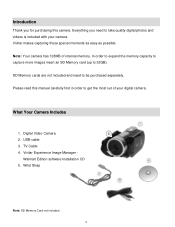
... Memory cards are not included and need to take quality digital photos and videos is included with your digital camera. USB cable 3. Wrist Strap Note: SD Memory Card not included 2 Vivitar makes capturing those special moments as easy as possible. Vivitar Experience Image Manager - In order to expand the memory capacity to capture more images insert an SD Memory card (up to get the most out of internal memory. Walmart Edition software Installation CD 5. Digital Video Camera 2. TV Cable...
... Memory cards are not included and need to take quality digital photos and videos is included with your digital camera. USB cable 3. Wrist Strap Note: SD Memory Card not included 2 Vivitar makes capturing those special moments as easy as possible. Vivitar Experience Image Manager - In order to expand the memory capacity to capture more images insert an SD Memory card (up to get the most out of internal memory. Walmart Edition software Installation CD 5. Digital Video Camera 2. TV Cable...
Camera Manual
Page 6
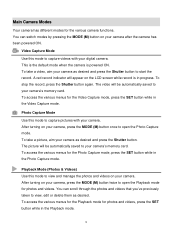
... menus for the Photo Capture mode, press the SET button while in the Video Capture mode. After turning on the LCD screen while record is powered ON. Video Capture Mode Use this mode to view, edit or delete them as desired. To take a video, aim your camera. To access the various menus for the Video Capture mode, press the SET button while in the Photo Capture mode. Playback Mode (Photos & Videos) Use this mode to capture pictures with your digital camera. A red record indicator will be automatically saved to open the Playback mode for photos and videos. You can...
... menus for the Photo Capture mode, press the SET button while in the Video Capture mode. After turning on the LCD screen while record is powered ON. Video Capture Mode Use this mode to view, edit or delete them as desired. To take a video, aim your camera. To access the various menus for the Video Capture mode, press the SET button while in the Photo Capture mode. Playback Mode (Photos & Videos) Use this mode to capture pictures with your digital camera. A red record indicator will be automatically saved to open the Playback mode for photos and videos. You can...

Camera Manual
Page 7
... Internal Memory External Memory LCD Display 128 MB SD Card (up to 32GB) 1.8 Inch TFT Lens Zoom Exposure 3P 4X Digital Zoom -3.0EV ~ +3.0EV White Balance Scene Auto, Daylight, Cloudy, Incandescent , Fluorescent Auto / Scenery / Portrait / Night Scenery / Night Portrait / High Sensitivity / Sport / Beach / Party Color Effect Microphone Speaker Standard, Sepia, Monochrome, Vivid Yes Yes Self-Timer 2, 5 or 10 second delay Multi Snapshots (Burst) Yes Interface System Requirements Battery USB 2.0 Windows...
... Internal Memory External Memory LCD Display 128 MB SD Card (up to 32GB) 1.8 Inch TFT Lens Zoom Exposure 3P 4X Digital Zoom -3.0EV ~ +3.0EV White Balance Scene Auto, Daylight, Cloudy, Incandescent , Fluorescent Auto / Scenery / Portrait / Night Scenery / Night Portrait / High Sensitivity / Sport / Beach / Party Color Effect Microphone Speaker Standard, Sepia, Monochrome, Vivid Yes Yes Self-Timer 2, 5 or 10 second delay Multi Snapshots (Burst) Yes Interface System Requirements Battery USB 2.0 Windows...
Camera Manual
Page 9
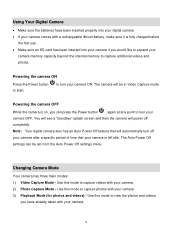
... an Auto Power Off feature that your camera. 8 Use this mode to capture additional videos and photos. to turn your camera memory capacity beyond the internal memory to capture photos with a rechargeable lithium battery, make sure it is fully charged before the first use. Make sure an SD card has been inserted into your digital camera. If your camera comes with your camera OFF. The camera will automatically turn your camera. 3) Playback Mode (for photos and videos) - Use this mode...
... an Auto Power Off feature that your camera. 8 Use this mode to capture additional videos and photos. to turn your camera memory capacity beyond the internal memory to capture photos with a rechargeable lithium battery, make sure it is fully charged before the first use. Make sure an SD card has been inserted into your digital camera. If your camera comes with your camera OFF. The camera will automatically turn your camera. 3) Playback Mode (for photos and videos) - Use this mode...

Camera Manual
Page 11
... saved to the camera‟s memory or SD card. Video Capture Mode Quick Function Buttons Your digital camera has a four-directional pad that the record is first powered ON, the camera will automatically be in Video Capture Mode use the LCD display to direct the camera at the top of the directional pad to start the video capture. 4) You will see a red icon at the scene you to the „Delete Last Video‟ option ViviLink Opens the ViviLink menu 10 Video Capture Mode The Video Capture Mode...
... saved to the camera‟s memory or SD card. Video Capture Mode Quick Function Buttons Your digital camera has a four-directional pad that the record is first powered ON, the camera will automatically be in Video Capture Mode use the LCD display to direct the camera at the top of the directional pad to start the video capture. 4) You will see a red icon at the scene you to the „Delete Last Video‟ option ViviLink Opens the ViviLink menu 10 Video Capture Mode The Video Capture Mode...

Camera Manual
Page 13
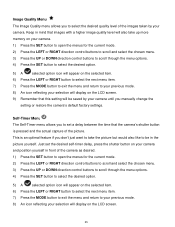
... display on the LCD screen. 9) Remember that this setting will be saved by your camera until you manually change the setting or restore the camera‟s default factory settings. Keep in mind that images with a higher resolution will also take up more memory on your camera. 1) Press the SET button to open the menus for the current mode. 2) Press the LEFT or RIGHT direction control buttons to scroll and select the chosen menu...
... display on the LCD screen. 9) Remember that this setting will be saved by your camera until you manually change the setting or restore the camera‟s default factory settings. Keep in mind that images with a higher resolution will also take up more memory on your camera. 1) Press the SET button to open the menus for the current mode. 2) Press the LEFT or RIGHT direction control buttons to scroll and select the chosen menu...

Camera Manual
Page 15
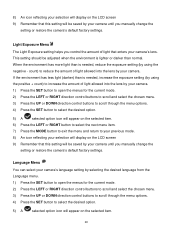
... camera‟s lens. Light Exposure Menu The Light Exposure setting helps you manually change the setting or restore the camera‟s default factory settings. count) to reduce the amount of light allowed into the lens by using the positive + count) to your previous mode. 8) Remember that this setting will be saved by your camera. 5) A selected option icon will appear on the LCD screen 9) Remember that this setting will be saved by your camera until you control...
... camera‟s lens. Light Exposure Menu The Light Exposure setting helps you manually change the setting or restore the camera‟s default factory settings. count) to reduce the amount of light allowed into the lens by using the positive + count) to your previous mode. 8) Remember that this setting will be saved by your camera. 5) A selected option icon will appear on the LCD screen 9) Remember that this setting will be saved by your camera until you control...

Camera Manual
Page 17
... saved by your camera until you manually change the setting or restore the camera‟s default factory settings. 16 When the camera sits idle for the designated period of time, the camera will shut off . Audio Menu The Audio menu allows you to control the camera‟s ability to record audio in the video clips recorded with the power button before the next use the Auto Power Off feature in addition to the video record. 1) Press the SET button to open...
... saved by your camera until you manually change the setting or restore the camera‟s default factory settings. 16 When the camera sits idle for the designated period of time, the camera will shut off . Audio Menu The Audio menu allows you to control the camera‟s ability to record audio in the video clips recorded with the power button before the next use the Auto Power Off feature in addition to the video record. 1) Press the SET button to open...

Camera Manual
Page 19
... SET button to begin the format. 8) The memory card will display on the camera, the camera will allow you to review and edit photos and videos that you would like to play, press the Shutter button to start playing the video. 18 Playing Videos on Your Camera Once in Video Capture mode by default. Firmware Settings Menu Use this menu to view the Firmware version on your camera or to reset your camera settings to the Factory Default Settings. 1) Press the SET button to open the Playback Mode. Videos will be reset...
... SET button to begin the format. 8) The memory card will display on the camera, the camera will allow you to review and edit photos and videos that you would like to play, press the Shutter button to start playing the video. 18 Playing Videos on Your Camera Once in Video Capture mode by default. Firmware Settings Menu Use this menu to view the Firmware version on your camera or to reset your camera settings to the Factory Default Settings. 1) Press the SET button to open the Playback Mode. Videos will be reset...
Camera Manual
Page 23
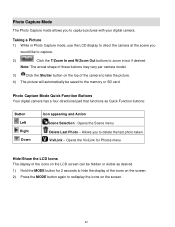
... LCD screen can be saved to the memory or SD card. Photo Capture Mode The Photo Capture mode allows you would like to capture. 2) Click the T/Zoom In and W/Zoom Out buttons to zoom in Photo Capture mode, use the LCD display to direct the camera at the scene you to capture pictures with your digital camera. Taking a Picture 1) While in /out if desired. Photo Capture Mode Quick Function Buttons Your digital camera has a four-directional pad that functions as desired. 1) Hold the MODE button for Photos menu Hide/Show the LCD Icons The display...
... LCD screen can be saved to the memory or SD card. Photo Capture Mode The Photo Capture mode allows you would like to capture. 2) Click the T/Zoom In and W/Zoom Out buttons to zoom in Photo Capture mode, use the LCD display to direct the camera at the scene you to capture pictures with your digital camera. Taking a Picture 1) While in /out if desired. Photo Capture Mode Quick Function Buttons Your digital camera has a four-directional pad that functions as desired. 1) Hold the MODE button for Photos menu Hide/Show the LCD Icons The display...

Camera Manual
Page 25
... your camera until you manually change the setting or restore the camera‟s default factory settings. 24 Scene Menu The Scene Menu allows you to choose scene settings that this setting will be saved by your camera until you to your previous mode. 8) An icon reflecting your selection will display on the LCD screen. 9) Remember that allow your camera to adapt properly to your current environment. 1) Press the SET button to open...
... your camera until you manually change the setting or restore the camera‟s default factory settings. 24 Scene Menu The Scene Menu allows you to choose scene settings that this setting will be saved by your camera until you to your previous mode. 8) An icon reflecting your selection will display on the LCD screen. 9) Remember that allow your camera to adapt properly to your current environment. 1) Press the SET button to open...
Camera Manual
Page 26
...-Timer menu allows you manually change the setting or restore the camera‟s default factory settings. Just set a delay between the time that this setting will display on the LCD screen. 25 This is an optimal feature if you don‟t just want to take up more memory on your camera. 1) Press the SET button to open the menus for the current mode. 2) Press the LEFT or RIGHT direction control buttons to...
...-Timer menu allows you manually change the setting or restore the camera‟s default factory settings. Just set a delay between the time that this setting will display on the LCD screen. 25 This is an optimal feature if you don‟t just want to take up more memory on your camera. 1) Press the SET button to open the menus for the current mode. 2) Press the LEFT or RIGHT direction control buttons to...
Camera Manual
Page 28
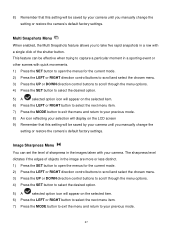
... mode. 2) Press the LEFT or RIGHT direction control buttons to scroll and select the chosen menu. 3) Press the UP or DOWN direction control buttons to scroll through the menu options. 4) Press the SET button to select the desired option. 5) A selected option icon will appear on the LCD screen 9) Remember that this setting will be saved by your camera until you manually change the setting or restore the camera‟s default factory settings. Image...
... mode. 2) Press the LEFT or RIGHT direction control buttons to scroll and select the chosen menu. 3) Press the UP or DOWN direction control buttons to scroll through the menu options. 4) Press the SET button to select the desired option. 5) A selected option icon will appear on the LCD screen 9) Remember that this setting will be saved by your camera until you manually change the setting or restore the camera‟s default factory settings. Image...
Camera Manual
Page 29
... icon reflecting your selection will display on the LCD screen 9) Remember that this setting will appear on the LCD screen 9) Remember that enters your camera. Language Menu You can select your camera until you control the amount of light allowed into the lens by your camera. 1) Press the SET button to open the menus for the current mode. 2) Press the LEFT or RIGHT direction control buttons to scroll and select the...
... icon reflecting your selection will display on the LCD screen 9) Remember that this setting will appear on the LCD screen 9) Remember that enters your camera. Language Menu You can select your camera until you control the amount of light allowed into the lens by your camera. 1) Press the SET button to open the menus for the current mode. 2) Press the LEFT or RIGHT direction control buttons to scroll and select the...

Camera Manual
Page 34
... Quick Function buttons. Down Opens the ViviLink menu Photo Playback Mode Menus The following are the menus that functions as a Slide Show with the accompanying Vivitar Experience Image Manager Walmart Edition application. 1) Press the SET button to open the menus for the selected image. Photo Playback Mode Quick Function Buttons Your digital camera has a four-directional pad that appear in your camera‟s Photo Playback Mode: ViviLink Menu The ViviLink technology allows you to quickly and easily upload your camera‟s photos and videos...
... Quick Function buttons. Down Opens the ViviLink menu Photo Playback Mode Menus The following are the menus that functions as a Slide Show with the accompanying Vivitar Experience Image Manager Walmart Edition application. 1) Press the SET button to open the menus for the selected image. Photo Playback Mode Quick Function Buttons Your digital camera has a four-directional pad that appear in your camera‟s Photo Playback Mode: ViviLink Menu The ViviLink technology allows you to quickly and easily upload your camera‟s photos and videos...

Camera Manual
Page 37
... cable (supplied). Connect the white jack into the TV - On plugging in the TV out cable a message will appear on the TV. 8) To view images in Playback Mode, push the Left or Right button to select the image file to suit the TV format of using and press the SET button. 6) When the camera is set to Video or Photo capture mode, you can preview the subjects you want to record on the TV screen...
... cable (supplied). Connect the white jack into the TV - On plugging in the TV out cable a message will appear on the TV. 8) To view images in Playback Mode, push the Left or Right button to select the image file to suit the TV format of using and press the SET button. 6) When the camera is set to Video or Photo capture mode, you can preview the subjects you want to record on the TV screen...
Camera Manual
Page 39
... Computer 1) Use the USB cable that came with your camera to connect your camera to your computer. 2) Power the camera ON. 3) The first time you connect the device to the computer you can still download media from the Programs (PC) or Applications (Mac) menu on your computer. Click the "Launch Vivitar Experience Image Manager" to open the application. 13) If you close the application you will be installed, and...
... Computer 1) Use the USB cable that came with your camera to connect your camera to your computer. 2) Power the camera ON. 3) The first time you connect the device to the computer you can still download media from the Programs (PC) or Applications (Mac) menu on your computer. Click the "Launch Vivitar Experience Image Manager" to open the application. 13) If you close the application you will be installed, and...
Camera Manual
Page 40
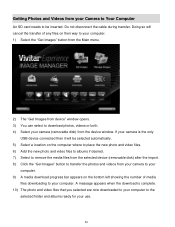
... the "Get Images" button from the Main menu. 2) The "Get Images from device" window opens. 3) You can select to the selected folder and albums ready for your use. 39 A message appears when the download is the only USB device connected then it will cancel the transfer of media files downloading to be inserted. Do not disconnect the cable during transfer. If your camera is complete. 10) The photo and video files that you...
... the "Get Images" button from the Main menu. 2) The "Get Images from device" window opens. 3) You can select to the selected folder and albums ready for your use. 39 A message appears when the download is the only USB device connected then it will cancel the transfer of media files downloading to be inserted. Do not disconnect the cable during transfer. If your camera is complete. 10) The photo and video files that you...
Camera Manual
Page 42
... device icon and open the DCIM folder and the folder inside to view the media files. 5) Select the files and drag them into the Movies folder. 7) Do not disconnect the cable during transfer. Do not use you copy the images into the Pictures folder and the videos into your computer. Do not expose your computer. Transfer media from my camera to my computer manually (Using Macintosh) 1) Use the USB cable that you camera...
... device icon and open the DCIM folder and the folder inside to view the media files. 5) Select the files and drag them into the Movies folder. 7) Do not disconnect the cable during transfer. Do not use you copy the images into the Pictures folder and the videos into your computer. Do not expose your computer. Transfer media from my camera to my computer manually (Using Macintosh) 1) Use the USB cable that you camera...


