
Camera Manual
Page 1
All rights reserved. All other trademarks are registered trademarks of their respective companies. Windows and the Windows logo are the property of Microsoft Corporation. 615HD Digital Video Camera User Manual © 2009-2011 Sakar International, Inc.
All rights reserved. All other trademarks are registered trademarks of their respective companies. Windows and the Windows logo are the property of Microsoft Corporation. 615HD Digital Video Camera User Manual © 2009-2011 Sakar International, Inc.
Camera Manual
Page 3
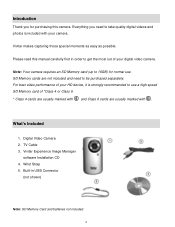
... quality digital videos and photos is strongly recommended to use a high speed SD Memory card of *Class 4 or Class 6. * Class 4 cards are usually marked with and Class 6 cards are not included and need to 16GB) for purchasing this manual carefully first in USB Connector (not shown) Note: SD Memory Card and batteries not included. 2 Digital Video Camera 2. Built-in order to be purchased separately. Wrist Strap 5. Vivitar makes capturing those...
... quality digital videos and photos is strongly recommended to use a high speed SD Memory card of *Class 4 or Class 6. * Class 4 cards are usually marked with and Class 6 cards are not included and need to 16GB) for purchasing this manual carefully first in USB Connector (not shown) Note: SD Memory Card and batteries not included. 2 Digital Video Camera 2. Built-in order to be purchased separately. Wrist Strap 5. Vivitar makes capturing those...
Camera Manual
Page 4
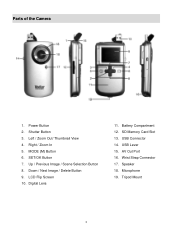
Down / Next Image / Delete Button 9. LCD Flip Screen 10. Right / Zoom In 5. Microphone 19. Left / Zoom Out/ Thumbnail View 4. SET/OK Button 7. AV Out Port 16. Up / Previous Image / Scene Selection Button 8. Tripod Mount 3 SD Memory Card Slot 13. Shutter Button 3. Battery Compartment 12. USB Connector 14. Speaker 18. Power Button 2. Digital Lens 11. Wrist Strap Connector 17. Parts of the Camera 1. USB Lever 15. MODE (M) Button 6.
Down / Next Image / Delete Button 9. LCD Flip Screen 10. Right / Zoom In 5. Microphone 19. Left / Zoom Out/ Thumbnail View 4. SET/OK Button 7. AV Out Port 16. Up / Previous Image / Scene Selection Button 8. Tripod Mount 3 SD Memory Card Slot 13. Shutter Button 3. Battery Compartment 12. USB Connector 14. Speaker 18. Power Button 2. Digital Lens 11. Wrist Strap Connector 17. Parts of the Camera 1. USB Lever 15. MODE (M) Button 6.

Camera Manual
Page 6
... INITIAL CAMERA SETUP. Note: After the camera is powered on, an SD icon will appear on LCD as Flash, will not work if the battery power level is low. When the battery power is low the battery icon turns red and the camera will take you hear a slight clicking sound. Batteries Make sure the batteries have been inserted properly into the slot in use for the first time the camera...
... INITIAL CAMERA SETUP. Note: After the camera is powered on, an SD icon will appear on LCD as Flash, will not work if the battery power level is low. When the battery power is low the battery icon turns red and the camera will take you hear a slight clicking sound. Batteries Make sure the batteries have been inserted properly into the slot in use for the first time the camera...
Camera Manual
Page 7
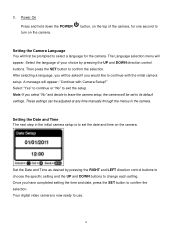
... direction control buttons to choose the specific setting and the UP and DOWN buttons to select a language for the camera. Then press the SET button to confirm the selection. A message will appear. Once you will be prompted to change each setting. Your digital video camera is to set to exit the setup. button, on the camera. After selecting a language, you have completed setting the time and date, press the SET button to confirm the selection. The Language...
... direction control buttons to choose the specific setting and the UP and DOWN buttons to select a language for the camera. Then press the SET button to confirm the selection. A message will appear. Once you will be prompted to change each setting. Your digital video camera is to set to exit the setup. button, on the camera. After selecting a language, you have completed setting the time and date, press the SET button to confirm the selection. The Language...
Camera Manual
Page 8
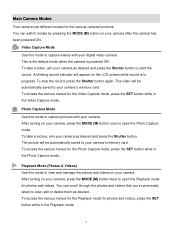
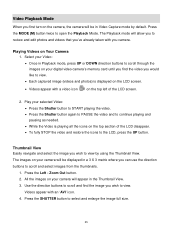
... digital video camera. To access the various menus for the Playback mode for the Video Capture mode, press the SET button while in progress. To access the various menus for photos and videos, press the SET button while in the Photo Capture mode. Video Capture Mode Use this mode to start the record. This is the default mode when the camera is in the Video Capture mode. A blinking record indicator will be automatically saved to view, edit or delete them as desired and press the Shutter button...
... digital video camera. To access the various menus for the Playback mode for the Video Capture mode, press the SET button while in progress. To access the various menus for photos and videos, press the SET button while in the Photo Capture mode. Video Capture Mode Use this mode to start the record. This is the default mode when the camera is in the Video Capture mode. A blinking record indicator will be automatically saved to view, edit or delete them as desired and press the Shutter button...
Camera Manual
Page 9
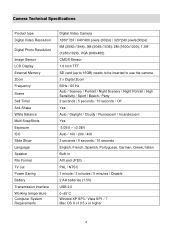
Camera Technical Specifications Product type Digital Video Resolution Digital Photo Resolution Image Sensor LCD Display External Memory Zoom Frequency Scene Self Timer Anti-Shake White Balance Multi SnapShots Exposure ISO Slide Show Language Speaker File Format TV out Power Saving Battery Transmission interface Working temperature Computer System Requirements Digital Video Camera 1280*720 / 640*480 pixels (30fps) / 320*240 pixels(30fps) 5M (2592×1944), 3M (2048×1536), 2M (1600x1200), 1.3M (1280x1024), VGA (640x480) CMOS...
Camera Technical Specifications Product type Digital Video Resolution Digital Photo Resolution Image Sensor LCD Display External Memory Zoom Frequency Scene Self Timer Anti-Shake White Balance Multi SnapShots Exposure ISO Slide Show Language Speaker File Format TV out Power Saving Battery Transmission interface Working temperature Computer System Requirements Digital Video Camera 1280*720 / 640*480 pixels (30fps) / 320*240 pixels(30fps) 5M (2592×1944), 3M (2048×1536), 2M (1600x1200), 1.3M (1280x1024), VGA (640x480) CMOS...
Camera Manual
Page 11
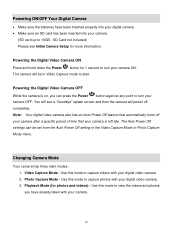
... setting in Video Capture mode to view the videos and photos you can be in the Video Capture Mode or Photo Capture Mode menu. Video Capture Mode - Playback Mode (for more information. Use this mode to capture videos with your digital video camera 2. Powering the Digital Video Camera ON Press and hold down the Power button for 1 second to capture photos with your camera. 10 The Auto Power Off settings can press the Power button again at any point to 16GB - The camera will power off your camera after a specific period of time that automatically turns...
... setting in Video Capture mode to view the videos and photos you can be in the Video Capture Mode or Photo Capture Mode menu. Video Capture Mode - Playback Mode (for more information. Use this mode to capture videos with your digital video camera 2. Powering the Digital Video Camera ON Press and hold down the Power button for 1 second to capture photos with your camera. 10 The Auto Power Off settings can press the Power button again at any point to 16GB - The camera will power off your camera after a specific period of time that automatically turns...

Camera Manual
Page 13
Taking a Video 1. Zoom Out buttons to capture videos with your videos using the Flip Screen. However, videos recorded at the higher resolution. The elapsed time appears on the LCD screen while record is in Video Capture Mode. A blinking red record indicator appears on the top right corner of the SD memory card inserted as well as twist and shoot! When you would like to START the video capture. 4. It‟s as easy as the video resolution selected...
Taking a Video 1. Zoom Out buttons to capture videos with your videos using the Flip Screen. However, videos recorded at the higher resolution. The elapsed time appears on the LCD screen while record is in Video Capture Mode. A blinking red record indicator appears on the top right corner of the SD memory card inserted as well as twist and shoot! When you would like to START the video capture. 4. It‟s as easy as the video resolution selected...

Camera Manual
Page 19
... mode. 8. Light Exposure Menu The Light Exposure setting helps you control the amount of objects in the images taken with your camera. Press the MODE (M) button to exit the menu and return to your camera until you manually change the setting or restore the camera‟s default factory settings. Remember that this setting will be saved by your previous mode. 8. A selected option icon will display on the LCD screen 9. Remember that enters your camera until you manually change...
... mode. 8. Light Exposure Menu The Light Exposure setting helps you control the amount of objects in the images taken with your camera. Press the MODE (M) button to exit the menu and return to your camera until you manually change the setting or restore the camera‟s default factory settings. Remember that this setting will be saved by your previous mode. 8. A selected option icon will display on the LCD screen 9. Remember that enters your camera until you manually change...
Camera Manual
Page 25
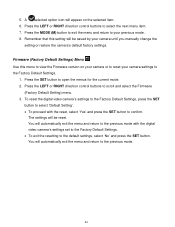
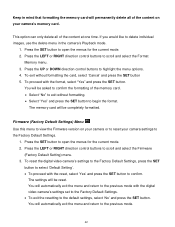
... RIGHT direction control buttons to scroll and select the Firmware (Factory Default Setting) menu. 3. Press the LEFT or RIGHT direction control buttons to select the next menu item. 7. Firmware (Factory Default Settings) Menu Use this setting will be reset. The settings will automatically exit the menu and return to open the menus for the current mode. 2. You will be saved by your previous mode. 8. 5. Press the MODE (M) button to exit the menu and return to view the Firmware version...
... RIGHT direction control buttons to scroll and select the Firmware (Factory Default Setting) menu. 3. Press the LEFT or RIGHT direction control buttons to select the next menu item. 7. Firmware (Factory Default Settings) Menu Use this setting will be reset. The settings will automatically exit the menu and return to open the menus for the current mode. 2. You will be saved by your previous mode. 8. 5. Press the MODE (M) button to exit the menu and return to view the Firmware version...
Camera Manual
Page 26
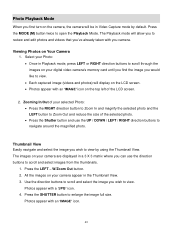
... to view. Play your camera will be displayed in the Thumbnail View. 3. Press the SHUTTER button to open the Playback Mode. Select your Video: Once in Video Capture mode by using the Thumbnail View. Use the direction buttons to scroll and find the video you can use the direction buttons to scroll and select images from the thumbnails. 1. The Playback mode will be in Playback mode, press UP or DOWN direction buttons to scroll through the images on your camera will...
... to view. Play your camera will be displayed in the Thumbnail View. 3. Press the SHUTTER button to open the Playback Mode. Select your Video: Once in Video Capture mode by using the Thumbnail View. Use the direction buttons to scroll and find the video you can use the direction buttons to scroll and select images from the thumbnails. 1. The Playback mode will be in Playback mode, press UP or DOWN direction buttons to scroll through the images on your camera will...
Camera Manual
Page 30
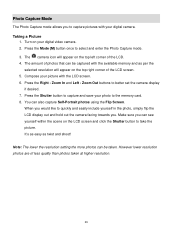
... set the camera display if desired. 7. Taking a Picture 1. Turn on the top right corner of the LCD screen. 5. Compose your picture with your digital camera. You can be captured with the available memory and as twist and shoot! Press the Right - Zoom Out buttons to capture pictures with the LCD screen. 6. When you would like to the memory card. 8. However lower resolution photos are of the LCD. 4. Press the Shutter button to capture and save your digital video camera. 2. The camera...
... set the camera display if desired. 7. Taking a Picture 1. Turn on the top right corner of the LCD screen. 5. Compose your picture with your digital camera. You can be captured with the available memory and as twist and shoot! Press the Right - Zoom Out buttons to capture pictures with the LCD screen. 6. When you would like to the memory card. 8. However lower resolution photos are of the LCD. 4. Press the Shutter button to capture and save your digital video camera. 2. The camera...

Camera Manual
Page 37
... factory settings. Press the UP or DOWN direction control buttons to select the next menu item. 7. A selected option icon will be adjusted when the environment is lighter or darker than normal. Light Exposure Menu The Light Exposure setting helps you control the amount of objects in the images taken with your camera. This setting should be saved by your camera. Press the SET button to open the menus for the current mode...
... factory settings. Press the UP or DOWN direction control buttons to select the next menu item. 7. A selected option icon will be adjusted when the environment is lighter or darker than normal. Light Exposure Menu The Light Exposure setting helps you control the amount of objects in the images taken with your camera. This setting should be saved by your camera. Press the SET button to open the menus for the current mode...
Camera Manual
Page 43
... the Factory Default Settings. 1. Firmware (Factory Default Settings) Menu Use this menu to view the Firmware version on your camera settings to exit without formatting the card, select „Cancel‟ and press the SET button 5. Press the SET button to the default settings, select „No‟ and press the SET button. To proceed with the digital video camera‟s settings set to the Factory Default Settings. To exit the resetting to open the menus for the current mode...
... the Factory Default Settings. 1. Firmware (Factory Default Settings) Menu Use this menu to view the Firmware version on your camera settings to exit without formatting the card, select „Cancel‟ and press the SET button 5. Press the SET button to the default settings, select „No‟ and press the SET button. To proceed with the digital video camera‟s settings set to the Factory Default Settings. To exit the resetting to open the menus for the current mode...
Camera Manual
Page 44
... enlarge the image full size. Press the LEFT - W/Zoom Out button. 2. Press the SHUTTER button to view by default. Press the MODE (M) button twice to view. Zooming In/Out of your camera are displayed in a 3 X 3 matrix where you can use the UP / DOWN / LEFT / RIGHT direction buttons to navigate around the magnified photo. Photo Playback Mode When you first turn on the camera, the camera will allow you to review and edit photos and videos that...
... enlarge the image full size. Press the LEFT - W/Zoom Out button. 2. Press the SHUTTER button to view by default. Press the MODE (M) button twice to view. Zooming In/Out of your camera are displayed in a 3 X 3 matrix where you can use the UP / DOWN / LEFT / RIGHT direction buttons to navigate around the magnified photo. Photo Playback Mode When you first turn on the camera, the camera will allow you to review and edit photos and videos that...

Camera Manual
Page 45
... . Quick Function Button Action Zooms out of the selected photo after you to full screen the selected thumbnail image and exits Thumbnail view. Opens the menu options for Photo Playback Mode. Saves your selected menu option. STOPS the Slide Show. Note: To navigate through the Menus, use the Left, Up, Right, and Down direction control buttons. Toggles between the Video Capture Mode, Photo Capture Mode, and Playback Mode. Exits the menu screen. 44 Photo Playback Mode Button Functionality Your digital camera...
... . Quick Function Button Action Zooms out of the selected photo after you to full screen the selected thumbnail image and exits Thumbnail view. Opens the menu options for Photo Playback Mode. Saves your selected menu option. STOPS the Slide Show. Note: To navigate through the Menus, use the Left, Up, Right, and Down direction control buttons. Toggles between the Video Capture Mode, Photo Capture Mode, and Playback Mode. Exits the menu screen. 44 Photo Playback Mode Button Functionality Your digital camera...

Camera Manual
Page 50
... access at the time of inserting the CD-ROM, connect to the internet and then click the "Install Vivitar Experience Image Manager" button to transfer photos and videos from the camera. Installing the Software You must be connected to the internet to my computer" button for instructions. 49 On PC: The Vivitar Experience Image Manager Installer window appears. Insert the installation CD into your CD-ROM drive. The installation screen should automatically open the application‟s CD/DVD drive...
... access at the time of inserting the CD-ROM, connect to the internet and then click the "Install Vivitar Experience Image Manager" button to transfer photos and videos from the camera. Installing the Software You must be connected to the internet to my computer" button for instructions. 49 On PC: The Vivitar Experience Image Manager Installer window appears. Insert the installation CD into your CD-ROM drive. The installation screen should automatically open the application‟s CD/DVD drive...

Camera Manual
Page 51
... internet access, the "Choose your language" window opens, choose your computer. Connecting the Camera to install the application. 8. Select your camera is inserted in USB connector. The first time you connect the device to open the application. 13. The application automatically opens. 14. On Macintosh: Close the System Preferences window that your camera model from the Programs (PC) or Applications (Mac) menu on automatically. 3. The camera will power on your language and...
... internet access, the "Choose your language" window opens, choose your computer. Connecting the Camera to install the application. 8. Select your camera is inserted in USB connector. The first time you connect the device to open the application. 13. The application automatically opens. 14. On Macintosh: Close the System Preferences window that your camera model from the Programs (PC) or Applications (Mac) menu on automatically. 3. The camera will power on your language and...
Camera Manual
Page 54
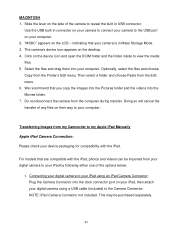
...-in Mass Storage Mode. 3. Optionally, select the files and choose Copy from the Edit menu. 6. Connecting your digital camera to your device packaging for compatibility with the iPad, photos and videos can be purchased separately. 53 Slide the lever on your iPad, then attach your digital camera using a USB cable (included) to my Apple iPad Manually Apple iPad Camera Connection: Please check your iPad using an iPad Camera Connector: Plug the Camera Connector into...
...-in Mass Storage Mode. 3. Optionally, select the files and choose Copy from the Edit menu. 6. Connecting your digital camera to your device packaging for compatibility with the iPad, photos and videos can be purchased separately. 53 Slide the lever on your iPad, then attach your digital camera using a USB cable (included) to my Apple iPad Manually Apple iPad Camera Connection: Please check your iPad using an iPad Camera Connector: Plug the Camera Connector into...


