
Camera Manual
Page 3
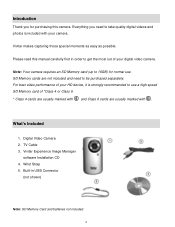
...: SD Memory Card and batteries not included. 2 TV Cable 3. For best video performance of your camera. What‟s Included 1. Everything you for normal use a high speed SD Memory card of your digital video camera. Built-in order to be purchased separately. Vivitar makes... capturing those special moments as easy as possible. Vivitar Experience Image Manager software Installation CD 4.
...: SD Memory Card and batteries not included. 2 TV Cable 3. For best video performance of your camera. What‟s Included 1. Everything you for normal use a high speed SD Memory card of your digital video camera. Built-in order to be purchased separately. Vivitar makes... capturing those special moments as easy as possible. Vivitar Experience Image Manager software Installation CD 4.
Camera Manual
Page 4
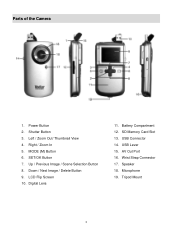
Up / Previous Image / Scene Selection Button 8. AV Out Port 16. Speaker 18. Microphone 19. Power Button 2. Down / Next Image / Delete Button 9. Digital Lens 11. Wrist Strap Connector 17. Right / Zoom In 5. MODE (M) Button 6. Battery Compartment 12. Parts of the Camera 1. Tripod Mount 3 Shutter Button 3. LCD Flip Screen 10. SET/OK Button 7. USB Lever 15. Left / Zoom Out/ Thumbnail View 4. SD Memory Card Slot 13. USB Connector 14.
Up / Previous Image / Scene Selection Button 8. AV Out Port 16. Speaker 18. Microphone 19. Power Button 2. Down / Next Image / Delete Button 9. Digital Lens 11. Wrist Strap Connector 17. Right / Zoom In 5. MODE (M) Button 6. Battery Compartment 12. Parts of the Camera 1. Tripod Mount 3 Shutter Button 3. LCD Flip Screen 10. SET/OK Button 7. USB Lever 15. Left / Zoom Out/ Thumbnail View 4. SD Memory Card Slot 13. USB Connector 14.

Camera Manual
Page 5
For best video performance of your HD device, it is strongly recommended to 16GB) needed for normal use a high speed SD Memory card of the camera and install 2 x AA batteries with the correct polarity as illustrated inside the battery compartment. Turning On the Camera SD Memory card (up to use . Alkaline batteries recommended. Using the Camera 4 Initial Camera Setup Installing the Batteries Installing the Memory Card Slide open the battery cover on the back of Class 4 or Class 6 .
For best video performance of your HD device, it is strongly recommended to 16GB) needed for normal use a high speed SD Memory card of the camera and install 2 x AA batteries with the correct polarity as illustrated inside the battery compartment. Turning On the Camera SD Memory card (up to use . Alkaline batteries recommended. Using the Camera 4 Initial Camera Setup Installing the Batteries Installing the Memory Card Slide open the battery cover on the back of Class 4 or Class 6 .

Camera Manual
Page 6
...batteries from saving captured photos to the polarity shown inside the battery compartment. SD Card Make sure an SD card has been properly inserted into your camera. (SD card not included.) To properly insert the SD Card: Push the SD card into your camera, such as Flash, will not work if the battery ...and the camera will take you through the INITIAL CAMERA SETUP. Alkaline batteries are included with your digital camera, according to the SD card. 5 If you hear a slight clicking sound. Batteries Make sure the batteries have been inserted properly into the slot in use...
...batteries from saving captured photos to the polarity shown inside the battery compartment. SD Card Make sure an SD card has been properly inserted into your camera. (SD card not included.) To properly insert the SD Card: Push the SD card into your camera, such as Flash, will not work if the battery ...and the camera will take you through the INITIAL CAMERA SETUP. Alkaline batteries are included with your digital camera, according to the SD card. 5 If you hear a slight clicking sound. Batteries Make sure the batteries have been inserted properly into the slot in use...
Camera Manual
Page 9
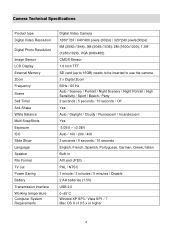
...*480 pixels (30fps) / 320*240 pixels(30fps) 5M (2592×1944), 3M (2048×1536), 2M (1600x1200), 1.3M (1280x1024), VGA (640x480) CMOS Sensor 1.8 Inch TFT SD card (up to 16GB) needs to be inserted to use the camera 2 x Digital Zoom 50Hz / 60 Hz Auto / Scenery / Portrait / Night Scenery / Night Portrait / High Sensitivity...
...*480 pixels (30fps) / 320*240 pixels(30fps) 5M (2592×1944), 3M (2048×1536), 2M (1600x1200), 1.3M (1280x1024), VGA (640x480) CMOS Sensor 1.8 Inch TFT SD card (up to 16GB) needs to be inserted to use the camera 2 x Digital Zoom 50Hz / 60 Hz Auto / Scenery / Portrait / Night Scenery / Night Portrait / High Sensitivity...
Camera Manual
Page 11
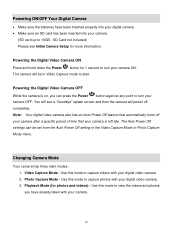
SD Card not included) Please see a "Goodbye" splash screen and then the camera will be set from the Auto Power Off setting in Video Capture mode to ... Auto Power Off feature that your camera is on, you have been inserted properly into your digital camera. Make sure an SD card has been inserted into your camera. (SD card up to turn your camera ON. Changing Camera Mode Your camera has three main modes: 1. Use this mode to turn your camera...
SD Card not included) Please see a "Goodbye" splash screen and then the camera will be set from the Auto Power Off setting in Video Capture mode to ... Auto Power Off feature that your camera is on, you have been inserted properly into your digital camera. Make sure an SD card has been inserted into your camera. (SD card up to turn your camera ON. Changing Camera Mode Your camera has three main modes: 1. Use this mode to turn your camera...

Camera Manual
Page 13
...capture. 2. The video will be saved to direct the camera at the higher resolution. While in Video Capture Mode use the LCD display to the SD card. 7. Press the Shutter button to better set the camera display if desired. 3. Note: The amount of recording time available for the resolution selected ... on the size of time that you would like to capture videos with your videos using the Flip Screen. Remember, the amount of the SD memory card inserted as well as twist and shoot! Taking a Video 1. When the camera is first powered ON, the camera will automatically be in ...
...capture. 2. The video will be saved to direct the camera at the higher resolution. While in Video Capture Mode use the LCD display to the SD card. 7. Press the Shutter button to better set the camera display if desired. 3. Note: The amount of recording time available for the resolution selected ... on the size of time that you would like to capture videos with your videos using the Flip Screen. Remember, the amount of the SD memory card inserted as well as twist and shoot! Taking a Video 1. When the camera is first powered ON, the camera will automatically be in ...

Camera Manual
Page 51
... the "Close" button when the installation is inserted in USB connector. On Macintosh: Close the System Preferences window that your computer. Make sure the SD Memory Card is complete. 5. Select your camera model from the Programs (PC) or Applications (Mac) menu on the side of the camera to the USB ...the program will power on the LCD, indicating that appears as the last step in Mass Storage Mode. 50 On PC only: Let the "Vivitar Experience Image Manager" installer create the folder to open the application. 13. The first time you connect the device to the computer you have...
... the "Close" button when the installation is inserted in USB connector. On Macintosh: Close the System Preferences window that your computer. Make sure the SD Memory Card is complete. 5. Select your camera model from the Programs (PC) or Applications (Mac) menu on the side of the camera to the USB ...the program will power on the LCD, indicating that appears as the last step in Mass Storage Mode. 50 On PC only: Let the "Vivitar Experience Image Manager" installer create the folder to open the application. 13. The first time you connect the device to the computer you have...

Camera Manual
Page 52
... photos, videos or both. 4. Select to remove the media files from device" window opens. 3. Getting Photos and Videos from your Camera to Your Computer An SD card needs to be selected automatically. 5. The photo and video files that you selected are now downloaded to your computer to albums if desired. 7. Do not...
... photos, videos or both. 4. Select to remove the media files from device" window opens. 3. Getting Photos and Videos from your Camera to Your Computer An SD card needs to be selected automatically. 5. The photo and video files that you selected are now downloaded to your computer to albums if desired. 7. Do not...

Camera Manual
Page 55
Using an iPad SD Card Reader: Connect the SD Card Reader to your iPad, then insert your digital camera's SD card into albums. Camera Maintenance The digital camera is a delicate device. Do not expose your camera's SD card. NOTE: iPad SD Card Reader not included. 2. After you make the connection, your camera with care to import, then organizes them into the...
Using an iPad SD Card Reader: Connect the SD Card Reader to your iPad, then insert your digital camera's SD card into albums. Camera Maintenance The digital camera is a delicate device. Do not expose your camera's SD card. NOTE: iPad SD Card Reader not included. 2. After you make the connection, your camera with care to import, then organizes them into the...
Camera Manual
Page 58
...get a message that you upload them again. What do not appear on the SD memory card. These photos should appear. If the camera powers off . The images were also deleted from there. All images deleted using the Vivitar Experience Image Manager. Q: How do I make sure I do I recover images... that I deleted images using the Vivitar Experience Image Manager are saved to your computer‟s Recycle or Trash Bin and can be uploaded quickly before you have taken photos and selected the "Get Images" button. This camera requires an SD card for normal use. How do ? ...
...get a message that you upload them again. What do not appear on the SD memory card. These photos should appear. If the camera powers off . The images were also deleted from there. All images deleted using the Vivitar Experience Image Manager. Q: How do I make sure I do I recover images... that I deleted images using the Vivitar Experience Image Manager are saved to your computer‟s Recycle or Trash Bin and can be uploaded quickly before you have taken photos and selected the "Get Images" button. This camera requires an SD card for normal use. How do ? ...


