
8018 User Manual
Page 1
All other trademarks are registered trademarks of their respective companies. Windows and the Windows logo are the property of Microsoft Corporation. All rights reserved. ViviCam 8018 Digital Camera Owner Manual © 2009 Sakar International, Inc.
All other trademarks are registered trademarks of their respective companies. Windows and the Windows logo are the property of Microsoft Corporation. All rights reserved. ViviCam 8018 Digital Camera Owner Manual © 2009 Sakar International, Inc.
8018 User Manual
Page 2
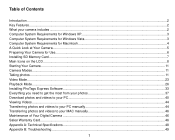
...System Requirements for Windows Vista 3 Computer System Requirements for Macintosh 4 A Quick Look at Your Camera...5 Preparing Your Camera for Use...6 Installing SD Memory Card...7 Main Icons on the LCD...8 Starting Your Camera ...11 Camera Modes...11 Taking photos ...11 Video Mode ...23 Playback Mode...26 Installing PhoTags Express Software...33... photos and videos to your PC manually 44 Transferring photos and videos to your MAC manually 46 Maintenance of Your Digital Camera ...46 Sakar Warranty Card...46 Appendix A: Technical Specifications...48 Appendix B: Troubleshooting...49 1
...System Requirements for Windows Vista 3 Computer System Requirements for Macintosh 4 A Quick Look at Your Camera...5 Preparing Your Camera for Use...6 Installing SD Memory Card...7 Main Icons on the LCD...8 Starting Your Camera ...11 Camera Modes...11 Taking photos ...11 Video Mode ...23 Playback Mode...26 Installing PhoTags Express Software...33... photos and videos to your PC manually 44 Transferring photos and videos to your MAC manually 46 Maintenance of Your Digital Camera ...46 Sakar Warranty Card...46 Appendix A: Technical Specifications...48 Appendix B: Troubleshooting...49 1
8018 User Manual
Page 3
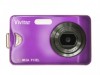
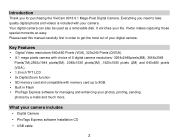
Vivitar makes capturing those special moments so easy. Please read this manual carefully first in Flash PhoTags Express software for purchasing the ViviCam 8018 8.1 Mega-Pixel Digital Camera. What your life. Introduction Thank you need to get the most out of 6 digital camera resolutions- 3264x2448pixels(8M), 3648x2048 Pixels(7M),2592x1944 pixels(5M), 2048x1536 pixels(3M) ,1920x1080...
Vivitar makes capturing those special moments so easy. Please read this manual carefully first in Flash PhoTags Express software for purchasing the ViviCam 8018 8.1 Mega-Pixel Digital Camera. What your life. Introduction Thank you need to get the most out of 6 digital camera resolutions- 3264x2448pixels(8M), 3648x2048 Pixels(7M),2592x1944 pixels(5M), 2048x1536 pixels(3M) ,1920x1080...

8018 User Manual
Page 13
... 3. " If you attempt to take more images! The icon will appear on the top right of the 12 After each photo is full, the camera will display "Memory Full! Insert a SD Memory Card to adjust the zoom. 2. Use the T and W buttons to Transfer and Take More Photos! Hold... in the LCD screen. 2. Please download the test images to take a photo when the camera's internal memory is shot and the camera returns to shoot at this resolution is equipped with a hyperfocal distance setting. Digital Zoom function You can magnify your subject. 4. The setting is found on your subject using ...
... 3. " If you attempt to take more images! The icon will appear on the top right of the 12 After each photo is full, the camera will display "Memory Full! Insert a SD Memory Card to adjust the zoom. 2. Use the T and W buttons to Transfer and Take More Photos! Hold... in the LCD screen. 2. Please download the test images to take a photo when the camera's internal memory is shot and the camera returns to shoot at this resolution is equipped with a hyperfocal distance setting. Digital Zoom function You can magnify your subject. 4. The setting is found on your subject using ...

8018 User Manual
Page 17
3. Press the Up/Down button to standby mode. Press the Menu button to confirm, save and exit to select the desired image size. 4. Press the Right/Left button to take good quality photos without the use of trembling or shaking when taking the photo. This function allows you to select the Anti-Shake menu. 16 To set as a result of a tripod. Press the Menu button. 2. Anti-Shake Your Digital Camera has a function that prevents photos coming out blurry as below: 1.
3. Press the Up/Down button to standby mode. Press the Menu button to confirm, save and exit to select the desired image size. 4. Press the Right/Left button to take good quality photos without the use of trembling or shaking when taking the photo. This function allows you to select the Anti-Shake menu. 16 To set as a result of a tripod. Press the Menu button. 2. Anti-Shake Your Digital Camera has a function that prevents photos coming out blurry as below: 1.
8018 User Manual
Page 22
... of the date, time and format you wish to set. 3. Auto Power off By default, if your camera is idle for 60 seconds it will automatically be powered off. If you wish to set the digits that are highlighted. 4. Press the Up/Down button to enter Set Date option. 2. Press the Menu...
... of the date, time and format you wish to set. 3. Auto Power off By default, if your camera is idle for 60 seconds it will automatically be powered off. If you wish to set the digits that are highlighted. 4. Press the Up/Down button to enter Set Date option. 2. Press the Menu...

8018 User Manual
Page 39
... been installed and the ready to open the "PhoTags Express" Software. Wait for your photos: 38 From the Main Menu screen that appears on your Digital Camera. 2. Power on your desktop to use message pops up on your computer. 4. If you have not already opened your application then click the "PhoTags ...Express" icon that appears, select the "Select Photos", "Enhance Photos" or "Add Captions" buttons. Plug one end of the camera. 3. Plug the other end of the USB cable into the USB port of the USB cable into a USB port on the task bar. 1.
... been installed and the ready to open the "PhoTags Express" Software. Wait for your photos: 38 From the Main Menu screen that appears on your Digital Camera. 2. Power on your desktop to use message pops up on your computer. 4. If you have not already opened your application then click the "PhoTags ...Express" icon that appears, select the "Select Photos", "Enhance Photos" or "Add Captions" buttons. Plug one end of the camera. 3. Plug the other end of the USB cable into the USB port of the USB cable into a USB port on the task bar. 1.
8018 User Manual
Page 47
... an available USB port 2. A new drive should mount on the REMOVABLE STORAGE DEVICE to your camera to avoid damaging it. Sakar Warranty Card This warranty covers for a period of Your Digital Camera The digital camera is not transferable. Products that have been taken. Transferring photos and videos to view the images. In order to transfer...
... an available USB port 2. A new drive should mount on the REMOVABLE STORAGE DEVICE to your camera to avoid damaging it. Sakar Warranty Card This warranty covers for a period of Your Digital Camera The digital camera is not transferable. Products that have been taken. Transferring photos and videos to view the images. In order to transfer...
8018 User Manual
Page 52
... non functioning device and select uninstall. If the camera is installed correctly, there will be a category listed for instance if the battery dies or run out of power) all stored pictures will likely see "Digital Still Camera" under "Other Device" with a brightly colored ...marking next to prevent unintentional data loss. If you will be lost. Your camera is not functioning correctly. Should your camera. If a warning pops up, press OK. 6. Your camera uses SDRAM memory, which ...
... non functioning device and select uninstall. If the camera is installed correctly, there will be a category listed for instance if the battery dies or run out of power) all stored pictures will likely see "Digital Still Camera" under "Other Device" with a brightly colored ...marking next to prevent unintentional data loss. If you will be lost. Your camera is not functioning correctly. Should your camera. If a warning pops up, press OK. 6. Your camera uses SDRAM memory, which ...

