Camera Manual
Page 1
All other trademarks are registered trademarks of their respective companies. Windows and the Windows logo are the property of Microsoft Corporation. All rights reserved. ViviCam7690 Digital Camera Owner‟s Manual © 2009 Sakar International, Inc.
All other trademarks are registered trademarks of their respective companies. Windows and the Windows logo are the property of Microsoft Corporation. All rights reserved. ViviCam7690 Digital Camera Owner‟s Manual © 2009 Sakar International, Inc.

Camera Manual
Page 2
... System Requirements for Macintosh 4 Quick Look at Your Camera ...5 Prepare Your Camera for use...6 Install SD memory card...7 Starting Your Digital Camera ...9 Main Icons on the LCD ...11 Camera mode ...13 Video Mode ...28 Playback Mode ...30 Install the Vivitar Experience Image Manager Software 39 Connect your camera to the computer 41 Get photos and videos from...
... System Requirements for Macintosh 4 Quick Look at Your Camera ...5 Prepare Your Camera for use...6 Install SD memory card...7 Starting Your Digital Camera ...9 Main Icons on the LCD ...11 Camera mode ...13 Video Mode ...28 Playback Mode ...30 Install the Vivitar Experience Image Manager Software 39 Connect your camera to the computer 41 Get photos and videos from...
Camera Manual
Page 3
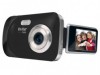
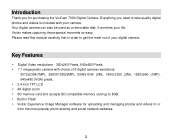
... up to 8GB. Built in Flash Vivitar Experience Image Manager software for purchasing the ViviCam 7690 Digital Camera. It enriches your digital camera. Your digital camera can also be used as a removable disk. Key Features Digital Video resolutions - 320x240 Pixels, 640x480 Pixels. 7.1 mega pixels camera with your camera. Vivitar makes capturing those special moments so easy. Everything you...
... up to 8GB. Built in Flash Vivitar Experience Image Manager software for purchasing the ViviCam 7690 Digital Camera. It enriches your digital camera. Your digital camera can also be used as a removable disk. Key Features Digital Video resolutions - 320x240 Pixels, 640x480 Pixels. 7.1 mega pixels camera with your camera. Vivitar makes capturing those special moments so easy. Everything you...
Camera Manual
Page 4
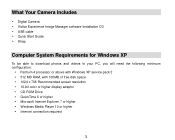
What Your Camera Includes Digital Camera Vivitar Experience Image Manager software Installation CD USB cable Quick Start Guide Strap Computer System Requirements for Windows XP To be able to ...
What Your Camera Includes Digital Camera Vivitar Experience Image Manager software Installation CD USB cable Quick Start Guide Strap Computer System Requirements for Windows XP To be able to ...
Camera Manual
Page 10
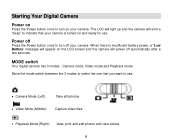
...insufficient battery power, a "Low Battery" message will appear on the LCD screen and the camera will emit a "beep" to indicate that you want to turn on your camera. Starting Your Digital Camera Power on Press the Power button once to turn off automatically after a few seconds. When... there is turned on and ready for use . Camera Mode (Left): Take still photos Video Mode (...
...insufficient battery power, a "Low Battery" message will appear on the LCD screen and the camera will emit a "beep" to indicate that you want to turn on your camera. Starting Your Digital Camera Power on Press the Power button once to turn off automatically after a few seconds. When... there is turned on and ready for use . Camera Mode (Left): Take still photos Video Mode (...
Camera Manual
Page 14
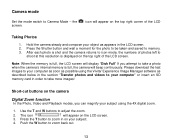
... - icon will appear on your object as described below in order to take a photo when the camera‟s internal memory is displayed on the camera Digital Zoom function In the Photo, Video and Playback modes, you attempt to icon mode, the numbers of the LCD screen. Short-cut buttons on the... to shoot at this resolution is full, the camera will display "Disk Full" If you can magnify your computer" or insert an SD memory card in the section "Transfer photos and videos to your computer as soon as possible using the Vivitar Experience Image Manager software as appears in the LCD...
... - icon will appear on your object as described below in order to take a photo when the camera‟s internal memory is displayed on the camera Digital Zoom function In the Photo, Video and Playback modes, you attempt to icon mode, the numbers of the LCD screen. Short-cut buttons on the... to shoot at this resolution is full, the camera will display "Disk Full" If you can magnify your computer" or insert an SD memory card in the section "Transfer photos and videos to your computer as soon as possible using the Vivitar Experience Image Manager software as appears in the LCD...
Camera Manual
Page 20
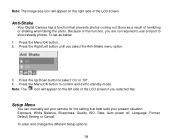
... or Cancel. Press the Up/Down button to standby mode. To enter and change the different Setup options: 19 Anti-Shake Your Digital Camera has a function that best suits your camera for the setting that prevents photos coming out blurry as below: 1. Press the Menu/OK button. 2. Because of the LCD screen if...
... or Cancel. Press the Up/Down button to standby mode. To enter and change the different Setup options: 19 Anti-Shake Your Digital Camera has a function that best suits your camera for the setting that prevents photos coming out blurry as below: 1. Press the Menu/OK button. 2. Because of the LCD screen if...
Camera Manual
Page 26
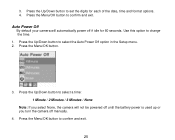
Press the Menu/OK button to set the digits for 60 seconds. Press the Up/Down button to confirm and exit. 25 Press the Up/Down button to confirm and exit. Press the Up/... Off option in the Setup menu. 2. Press the Menu/OK button. 3. Auto Power Off By default your camera will not be powered off until the battery power is used up or you select None, the camera will automatically power off manually. 4. 3. Press the Menu/OK button to select a time: 1 Minute / 2 Minutes / 3 Minutes...
Press the Menu/OK button to set the digits for 60 seconds. Press the Up/Down button to confirm and exit. 25 Press the Up/Down button to confirm and exit. Press the Up/... Off option in the Setup menu. 2. Press the Menu/OK button. 3. Auto Power Off By default your camera will not be powered off until the battery power is used up or you select None, the camera will automatically power off manually. 4. 3. Press the Menu/OK button to select a time: 1 Minute / 2 Minutes / 3 Minutes...

Camera Manual
Page 27
Press the Up/Down button to confirm. The following Format message will erase all files in the Setup menu. 2. Press the Menu/OK button to select the Format option in memory including files that have been protected, please operate cautiously. 1. Press the Up/Down button to select „OK‟. 4. Format This function reformats the memory card and will appear on the LCD. 26 Press the Menu/OK button. 3. Language Your Digital Camera only supports English for now.
Press the Up/Down button to confirm. The following Format message will erase all files in the Setup menu. 2. Press the Menu/OK button to select the Format option in memory including files that have been protected, please operate cautiously. 1. Press the Up/Down button to select „OK‟. 4. Format This function reformats the memory card and will appear on the LCD. 26 Press the Menu/OK button. 3. Language Your Digital Camera only supports English for now.

Camera Manual
Page 45
...the desktop. 3. We recommend that you copy the images into the Pictures folder and the videos into your computer. Maintenance of Your Digital Camera The digital camera is not transferable. Sakar Warranty Card This warranty covers for the original consumer purchaser only and is a delicate device. Doing so will... select a folder and choose Paste from the Finder‟s Edit menu. into the Videos/My Videos folder. 6. Transfer media from my camera to your computer. 2. Optionally, select the files and choose Copy from the Edit menu. 5. Doing so will cancel the transfer of any...
...the desktop. 3. We recommend that you copy the images into the Pictures folder and the videos into your computer. Maintenance of Your Digital Camera The digital camera is not transferable. Sakar Warranty Card This warranty covers for the original consumer purchaser only and is a delicate device. Doing so will... select a folder and choose Paste from the Finder‟s Edit menu. into the Videos/My Videos folder. 6. Transfer media from my camera to your computer. 2. Optionally, select the files and choose Copy from the Edit menu. 5. Doing so will cancel the transfer of any...

Camera Manual
Page 47
... Resolution File Format External Memory Storage capability - example for reference LCD Display Lens Zoom Exposure White Balance (Video Mode) ISO Scene (Camera Mode) Flash Self-timer Anti-Shake PictBridge Interface System Requirements Battery Dimension (CM) CMOS Sensor 3072X2304pixels(7M), 2560X1920pixels(5M) , 2048X1536 ... About18(Interpolation7M),23(5M),27(3M),39(2M), 46 (1M). 93(VGA) 2.4 Inch TFT LCD f=7.45mm, F3.0 (with Macro) 4X Digital Zoom -3.0EV ~ 3.0EV Auto, Daylight, Cloudy, Tungsten, Fluorescent Auto/100/200/400 Auto/Night Portrait/Night Scenery/ Portrait/Scenery/Sport Party/Beach...
... Resolution File Format External Memory Storage capability - example for reference LCD Display Lens Zoom Exposure White Balance (Video Mode) ISO Scene (Camera Mode) Flash Self-timer Anti-Shake PictBridge Interface System Requirements Battery Dimension (CM) CMOS Sensor 3072X2304pixels(7M), 2560X1920pixels(5M) , 2048X1536 ... About18(Interpolation7M),23(5M),27(3M),39(2M), 46 (1M). 93(VGA) 2.4 Inch TFT LCD f=7.45mm, F3.0 (with Macro) 4X Digital Zoom -3.0EV ~ 3.0EV Auto, Daylight, Cloudy, Tungsten, Fluorescent Auto/100/200/400 Auto/Night Portrait/Night Scenery/ Portrait/Scenery/Sport Party/Beach...

