

Owner Manual
Page 5
Button Beeps 25 Paging 25 Temp Units 25 Adjustments Menu 26 Clock Settings 26 Timer Start 26 Smart Start 27 Remote Pair 28 Sensor Adjust 29 Options Menu 31 Power Off 31 Parking Meter 31 Countdown Timer 32 Name Tags 33 Demo Mode 33 Level 5 Screen 34 ... Report 37 Alarm Trigger Report 37 Last Trigger Report 38 Nuisance Prevention (NPC 38 Remote Start Features 39 Pit Stop Mode 39 Key Takeover 39 Remote Start Safe-lock 40 Disabling Remote Start 40 Advanced Start 40 Temperature Reporting 41 Remote Start Time-out Alert 42 Manual Transmission Start (MTS mode 42 Turbo Timer...
Button Beeps 25 Paging 25 Temp Units 25 Adjustments Menu 26 Clock Settings 26 Timer Start 26 Smart Start 27 Remote Pair 28 Sensor Adjust 29 Options Menu 31 Power Off 31 Parking Meter 31 Countdown Timer 32 Name Tags 33 Demo Mode 33 Level 5 Screen 34 ... Report 37 Alarm Trigger Report 37 Last Trigger Report 38 Nuisance Prevention (NPC 38 Remote Start Features 39 Pit Stop Mode 39 Key Takeover 39 Remote Start Safe-lock 40 Disabling Remote Start 40 Advanced Start 40 Temperature Reporting 41 Remote Start Time-out Alert 42 Manual Transmission Start (MTS mode 42 Turbo Timer...

Owner Manual
Page 25
Button Auto Lock Alert Types Animations Button Beeps Paging Temp Units Clock Settings Timer Start Smart Start Remote Pair Sensor Adjust Power Off Parking Meter Countdown Timer Name Tags Demo Mode Level 5 screen No features, used only to Enter Menu Wheel Toggle Up Toggle ...Down 22 © 2009 Directed Electronics. Configuring your System You can customize the way the HD remote communicates information and adjust a variety of system features in the same sequential order as they appear on your system is performed via the menu wheel...
Button Auto Lock Alert Types Animations Button Beeps Paging Temp Units Clock Settings Timer Start Smart Start Remote Pair Sensor Adjust Power Off Parking Meter Countdown Timer Name Tags Demo Mode Level 5 screen No features, used only to Enter Menu Wheel Toggle Up Toggle ...Down 22 © 2009 Directed Electronics. Configuring your System You can customize the way the HD remote communicates information and adjust a variety of system features in the same sequential order as they appear on your system is performed via the menu wheel...

Owner Manual
Page 31
s : Press to delete new settings and go back to the Adjustments feature menu. Remote Pair Remote Pair is a process where the Responder HD and the system in the vehicle learn each others encrypted identification, securing their communication from the factory. ... new settings and go back to Off. s AUX : Press to reset the setting to enter the High Temp Start field. 4. How to Remote Pair Make sure the remote control is set for the desired Car 1 or Car 2 operation for the system it is preset to adjust the setting up /down . Press the...
s : Press to delete new settings and go back to the Adjustments feature menu. Remote Pair Remote Pair is a process where the Responder HD and the system in the vehicle learn each others encrypted identification, securing their communication from the factory. ... new settings and go back to Off. s AUX : Press to reset the setting to enter the High Temp Start field. 4. How to Remote Pair Make sure the remote control is set for the desired Car 1 or Car 2 operation for the system it is preset to adjust the setting up /down . Press the...
Owner Manual
Page 32
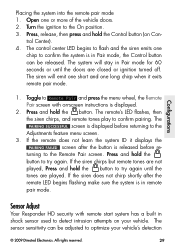
... the system is released before returning to the On position. 3. If the siren does not chirp shortly after the button is in remote pair mode. If the siren chirps but remote tones are not played, Press and hold the button. The sensor sensitivity can be adjusted to try again. Sensor Adjust Your Responder...
... the system is released before returning to the On position. 3. If the siren does not chirp shortly after the button is in remote pair mode. If the siren chirps but remote tones are not played, Press and hold the button. The sensor sensitivity can be adjusted to try again. Sensor Adjust Your Responder...

Owner Manual
Page 55
...last approximately one long chirp to confirm the remote has been learned. Insert a new battery into the remote pair mode. All rights reserved. Gently pry up . Replace the battery cover. Per the instruction in the Remote Pair section of this guide, following step 4 of Placing the... system into the holder and under normal use . 52 © 2009 Directed Electronics. Battery Information (1-Way) The 1way companion remote is powered by applying equal pressure at its...
...last approximately one long chirp to confirm the remote has been learned. Insert a new battery into the remote pair mode. All rights reserved. Gently pry up . Replace the battery cover. Per the instruction in the Remote Pair section of this guide, following step 4 of Placing the... system into the holder and under normal use . 52 © 2009 Directed Electronics. Battery Information (1-Way) The 1way companion remote is powered by applying equal pressure at its...


