Two-Page Specifications Sheet
Page 1
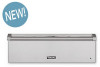
... interior humidity §§Powerful 425-watt heating element on 27" wide model; 450-watt element on 30" wide model §§Power "on" indicator light cycles on and off with Flush Mount Installation Kit accessory MODEL NUMBERS §§VWD527 - 27"W. close vent to keep foods crisp; cosmetic parts such as glass, painted items, and decorative items §§5-year limited - Warming Drawer ACCESSORIES §§V30FTWSS - 30"W. model...
... interior humidity §§Powerful 425-watt heating element on 27" wide model; 450-watt element on 30" wide model §§Power "on" indicator light cycles on and off with Flush Mount Installation Kit accessory MODEL NUMBERS §§VWD527 - 27"W. close vent to keep foods crisp; cosmetic parts such as glass, painted items, and decorative items §§5-year limited - Warming Drawer ACCESSORIES §§V30FTWSS - 30"W. model...
Two-Page Specifications Sheet
Page 2
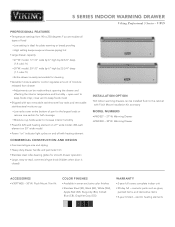
... from brochure data only. hard wire direct with separate 15-amp minimum 2-wire with ground circuit Maximum Amp Usage 425 watts - 3.6 amps 450 watts - 3.8 amps Interior Dimensions Width - 17-1/4" (43.8 cm) Height - 6" (15.2 cm) Depth - 22-3/4" (57.8 cm) Overall Size - 1.4 cu. Approximate Shipping Weight 80 lb. (36 kg) 90 lb. (40.5 kg) Please do not prepare installation from Rear ELECTRIC WARMING DRAWERS VWD527 VWD530 26-1/2" (67.3 cm) 29...
... from brochure data only. hard wire direct with separate 15-amp minimum 2-wire with ground circuit Maximum Amp Usage 425 watts - 3.6 amps 450 watts - 3.8 amps Interior Dimensions Width - 17-1/4" (43.8 cm) Height - 6" (15.2 cm) Depth - 22-3/4" (57.8 cm) Overall Size - 1.4 cu. Approximate Shipping Weight 80 lb. (36 kg) 90 lb. (40.5 kg) Please do not prepare installation from Rear ELECTRIC WARMING DRAWERS VWD527 VWD530 26-1/2" (67.3 cm) 29...

Installation Instructions
Page 1
Installation GUIDE 5 SERIES Warming Drawer VWD527 VWD530 1
Installation GUIDE 5 SERIES Warming Drawer VWD527 VWD530 1
Installation Instructions
Page 2
... installation work and electrical wiring must conform with local codes, or in this manual is equipped with a 3-prong power cord with the current CSA C22.1 Canadian Electrical Codes Part 1 and/or local codes. WARNING If the information in the absence of Contents Important Safety Instructions 2 Dimensions 3 Specifications 4 Cutout Dimensions 4 Electrical Requirements 5 General Information 5 Installation 6 Final Preparation 7 Service & Registration 7 Important Safety Instructions- Installation must be in accordance with all applicable codes and standards, including fire-rated...
... installation work and electrical wiring must conform with local codes, or in this manual is equipped with a 3-prong power cord with the current CSA C22.1 Canadian Electrical Codes Part 1 and/or local codes. WARNING If the information in the absence of Contents Important Safety Instructions 2 Dimensions 3 Specifications 4 Cutout Dimensions 4 Electrical Requirements 5 General Information 5 Installation 6 Final Preparation 7 Service & Registration 7 Important Safety Instructions- Installation must be in accordance with all applicable codes and standards, including fire-rated...

Installation Instructions
Page 3
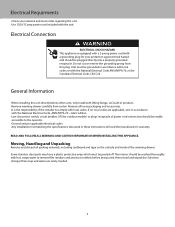
... View 2" (5.1 cm) 25-1/2" (64.8 cm) VWD527 24-3/4" (62.9 cm) VWD530 27-3/4" (70.5 cm) 21-1/4" (54.0 cm) 2-1/2" (6.4 cm) 1-3/4" (4.4 cm) 120 VAC Electrical Connection 9" (22.9 cm) WARNING ELECTRICAL SHOCK HAZARD This appliance is equipped with a 3-prong power cord with the unit. 3 Only use power cord supplied with a grounding plug for your protection against shock hazard and should be plugged directly into a properly grounded receptacle.
... View 2" (5.1 cm) 25-1/2" (64.8 cm) VWD527 24-3/4" (62.9 cm) VWD530 27-3/4" (70.5 cm) 21-1/4" (54.0 cm) 2-1/2" (6.4 cm) 1-3/4" (4.4 cm) 120 VAC Electrical Connection 9" (22.9 cm) WARNING ELECTRICAL SHOCK HAZARD This appliance is equipped with a 3-prong power cord with the unit. 3 Only use power cord supplied with a grounding plug for your protection against shock hazard and should be plugged directly into a properly grounded receptacle.

Installation Instructions
Page 4
... handle With drawer fully extended Interior width Interior height Interior depth Electrical requirement Max Amp Usage Approx. Outer cabinet edges need to be placed anywhere inside the cutout as needed to ensure unit remains level and does not tilt forward when opened. Spacers can be placed on back cutout. Electrical receptacle can be required to make sure unit is the rear right so that excess cord can be finished. 4 Location...
... handle With drawer fully extended Interior width Interior height Interior depth Electrical requirement Max Amp Usage Approx. Outer cabinet edges need to be placed anywhere inside the cutout as needed to ensure unit remains level and does not tilt forward when opened. Spacers can be placed on back cutout. Electrical receptacle can be required to make sure unit is the rear right so that excess cord can be finished. 4 Location...
Installation Instructions
Page 5
... power cord connection should be washed thoroughly with a grounding plug for outdoor models) or plug/ receptacle of the installer to the operator. •Ground unit per applicable electrical codes. •Any installation not matching the specifications discussed in accordance with local codes or with local codes. latest edition. •Line disconnect switch, circuit breaker, GFI (for your national and local codes regarding this unit. -Use 120V/15 amp power cord included with Viking Range...
... power cord connection should be washed thoroughly with a grounding plug for outdoor models) or plug/ receptacle of the installer to the operator. •Ground unit per applicable electrical codes. •Any installation not matching the specifications discussed in accordance with local codes or with local codes. latest edition. •Line disconnect switch, circuit breaker, GFI (for your national and local codes regarding this unit. -Use 120V/15 amp power cord included with Viking Range...

Installation Instructions
Page 6
Pull out the drawer pan. 4 Attach cord to the cutout using the four mounting screws which are provided. Replace warming drawer pan assembly. 6 To avoid an electrical shock hazard, make sure you reach the hand latches (located approximately in cutout. Slide warming drawer cavity into receptacle in the center of the control panel and plug into the cabinet opening. Pull up on on the left side until you only use the cord provided with...
Pull out the drawer pan. 4 Attach cord to the cutout using the four mounting screws which are provided. Replace warming drawer pan assembly. 6 To avoid an electrical shock hazard, make sure you reach the hand latches (located approximately in cutout. Slide warming drawer cavity into receptacle in the center of the control panel and plug into the cabinet opening. Pull up on on the left side until you only use the cord provided with...
Installation Instructions
Page 7
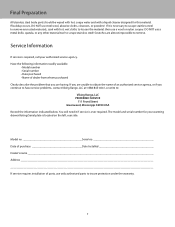
... scrape stainless steel! Scratches are having. Service Information If service is required, call your warming drawer Rating/Serial plate is located on the left, rear side. You will need it is ever required. DO NOT use a metal knife, spatula, or any other material tool to remove. Model no Serial no Date of purchase Date Installed Dealer's name Address If service requires installation of parts, use steel wool, abrasive cloths, cleansers, or...
... scrape stainless steel! Scratches are having. Service Information If service is required, call your warming drawer Rating/Serial plate is located on the left, rear side. You will need it is ever required. DO NOT use a metal knife, spatula, or any other material tool to remove. Model no Serial no Date of purchase Date Installed Dealer's name Address If service requires installation of parts, use steel wool, abrasive cloths, cleansers, or...
Use and Care Manual
Page 1
Use & Care MANUAL 5 SERIES Warming Drawer VWD527 VWD530
Use & Care MANUAL 5 SERIES Warming Drawer VWD527 VWD530
Use and Care Manual
Page 2
... of Contents Getting Started Warnings and Important Safety Information 3 Before Using Your Warming Drawer 5 Product Controls Drawer Features 6 Control Panel Settings 6 Operation Preheating the Warming Drawer 7 Warming Food 7 Proofing 7 Crisping Stale Items 7 Suggested Heat Settings 8 Product Care Cleaning and Maintenance 9 Service Information 10 Warranty 11 2 For more information about this product, please contact the dealer from whom you need to become familiar with the information you purchased it, or contact our Consumer Support Center at...
... of Contents Getting Started Warnings and Important Safety Information 3 Before Using Your Warming Drawer 5 Product Controls Drawer Features 6 Control Panel Settings 6 Operation Preheating the Warming Drawer 7 Warming Food 7 Proofing 7 Crisping Stale Items 7 Suggested Heat Settings 8 Product Care Cleaning and Maintenance 9 Service Information 10 Warranty 11 2 For more information about this product, please contact the dealer from whom you need to become familiar with the information you purchased it, or contact our Consumer Support Center at...
Use and Care Manual
Page 3
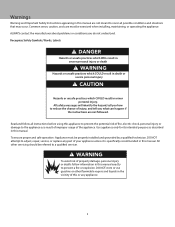
... adjust, repair, service, or replace any part of injury, and tell you do not understand. ALWAYS contact the manufacturer about problems or conditions you what can happen if the instructions are not meant to cover all instructions before using this appliance to prevent the potential risk of the appliance. WARNING To avoid risk of this manual. Warnings Warning and Important Safety Instructions...
... adjust, repair, service, or replace any part of injury, and tell you do not understand. ALWAYS contact the manufacturer about problems or conditions you what can happen if the instructions are not meant to cover all instructions before using this appliance to prevent the potential risk of the appliance. WARNING To avoid risk of this manual. Warnings Warning and Important Safety Instructions...

Use and Care Manual
Page 4
... two hours. WARNING NEVER cover any cleaning agent with your builder or cabinet supplier to remove. An electric rating plate specifying voltage, hertz, wattage, amps, and phase is to be very difficult to make sure that will not discolor or delaminate and will withstand temperatures up to stainless steel. Doing so blocks air flow through the oven and may also trap...
... two hours. WARNING NEVER cover any cleaning agent with your builder or cabinet supplier to remove. An electric rating plate specifying voltage, hertz, wattage, amps, and phase is to be very difficult to make sure that will not discolor or delaminate and will withstand temperatures up to stainless steel. Doing so blocks air flow through the oven and may also trap...
Use and Care Manual
Page 5
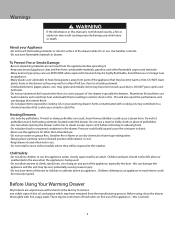
.... Before Using Your Warming Drawer All products are used . •Do not allow anyone to climb, stand, lean, sit or hang on an appliance to a heating element. •Combustible items (paper, plastic, etc.) may ignite and metallic items may be seriously injured. Do not let potholders touch hot heating elements located under the drawer. Let hot air or steam escape (open vent) before operating it is...
.... Before Using Your Warming Drawer All products are used . •Do not allow anyone to climb, stand, lean, sit or hang on an appliance to a heating element. •Combustible items (paper, plastic, etc.) may ignite and metallic items may be seriously injured. Do not let potholders touch hot heating elements located under the drawer. Let hot air or steam escape (open vent) before operating it is...
Use and Care Manual
Page 6
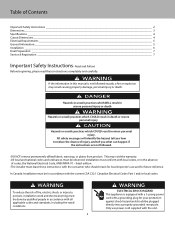
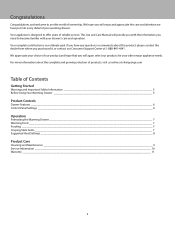
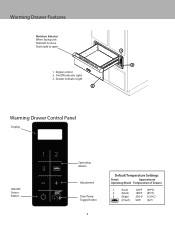
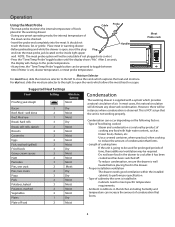
Drawer indicator Light 3 1 2 Warming Drawer Control Panel Display ON/OFF Power Button 12 3 Operating Modes Adjustment Time/Temp Toggle Button 6 Default Temperature Settings Preset Approximate Operating Mode Temperature of Drawer 1 (Low) 120ºF (49ºC) 2 (Med) 185ºF (85ºC) 3 (High) 250 ºF (121ºC) (Proof ) 90ºF (32º) Warming Drawer Features Moisture Selector When facing unit: Slide left to close Slide right to open 1. Digital control 2. On/Off Indicator Light 3.
Drawer indicator Light 3 1 2 Warming Drawer Control Panel Display ON/OFF Power Button 12 3 Operating Modes Adjustment Time/Temp Toggle Button 6 Default Temperature Settings Preset Approximate Operating Mode Temperature of Drawer 1 (Low) 120ºF (49ºC) 2 (Med) 185ºF (85ºC) 3 (High) 250 ºF (121ºC) (Proof ) 90ºF (32º) Warming Drawer Features Moisture Selector When facing unit: Slide left to close Slide right to open 1. Digital control 2. On/Off Indicator Light 3.
Use and Care Manual
Page 7
... desired operating mode for 3 seconds. Adjusting the Temperature -To manually set before the warming drawer reaches the set , press the desired operating mode. The preset operating mode button will light up and a long 2 second beep will flash during a preset mode. -Press the "Time/Temp/Probe" toggle botton to display timer mode. If the Sabbath mode is canceled, the control will immediately enter the preheat phase until an operating mode is pressed, the display will show "SAb" and will start another heating cycle...
... desired operating mode for 3 seconds. Adjusting the Temperature -To manually set before the warming drawer reaches the set , press the desired operating mode. The preset operating mode button will light up and a long 2 second beep will flash during a preset mode. -Press the "Time/Temp/Probe" toggle botton to display timer mode. If the Sabbath mode is canceled, the control will immediately enter the preheat phase until an operating mode is pressed, the display will show "SAb" and will start another heating cycle...
Use and Care Manual
Page 8
... cabinetry the oven is installed in -Cabinets need to meet specific temperature requirements. • Ambient conditions in warming drawer. Handles -Before preheating and while the drawer is open the vents which provides a natural circulation of air. Moisture Selector For moist heat, slide the moisture selector to the left to close the vents which captures the heat and moisture. After 2 seconds, the display will eliminate any time, the "Time/Temp/Probe" toggle button can be...
... cabinetry the oven is installed in -Cabinets need to meet specific temperature requirements. • Ambient conditions in warming drawer. Handles -Before preheating and while the drawer is open the vents which provides a natural circulation of air. Moisture Selector For moist heat, slide the moisture selector to the left to close the vents which captures the heat and moisture. After 2 seconds, the display will eliminate any time, the "Time/Temp/Probe" toggle button can be...
Use and Care Manual
Page 9
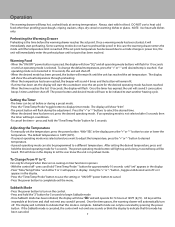
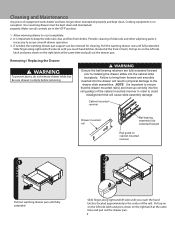
... forward Rail guide on cabinet mounted receiver 2 1 Pull out warming drawer pan until fully extended 2 1 Slide finger along right and left side until fully extended. If needed, the warming drawer pan support can be kept clean and maintained properly. Cleaning and Maintenance Any piece of slide rails and other adjoining parts is necessary to assure smooth drawer operation. 3. Your warming drawer must be removed for cleaning. Be sure drawer is important...
... forward Rail guide on cabinet mounted receiver 2 1 Pull out warming drawer pan until fully extended 2 1 Slide finger along right and left side until fully extended. If needed, the warming drawer pan support can be kept clean and maintained properly. Cleaning and Maintenance Any piece of slide rails and other adjoining parts is necessary to assure smooth drawer operation. 3. Your warming drawer must be removed for cleaning. Be sure drawer is important...
Use and Care Manual
Page 10
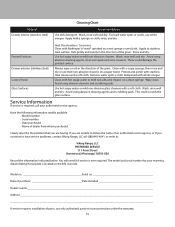
.... Service Information If service is required, call your warming drawer Rating/Serial plate is ever required. If you continue to have service problems, contact Viking Range, LLC at1-888-845-4641, or write to stainless steel surface. Wipe clean. Model no Serial no Date of purchase Date Installed Dealer's name Address If service requires installation of an authorized service agency, or if you are having. Cleaning Chart Material Drawer interior (stainless steel) Recommendations Use dish...
.... Service Information If service is required, call your warming drawer Rating/Serial plate is ever required. If you continue to have service problems, contact Viking Range, LLC at1-888-845-4641, or write to stainless steel surface. Wipe clean. Model no Serial no Date of purchase Date Installed Dealer's name Address If service requires installation of an authorized service agency, or if you are having. Cleaning Chart Material Drawer interior (stainless steel) Recommendations Use dish...
Use and Care Manual
Page 11
... the product should only be used in accordance to national and local codes. To support the manufacturing quality of its component parts contains a defect or malfunction during the warranty period, after a reasonable number of attempts by this warranty. Warrantor is not a condition of warranty coverage. To obtain warranty service contact Viking Range LLC Customer Care at time of delivery. Viking Range, LLC, warrantor, agrees to repair or replace, at...
... the product should only be used in accordance to national and local codes. To support the manufacturing quality of its component parts contains a defect or malfunction during the warranty period, after a reasonable number of attempts by this warranty. Warrantor is not a condition of warranty coverage. To obtain warranty service contact Viking Range LLC Customer Care at time of delivery. Viking Range, LLC, warrantor, agrees to repair or replace, at...


