
Use and Care Guide
Page 1
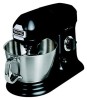
It will turn your stand mixer into more than just a mixer, a true multi-function stand mixer, that every kitchen must have a large selection of finishes offered for Viking Culinary Products. We also have . www.vikingrange.com ® VSM500 Professional 5 quart Stand Mixer - 800 watts VSM700 Professional 7 quart Stand Mixer - 1000 watts Both Models Available in the wide selection of attachments available to use with your stand mixer. You have just purchased a Viking Professional Stand Mixer. Viking Professional Stand Mixer Use and Care Instructions and Recipes Congratulations!
It will turn your stand mixer into more than just a mixer, a true multi-function stand mixer, that every kitchen must have a large selection of finishes offered for Viking Culinary Products. We also have . www.vikingrange.com ® VSM500 Professional 5 quart Stand Mixer - 800 watts VSM700 Professional 7 quart Stand Mixer - 1000 watts Both Models Available in the wide selection of attachments available to use with your stand mixer. You have just purchased a Viking Professional Stand Mixer. Viking Professional Stand Mixer Use and Care Instructions and Recipes Congratulations!

Use and Care Guide
Page 2
To reduce the chances of bodily injury and/or damage to the stand mixer, keep hands, clothing, cooking utensils etc... Have the machine checked and serviced before resuming usage. • When using an attachment make sure that you have ... use this product outside. • To protect against the risk of electric shock do not put in water or other liquid. • Remove beater from stand mixer before cleaning. • This machine is not intended for use by the manufacturer may draw significantly less power.
To reduce the chances of bodily injury and/or damage to the stand mixer, keep hands, clothing, cooking utensils etc... Have the machine checked and serviced before resuming usage. • When using an attachment make sure that you have ... use this product outside. • To protect against the risk of electric shock do not put in water or other liquid. • Remove beater from stand mixer before cleaning. • This machine is not intended for use by the manufacturer may draw significantly less power.

Use and Care Guide
Page 3
NOTE: Do not scrape side of bowl while mixer is in use 5 3 9 2b 13 2a 10 78 11 12 6 4 14 USES OF THE STANDARD ACCESSORIES • Stainless steel "V" Beater- this could damage the attachment. &#... making cakes, mashed potatoes, fillings, muffins and éclairs. • Stainless Steel Whip- For yeast mixtures such as creaming butter and sugar for cakes; THE VIKING PROFESSIONAL STAND MIXER (a) High-speed attachment outlet and (b) cover (a) Slow-speed attachment cover and (b) cover release Slow-speed attachment outlet "V"Beater, stainless steel whip, dough hook, standard...
NOTE: Do not scrape side of bowl while mixer is in use 5 3 9 2b 13 2a 10 78 11 12 6 4 14 USES OF THE STANDARD ACCESSORIES • Stainless steel "V" Beater- this could damage the attachment. &#... making cakes, mashed potatoes, fillings, muffins and éclairs. • Stainless Steel Whip- For yeast mixtures such as creaming butter and sugar for cakes; THE VIKING PROFESSIONAL STAND MIXER (a) High-speed attachment outlet and (b) cover (a) Slow-speed attachment cover and (b) cover release Slow-speed attachment outlet "V"Beater, stainless steel whip, dough hook, standard...
Use and Care Guide
Page 4
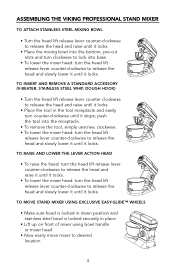
...8226; Place the tool in place • Lift up on front of mixer using bowl handle or mixer head • Now easily move mixer to release the head and slowly lower it until it locks. ASSEMBLING THE VIKING PROFESSIONAL STAND MIXER TO ATTACH STAINLESS STEEL MIXING BOWL • Turn the head lift release ... counter-clockwise to release the head and raise it until it locks. • To lower the mixer head: turn the head lift release lever counter-clockwise to desired location 4 TO MOVE STAND MIXER USING EXCLUSIVE EASY-GLIDE™ WHEELS • Make sure head is locked in down position and...
...8226; Place the tool in place • Lift up on front of mixer using bowl handle or mixer head • Now easily move mixer to release the head and slowly lower it until it locks. ASSEMBLING THE VIKING PROFESSIONAL STAND MIXER TO ATTACH STAINLESS STEEL MIXING BOWL • Turn the head lift release ... counter-clockwise to release the head and raise it until it locks. • To lower the mixer head: turn the head lift release lever counter-clockwise to desired location 4 TO MOVE STAND MIXER USING EXCLUSIVE EASY-GLIDE™ WHEELS • Make sure head is locked in down position and...

Use and Care Guide
Page 5
... there is fitted with spatula for best results. • Eggs at the factory, but they can adjust the height by turning the shaft. Unplug stand mixer. - Adjust the height by : - For ideal operation the stainless steel whip and stainless steel V-beater should knock against the bottom of the bowl...HINTS • If necessary, switch unit off and scrape sides of bowl with an overload protection device and will have to overload the mixer. Raise the mixer head and insert the accessory. - Switch off immediately and remove half of the ingredients to reduce the load, and allow to protect ...
... there is fitted with spatula for best results. • Eggs at the factory, but they can adjust the height by turning the shaft. Unplug stand mixer. - Adjust the height by : - For ideal operation the stainless steel whip and stainless steel V-beater should knock against the bottom of the bowl...HINTS • If necessary, switch unit off and scrape sides of bowl with an overload protection device and will have to overload the mixer. Raise the mixer head and insert the accessory. - Switch off immediately and remove half of the ingredients to reduce the load, and allow to protect ...

Use and Care Guide
Page 8
STANDARD ACCESSORIES (standard with mixer, additional accessories can be washed in dishwasher. • Never use a wire brush, steel wool or bleach on all kinds of yeast mixtures • For homemade ..., two back mounted wheels allow for easy maneuvering without loss of stabilization CLEANING AND SERVICE • Always switch unit off and unplug before cleaning. • Stand mixer may emit a pungent odor, especially when new. This is on your stainless steel bowl. Use vinegar and water to remove spotting or rainbow effects. •...
STANDARD ACCESSORIES (standard with mixer, additional accessories can be washed in dishwasher. • Never use a wire brush, steel wool or bleach on all kinds of yeast mixtures • For homemade ..., two back mounted wheels allow for easy maneuvering without loss of stabilization CLEANING AND SERVICE • Always switch unit off and unplug before cleaning. • Stand mixer may emit a pungent odor, especially when new. This is on your stainless steel bowl. Use vinegar and water to remove spotting or rainbow effects. •...

Use and Care Guide
Page 9
...numbers (located on bottom of the unit), and a brief description of what has occurred with the product. 9 to commercial usage. VIKING PROFESSIONAL STAND MIXER ONE-YEAR FULL WARRANTY Viking Professional Stand Mixers/attachments/accessories are warranted to be free from defective materials or workmanship for a period of ninety (90) days from the date ... all color finishes. Any defects must be defective during the warranty period. You should, however, return the Owner Registration Card so that Viking Range Corporation can contact you should any stand mixer which could affect you.
...numbers (located on bottom of the unit), and a brief description of what has occurred with the product. 9 to commercial usage. VIKING PROFESSIONAL STAND MIXER ONE-YEAR FULL WARRANTY Viking Professional Stand Mixers/attachments/accessories are warranted to be free from defective materials or workmanship for a period of ninety (90) days from the date ... all color finishes. Any defects must be defective during the warranty period. You should, however, return the Owner Registration Card so that Viking Range Corporation can contact you should any stand mixer which could affect you.