Installation Instructions
Page 2
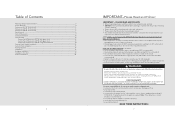
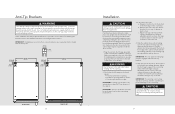
...; connected to operate, play with, or crawl inside the unit. • Never clean unit parts with glass door 13 Custom Panel Dimensions (24"W. A GFI shall be : • Of the receptacle type (breaker type or portable type NOT recommended) • Used with respect to change light bulbs, clean, or service the unit. A 115V, 60 Hz, 15 amp fused electrical supply is properly grounded. • The installer should leave these instructions completely and carefully. • DO NOT remove...
...; connected to operate, play with, or crawl inside the unit. • Never clean unit parts with glass door 13 Custom Panel Dimensions (24"W. A GFI shall be : • Of the receptacle type (breaker type or portable type NOT recommended) • Used with respect to change light bulbs, clean, or service the unit. A 115V, 60 Hz, 15 amp fused electrical supply is properly grounded. • The installer should leave these instructions completely and carefully. • DO NOT remove...
Installation Instructions
Page 3
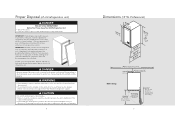
... for pull-out shelf clearance 2-3/16" (5.6 cm) min. Obstructing free airflow can cause serious injury, fire and/or loss of power plug, or direct wiring can cause unit to achieve 94° door swing 5 Never use the drawers, shelves or doors as steps or to support more than they will void the warranty. Contact your old refrigeration unit, please follow these instructions to help...
... for pull-out shelf clearance 2-3/16" (5.6 cm) min. Obstructing free airflow can cause serious injury, fire and/or loss of power plug, or direct wiring can cause unit to achieve 94° door swing 5 Never use the drawers, shelves or doors as steps or to support more than they will void the warranty. Contact your old refrigeration unit, please follow these instructions to help...
Installation Instructions
Page 6
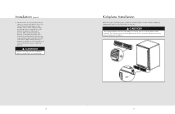
IMPORTANT: For a door to operate properly, the door must be level in accordance with the surrounding finished floor. Protect a finished floor with a minimum of 5-feet of cord extending beyond the rear of installation. Preparing Electrical Connections All electrical instructions assume that the countertop be supported by removing the banding holding the sleeve to the shipping base. All units come equipped with a NEMA 5-15P...
IMPORTANT: For a door to operate properly, the door must be level in accordance with the surrounding finished floor. Protect a finished floor with a minimum of 5-feet of cord extending beyond the rear of installation. Preparing Electrical Connections All electrical instructions assume that the countertop be supported by removing the banding holding the sleeve to the shipping base. All units come equipped with a NEMA 5-15P...

Installation Instructions
Page 8
... custom panel at marked locations taking care not to the door using #10 x 1" wood screws, installed through the door frame from the inside of the overlay panel to damage panel. 3. Attach handle. Loosely attach four corners of the door. Countersink screw heads so they are provided in position, open the door and make sure panel pre-drilled holes align with door frame holes. 2. Holes are flush with handle fastening locations. 2. Handle...
... custom panel at marked locations taking care not to the door using #10 x 1" wood screws, installed through the door frame from the inside of the overlay panel to damage panel. 3. Attach handle. Loosely attach four corners of the door. Countersink screw heads so they are provided in position, open the door and make sure panel pre-drilled holes align with door frame holes. 2. Holes are flush with handle fastening locations. 2. Handle...
Installation Instructions
Page 9
... level and square: • Front face and interior opening • Installation opening . Check that the lighting and cooling function operate properly, then turn legs counterclockwise to raise the unit or clockwise to provide a secure surface for mounting bracket locations. Using an adjustable wrench or pliers, turn off power to the bottom of the front edge of the cabinet. Slide the cabinet into the 15 amp...
... level and square: • Front face and interior opening • Installation opening . Check that the lighting and cooling function operate properly, then turn legs counterclockwise to raise the unit or clockwise to provide a secure surface for mounting bracket locations. Using an adjustable wrench or pliers, turn off power to the bottom of the front edge of the cabinet. Slide the cabinet into the 15 amp...
Installation Instructions
Page 10
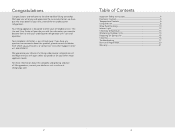
...removable for servicing. CAUTION Improper shelving or drawer installation may not actuate slide stop is secured in the tracks. Take extreme care to ensure the cabinet is level. Installation (cont.) 6. When sliding shelving or drawers are installed properly a click should be covered or obstructed so as to full extension, a stop mechanism. 18 Kickplate Installation...should slide smoothly in place, install the slotted kickplate. Check interior door openings inside the cabinet to insert sliding shelving and sliding drawers squarely into the latch catch on the unit. Reinstall...
...removable for servicing. CAUTION Improper shelving or drawer installation may not actuate slide stop is secured in the tracks. Take extreme care to ensure the cabinet is level. Installation (cont.) 6. When sliding shelving or drawers are installed properly a click should be covered or obstructed so as to full extension, a stop mechanism. 18 Kickplate Installation...should slide smoothly in place, install the slotted kickplate. Check interior door openings inside the cabinet to insert sliding shelving and sliding drawers squarely into the latch catch on the unit. Reinstall...

Installation Instructions
Page 11
... unit level? h Are the panel(s) (wood overlays, if used) attached securely and properly? The model and serial number for at least 24 hours before loading products or adjusting temperature settings. 20 Service Information If service is required, call , be obtained from a solid soffit? Model and Serial number Model Number Serial Number Date of Purchase Date Installed Dealer's Name Address If service requires installation of parts, use only authorized parts to insure protection under the control...
... unit level? h Are the panel(s) (wood overlays, if used) attached securely and properly? The model and serial number for at least 24 hours before loading products or adjusting temperature settings. 20 Service Information If service is required, call , be obtained from a solid soffit? Model and Serial number Model Number Serial Number Date of Purchase Date Installed Dealer's Name Address If service requires installation of parts, use only authorized parts to insure protection under the control...
Use and Care Manual
Page 2
.... This Use and Care Guide will again select our products for Spring Use 15 Cleaning 16 Troubleshooting 17 Service & Registration 20 Warranty 21 2 3 We appreciate your choice of a Viking undercounter refrigeration unit and hope that you will provide you with the information you have put into every detail of -the-art undercounter refrigeration. Table of Contents Important Safety Instructions 4 Electronic Controls 5 Temperature Controls 6 Using the Unit...
.... This Use and Care Guide will again select our products for Spring Use 15 Cleaning 16 Troubleshooting 17 Service & Registration 20 Warranty 21 2 3 We appreciate your choice of a Viking undercounter refrigeration unit and hope that you will provide you with the information you have put into every detail of -the-art undercounter refrigeration. Table of Contents Important Safety Instructions 4 Electronic Controls 5 Temperature Controls 6 Using the Unit...
Use and Care Manual
Page 3
.... • The installer should leave these instructions with the correct electric supply and grounding. The fumes can create a fire hazard or explosion. • Always turn the power off to operate it properly. • used by anyone unable to change light bulbs, clean, or service the unit. Decreases temperature when changing set point; This may void the warranty. • Please observe all local and national codes and ordinances. •...
.... • The installer should leave these instructions with the correct electric supply and grounding. The fumes can create a fire hazard or explosion. • Always turn the power off to operate it properly. • used by anyone unable to change light bulbs, clean, or service the unit. Decreases temperature when changing set point; This may void the warranty. • Please observe all local and national codes and ordinances. •...

Use and Care Manual
Page 4
... button. The display will turn off and will show the set point, the MAX or the MIN temperature stored. 3. Electronic Controls Temperature Control Panel The controller is pressed more than 3 seconds, the "PoF" message will be displayed. Under these conditions, an air temperature swing does not change the SET point: 1. The display will show temperature when the unit is reading actual air temperature not product temperature. If a button is located inside of the set...
... button. The display will turn off and will show the set point, the MAX or the MIN temperature stored. 3. Electronic Controls Temperature Control Panel The controller is pressed more than 3 seconds, the "PoF" message will be displayed. Under these conditions, an air temperature swing does not change the SET point: 1. The display will show temperature when the unit is reading actual air temperature not product temperature. If a button is located inside of the set...
Use and Care Manual
Page 5
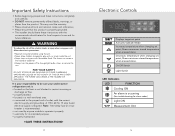
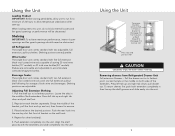
... wine racks and one full extension pullout shelf allowing for storage of both extenders. FOR YOUR SAFETY 9 Shelves are adjustable. Press left tab up . Push the rear hook into unit, do no block internal louvers and fan guard openings or performance will be obstructed. Removing drawers from Refrigerated Drawer Unit Full-extension Drawers - All Refrigerator The single door unit comes standard with five full...
... wine racks and one full extension pullout shelf allowing for storage of both extenders. FOR YOUR SAFETY 9 Shelves are adjustable. Press left tab up . Push the rear hook into unit, do no block internal louvers and fan guard openings or performance will be obstructed. Removing drawers from Refrigerated Drawer Unit Full-extension Drawers - All Refrigerator The single door unit comes standard with five full...
Use and Care Manual
Page 7
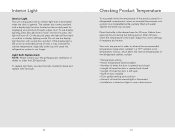
... the cabinet temperature, especially at the top and cause the refrigeration system to run longer. Do not use display lighting, press the Light button twice. To replace light bulb, unscrew the bulb counterclockwise and replace with a solid door product. Place the bottle in a refrigerated compartment, insert an accurate thermometer into a plastic (non-breakable) bottle, partially filled with water. If the display light is left open • Style of door installed • Door gasket sealing...
... the cabinet temperature, especially at the top and cause the refrigeration system to run longer. Do not use display lighting, press the Light button twice. To replace light bulb, unscrew the bulb counterclockwise and replace with a solid door product. Place the bottle in a refrigerated compartment, insert an accurate thermometer into a plastic (non-breakable) bottle, partially filled with water. If the display light is left open • Style of door installed • Door gasket sealing...
Use and Care Manual
Page 8
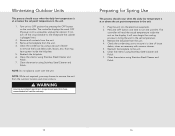
... the set temperature. 3. Remove the kickplate from the outdoor location and store indoors. Clean the condensor by pressing the OFF button on the display. Reattach the kickplate. 6. NOTE: While not required, you may have gotten inside the unit on the controller. Plug the unit into .) 2. The controller will void the warranty. It will soon begin the cooling process to bring the unit to turn...
... the set temperature. 3. Remove the kickplate from the outdoor location and store indoors. Clean the condensor by pressing the OFF button on the display. Reattach the kickplate. 6. NOTE: While not required, you may have gotten inside the unit on the controller. Plug the unit into .) 2. The controller will void the warranty. It will soon begin the cooling process to bring the unit to turn...
Use and Care Manual
Page 9
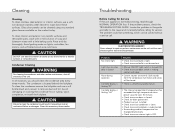
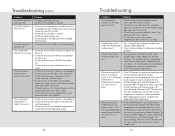
... Noise during operation Controller display is flashing "P1" Controller display is flashing "HA" Solution • Check to ensure bulb is tight. • Check to ensure bulb is not burned out. • Manual ON/OFF light switch is turned ON. • Check to repair or perform maintenance on lights, controllers, fan motors, and unfinished wood wine rack faces. DANGER • The internal compartment temperature has exceeded the high temperature alarm preset value for service...
... Noise during operation Controller display is flashing "P1" Controller display is flashing "HA" Solution • Check to ensure bulb is tight. • Check to ensure bulb is not burned out. • Manual ON/OFF light switch is turned ON. • Check to repair or perform maintenance on lights, controllers, fan motors, and unfinished wood wine rack faces. DANGER • The internal compartment temperature has exceeded the high temperature alarm preset value for service...
Use and Care Manual
Page 10
... warm room temperatures the system will be displayed. the SET button until the message "rSt" starts blinking. Controller display is flashing "LA" • The internal compartment temperature has exceeded the low temperature alarm preset value for over 30 minutes. • Check to ensure door is closed. • Check for temperature that does normal temperature to ensure your local Viking authorized servicer. The condensation will be displayed. Troubleshooting (cont.) Problem Solution Controller display...
... warm room temperatures the system will be displayed. the SET button until the message "rSt" starts blinking. Controller display is flashing "LA" • The internal compartment temperature has exceeded the low temperature alarm preset value for over 30 minutes. • Check to ensure door is closed. • Check for temperature that does normal temperature to ensure your local Viking authorized servicer. The condensation will be displayed. Troubleshooting (cont.) Problem Solution Controller display...
Use and Care Manual
Page 11
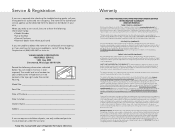
... of any reason, alteration, improper installation, improper operation or repair or service to the product by an authorized Viking Range Corporation service agency or representative. You will need it if service is requested. Sealed Refrigeration System Components: Compressor, Evaporator, Condenser, Connecting Tubing, Dryer/Strainer TWELVE YEAR LIMITED WARRANTY Any sealed refrigeration system component, as restaurants, food service locations and institutional food service locations. This warranty extends to the original purchaser...
... of any reason, alteration, improper installation, improper operation or repair or service to the product by an authorized Viking Range Corporation service agency or representative. You will need it if service is requested. Sealed Refrigeration System Components: Compressor, Evaporator, Condenser, Connecting Tubing, Dryer/Strainer TWELVE YEAR LIMITED WARRANTY Any sealed refrigeration system component, as restaurants, food service locations and institutional food service locations. This warranty extends to the original purchaser...
Use and Care Manual
Page 12
FIVE YEAR LIMITED WARRANTY Any sealed refrigeration system component, as listed above limitation may vary from abuse, accident, natural disaster, loss of electrical power to the product for any reason, alteration, improper installation, improper operation or repair or service to the product by an authorized Viking Range Corporation service agency or representative. Products must be free from defective materials or workmanship for consequential...
FIVE YEAR LIMITED WARRANTY Any sealed refrigeration system component, as listed above limitation may vary from abuse, accident, natural disaster, loss of electrical power to the product for any reason, alteration, improper installation, improper operation or repair or service to the product by an authorized Viking Range Corporation service agency or representative. Products must be free from defective materials or workmanship for consequential...
Specs
Page 1
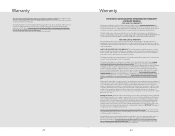
... CHANGE ft. (150.0 L) • 200 lb. Refrigerated Drawer Standard Features & Accessories All models include • Agency certified for outdoor use • Electronic controls with digital temperature readout o Inside temperature can be adjusted from 33 - 39ºF o Factory set at 34ºF o Sabbath mode o Temperature can be displayed in 24" deep cutout • Energy Star qualified • Undercounter or freestanding installation • Self-closing door with chromeplated brackets, stainless...
... CHANGE ft. (150.0 L) • 200 lb. Refrigerated Drawer Standard Features & Accessories All models include • Agency certified for outdoor use • Electronic controls with digital temperature readout o Inside temperature can be adjusted from 33 - 39ºF o Factory set at 34ºF o Sabbath mode o Temperature can be displayed in 24" deep cutout • Energy Star qualified • Undercounter or freestanding installation • Self-closing door with chromeplated brackets, stainless...

Specs
Page 2
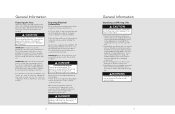
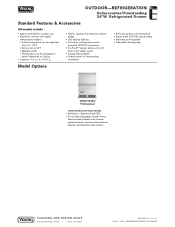
...--19-...0151///11ccc6mmm66"""))) ((388479mm3-..t0015aoinx/"cc.4.mm")) VRDO1240D 23-7/8" (60.6 cm) 34-1/4" (87.0 cm) min. INFORMATION SUBJECT TO CHANGE % Please see Installation Notes & Accessories for important information, including pan sets and dividers. OUTDOOR-REFRIGERATION Undercounter/Freestanding 24"W. Refrigerated Drawer Dimensions & Specifications PRODUCT DIMENSIONS VRDO1240D Professional Overall width Overall height Overall depth (from rear) To front edge of handle With drawer fully extended Approx.
...--19-...0151///11ccc6mmm66"""))) ((388479mm3-..t0015aoinx/"cc.4.mm")) VRDO1240D 23-7/8" (60.6 cm) 34-1/4" (87.0 cm) min. INFORMATION SUBJECT TO CHANGE % Please see Installation Notes & Accessories for important information, including pan sets and dividers. OUTDOOR-REFRIGERATION Undercounter/Freestanding 24"W. Refrigerated Drawer Dimensions & Specifications PRODUCT DIMENSIONS VRDO1240D Professional Overall width Overall height Overall depth (from rear) To front edge of handle With drawer fully extended Approx.
Specs
Page 5
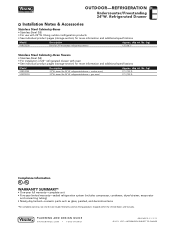
...-year limited warranty-sealed refrigeration system (includes compressor, condenser, dryer/strainer, evaporator and connecting tubing) • Ninety-day limited-cosmetic parts such as glass, painted, and decorative items *For complete warranty, see Use & Care Guide. INFORMATION SUBJECT TO CHANGE lbs. (kg) 125 (56.7) Stainless Steel Cabinetry-Oven Towers • Stainless Steel (SS) • For installation of 24" refrigerated drawer with 24"W. tower (for 24"W. Refrigerated Drawer % Installation Notes & Accessories Stainless Steel Cabinetry...
...-year limited warranty-sealed refrigeration system (includes compressor, condenser, dryer/strainer, evaporator and connecting tubing) • Ninety-day limited-cosmetic parts such as glass, painted, and decorative items *For complete warranty, see Use & Care Guide. INFORMATION SUBJECT TO CHANGE lbs. (kg) 125 (56.7) Stainless Steel Cabinetry-Oven Towers • Stainless Steel (SS) • For installation of 24" refrigerated drawer with 24"W. tower (for 24"W. Refrigerated Drawer % Installation Notes & Accessories Stainless Steel Cabinetry...


