27 inchW. Professional Built-in Trim Kit - VMTK272 - Installation Instructions
Page 2
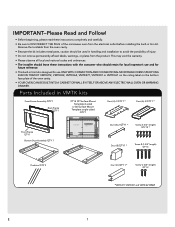
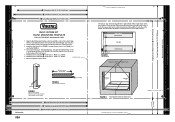
... Mount Template single-sided QTY 1 Maximum Cutout Opening Width 24-11/16" (627.06 mm) Minimum Cutout Opening Width 24-3/8" (619.13 mm) BUILT-IN TRIM KIT TEMPLATE FOR CUSTOM SERIES MICROWAVE OVEN Center Line USE THIS SIDE OF TEMPLATE FOR MODELS VMTK272 and VMTK302 ONLY. 1. This may void the warranty. • Please observe all local and national codes and ordinances. • The installer should leave these instructions completely and carefully...
... Mount Template single-sided QTY 1 Maximum Cutout Opening Width 24-11/16" (627.06 mm) Minimum Cutout Opening Width 24-3/8" (619.13 mm) BUILT-IN TRIM KIT TEMPLATE FOR CUSTOM SERIES MICROWAVE OVEN Center Line USE THIS SIDE OF TEMPLATE FOR MODELS VMTK272 and VMTK302 ONLY. 1. This may void the warranty. • Please observe all local and national codes and ordinances. • The installer should leave these instructions completely and carefully...
27 inchW. Professional Built-in Trim Kit - VMTK272 - Installation Instructions
Page 4
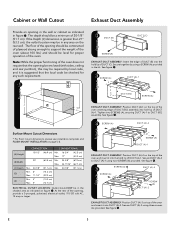
... mount dimensions please see installation template and FLUSH MOUNT INSTALLATION on the rear wall. Secure DUCT (A)-2 to DUCT (A)-1 using three screws (A) provided. The depth should be checked for proper operation of the oven. E 3 Cabinet or Wall Cutout Exhaust Duct Assembly Provide an opening in the wall or cabinet as indicated on the top of the oven and insert it into the hold lip of DUCT (C). Note: While the proper functioning of the opening , provide a 3-pronged, polarized, electrical...
... mount dimensions please see installation template and FLUSH MOUNT INSTALLATION on the rear wall. Secure DUCT (A)-2 to DUCT (A)-1 using three screws (A) provided. The depth should be checked for proper operation of the oven. E 3 Cabinet or Wall Cutout Exhaust Duct Assembly Provide an opening in the wall or cabinet as indicated on the top of the oven and insert it into the hold lip of DUCT (C). Note: While the proper functioning of the opening , provide a 3-pronged, polarized, electrical...
27 inchW. Professional Built-in Trim Kit - VMTK272 - Installation Instructions
Page 5
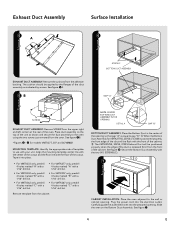
..., 307SS or 376SS is equal to the flanges of the cutout. Remove template from the adhesive backing. Exhaust Duct Assembly 5 A Surface Installation 6 EXHAUST DUCT ASSEMBLY: Remove the cushions from the cabinet. Secure the Bottom Duct Assembly with the floor of the duct assembly as shown and secure the duct assembly to use with your unit. Carefully guide the assembled oven into the prepared opening so that gap "A" is positioned properly, the front edge of...
..., 307SS or 376SS is equal to the flanges of the cutout. Remove template from the adhesive backing. Exhaust Duct Assembly 5 A Surface Installation 6 EXHAUST DUCT ASSEMBLY: Remove the cushions from the cabinet. Secure the Bottom Duct Assembly with the floor of the duct assembly as shown and secure the duct assembly to use with your unit. Carefully guide the assembled oven into the prepared opening so that gap "A" is positioned properly, the front edge of...
30 inchW. Flush Mount Kit for Microwave Trim - PMF302TK - Installation Instructions
Page 1
...careful to align the Floor Line to the bottom edges of the cabinet. The front edge of the exhaust duct should be recessed from the edge of the bottom spacer by 5 mm in order for the unit to be flush with the left to the corresponding Side Spacer (see FIGURE 2) as shown. Cut... VIEW 4" 1-15/16" (50.35 mm) FIGURE 3 Front of Cabinet (1) Bottom Spacer 1-15/16" (49.9 mm) Edges to cutout 13-7/16" (341.6 mm) =" Cutout Opening Width 26-15/16" (683.2 mm) BUILT-IN TRIM KIT FLUSH MOUNTING TEMPLATE FOR CUSTOM SERIES MICROWAVE OVEN 1. L with a / " drill bit. 6. 5/16" (8.77 mm...
...careful to align the Floor Line to the bottom edges of the cabinet. The front edge of the exhaust duct should be recessed from the edge of the bottom spacer by 5 mm in order for the unit to be flush with the left to the corresponding Side Spacer (see FIGURE 2) as shown. Cut... VIEW 4" 1-15/16" (50.35 mm) FIGURE 3 Front of Cabinet (1) Bottom Spacer 1-15/16" (49.9 mm) Edges to cutout 13-7/16" (341.6 mm) =" Cutout Opening Width 26-15/16" (683.2 mm) BUILT-IN TRIM KIT FLUSH MOUNTING TEMPLATE FOR CUSTOM SERIES MICROWAVE OVEN 1. L with a / " drill bit. 6. 5/16" (8.77 mm...
Two-Page Specifications Sheet
Page 1
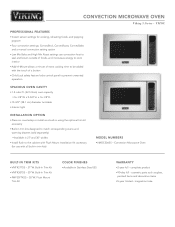
...;Child Lock safety feature locks control panel to prevent unwanted operation SPACIOUS OVEN CAVITY §§1.5 cubic ft. (42.5 liters) oven capacity §§16-1/8"W. cosmetic parts such as a built-in using the optional trim kit accessory §§Built-in trim kits designed to be added with all built-in trim kits) MODEL NUMBERS §§VMOC506SS - VMOC PROFESSIONAL FEATURES §§Instant sensor settings for use convection heat to seal and brown outside of foods, and microwave energy to cook interior...
...;Child Lock safety feature locks control panel to prevent unwanted operation SPACIOUS OVEN CAVITY §§1.5 cubic ft. (42.5 liters) oven capacity §§16-1/8"W. cosmetic parts such as a built-in using the optional trim kit accessory §§Built-in trim kits designed to be added with all built-in trim kits) MODEL NUMBERS §§VMOC506SS - VMOC PROFESSIONAL FEATURES §§Instant sensor settings for use convection heat to seal and brown outside of foods, and microwave energy to cook interior...
Installation Instructions
Page 2
... available: a. You will need it if service is required: 1. Name of parts, use only authorized parts to : VIKING RANGE, LLC PREFERRED SERVICE 111 Front Street Greenwood, Mississippi (MS) 38930 USA Record the information indicated below. Model Number Serial Number Date of Purchase Date Installed Dealer's Name Address If service requires installation of dealer from whom purchased 3. Call your oven are having. Model number b. The model and serial number for your authorized...
... available: a. You will need it if service is required: 1. Name of parts, use only authorized parts to : VIKING RANGE, LLC PREFERRED SERVICE 111 Front Street Greenwood, Mississippi (MS) 38930 USA Record the information indicated below. Model Number Serial Number Date of Purchase Date Installed Dealer's Name Address If service requires installation of dealer from whom purchased 3. Call your oven are having. Model number b. The model and serial number for your authorized...
Installation Instructions
Page 3
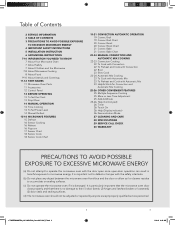
... INSTRUCTIONS 5 INSTALLATION INSTRUCTION 6 GROUNDING INSTRUCTIONS 7-10 INFORMATION YOU NEED TO KNOW 7 About Your Microwave Oven 7 About Safety 7 About Children and the Microwave 7-8 About Microwave Cooking 8 About Food 9-10 About Utensils and Coverings 11-12 PART NAMES 11 Microwave Oven Parts 11 Accessories 12 Control Panel 13 BEFORE OPERATING 13 To Set the Clock 13 Stop/Clear 14 MANUAL OPERATION 14 Time Cooking 14 To Set Power Level 14 Manual Defrost 15-18 MICROWAVE FEATURES 15 Defrost 16 Sensor Cooking 16 Reheat 16 Popcorn 17 Sensor Chart 18 Sensor Cook...
... INSTRUCTIONS 5 INSTALLATION INSTRUCTION 6 GROUNDING INSTRUCTIONS 7-10 INFORMATION YOU NEED TO KNOW 7 About Your Microwave Oven 7 About Safety 7 About Children and the Microwave 7-8 About Microwave Cooking 8 About Food 9-10 About Utensils and Coverings 11-12 PART NAMES 11 Microwave Oven Parts 11 Accessories 12 Control Panel 13 BEFORE OPERATING 13 To Set the Clock 13 Stop/Clear 14 MANUAL OPERATION 14 Time Cooking 14 To Set Power Level 14 Manual Defrost 15-18 MICROWAVE FEATURES 15 Defrost 16 Sensor Cooking 16 Reheat 16 Popcorn 17 Sensor Chart 18 Sensor Cook...
Installation Instructions
Page 4
... 6. 4. See door surface cleaning instructions on top of fire in the microwave oven at the fuse or circuit breaker panel. Getting Started IMPORTANT SAFETY INSTRUCTIONS When using the appliance. 2. Do not use as water, coffee or tea are able to facilitate cooking. If the microwave oven is not working properly or if it has been damaged or dropped. 9. Connect only to heat, cook or dry food. Install or locate this appliance...
... 6. 4. See door surface cleaning instructions on top of fire in the microwave oven at the fuse or circuit breaker panel. Getting Started IMPORTANT SAFETY INSTRUCTIONS When using the appliance. 2. Do not use as water, coffee or tea are able to facilitate cooking. If the microwave oven is not working properly or if it has been damaged or dropped. 9. Connect only to heat, cook or dry food. Install or locate this appliance...
Installation Instructions
Page 5
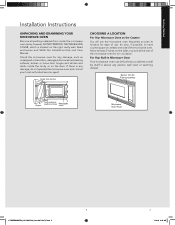
... door, damaged door seals and sealing surfaces, broken or loose door hinges and latches and dents inside the microwave oven cavity; Read enclosures and SAVE the Installation/Use and Care Manual. Allow at least 2 inches on the right cavity wall. For Your Built-in Trim Kit Frame Assembly Microwave Oven Front 5 1.TINSEB564MRR0_VK-VMOC506_Conv MO U&C_E.indd 5 E 5/4/18 9:46 AM Getting Started UNPACKING AND EXAMINING YOUR MICROWAVE OVEN Installation Instructions UNPACKING AND EXAMINING YOUR MICROWAVE OVEN Remove...
... door, damaged door seals and sealing surfaces, broken or loose door hinges and latches and dents inside the microwave oven cavity; Read enclosures and SAVE the Installation/Use and Care Manual. Allow at least 2 inches on the right cavity wall. For Your Built-in Trim Kit Frame Assembly Microwave Oven Front 5 1.TINSEB564MRR0_VK-VMOC506_Conv MO U&C_E.indd 5 E 5/4/18 9:46 AM Getting Started UNPACKING AND EXAMINING YOUR MICROWAVE OVEN Installation Instructions UNPACKING AND EXAMINING YOUR MICROWAVE OVEN Remove...
Installation Instructions
Page 7
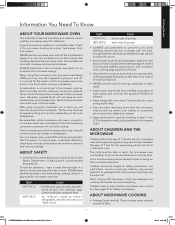
... waveguide cover clean. ABOUT CHILDREN AND THE MICROWAVE Children below 100%, you will turn the turntable over so that there is no time should stand on and off. Children should be extra hot. Condensation is a normal part of poultry. ... Vents on the microwave oven door. white meat of microwave cooking. Food residue can cause arcing and/or fires. • Use care when removing items from the microwave oven so that are cooked...
... waveguide cover clean. ABOUT CHILDREN AND THE MICROWAVE Children below 100%, you will turn the turntable over so that there is no time should stand on and off. Children should be extra hot. Condensation is a normal part of poultry. ... Vents on the microwave oven door. white meat of microwave cooking. Food residue can cause arcing and/or fires. • Use care when removing items from the microwave oven so that are cooked...
Installation Instructions
Page 9
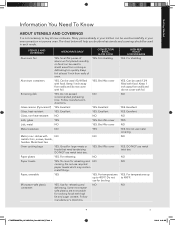
... ties. Can be used in your new convection microwave oven. Broil-No cover NO YES. To cover for broiling. Can be used if 3/4 filled with food. For temperatures up to shield areas from walls and do not cover with NO NO metallic trim, screws, bands, handles. YES. Do not use for reheating and NO cooking. NO YES. NO YES. Getting Started Information You Need To Know ABOUT...
... ties. Can be used in your new convection microwave oven. Broil-No cover NO YES. To cover for broiling. Can be used if 3/4 filled with food. For temperatures up to shield areas from walls and do not cover with NO NO metallic trim, screws, bands, handles. YES. Do not use for reheating and NO cooking. NO YES. NO YES. Getting Started Information You Need To Know ABOUT...
Installation Instructions
Page 14
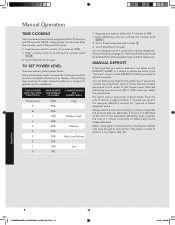
... end of the estimated defrosting time, program the oven in 1 minute increments on the DEFROST CHART or is recommended for 1 pound of meats. Always stop the oven periodically to remove or separate the portions that Power Level must be programmed for 5 minutes at 100%. 1. Touch Start/Touch On pad. Manual Operation TIME COOKING Your microwave oven can program up to 4 automatic cooking sequences. When using Power Level 3. Note that are defrosted. Enter defrosting time by touching the number pads 500. 2.
... end of the estimated defrosting time, program the oven in 1 minute increments on the DEFROST CHART or is recommended for 1 pound of meats. Always stop the oven periodically to remove or separate the portions that Power Level must be programmed for 5 minutes at 100%. 1. Touch Start/Touch On pad. Manual Operation TIME COOKING Your microwave oven can program up to 4 automatic cooking sequences. When using Power Level 3. Note that are defrosted. Enter defrosting time by touching the number pads 500. 2.
Installation Instructions
Page 16
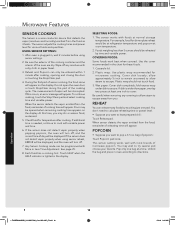
... for dinner plate reheat would be programmed with variable power and time. 6. Unfold the bag and place in the display. If the sensor does not detect vapor properly when using sensor settings. 2. bag of microwave popcorn. If additional time is needed, continue to heat prepared chili: Touch Reheat pad. Any Sensor Cooking mode can reheat many foods by time and variable power. See page 25. 8. COVERING FOODS: Some foods work best when covered. Microwave Features SENSOR COOKING The Sensor is...
... for dinner plate reheat would be programmed with variable power and time. 6. Unfold the bag and place in the display. If the sensor does not detect vapor properly when using sensor settings. 2. bag of microwave popcorn. If additional time is needed, continue to heat prepared chili: Touch Reheat pad. Any Sensor Cooking mode can reheat many foods by time and variable power. See page 25. 8. COVERING FOODS: Some foods work best when covered. Microwave Features SENSOR COOKING The Sensor is...
Installation Instructions
Page 19
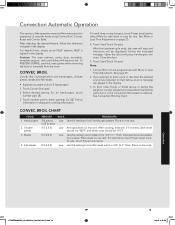
... the desired feature, follow instructions in display for rare, touch Power Level twice. Caution: The oven cabinet, cavity, door, turntable, turntable support, racks and dishes will be displayed. Follow information in the Convection Microwave Cookbook. To broil other foods or foods above or below , an error message will appear in the display. Hamburgers 2. Place on low rack. For well done or rare burgers, touch Power Level pad to enter quantity. Touch Start/Touch On pad. Dark...
... the desired feature, follow instructions in display for rare, touch Power Level twice. Caution: The oven cabinet, cavity, door, turntable, turntable support, racks and dishes will be displayed. Follow information in the Convection Microwave Cookbook. To broil other foods or foods above or below , an error message will appear in the display. Hamburgers 2. Place on low rack. For well done or rare burgers, touch Power Level pad to enter quantity. Touch Start/Touch On pad. Dark...
Installation Instructions
Page 22
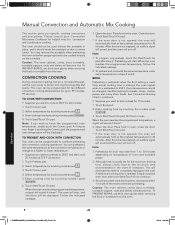
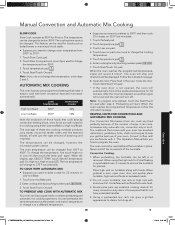
... entered; To PREVENT BURNS, use thick oven gloves when removing the food or turntable from 7 to completely reprogram the oven if additional cooking time is not opened , the oven will sound 4 times*. 4. The oven will stop, and directions will turn off . Touch Convec pad. 2. Place food in the oven. Manual Convection and Automatic Mix Cooking This section gives you need to 10 minutes depending on the turntable. Caution: The oven cabinet, cavity, door, turntable, turntable support, racks and dishes will become hot.
... entered; To PREVENT BURNS, use thick oven gloves when removing the food or turntable from 7 to completely reprogram the oven if additional cooking time is not opened , the oven will sound 4 times*. 4. The oven will stop, and directions will turn off . Touch Convec pad. 2. Place food in the oven. Manual Convection and Automatic Mix Cooking This section gives you need to 10 minutes depending on the turntable. Caution: The oven cabinet, cavity, door, turntable, turntable support, racks and dishes will become hot.
Installation Instructions
Page 23
... message. 8. Open the door. After this time has elapsed, an audible signal will sound and the oven will start. Note: To program only preheat, touch the Start/Touch On pad after step 2. Preheating will turn off. When the oven reaches the programmed temperature, follow the indicated message. HELPFUL HINTS FOR CONVECTION AND AUTOMATIC MIX COOKING Your Convection Microwave Oven can be baked inside. 2. The cookbook that cooks food. 3. Convection Cooking: 1. Place high rack on...
... message. 8. Open the door. After this time has elapsed, an audible signal will sound and the oven will start. Note: To program only preheat, touch the Start/Touch On pad after step 2. Preheating will turn off. When the oven reaches the programmed temperature, follow the indicated message. HELPFUL HINTS FOR CONVECTION AND AUTOMATIC MIX COOKING Your Convection Microwave Oven can be baked inside. 2. The cookbook that cooks food. 3. Convection Cooking: 1. Place high rack on...
Installation Instructions
Page 26
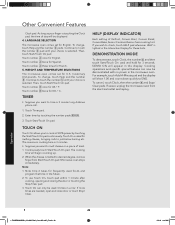
... quickly to touch the number 5 until your choice is selected. If more times are needed, open and close door or touch Stop/ Clear. Cooking operations and specific special features can only be displayed. 4. For example, touch Add-A-Minute pad and the display will begin counting up. 2. Touch number 4 twice for KG / ˚C. Touch number 4 three times for U.S. WEIGHT AND TEMPERATURE SELECTIONS The microwave oven comes set for 3 seconds. To change , touch Help and the number 4 pads. Then, touch Start/Touch...
... quickly to touch the number 5 until your choice is selected. If more times are needed, open and close door or touch Stop/ Clear. Cooking operations and specific special features can only be displayed. 4. For example, touch Add-A-Minute pad and the display will begin counting up. 2. Touch number 4 twice for KG / ˚C. Touch number 4 three times for U.S. WEIGHT AND TEMPERATURE SELECTIONS The microwave oven comes set for 3 seconds. To change , touch Help and the number 4 pads. Then, touch Start/Touch...
Installation Instructions
Page 27
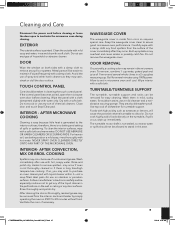
... of 1 lemon and several minutes using 100% power. After cleaning the interior thoroughly, residual grease may remain in microwave oven until cool. Keep the waveguide cover clean to set in the microwave oven. ODOR REMOVAL Occasionally, a cooking odor may be allowed to remove any food spatters from mica so requires special care. WAVEGUIDE COVER The waveguide cover is painted. Close door and touch Stop/Clear pad. AFTER CONVECTION, MIX OR BROIL COOKING Spatters may wish to purchase...
... of 1 lemon and several minutes using 100% power. After cleaning the interior thoroughly, residual grease may remain in microwave oven until cool. Keep the waveguide cover clean to set in the microwave oven. ODOR REMOVAL Occasionally, a cooking odor may be allowed to remove any food spatters from mica so requires special care. WAVEGUIDE COVER The waveguide cover is painted. Close door and touch Stop/Clear pad. AFTER CONVECTION, MIX OR BROIL COOKING Spatters may wish to purchase...
Installation Instructions
Page 30
... service is requested. Service will be repaired or replaced, free of charge for a period of two (2) years from the date of original retail purchase from the date of original retail purchase it will be provided during the warranty period. * Glass (including light bulbs), painted and decorative items are limited in no case exceed the price of the goods or service or part...
... service is requested. Service will be repaired or replaced, free of charge for a period of two (2) years from the date of original retail purchase from the date of original retail purchase it will be provided during the warranty period. * Glass (including light bulbs), painted and decorative items are limited in no case exceed the price of the goods or service or part...
Convection Cookbook
Page 4
... white meat becomes dry in the oven while it for convection, combination and microwave cooking. Excessively hot air does not collect at a time, and fine-textures quick bread loaves. Glass ceramic (Pyroceram®) casseroles go from convection and combination cooking. The metal turntable is needed to temperatures of food. Convection Cooking A high speed fan circulates air past the heat source and around the food. Use baking rack for breads and cookies. Breads...
... white meat becomes dry in the oven while it for convection, combination and microwave cooking. Excessively hot air does not collect at a time, and fine-textures quick bread loaves. Glass ceramic (Pyroceram®) casseroles go from convection and combination cooking. The metal turntable is needed to temperatures of food. Convection Cooking A high speed fan circulates air past the heat source and around the food. Use baking rack for breads and cookies. Breads...


