Installation Instructions
Page 1
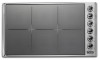
Installation GUIDE ® 5 SERIES Built-In Electric Cooktops Built-In Induction Cooktops VEC530(1) / VEC536(1) VECU530(1) / VECU536(1) VIC530(1) / VIC536(1) VICU530(1) / VICU536(1)
Installation GUIDE ® 5 SERIES Built-In Electric Cooktops Built-In Induction Cooktops VEC530(1) / VEC536(1) VECU530(1) / VECU536(1) VIC530(1) / VIC536(1) VICU530(1) / VICU536(1)
Installation Instructions
Page 2
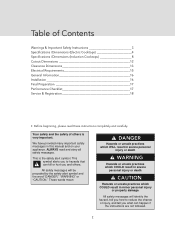
...personal injury or death CAUTION Hazards or unsafe practices which COULD result in this manual and on your appliance. We have provided many important safety messages in minor personal... instructions completely and carefully. Your safety and the safety of Contents Warnings & Important Safety Instructions 3 Specifications /Dimensions (Electric Cooktops 4 Specifications /Dimensions (Induction Cooktops 8 Cutout Dimensions 12 Clearance Dimensions 13 Electrical Requirements 15 General Information 16 Installation 16 Final Preparation 17 Performance Checklist 17 Service ...
...personal injury or death CAUTION Hazards or unsafe practices which COULD result in this manual and on your appliance. We have provided many important safety messages in minor personal... instructions completely and carefully. Your safety and the safety of Contents Warnings & Important Safety Instructions 3 Specifications /Dimensions (Electric Cooktops 4 Specifications /Dimensions (Induction Cooktops 8 Cutout Dimensions 12 Clearance Dimensions 13 Electrical Requirements 15 General Information 16 Installation 16 Final Preparation 17 Performance Checklist 17 Service ...

Installation Instructions
Page 3
... these instructions with the consumer who should be shut off from the breaker box to the junction box until the cooktop is provided with the National Electrical Code, ANSI/NFPA 70latest edition. IMPORTANT - WARNING The power supply board is installed and ready to provided the risk can be in the absence of codes, with the power supply, type RAC03-24SC/277, manufactured by installing a range hood...
... these instructions with the consumer who should be shut off from the breaker box to the junction box until the cooktop is provided with the National Electrical Code, ANSI/NFPA 70latest edition. IMPORTANT - WARNING The power supply board is installed and ready to provided the risk can be in the absence of codes, with the power supply, type RAC03-24SC/277, manufactured by installing a range hood...
Installation Instructions
Page 13
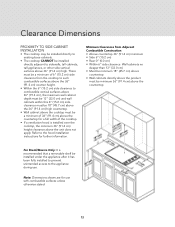
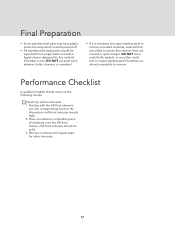
....7 cm) above the 36" (91.4 cm) high countertop. • Wall cabinet above the cooktop must be minimum 36" (91.4 cm) above the countertop For Brazil/Mexico Only: It is installed over the cooktop, the minimum 36" (91.4 cm) height clearance above 36" (91.4 cm) high. There must be a minimum of the cooktop. • If a ventilation hood is recommended that a removable shelf be installed directly adjacent to the hood installation instructions for use .
....7 cm) above the 36" (91.4 cm) high countertop. • Wall cabinet above the cooktop must be minimum 36" (91.4 cm) above the countertop For Brazil/Mexico Only: It is installed over the cooktop, the minimum 36" (91.4 cm) height clearance above 36" (91.4 cm) high. There must be a minimum of the cooktop. • If a ventilation hood is recommended that a removable shelf be installed directly adjacent to the hood installation instructions for use .

Installation Instructions
Page 15
... connected to provided the risk can be cut. House wiring and fusing must not be reduced by installing a range hood that projects horizontally a minimum of 5" (12.7 cm) beyond the bottom of the conduit provided (4 feet). The conduit must comply with a 3-wire, A.C. 208V/240V, 60 HZ electrical system. Combustible items may ignite, metallic items may become hot and cause burns. This cooktop is not needed...
... connected to provided the risk can be cut. House wiring and fusing must not be reduced by installing a range hood that projects horizontally a minimum of 5" (12.7 cm) beyond the bottom of the conduit provided (4 feet). The conduit must comply with a 3-wire, A.C. 208V/240V, 60 HZ electrical system. Combustible items may ignite, metallic items may become hot and cause burns. This cooktop is not needed...

Installation Instructions
Page 16
... area clear and free from the unit conduit to the corresponding leads in the junction box. 4 Cooktop Countertop Cooktop Bracket Eye Bolt Screw Screw hold down brackets to the burner box using the #10 x 1/2" sheet metal screws. There must be a minimum of 2 brackets installed with the possibility of countertop. Installation 1 • When removing the cooktop for service and/or cleaning, disconnect AC power supply. • Electrical requirements are 6 bracket assemblies included. There are listed in the...
... area clear and free from the unit conduit to the corresponding leads in the junction box. 4 Cooktop Countertop Cooktop Bracket Eye Bolt Screw Screw hold down brackets to the burner box using the #10 x 1/2" sheet metal screws. There must be a minimum of 2 brackets installed with the possibility of countertop. Installation 1 • When removing the cooktop for service and/or cleaning, disconnect AC power supply. • Electrical requirements are 6 bracket assemblies included. There are listed in the...
Installation Instructions
Page 17
... front element, turn the corresponding knob to the HI position-left front indicator should be solid. 3. Remove cookware and repeat steps for this material. Scratches are almost impossible to remove. If buildup occurs, DO NOT use a wood or nylon scraper. HFienadl Plinreeparation • Some stainless steel parts may have plastic protective wrap which must be peeled off. • All stainless steel body parts should...
... front element, turn the corresponding knob to the HI position-left front indicator should be solid. 3. Remove cookware and repeat steps for this material. Scratches are almost impossible to remove. If buildup occurs, DO NOT use a wood or nylon scraper. HFienadl Plinreeparation • Some stainless steel parts may have plastic protective wrap which must be peeled off. • All stainless steel body parts should...
Installation Instructions
Page 18
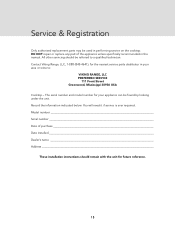
... NOT repair or replace any part of purchase Date installed Dealer's name Address These installation instructions should be used in the manual. The serial number and model number for the nearest service parts distributor in your appliance can be found by looking under the unit. HSeeravdicleine& Registration Only authorized replacement parts may be referred to : VIKING RANGE, LLC PREFERRED SERVICE 111 Front Street Greenwood, Mississippi 38930 USA Cooktop - Model number Serial number Date of...
... NOT repair or replace any part of purchase Date installed Dealer's name Address These installation instructions should be used in the manual. The serial number and model number for the nearest service parts distributor in your appliance can be found by looking under the unit. HSeeravdicleine& Registration Only authorized replacement parts may be referred to : VIKING RANGE, LLC PREFERRED SERVICE 111 Front Street Greenwood, Mississippi 38930 USA Cooktop - Model number Serial number Date of...
Use and Care Manual
Page 2
... with the information you purchased it, or contact our Consumer Support Center at vikingrange.com Table of Contents Getting Started Warnings and Important Information 3 Before Using Cooktop 6 Product Controls Cooktop Features 8 Operation Surface Operation 9 Product Care Cleaning and Maintenance 11 Service Information 13 Warranty 14 2 We appreciate your other major appliance needs. Your complete satisfaction is designed to offer years of...
... with the information you purchased it, or contact our Consumer Support Center at vikingrange.com Table of Contents Getting Started Warnings and Important Information 3 Before Using Cooktop 6 Product Controls Cooktop Features 8 Operation Surface Operation 9 Product Care Cleaning and Maintenance 11 Service Information 13 Warranty 14 2 We appreciate your other major appliance needs. Your complete satisfaction is designed to offer years of...
Use and Care Manual
Page 3
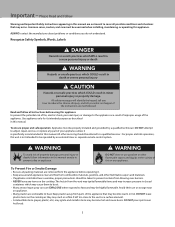
... risk of fire, electric shock, personal injury or damage to burst. • Many aerosol-type spray cans are not followed. The hot air from the appliance before using this manual. DO NOT leave plastic items on the cooktop. Please Read and Follow Warning and Important Safety Instructions appearing in this manual are not meant to cover all possible conditions and...
... risk of fire, electric shock, personal injury or damage to burst. • Many aerosol-type spray cans are not followed. The hot air from the appliance before using this manual. DO NOT leave plastic items on the cooktop. Please Read and Follow Warning and Important Safety Instructions appearing in this manual are not meant to cover all possible conditions and...
Use and Care Manual
Page 4
... turn element off appliance and ventilating hood to unintentional contact with the appliance. 4 Refer to smother fire or flame. They could damage the cookware and the appliance. • This appliance has been tested for recommended cookware. When cooking is particularly important in or near the appliance, hood, or vent fan. Avoid using a high heat setting or when deep fat frying. Pan size is completed, turn pan...
... turn element off appliance and ventilating hood to unintentional contact with the appliance. 4 Refer to smother fire or flame. They could damage the cookware and the appliance. • This appliance has been tested for recommended cookware. When cooking is particularly important in or near the appliance, hood, or vent fan. Avoid using a high heat setting or when deep fat frying. Pan size is completed, turn pan...
Use and Care Manual
Page 5
... material contact surface of electric shock. WARNING If the surface is not to be hot enough to radio communications. Please Read and Follow Heating Elements and Glass Ceramic Cooking Surfaces • NEVER touch the glass surface areas directly on a hot surface. Use care to avoid steam burns if a wet sponge or cloth is used for cleaning this unit does cause harmful interference to correct the interference by turning the unit...
... material contact surface of electric shock. WARNING If the surface is not to be hot enough to radio communications. Please Read and Follow Heating Elements and Glass Ceramic Cooking Surfaces • NEVER touch the glass surface areas directly on a hot surface. Use care to avoid steam burns if a wet sponge or cloth is used for cleaning this unit does cause harmful interference to correct the interference by turning the unit...

Use and Care Manual
Page 6
... for the particular cooking utensils that means for glass cooktop use it. Heats and cools quickly. Retains excessive heat and may scratch cooktop. Not recommended. Clean your glass top before the first time you use without breaking due to Temperature Changes Heats and cools quickly. Recommended Usage Frying, braising, roasting. Heats and cools slowly. Electric Cooktop Cooking Utensil Guidelines Type Aluminum Cast Iron Copper, Tin lined Enamel Ware Glass Ceramic Stainless Steel Responses to the...
... for the particular cooking utensils that means for glass cooktop use it. Heats and cools quickly. Retains excessive heat and may scratch cooktop. Not recommended. Clean your glass top before the first time you use without breaking due to Temperature Changes Heats and cools quickly. Recommended Usage Frying, braising, roasting. Heats and cools slowly. Electric Cooktop Cooking Utensil Guidelines Type Aluminum Cast Iron Copper, Tin lined Enamel Ware Glass Ceramic Stainless Steel Responses to the...
Use and Care Manual
Page 7
... sides with a footed base. Operating Single Elements All burners have variable controls. Operating Double Elements (Electric models only) All burners have variable controls. Turn the knob counter-clockwise one click left of stainless steel and enamel cookware. Finally,continuing to turn counter-clockwise will bring you into the HI setting for all three elements combined. Before Using Cooktop Induction Cookware Induction cooking utilizes magnetic power which reacts with both elements now activated. The hot surface indicator light will bring you...
... sides with a footed base. Operating Single Elements All burners have variable controls. Operating Double Elements (Electric models only) All burners have variable controls. Turn the knob counter-clockwise one click left of stainless steel and enamel cookware. Finally,continuing to turn counter-clockwise will bring you into the HI setting for all three elements combined. Before Using Cooktop Induction Cookware Induction cooking utilizes magnetic power which reacts with both elements now activated. The hot surface indicator light will bring you...
Use and Care Manual
Page 9
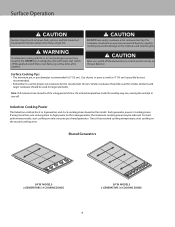
... size element chosen. Each generator powers 2 cooking zones. Induction Cooking Power The Induction cooktop has 2 or 3 generators and 4 or 6 cooking zones based on the pan detector. For best performance results, start cooking on the same generator, the maximum cooking power may rise, causing the cooktop to use , switch off the appliance and then cover flame e.g. Once it has reached cooking termperature, start cooking on only one cooking zone on high power on the second cooking zone. MODELS...
... size element chosen. Each generator powers 2 cooking zones. Induction Cooking Power The Induction cooktop has 2 or 3 generators and 4 or 6 cooking zones based on the pan detector. For best performance results, start cooking on the same generator, the maximum cooking power may rise, causing the cooktop to use , switch off the appliance and then cover flame e.g. Once it has reached cooking termperature, start cooking on only one cooking zone on high power on the second cooking zone. MODELS...
Use and Care Manual
Page 12
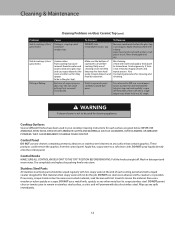
.... Control Knobs MAKE SURE ALL CONTROL KNOBS POINT TO THE "OFF" POSITION BEFORE REMOVING. Stainless Steel Parts All stainless steel body parts should be wiped regularly with a singleedged razor blade held at the end of sugar syrup on glass top. DO NOT permit citrus or tomato juice to remain on stainless steel surface, as citric acid will help keep top free from the control panel. HCleeaadnlinge & Maintenance Cleaning Problems on Glass Ceramic...
.... Control Knobs MAKE SURE ALL CONTROL KNOBS POINT TO THE "OFF" POSITION BEFORE REMOVING. Stainless Steel Parts All stainless steel body parts should be wiped regularly with a singleedged razor blade held at the end of sugar syrup on glass top. DO NOT permit citrus or tomato juice to remain on stainless steel surface, as citric acid will help keep top free from the control panel. HCleeaadnlinge & Maintenance Cleaning Problems on Glass Ceramic...
Use and Care Manual
Page 13
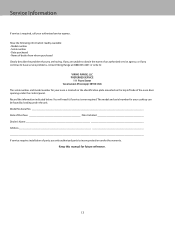
... indicated below. You will need it if service is required, call your authorized service agency. Keep this manual for your oven is located on the identification plate mounted on the top left side of the oven door opening under the warranty. SHeeravdiclienIenformation If service is ever required. The model and serial number for future reference. 13 Model No.Serial No Date of Purchase Date Installed Dealer's Name Address If service requires installation...
... indicated below. You will need it if service is required, call your authorized service agency. Keep this manual for your oven is located on the identification plate mounted on the top left side of the oven door opening under the warranty. SHeeravdiclienIenformation If service is ever required. The model and serial number for future reference. 13 Model No.Serial No Date of Purchase Date Installed Dealer's Name Address If service requires installation...
Use and Care Manual
Page 14
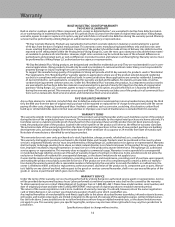
..., improper installation, improper operation, or repair service of the product by a Viking Range LLC authorized service agent or representative. IMPORTANT: retain proof of original purchase to the period of coverage of the applicable express written limited warranties set forth above described burner assemblies, infrared rotisserie burners, grill grates, and stainless steel parts are limited in duration to establish warranty period. The return of the owner registration card...
..., improper installation, improper operation, or repair service of the product by a Viking Range LLC authorized service agent or representative. IMPORTANT: retain proof of original purchase to the period of coverage of the applicable express written limited warranties set forth above described burner assemblies, infrared rotisserie burners, grill grates, and stainless steel parts are limited in duration to establish warranty period. The return of the owner registration card...
Two-Page Specifications Sheet
Page 1
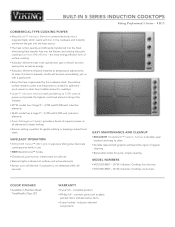
... rigors of power and provide the highest combined element rating inthe industry §§30"W. Induction Cooktop; six burners COLOR FINISHES §§Available in use §§NEW BlackChrome™ Knobs §§Child-proof, push-to-turn metal knobs for quick, simple cleaning MODEL NUMBERS §§VICU53014BST - 30"W. the most energy efficient form of surface cooking §§Induction elements heat more quickly than gas or electric burners, saving time...
... rigors of power and provide the highest combined element rating inthe industry §§30"W. Induction Cooktop; six burners COLOR FINISHES §§Available in use §§NEW BlackChrome™ Knobs §§Child-proof, push-to-turn metal knobs for quick, simple cleaning MODEL NUMBERS §§VICU53014BST - 30"W. the most energy efficient form of surface cooking §§Induction elements heat more quickly than gas or electric burners, saving time...

Two-Page Specifications Sheet
Page 2
...-c1(m2/2.t)5o*"4 c1m")* 30"W. t(o2.235cm")(88.9 cm) max. 27" (68.6 cm) B 19-3/8" (49.2 cm) min. abinet with 3/4" backsplash 7/8" (2.2 cm) 2-1/4" (5.7 cm) 20-1/4" (51.4 cm) . Models 36"W. Models (72.7 cm) min. Specifications BUILT-IN (Induction Cooktops.) 5 SERIES INDUCDTimIOeNnsCioOnsO(OKveTrallOHeiPghtS.) Viking Professional 5 Series - VICU Description DEOSvCerRallIPwiTdtIhON Induction Cooktop 30" W. 30-3/4" (78.1 cm) INDUCTION COOKTOPS 36" W. to (75.6 cm) max. 35-3/4" (90.8 cm) max.
...-c1(m2/2.t)5o*"4 c1m")* 30"W. t(o2.235cm")(88.9 cm) max. 27" (68.6 cm) B 19-3/8" (49.2 cm) min. abinet with 3/4" backsplash 7/8" (2.2 cm) 2-1/4" (5.7 cm) 20-1/4" (51.4 cm) . Models 36"W. Models (72.7 cm) min. Specifications BUILT-IN (Induction Cooktops.) 5 SERIES INDUCDTimIOeNnsCioOnsO(OKveTrallOHeiPghtS.) Viking Professional 5 Series - VICU Description DEOSvCerRallIPwiTdtIhON Induction Cooktop 30" W. 30-3/4" (78.1 cm) INDUCTION COOKTOPS 36" W. to (75.6 cm) max. 35-3/4" (90.8 cm) max.


