LP/Propane Conversion Kit - Installation Instructions
Page 3
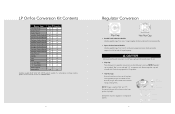
... LP operation. • Hex Nut Cap Remove brass hex nut from far left side of regulator. Converted fuel type will be shown on these models, please contact customer service at 1-888-845-4641. 4 Regulator Conversion Flip Cap Hex Nut Cap • Sealed Surface Burner Models Identify regulator type from rear of range/rangetop located underneath main top assembly. • Open Surface Burner Models Identify regulator type from brass hex nut. LP Orifice Conversion Kit Contents Burner...
... LP operation. • Hex Nut Cap Remove brass hex nut from far left side of regulator. Converted fuel type will be shown on these models, please contact customer service at 1-888-845-4641. 4 Regulator Conversion Flip Cap Hex Nut Cap • Sealed Surface Burner Models Identify regulator type from rear of range/rangetop located underneath main top assembly. • Open Surface Burner Models Identify regulator type from brass hex nut. LP Orifice Conversion Kit Contents Burner...
LP/Propane Conversion Kit - Installation Instructions
Page 4
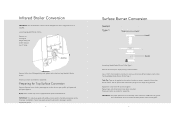
... griddle temperature probe for Top Surface Conversion Remove all grates, burner bowls, grate supports, surface burner caps, griddle, grill grates and grill grate supports. Remove nut securing 90 degree fitting and broiler tubing to griddle temperature probe. 6 Surface Burner Conversion Sealed Type 1 Item #1 Item #2 Locate bag labeled Sealed Burner Orifice Type 1. NOTE: Some models may not be equipped with orifice from rear of range before unit is installed. Replace the venturi (Item #1) and hand tighten. Infrared Broiler Conversion IMPORTANT: The infrared broiler orifice...
... griddle temperature probe for Top Surface Conversion Remove all grates, burner bowls, grate supports, surface burner caps, griddle, grill grates and grill grate supports. Remove nut securing 90 degree fitting and broiler tubing to griddle temperature probe. 6 Surface Burner Conversion Sealed Type 1 Item #1 Item #2 Locate bag labeled Sealed Burner Orifice Type 1. NOTE: Some models may not be equipped with orifice from rear of range before unit is installed. Replace the venturi (Item #1) and hand tighten. Infrared Broiler Conversion IMPORTANT: The infrared broiler orifice...

LP/Propane Conversion Kit - Installation Instructions
Page 9
... View Orifice Air Shutter Remove center trivet and/or grates, center ring and grate support. Remove oven bottom by turning counterclockwise and replace with orifice from bag labeled Wok Orifice. Loosen air shutter screw and adjust opening on burner to 5/8" and tighten air shutter screw. To reinstall burner, position rear of burner into slot on burner to unit. Remove orifice by sliding toward rear of the orifice can be located 3/16" inside the burner for proper gas mixture...
... View Orifice Air Shutter Remove center trivet and/or grates, center ring and grate support. Remove oven bottom by turning counterclockwise and replace with orifice from bag labeled Wok Orifice. Loosen air shutter screw and adjust opening on burner to 5/8" and tighten air shutter screw. To reinstall burner, position rear of burner into slot on burner to unit. Remove orifice by sliding toward rear of the orifice can be located 3/16" inside the burner for proper gas mixture...
Two-Page Specifications Sheet
Page 1
...,000 BTU U-shaped burner and infrared broiler with SureSpark ignition system §§Gourmet-Glo™ Infrared Broiler provides intense searing heat for easy movement of large pots MODEL NUMBERS § VGIC53014B - 30"W. four burners § VGIC53616B - 36"W. backguard for 36" range §§P24CSTSS - Gas Range; natural airflow bake, convection bake, infrared broil, convection infrared broil, convection dehydrate, and convection defrost §§All convection modes utilize the ProFlow™ Convection Air Baffle, which is specifically designed...
...,000 BTU U-shaped burner and infrared broiler with SureSpark ignition system §§Gourmet-Glo™ Infrared Broiler provides intense searing heat for easy movement of large pots MODEL NUMBERS § VGIC53014B - 30"W. four burners § VGIC53616B - 36"W. backguard for 36" range §§P24CSTSS - Gas Range; natural airflow bake, convection bake, infrared broil, convection infrared broil, convection dehydrate, and convection defrost §§All convection modes utilize the ProFlow™ Convection Air Baffle, which is specifically designed...
Two-Page Specifications Sheet
Page 2
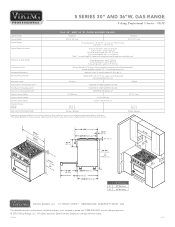
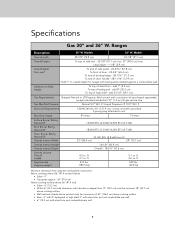
OPEN BURNER RANGE VGIC5301 29-7/8" (75.9 cm) To top of high shelf - Additions to change without notice. accepts standard residential 1/2" (1.3 cm) ID gas service line Natural 5.0" W.C.P./ Liquid Propane L/P 10.0" W.C.P. 120VAC/60 Hz; 4 ft. (121.9 cm), 3-wire cord with backguards installed against a combustible wall. ft. 4.6 cu. Specifications subject to Base Height Gas Requirements Gas Manifold Pressure Electrical Requirements Max Amp Usage Surface Burner Rating Natural/LP Broil Burner Rating Natural/LP Oven Burner Rating Natural/LP Oven(s) Interior Width Oven(s) Interior ...
OPEN BURNER RANGE VGIC5301 29-7/8" (75.9 cm) To top of high shelf - Additions to change without notice. accepts standard residential 1/2" (1.3 cm) ID gas service line Natural 5.0" W.C.P./ Liquid Propane L/P 10.0" W.C.P. 120VAC/60 Hz; 4 ft. (121.9 cm), 3-wire cord with backguards installed against a combustible wall. ft. 4.6 cu. Specifications subject to Base Height Gas Requirements Gas Manifold Pressure Electrical Requirements Max Amp Usage Surface Burner Rating Natural/LP Broil Burner Rating Natural/LP Oven Burner Rating Natural/LP Oven(s) Interior Width Oven(s) Interior ...
Installation Instructions
Page 3
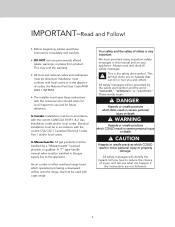
... void the warranty. • All local and national codes and ordinances must be installed by a "Massachusetts" licensed plumber or gasfitter. A "T" type handle manual valve must be observed. Installation must leave these instructions completely and carefully. • DO NOT remove permanently affixed labels, warnings, or plates from product. In Massachusetts: All gas products must be installed in the absence of codes, the National Fuel Gas Code ANSI...
... void the warranty. • All local and national codes and ordinances must be installed by a "Massachusetts" licensed plumber or gasfitter. A "T" type handle manual valve must be observed. Installation must leave these instructions completely and carefully. • DO NOT remove permanently affixed labels, warnings, or plates from product. In Massachusetts: All gas products must be installed in the absence of codes, the National Fuel Gas Code ANSI...
Installation Instructions
Page 8
... backguards installed against a combustible wall. add 8" (20.3 cm) To top of island trim - Electrical Requirements 120VAC/60 Hz; 4 ft. (121.9 cm), 3-wire cord with conversion kit (purchased separately); add 23-1/2" (59.7 cm) Gas Requirements Gas Manifold Pressure Shipped Natural or LP/Propane, field convert with grounded 3-prong plug attached to unit Max Amp Usage .83 amps 1.5 amps Surface Burner Rating Natural/LP Broil Burner Rating Natural/LP Oven Burner Rating Natural/LP Oven(s) Interior Width 15,000 BTU (4.4 kW)/12,500 BTU...
... backguards installed against a combustible wall. add 8" (20.3 cm) To top of island trim - Electrical Requirements 120VAC/60 Hz; 4 ft. (121.9 cm), 3-wire cord with conversion kit (purchased separately); add 23-1/2" (59.7 cm) Gas Requirements Gas Manifold Pressure Shipped Natural or LP/Propane, field convert with grounded 3-prong plug attached to unit Max Amp Usage .83 amps 1.5 amps Surface Burner Rating Natural/LP Broil Burner Rating Natural/LP Oven Burner Rating Natural/LP Oven(s) Interior Width 15,000 BTU (4.4 kW)/12,500 BTU...

Installation Instructions
Page 11
... range since service pressure may fluctuate with the intended gas supply. Electrical & Gas Requirements Electrical Requirements Check your dealer or a qualified licensed plumber or gas service company. Before beginning installation verify that the model is designed specifically for grounding instructions. Pressure Regulator: • All heavy-duty, commercial type cooking equipment must be reached quickly in the gas service line before work begins. Sealant on this manual before the appliance in the gas stream and in a location...
... range since service pressure may fluctuate with the intended gas supply. Electrical & Gas Requirements Electrical Requirements Check your dealer or a qualified licensed plumber or gas service company. Before beginning installation verify that the model is designed specifically for grounding instructions. Pressure Regulator: • All heavy-duty, commercial type cooking equipment must be reached quickly in the gas service line before work begins. Sealant on this manual before the appliance in the gas stream and in a location...

Installation Instructions
Page 19
... gas service company. 19 Before placing appliance in operation, always check for gas leaks. Before placing appliance in operation, always check for gas leaks with soapy water solution. • DO NOT USE AN OPEN FLAME TO CHECK FOR GAS LEAKS. Connecting Gas & Electric DANGER GAS LEAK HAZARD To avoid risk of the appliance must be conducted according to electrical and gas requirements section for proper installation information. 1 Connect gas and electrical...
... gas service company. 19 Before placing appliance in operation, always check for gas leaks. Before placing appliance in operation, always check for gas leaks with soapy water solution. • DO NOT USE AN OPEN FLAME TO CHECK FOR GAS LEAKS. Connecting Gas & Electric DANGER GAS LEAK HAZARD To avoid risk of the appliance must be conducted according to electrical and gas requirements section for proper installation information. 1 Connect gas and electrical...
Use and Care Manual
Page 2
...7 Range Features 7 Product Controls Oven Functions and Settings 8 Operation Surface Operation 8 Lighting Burners 8 Surface Burners-Automatic Reignition 8 Vari-Simmer 8 Surface Cooking Tips 9 Cooking Vessels 9 Oven Features 10 Rack Positions 10 Using the Oven 10 Conventional and Convection Cooking 10 Baking 11 BAKE (Natural Airflow Bake 11 CONVECTION BAKE 11 Broiling 16 BROIL (Infrared Broil 16 CONVECTION BROIL (Infrared Convection Broil 16 Convection Dehydrate 17 Convection Defrost 17 Product Care Cleaning and Maintenance 18 Replacing Oven Lights 19 Door Removal 20 Door...
...7 Range Features 7 Product Controls Oven Functions and Settings 8 Operation Surface Operation 8 Lighting Burners 8 Surface Burners-Automatic Reignition 8 Vari-Simmer 8 Surface Cooking Tips 9 Cooking Vessels 9 Oven Features 10 Rack Positions 10 Using the Oven 10 Conventional and Convection Cooking 10 Baking 11 BAKE (Natural Airflow Bake 11 CONVECTION BAKE 11 Broiling 16 BROIL (Infrared Broil 16 CONVECTION BROIL (Infrared Convection Broil 16 Convection Dehydrate 17 Convection Defrost 17 Product Care Cleaning and Maintenance 18 Replacing Oven Lights 19 Door Removal 20 Door...
Use and Care Manual
Page 3
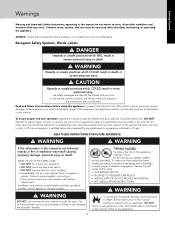
... rear top left corner of the range. • THIS RANGE CAN TIP • INJURIES TO PERSONS CAN RESULT • INSTALL ANTI-TIP DEVICE PACKED WITH RANGE • SEE INSTALLATION INSTRUCTIONS WARNING To avoid risk of your appliance unless it is specifically recommended in this manual. All other flammable vapors and liquids in the vicinity of this or any electrical switch. • DO NOT use commercial oven...
... rear top left corner of the range. • THIS RANGE CAN TIP • INJURIES TO PERSONS CAN RESULT • INSTALL ANTI-TIP DEVICE PACKED WITH RANGE • SEE INSTALLATION INSTRUCTIONS WARNING To avoid risk of your appliance unless it is specifically recommended in this manual. All other flammable vapors and liquids in the vicinity of this or any electrical switch. • DO NOT use commercial oven...

Use and Care Manual
Page 4
... reaching into the oven to add or remove food, using a high heat setting or when deep fat frying. The food could result in injury. • Use dry, sturdy pot-holders. Extinguish flame then turn burner off at the end of electric shock, fire, or damage to heat. Clean hood frequently to cover oven racks or oven bottom. Let hot air or steam escape before moving or replacing food. • NEVER...
... reaching into the oven to add or remove food, using a high heat setting or when deep fat frying. The food could result in injury. • Use dry, sturdy pot-holders. Extinguish flame then turn burner off at the end of electric shock, fire, or damage to heat. Clean hood frequently to cover oven racks or oven bottom. Let hot air or steam escape before moving or replacing food. • NEVER...
Use and Care Manual
Page 5
... touching oven vent area while oven is on a hot surface. stepping, sitting, or leaning on oven convection systems. The use of the burner should be adjusted to overheated cooking oil, fat, margarine and overheated non-stick cookware may become hot enough to cool. Keep oven free from the kitchen could cause the flames to spread out of control. • Once the unit has been installed as this manual can...
... touching oven vent area while oven is on a hot surface. stepping, sitting, or leaning on oven convection systems. The use of the burner should be adjusted to overheated cooking oil, fat, margarine and overheated non-stick cookware may become hot enough to cool. Keep oven free from the kitchen could cause the flames to spread out of control. • Once the unit has been installed as this manual can...

Use and Care Manual
Page 6
... electric igniters will function properly without the heat. The range is affected only when the power is . WARNING NEVER use the rangetop or oven as a space heater to heat or warm a room to prevent potential hazard to the user and damage to do so can result in the "OFF" position. WARNING NEVER cover any adjustments. NOTICE DO NOT turn the Temperature Control on will accelerate the natural...
... electric igniters will function properly without the heat. The range is affected only when the power is . WARNING NEVER use the rangetop or oven as a space heater to heat or warm a room to prevent potential hazard to the user and damage to do so can result in the "OFF" position. WARNING NEVER cover any adjustments. NOTICE DO NOT turn the Temperature Control on will accelerate the natural...

Use and Care Manual
Page 7
...plate 4. Before first use of the appliance-this is normal. Range Features (VGIC) Interior Oven Light Switch Left Front Burner Control Knob (15,000 BTU) Center Front Burner Control Knob (15,000 BTU) Oven Temperature Indicator Light Right Front Burner Control Knob (15,000 BTU) Left Rear Burner Control Knob (15,000 BTU) 1 Center Rear Burner Control Knob (15,000 BTU) 2 Oven Temperature Control Knob Right Rear Burner Control Knob (15,000 BTU) Convection Fan Switch 3 30" Four-Burner 36" Six-Burner 4 36" Six-Burner model shown 1. Before starting to sear delicate cuts of dirt, oil...
...plate 4. Before first use of the appliance-this is normal. Range Features (VGIC) Interior Oven Light Switch Left Front Burner Control Knob (15,000 BTU) Center Front Burner Control Knob (15,000 BTU) Oven Temperature Indicator Light Right Front Burner Control Knob (15,000 BTU) Left Rear Burner Control Knob (15,000 BTU) 1 Center Rear Burner Control Knob (15,000 BTU) 2 Oven Temperature Control Knob Right Rear Burner Control Knob (15,000 BTU) Convection Fan Switch 3 30" Four-Burner 36" Six-Burner 4 36" Six-Burner model shown 1. Before starting to sear delicate cuts of dirt, oil...

Use and Care Manual
Page 10
... rack at a time. Cooking with convection is intended when performing multi-rack baking and for multi-rack baking or cooking large loads.) • If cooking items which utilizes fan-forced air to bake with conventional baking, DO NOT use rack positions 2 and 4 or positions 3 and 5. For best results with the racks in cooking time. • A major benefit of three racks at various levels. All ovens have 10-15% reduction in quantity. Oven Features Broiler element Oven racks (3) Convection fan Oven lights 6 5 4 3 2 1 Removable bottom Bake burner Rack...
... rack at a time. Cooking with convection is intended when performing multi-rack baking and for multi-rack baking or cooking large loads.) • If cooking items which utilizes fan-forced air to bake with conventional baking, DO NOT use rack positions 2 and 4 or positions 3 and 5. For best results with the racks in cooking time. • A major benefit of three racks at various levels. All ovens have 10-15% reduction in quantity. Oven Features Broiler element Oven racks (3) Convection fan Oven lights 6 5 4 3 2 1 Removable bottom Bake burner Rack...

Use and Care Manual
Page 11
... bake burners in the conventional manner. Conventional baking is possible for baking and casseroles. Use this setting for the largest baking job. Many cookbooks contain recipes to desired temperature and turn on the oven. • DO NOT open the door, the best time is quickly replaced-searing meats on . 2. Arrange the oven rack in the bottom of the oven cavity. Baking BAKE (Natural Airflow Bake) Full power heat is radiated from the U- To Use BAKE Function...
... bake burners in the conventional manner. Conventional baking is possible for baking and casseroles. Use this setting for the largest baking job. Many cookbooks contain recipes to desired temperature and turn on the oven. • DO NOT open the door, the best time is quickly replaced-searing meats on . 2. Arrange the oven rack in the bottom of the oven cavity. Baking BAKE (Natural Airflow Bake) Full power heat is radiated from the U- To Use BAKE Function...

Use and Care Manual
Page 15
... half the recommended time, season, and turn meats. Season second side just before removing. • ALWAYS pull rack out to the broil element or on cold broiler pan and grid. This function is also more suitable for cuts of meat 1-2 inches thick and is exactly the same as regular broiling with butter several times as 2 inches (5 cm) to stop position. Set the oven temperature control knob to medium doneness...
... half the recommended time, season, and turn meats. Season second side just before removing. • ALWAYS pull rack out to the broil element or on cold broiler pan and grid. This function is also more suitable for cuts of meat 1-2 inches thick and is exactly the same as regular broiling with butter several times as 2 inches (5 cm) to stop position. Set the oven temperature control knob to medium doneness...

Use and Care Manual
Page 21
... adjusted. Unit will not function. Troubleshooting Problem Range will resume heating function once it has cooled. Gas supply valve is not grounded. Power supply is in oven. oven will not work . Igniters will not heat Possible Cause and/or Remedy Range is not connected to electrical power: Have electrician check power circuit breaker, wiring, and fuses. Range is operating properly. Oven is not connected to power. Product Care 21 Fuse is normal burn off of gas. Broil does not work. Igniters sparking continuously after using oven a few times...
... adjusted. Unit will not function. Troubleshooting Problem Range will resume heating function once it has cooled. Gas supply valve is not grounded. Power supply is in oven. oven will not work . Igniters will not heat Possible Cause and/or Remedy Range is not connected to electrical power: Have electrician check power circuit breaker, wiring, and fuses. Range is operating properly. Oven is not connected to power. Product Care 21 Fuse is normal burn off of gas. Broil does not work. Igniters sparking continuously after using oven a few times...
Use and Care Manual
Page 23
... the Owner Registration Card so that Viking Range, LLC can contact you . FIVE YEAR LIMITED WARRANTY ON BURNERS Any surface burner, griddle burner, grill burner, or oven burner which fails or is found to be defective during the warranty period. *FULL NINETY (90) DAY COSMETIC WARRANTY: Product is warranted to be purchased in normal residential use , but the warranty period for service. Warranty PROFESSIONAL FREESTANDING GAS OPEN BURNER RANGES WARRANTY TWO YEAR FULL WARRANTY Freestanding gas ranges and...
... the Owner Registration Card so that Viking Range, LLC can contact you . FIVE YEAR LIMITED WARRANTY ON BURNERS Any surface burner, griddle burner, grill burner, or oven burner which fails or is found to be defective during the warranty period. *FULL NINETY (90) DAY COSMETIC WARRANTY: Product is warranted to be purchased in normal residential use , but the warranty period for service. Warranty PROFESSIONAL FREESTANDING GAS OPEN BURNER RANGES WARRANTY TWO YEAR FULL WARRANTY Freestanding gas ranges and...


