
Two-Page Specifications Sheet
Page 1
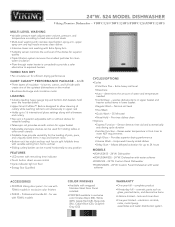
...silverware and cutlery §§Top rack is concealed to provide a safer alternative to 24 hours MODELS §§VDWU524SS - 24"W. Dishwasher with FDWU models in upper rack §§Holds up to exposed heaters TURBO FAN DRY §§Fan ...167;§Available with water softener ACCESSORIES §§PDDP524 Viking door panel - Professional Handle Kit - determines the amount of insulation - Provides superior drying performance §§Intense Wash - 24"W. 524 MODEL DISHWASHER Viking Premiere Dishwasher - Sensor detects rinse aid and automatically sets drying cycle...
...silverware and cutlery §§Top rack is concealed to provide a safer alternative to 24 hours MODELS §§VDWU524SS - 24"W. Dishwasher with FDWU models in upper rack §§Holds up to exposed heaters TURBO FAN DRY §§Fan ...167;§Available with water softener ACCESSORIES §§PDDP524 Viking door panel - Professional Handle Kit - determines the amount of insulation - Provides superior drying performance §§Intense Wash - 24"W. 524 MODEL DISHWASHER Viking Premiere Dishwasher - Sensor detects rinse aid and automatically sets drying cycle...
Two-Page Specifications Sheet
Page 2
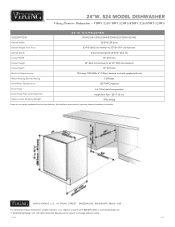
... notice. F60404 0918 VDWU524/VDWU524WS/FDWU524/FDWU524WS DESCRIPTION 24"W. See installation instructions for important clearance/installation information. 24"W. 524 MODEL DISHWASHER Viking Premiere Dishwasher - Specifications subject to 36 1/4" (92.0 cm) maximum Cutout Depth 24" (61.0 cm) Electrical Requirements 12.0 amps,...71.0 cm) Approximate Shipping Weight 97 lb. (44 kg) Please do not prepare installation from brochure data only. VIKING RANGE, LLC 111 FRONT STREET GREENWOOD, MISSISSIPPI 38930 USA For detailed product information, model numbers, or to request a ...
... notice. F60404 0918 VDWU524/VDWU524WS/FDWU524/FDWU524WS DESCRIPTION 24"W. See installation instructions for important clearance/installation information. 24"W. 524 MODEL DISHWASHER Viking Premiere Dishwasher - Specifications subject to 36 1/4" (92.0 cm) maximum Cutout Depth 24" (61.0 cm) Electrical Requirements 12.0 amps,...71.0 cm) Approximate Shipping Weight 97 lb. (44 kg) Please do not prepare installation from brochure data only. VIKING RANGE, LLC 111 FRONT STREET GREENWOOD, MISSISSIPPI 38930 USA For detailed product information, model numbers, or to request a ...
Installation Instructions
Page 2
...THE KICK PLATE 20 7.11 CONNECTION 21 8. INSTALLER CHECKLIST 23 9. IMPORTANT SAFETY INSTRUCTIONS 1 1.1 INSPECT THE DISHWASHER 2 2. DISHWASHER SPECIFICATIONS 5 5.1 TECHNICAL FEATURES 5 6. SELF HELP HINTS: 23 INTRODUCTION 1 1. To prevent accidents, which ... and / or use. MATERIALS SUPPLIED 4 4.1 PARTS SUPPLIED 4 4.2 MANUAL BAG 4 4.3 DISHWASHER PARTS BAG 1 4 4.4 DISHWASHER PARTS BAG 2 4 4.5 PARTS ATTACHED TO THE REAR OF THE DISHWASHER 4 5. ENCLOSURE PREPARATION 6 6.1 ELECTRICAL PREPARATION 6 6.2 PREPARATION FOR INSTALLING MOUNTING BRACKETS 6 6.3...
...THE KICK PLATE 20 7.11 CONNECTION 21 8. INSTALLER CHECKLIST 23 9. IMPORTANT SAFETY INSTRUCTIONS 1 1.1 INSPECT THE DISHWASHER 2 2. DISHWASHER SPECIFICATIONS 5 5.1 TECHNICAL FEATURES 5 6. SELF HELP HINTS: 23 INTRODUCTION 1 1. To prevent accidents, which ... and / or use. MATERIALS SUPPLIED 4 4.1 PARTS SUPPLIED 4 4.2 MANUAL BAG 4 4.3 DISHWASHER PARTS BAG 1 4 4.4 DISHWASHER PARTS BAG 2 4 4.5 PARTS ATTACHED TO THE REAR OF THE DISHWASHER 4 5. ENCLOSURE PREPARATION 6 6.1 ELECTRICAL PREPARATION 6 6.2 PREPARATION FOR INSTALLING MOUNTING BRACKETS 6 6.3...
Installation Instructions
Page 3
...installing and follow them on to the power supply when all listed warnings and cautions. Installation performed by warranty. • Dishwasher must ensure that experiences freezing temperatures (e.g. It may result in absence of freezing are not covered by persons other than this... installation manual and particularly the safety instructions completely and carefully. NOTICE : The dishwasher should be secured to persons, the installer must be performed by unqualified persons could result in a vacation home, ...
...installing and follow them on to the power supply when all listed warnings and cautions. Installation performed by warranty. • Dishwasher must ensure that experiences freezing temperatures (e.g. It may result in absence of freezing are not covered by persons other than this... installation manual and particularly the safety instructions completely and carefully. NOTICE : The dishwasher should be secured to persons, the installer must be performed by unqualified persons could result in a vacation home, ...
Installation Instructions
Page 4
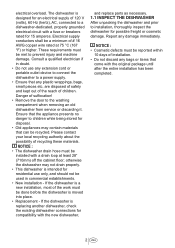
... loop at 75 °C (167 °F) or higher. The dishwasher is replacing another dishwasher, check the existing dishwasher connections for compatibility with a fuse or breakers rated for possible freight or cosmetic damage. If the dishwasher is designed for an electrical supply of installation. • Do not... disposed of safely and kept out of the reach of suffocation! • Remove the door to installation, thoroughly inspect the dishwasher for 15 amperes. Ensure that the appliance presents no danger to children while being stored for residential use any extension cord or...
... loop at 75 °C (167 °F) or higher. The dishwasher is replacing another dishwasher, check the existing dishwasher connections for compatibility with a fuse or breakers rated for possible freight or cosmetic damage. If the dishwasher is designed for an electrical supply of installation. • Do not... disposed of safely and kept out of the reach of suffocation! • Remove the door to installation, thoroughly inspect the dishwasher for 15 amperes. Ensure that the appliance presents no danger to children while being stored for residential use any extension cord or...
Installation Instructions
Page 5
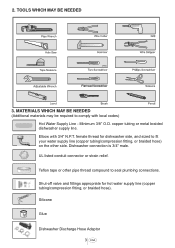
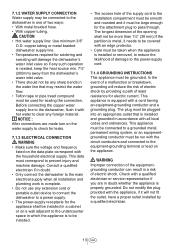
... BE NEEDED (Additional materials may be required to seal plumbing connections. Minimum 3/8" O.D. Shut-off valve and fittings appropriate for dishwasher side, and sized to fit your water supply line (copper tubing/compression fitting, or braided hose) on tape or other ...side. Silicone Glue Dishwasher Discharge Hose Adaptor 3 USA TOOLS WHICH MAY BE NEEDED Flat head Screwdriver 3. Dishwasher connection is 3/4" male. 2. Elbow with local codes) Hot Water Supply Line - UL listed conduit ...
... BE NEEDED (Additional materials may be required to seal plumbing connections. Minimum 3/8" O.D. Shut-off valve and fittings appropriate for dishwasher side, and sized to fit your water supply line (copper tubing/compression fitting, or braided hose) on tape or other ...side. Silicone Glue Dishwasher Discharge Hose Adaptor 3 USA TOOLS WHICH MAY BE NEEDED Flat head Screwdriver 3. Dishwasher connection is 3/4" male. 2. Elbow with local codes) Hot Water Supply Line - UL listed conduit ...

Installation Instructions
Page 6
... Custom Door Plug o. Mounting Bracket Right h. Toe Kick Bracket - Screw Clamp k. Steam Protection Foil 4.5 PARTS ATTACHED TO THE REAR OF THE DISHWASHER a. Side Trim Strips (Left) b. MATERIALS SUPPLIED 4.1 PARTS SUPPLIED Parts for your parts bags shown to make sure you have all the parts ... to the left. 4.2 MANUAL BAG The dishwasher comes with a manual bag containing: • User manual, • Installation manual 4.4 DISHWASHER PARTS BAG 2 (SELECT MODELS) In addition to the manual bag and the dishwasher parts bag (dishwasher models which contains: y. Side Trim Strips ...
... Custom Door Plug o. Mounting Bracket Right h. Toe Kick Bracket - Screw Clamp k. Steam Protection Foil 4.5 PARTS ATTACHED TO THE REAR OF THE DISHWASHER a. Side Trim Strips (Left) b. MATERIALS SUPPLIED 4.1 PARTS SUPPLIED Parts for your parts bags shown to make sure you have all the parts ... to the left. 4.2 MANUAL BAG The dishwasher comes with a manual bag containing: • User manual, • Installation manual 4.4 DISHWASHER PARTS BAG 2 (SELECT MODELS) In addition to the manual bag and the dishwasher parts bag (dishwasher models which contains: y. Side Trim Strips ...
Installation Instructions
Page 7
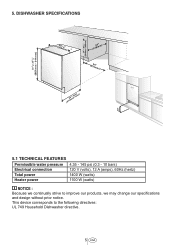
This device corresponds to improve our products, we continually strive to the following directives: UL 749 Household Dishwasher directive. 5 USA 5. DISHWASHER SPECIFICATIONS 5.1 TECHNICAL FEATURES Permissible water pressure 4.35 - 145 psi (0.3 - 10 bars) Electrical connection 120 V (volts), 12 A (amps), 60Hz (hertz) Total power 1400 W (watts) Heater power 1100 W (watts) NOTICE : Because we may change our specifications and design without prior notice.
This device corresponds to improve our products, we continually strive to the following directives: UL 749 Household Dishwasher directive. 5 USA 5. DISHWASHER SPECIFICATIONS 5.1 TECHNICAL FEATURES Permissible water pressure 4.35 - 145 psi (0.3 - 10 bars) Electrical connection 120 V (volts), 12 A (amps), 60Hz (hertz) Total power 1400 W (watts) Heater power 1100 W (watts) NOTICE : Because we may change our specifications and design without prior notice.
Installation Instructions
Page 8
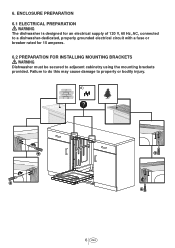
ENCLOSURE PREPARATION 6.1 ELECTRICAL PREPARATION WARNING The dishwasher is designed for an electrical supply of 120 V, 60 Hz, AC, connected to a dishwasher-dedicated, properly grounded electrical circuit with a fuse or breaker rated for 15 amperes. 6.2 PREPARATION FOR INSTALLING MOUNTING BRACKETS WARNING Dishwasher must be secured to property or bodily injury. 6. d) ? 6 USA Failure to do this may cause damage to adjacent cabinetry using the mounting brackets provided.
ENCLOSURE PREPARATION 6.1 ELECTRICAL PREPARATION WARNING The dishwasher is designed for an electrical supply of 120 V, 60 Hz, AC, connected to a dishwasher-dedicated, properly grounded electrical circuit with a fuse or breaker rated for 15 amperes. 6.2 PREPARATION FOR INSTALLING MOUNTING BRACKETS WARNING Dishwasher must be secured to property or bodily injury. 6. d) ? 6 USA Failure to do this may cause damage to adjacent cabinetry using the mounting brackets provided.
Installation Instructions
Page 9
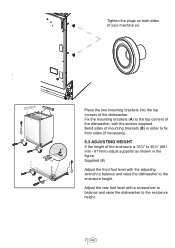
... the enclosure height. Tighten the plugs on both sides of your machine (v) Place the two mounting brackets into the top corners of the dishwasher, with the screws supplied. Bend sides of mounting brackets (B) in the figure. Adjust the rear foot level with the adjusting wrench to ...balance and raise the dishwasher to the enclosure height. 7 USA Fix the mounting brackets (A) to 35⅞" (861 mm - 911mm) adjust supports as shown in order to fix ...
... the enclosure height. Tighten the plugs on both sides of your machine (v) Place the two mounting brackets into the top corners of the dishwasher, with the screws supplied. Bend sides of mounting brackets (B) in the figure. Adjust the rear foot level with the adjusting wrench to ...balance and raise the dishwasher to the enclosure height. 7 USA Fix the mounting brackets (A) to 35⅞" (861 mm - 911mm) adjust supports as shown in order to fix ...
Installation Instructions
Page 10
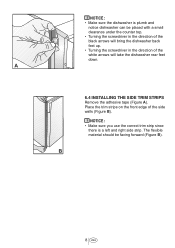
Place the trim strips on the front edge of the white arrows will take the dishwasher rear feet down. 6.4 INSTALLING THE SIDE TRIM STRIPS Remove the adhesive tape (Figure A). The flexible material should be placed with a small clearance under the ...counter top. • Turning the screwdriver in the direction of the black arrows will bring the dishwasher back feet up. • Turning the screwdriver in the direction of the side walls (Figure B). NOTICE : • Make sure you use the correct trim strip...
Place the trim strips on the front edge of the white arrows will take the dishwasher rear feet down. 6.4 INSTALLING THE SIDE TRIM STRIPS Remove the adhesive tape (Figure A). The flexible material should be placed with a small clearance under the ...counter top. • Turning the screwdriver in the direction of the black arrows will bring the dishwasher back feet up. • Turning the screwdriver in the direction of the side walls (Figure B). NOTICE : • Make sure you use the correct trim strip...
Installation Instructions
Page 11
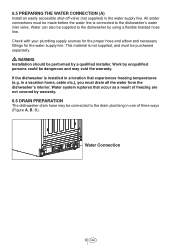
Work by a qualified installer. Water Connection 9 USA If the dishwasher is connected to the dishwasher's water inlet valve. All solder connections must be dangerous and may be purchased separately. Check with your plumbing supply sources for ... location that occur as a result of three ways (Figure A, B, C). This material is not supplied, and must be connected to the dishwasher by warranty. 6.6 DRAIN PREPARATION The dishwasher drain hose may void the warranty. in the water supply line. 6.5 PREPARING THE WATER CONNECTION (A) Install an easily accessible shut-off valve (...
Work by a qualified installer. Water Connection 9 USA If the dishwasher is connected to the dishwasher's water inlet valve. All solder connections must be dangerous and may be purchased separately. Check with your plumbing supply sources for ... location that occur as a result of three ways (Figure A, B, C). This material is not supplied, and must be connected to the dishwasher by warranty. 6.6 DRAIN PREPARATION The dishwasher drain hose may void the warranty. in the water supply line. 6.5 PREPARING THE WATER CONNECTION (A) Install an easily accessible shut-off valve (...

Installation Instructions
Page 12
... not operate properly. • A hose that attaches to prevent waste water from the dishwasher. Otherwise, the cleaning process is installed on the same water line as the dishwasher. If your disposer manual for a dishwasher; Every disposal has a hook up for correct connection. (Figure C) 10 USA If a hose extension is required, a drainage hose of...
... not operate properly. • A hose that attaches to prevent waste water from the dishwasher. Otherwise, the cleaning process is installed on the same water line as the dishwasher. If your disposer manual for a dishwasher; Every disposal has a hook up for correct connection. (Figure C) 10 USA If a hose extension is required, a drainage hose of...

Installation Instructions
Page 13
... location where the hot steam escapes when you first open the door (as shown in Figure B). The steam protection foil will form inside the dishwasher during installation can lead to damage to the cabinets and countertop. 11 USA Once the area dries, apply the steam protection foil. At the end... on the underside of the counter top. 6.6.2 FITTING THE PROTECTION FOIL Before applying the steam protection foil to the underside of the cycle, when the dishwasher door is opened, it is first opened.
... location where the hot steam escapes when you first open the door (as shown in Figure B). The steam protection foil will form inside the dishwasher during installation can lead to damage to the cabinets and countertop. 11 USA Once the area dries, apply the steam protection foil. At the end... on the underside of the counter top. 6.6.2 FITTING THE PROTECTION FOIL Before applying the steam protection foil to the underside of the cycle, when the dishwasher door is opened, it is first opened.
Installation Instructions
Page 14
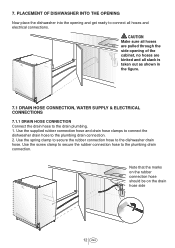
... 7.1 DRAIN HOSE CONNECTION, WATER SUPPLY & ELECTRICAL CONNECTIONS 7.1.1 DRAIN HOSE CONNECTION Connect the drain hose to the plumbing drain connection. 2. PLACEMENT OF DISHWASHER INTO THE OPENING Now place the dishwasher into the opening of the cabinet, no hoses are kinked and all hoses and electrical connections. CAUTION Make sure all hoses are... hose should be on the drain hose side 12 USA Use the supplied rubber connection hose and drain hose clamps to connect the dishwasher drain hose to the drain plumbing. 1. Use the spring clamp to secure the rubber connection hose to the...
... 7.1 DRAIN HOSE CONNECTION, WATER SUPPLY & ELECTRICAL CONNECTIONS 7.1.1 DRAIN HOSE CONNECTION Connect the drain hose to the plumbing drain connection. 2. PLACEMENT OF DISHWASHER INTO THE OPENING Now place the dishwasher into the opening of the cabinet, no hoses are kinked and all hoses and electrical connections. CAUTION Make sure all hoses are... hose should be on the drain hose side 12 USA Use the supplied rubber connection hose and drain hose clamps to connect the dishwasher drain hose to the drain plumbing. 1. Use the spring clamp to secure the rubber connection hose to the...
Installation Instructions
Page 15
...7.1.4 GROUNDING INSTRUCTIONS This appliance must be plugged into an appropriate outlet that may be connected to the dishwasher in a risk of a malfunction or breakdown, grounding will damage the dishwasher's water inlet valve so if any such operation is needed, keep the heat source min. 7⅞.... • The power-supply receptacle for electric current. In the event of electric shock. Before connecting the copper water supply line to the dishwasher, flush it will not fit the outlet, have a proper outlet installed by providing a path of two ways: • With...
...7.1.4 GROUNDING INSTRUCTIONS This appliance must be plugged into an appropriate outlet that may be connected to the dishwasher in a risk of a malfunction or breakdown, grounding will damage the dishwasher's water inlet valve so if any such operation is needed, keep the heat source min. 7⅞.... • The power-supply receptacle for electric current. In the event of electric shock. Before connecting the copper water supply line to the dishwasher, flush it will not fit the outlet, have a proper outlet installed by providing a path of two ways: • With...
Installation Instructions
Page 16
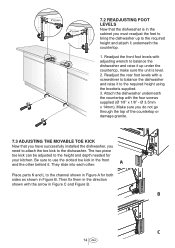
... sure you do not go through the top of the countertop or damage granite. 7.3 ADJUSTING THE MOVABLE TOE KICK Now that the dishwasher is level. 2. Place parts K and L to the channel shown in Figure A for your kitchen. They slide into each other behind it. Readjust the front foot ... height using the brackets supplied. 3. Then fix them in the front and the other . Readjust the rear foot levels with adjusting wrench to balance the dishwasher and raise it up to the required height and attach it to use the slotted toe kick in the direction shown with the four screws...
... sure you do not go through the top of the countertop or damage granite. 7.3 ADJUSTING THE MOVABLE TOE KICK Now that the dishwasher is level. 2. Place parts K and L to the channel shown in Figure A for your kitchen. They slide into each other behind it. Readjust the front foot ... height using the brackets supplied. 3. Then fix them in the front and the other . Readjust the rear foot levels with adjusting wrench to balance the dishwasher and raise it up to the required height and attach it to use the slotted toe kick in the direction shown with the four screws...
Installation Instructions
Page 24
.... 22 USA off is plugged in the ON position. TROUBLESHOOTING: The screen does not come on: • Check to make sure the breaker to the dishwasher is in the on and checked for leaks. • The drain hose has been connected and checked for any function related failure. • The manufacturer... counter top. • The inlet water supply is not kinked or comes out of your invoice and keep it with this manual and register your dishwasher, as shown above. There must be removed. • The spray arms are free and rotate freely. • The rinse cycle has been run. • The...
.... 22 USA off is plugged in the ON position. TROUBLESHOOTING: The screen does not come on: • Check to make sure the breaker to the dishwasher is in the on and checked for leaks. • The drain hose has been connected and checked for any function related failure. • The manufacturer... counter top. • The inlet water supply is not kinked or comes out of your invoice and keep it with this manual and register your dishwasher, as shown above. There must be removed. • The spray arms are free and rotate freely. • The rinse cycle has been run. • The...

Installation Instructions
Page 25
...to obtain the name of dealer from whom purchased Clearly describe the problem that you continue to have service problems, contact Viking Range, LLC at 1-888-845-4641, or write to: VIKING RANGE, LLC PREFERRED SERVICE 111 Front Street Greenwood, Mississippi 38930 USA Record the information indicated below. Have the following ... Date of purchase Date installed Dealer's name Address If service requires installation of parts, use only authorized parts to the left side of the dishwasher. Keep this manual for future reference. 23 USA SERVICE INFORMATION If service is ever required.
...to obtain the name of dealer from whom purchased Clearly describe the problem that you continue to have service problems, contact Viking Range, LLC at 1-888-845-4641, or write to: VIKING RANGE, LLC PREFERRED SERVICE 111 Front Street Greenwood, Mississippi 38930 USA Record the information indicated below. Have the following ... Date of purchase Date installed Dealer's name Address If service requires installation of parts, use only authorized parts to the left side of the dishwasher. Keep this manual for future reference. 23 USA SERVICE INFORMATION If service is ever required.
Use and Care Manual
Page 2
... / or use. DETERGENT 22 7.1 ADDING DETERGENT 22 7.2 TABLET DETERGENTS 22 7.3 RINSE AID 22 8. RECYCLING 4 3. GETTING TO KNOW YOUR DISHWASHER 5 4. LOADING THE DISHWASHER 6 4.1 UPPER RACK 8 4.2 LOWER RACK 9 4.3 PROPER AND IMPROPER LOADING OF DISHWARE 11 5. TROUBLESHOOTING 27 12. INTRODUCTION CONTENTS 1. ADJUSTING ....4 CLEANING THE HOSE FILTER 26 10.5 CLEANING THE WASH ARMS 26 11. WHAT SHOULD NOT BE WASHED IN YOUR DISHWASHER 12 OPERATING THE PRODUCT 12 PROGRAM SELECTION / PROGRAMME CANCEL KEY 5 SERIES 13 FUNCTION KEYS 13 PREPARING THE MACHINE 13...
... / or use. DETERGENT 22 7.1 ADDING DETERGENT 22 7.2 TABLET DETERGENTS 22 7.3 RINSE AID 22 8. RECYCLING 4 3. GETTING TO KNOW YOUR DISHWASHER 5 4. LOADING THE DISHWASHER 6 4.1 UPPER RACK 8 4.2 LOWER RACK 9 4.3 PROPER AND IMPROPER LOADING OF DISHWARE 11 5. TROUBLESHOOTING 27 12. INTRODUCTION CONTENTS 1. ADJUSTING ....4 CLEANING THE HOSE FILTER 26 10.5 CLEANING THE WASH ARMS 26 11. WHAT SHOULD NOT BE WASHED IN YOUR DISHWASHER 12 OPERATING THE PRODUCT 12 PROGRAM SELECTION / PROGRAMME CANCEL KEY 5 SERIES 13 FUNCTION KEYS 13 PREPARING THE MACHINE 13...


