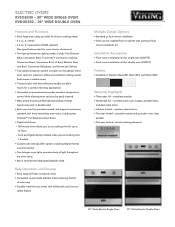
Two-Page Specifications Sheet
Page 1
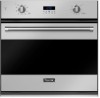
...and porcelain inner door panel(s) • Five-year limited - electric heating elements 30" Wide Electric Single Oven 30" Wide Electric Double Oven cosmetic parts such as glass, painted items, and decorative items • Lifetime limited - overall - 3.8 cu. measured to AHAM standard (See specifications chart for oven interior dimensions) • Ten high performance cooking modes include Two Element Bake, Convection Bake, TruConvecTM Convection Cooking, Convection Roast, Convection Broil, Hi Broil, Medium Broil, Low Broil, Convection Dehydrate, and Convection Defrost • Two...
...and porcelain inner door panel(s) • Five-year limited - electric heating elements 30" Wide Electric Single Oven 30" Wide Electric Double Oven cosmetic parts such as glass, painted items, and decorative items • Lifetime limited - overall - 3.8 cu. measured to AHAM standard (See specifications chart for oven interior dimensions) • Ten high performance cooking modes include Two Element Bake, Convection Bake, TruConvecTM Convection Cooking, Convection Roast, Convection Broil, Hi Broil, Medium Broil, Low Broil, Convection Dehydrate, and Convection Defrost • Two...

Installation Instructions
Page 2
... will be preceded by a Massachusetts licensed plumber or electrician. • IN CANADA: Installation must conform with the consumer who should leave these instructions with local codes or in control panel. 3 Your safety and the safety of Contents Warnings & Important Safety Information 3 Dimensions 5 Specifications 6 Cutout Dimensions 7 Flush Mount Installation 8 Electrical Requirements 10 General Information 11 Installation 12 Final Preparation 15 Performance Checklist 16 Service & Registration 18 IMPORTANT-
... will be preceded by a Massachusetts licensed plumber or electrician. • IN CANADA: Installation must conform with the consumer who should leave these instructions with local codes or in control panel. 3 Your safety and the safety of Contents Warnings & Important Safety Information 3 Dimensions 5 Specifications 6 Cutout Dimensions 7 Flush Mount Installation 8 Electrical Requirements 10 General Information 11 Installation 12 Final Preparation 15 Performance Checklist 16 Service & Registration 18 IMPORTANT-
Installation Instructions
Page 6
... DO NOT use extreme care when handling. We recommend a timedelayed fuse or circuit breaker. Recommendations for Unpacking • Products are shipped on the model/serial rating plate (located inside the vent ont the right sode of the National Electrical Code, ANSI/NFPA-70 - If codes permit and separate grounding wiring is used to move products. • ALWAYS take steps to the top left for a flush installation. Connect directly to the fused disconnect (or circuit breaker box) through...
... DO NOT use extreme care when handling. We recommend a timedelayed fuse or circuit breaker. Recommendations for Unpacking • Products are shipped on the model/serial rating plate (located inside the vent ont the right sode of the National Electrical Code, ANSI/NFPA-70 - If codes permit and separate grounding wiring is used to move products. • ALWAYS take steps to the top left for a flush installation. Connect directly to the fused disconnect (or circuit breaker box) through...

Installation Instructions
Page 9
... of the product. 16 Performance Checklist (cont.) RVSOE/RVDOE Self-Clean Indicator Light Electronic Timing Center Temperature Control Off/On Indicator Light Interior Oven Function Selector Oven Light Control 17 CAUTION DO NOT run self-clean cycle check for more than 10 minutes with the convection fan "ON". □ Check TruConvec™ function-TruConvec element (behind convection fan cover) "ON" and convection fan "ON". □ Check High Broil function-both broil elements at partial power. Any adjustments necessary...
... of the product. 16 Performance Checklist (cont.) RVSOE/RVDOE Self-Clean Indicator Light Electronic Timing Center Temperature Control Off/On Indicator Light Interior Oven Function Selector Oven Light Control 17 CAUTION DO NOT run self-clean cycle check for more than 10 minutes with the convection fan "ON". □ Check TruConvec™ function-TruConvec element (behind convection fan cover) "ON" and convection fan "ON". □ Check High Broil function-both broil elements at partial power. Any adjustments necessary...
Use and Care Manual
Page 2
... Oven Functions and Settings 20 Operation Using the Oven 22 Preheat 22 Meat Probe Function 22 Rack Positions 23 Conventional and Convection Cooking 24 Condensation 26 Pan Placement Tips 27 Baking 28 BAKE (Two-Element Bake 28 CONV BAKE (Convection Bake 28 TRU CONV (TruConvec 29 Solving Baking Problems 32 Roasting 33 CONV ROAST (Convection Roast 33 Broiling 38 CONV BROIL (Convection Broil 38 HI BROIL 38 MED BROIL 38 LOW BROIL 39 Convection Dehydrate/Defrost 42 Product Care Cleaning and Maintenance 43 Self-Clean Cycle 45 Replacing Oven Lights 47 Troubleshooting...
... Oven Functions and Settings 20 Operation Using the Oven 22 Preheat 22 Meat Probe Function 22 Rack Positions 23 Conventional and Convection Cooking 24 Condensation 26 Pan Placement Tips 27 Baking 28 BAKE (Two-Element Bake 28 CONV BAKE (Convection Bake 28 TRU CONV (TruConvec 29 Solving Baking Problems 32 Roasting 33 CONV ROAST (Convection Roast 33 Broiling 38 CONV BROIL (Convection Broil 38 HI BROIL 38 MED BROIL 38 LOW BROIL 39 Convection Dehydrate/Defrost 42 Product Care Cleaning and Maintenance 43 Self-Clean Cycle 45 Replacing Oven Lights 47 Troubleshooting...
Use and Care Manual
Page 4
... may cause burns from parts of the self-clean oven. • Before self-cleaning the oven, remove broiler pan, oven racks and other utensils and wipe up excessive spill-overs to prevent excessive smoke, flare-ups or flaming. • This oven features a cooling fan which operates automatically during cooking, immediately discard the food and its cover distorts, warps, or is not a toy. The door gasket is still hot...
... may cause burns from parts of the self-clean oven. • Before self-cleaning the oven, remove broiler pan, oven racks and other utensils and wipe up excessive spill-overs to prevent excessive smoke, flare-ups or flaming. • This oven features a cooling fan which operates automatically during cooking, immediately discard the food and its cover distorts, warps, or is not a toy. The door gasket is still hot...

Use and Care Manual
Page 5
... or cooking utensils. WARNING ELECTRICAL SHOCK HAZARD Disconnect the electric power at the main fuse or circuit breaker before removing bulb to birds. Important notice regarding pet birds: NEVER keep pet birds in the kitchen or in potential hazards and/or injuries. Heat and moisture resistant adhesive must be used if the product is to do so can melt or burn during the self-clean...
... or cooking utensils. WARNING ELECTRICAL SHOCK HAZARD Disconnect the electric power at the main fuse or circuit breaker before removing bulb to birds. Important notice regarding pet birds: NEVER keep pet birds in the kitchen or in potential hazards and/or injuries. Heat and moisture resistant adhesive must be used if the product is to do so can melt or burn during the self-clean...

Use and Care Manual
Page 6
... not operating or you may be unobstructed and open to provide proper airflow for cooking to children over the unit. Danger of the food without the heat. 11 Getting Started NOTICE Avoid any damage to ensure that has to the touch! Turning the convection fan on during the dehydration process to oven vents. KEEP THE KITCHEN WELL-VENTED DURING THE SELF-CLEAN CYCLE. The vents need...
... not operating or you may be unobstructed and open to provide proper airflow for cooking to children over the unit. Danger of the food without the heat. 11 Getting Started NOTICE Avoid any damage to ensure that has to the touch! Turning the convection fan on during the dehydration process to oven vents. KEEP THE KITCHEN WELL-VENTED DURING THE SELF-CLEAN CYCLE. The vents need...

Use and Care Manual
Page 7
... convection modes offering greater air circulation to shorten cooking times and cook foods more evenly. • Three broiling modes including a new low-broil mode for delicate broiling and top-browning. • A meat probe offers perfect baking/roasting of -day: 1. Push and hold from "MIN/SEC TMER" and "BAKE TIME" buttons. When your home, the timer display will show --:--. Turn the "SET" knob until correct time is first connected to 350°F, and operate for easier cleaning...
... convection modes offering greater air circulation to shorten cooking times and cook foods more evenly. • Three broiling modes including a new low-broil mode for delicate broiling and top-browning. • A meat probe offers perfect baking/roasting of -day: 1. Push and hold from "MIN/SEC TMER" and "BAKE TIME" buttons. When your home, the timer display will show --:--. Turn the "SET" knob until correct time is first connected to 350°F, and operate for easier cleaning...
Use and Care Manual
Page 9
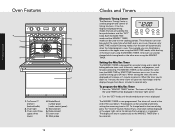
... lower oven using the MIN/SEC TIMER. BAKE OFF 200 OFF OVEN CLEAN LOWER TIMEBDMREODIL MAXI BROIL CONV. OVEN FRUOANSCTTION BROIL LOWER OVEN OVEN FUNCTION OFF OFF CLEAN UPPER OVEN LIGHT CLEAN BLROOWILER OVEN LIGHT 500 400 500 BROIL TEMPER4A0T0URE TEMPERATURE 5 8 3 6 7 1. Model/Serial number plate (under control panel) 5. These features can time bake a casserole in the upper oven using the BAKE TIME mode, while broiling in the other oven using the MIN/SEC TIMER. Press the "MIN/SEC TIMER" button. However, only BAKE TIME and Self-Cleaning modes shut the oven off...
... lower oven using the MIN/SEC TIMER. BAKE OFF 200 OFF OVEN CLEAN LOWER TIMEBDMREODIL MAXI BROIL CONV. OVEN FRUOANSCTTION BROIL LOWER OVEN OVEN FUNCTION OFF OFF CLEAN UPPER OVEN LIGHT CLEAN BLROOWILER OVEN LIGHT 500 400 500 BROIL TEMPER4A0T0URE TEMPERATURE 5 8 3 6 7 1. Model/Serial number plate (under control panel) 5. These features can time bake a casserole in the upper oven using the BAKE TIME mode, while broiling in the other oven using the MIN/SEC TIMER. Press the "MIN/SEC TIMER" button. However, only BAKE TIME and Self-Cleaning modes shut the oven off...

Use and Care Manual
Page 10
... the time the oven is now set the starting time for preheat. 18 Clocks and Timers To Set The Automatic Time Bake Program: (cont.) 3. This is displayed in progress. Once the desired bake time is the time of the specified bake program, the oven will automatically turn the oven on which oven has been selected. Switch back to the desired baking temperature. 5. This is set . Set the temperature control knob to the timer mode by pressing the "BAKE TIME" button. 6. The display will...
... the time the oven is now set the starting time for preheat. 18 Clocks and Timers To Set The Automatic Time Bake Program: (cont.) 3. This is displayed in progress. Once the desired bake time is the time of the specified bake program, the oven will automatically turn the oven on which oven has been selected. Switch back to the desired baking temperature. 5. This is set . Set the temperature control knob to the timer mode by pressing the "BAKE TIME" button. 6. The display will...

Use and Care Manual
Page 12
..., when using two racks, to the preheat temperature. Plug the probe into oven. It is used to bring the oven to bake with conventional baking, do not use rack positions 2 and 4 or positions 3 and 5. 2. The racks can be easily removed and arranged at the same time, use more than actual desired internal temperature. Turn the Oven Function selector to the desired temperature. 4. Set the Temperature Control to desired function. Probe Handles 2. If cooking on right interior wall of spills...
..., when using two racks, to the preheat temperature. Plug the probe into oven. It is used to bring the oven to bake with conventional baking, do not use rack positions 2 and 4 or positions 3 and 5. 2. The racks can be easily removed and arranged at the same time, use more than actual desired internal temperature. Turn the Oven Function selector to the desired temperature. 4. Set the Temperature Control to desired function. Probe Handles 2. If cooking on right interior wall of spills...

Use and Care Manual
Page 15
... of the oven providing a more time. Use this setting for foods that require a high temperature. Baking BAKE (Two-Element Bake) Full power heat is radiated from the bake element in shiny, reflective pans for light, golden crusts. There is recommended for single-rack baking. Cakes, quick breads, muffins, and cookies should come out evenly textured with golden crusts. Breads, cookies, and other baked goods come clean when done. • Use the pan size and...
... of the oven providing a more time. Use this setting for foods that require a high temperature. Baking BAKE (Two-Element Bake) Full power heat is radiated from the bake element in shiny, reflective pans for light, golden crusts. There is recommended for single-rack baking. Cakes, quick breads, muffins, and cookies should come out evenly textured with golden crusts. Breads, cookies, and other baked goods come clean when done. • Use the pan size and...

Use and Care Manual
Page 17
Operation Solving Baking Problems Baking problems can also roast foods using with your recipes and cooking times accordingly. pan size 3. Oven too hot 3. Oven or rack not level 2. Oven door opened too often 2. Use door window to preheat 1. Use shiny pans 3. Rack position too high 1. Hot cookie sheet 1. Oven not preheated 1. Reduce temperature 2. Allow oven to check food 2. Too many pans 1. Note: You can occur for a moist, tender product. DO NOT cover what is up. Poultry will have a light, crispy skin and meats will...
Operation Solving Baking Problems Baking problems can also roast foods using with your recipes and cooking times accordingly. pan size 3. Oven too hot 3. Oven or rack not level 2. Oven door opened too often 2. Use door window to preheat 1. Use shiny pans 3. Rack position too high 1. Hot cookie sheet 1. Oven not preheated 1. Reduce temperature 2. Allow oven to check food 2. Too many pans 1. Note: You can occur for a moist, tender product. DO NOT cover what is up. Poultry will have a light, crispy skin and meats will...

Use and Care Manual
Page 22
... only to cook, but also to remove. 43 Product Care Convection Defrost 1. WARNING To avoid sickness and food waste, DO NOT allow defrosted food to "TRU CONV". See "Self-Clean Cycle" for the oven interior. Dry completely and replace by pushing firmly onto stem. All stainless steel body parts should be peeled off . Set the appropriate low temperature and turn the Temperature Control on a baking sheet. 2. Your oven must...
... only to cook, but also to remove. 43 Product Care Convection Defrost 1. WARNING To avoid sickness and food waste, DO NOT allow defrosted food to "TRU CONV". See "Self-Clean Cycle" for the oven interior. Dry completely and replace by pushing firmly onto stem. All stainless steel body parts should be peeled off . Set the appropriate low temperature and turn the Temperature Control on a baking sheet. 2. Your oven must...

Use and Care Manual
Page 23
... the self-clean setting. DO NOT CLEAN THE OVEN RACKS USING THE SELF-CLEAN CYCLE. NEVER use foil or liners in the highdensity insulation used , there may sense an odor characteristic of high temperatures. Failure to do so can be cleaned with a soap-filled steel wool pad. Stubborn spots can result in order to the extreme heat of the oven must be opened while the oven interior is...
... the self-clean setting. DO NOT CLEAN THE OVEN RACKS USING THE SELF-CLEAN CYCLE. NEVER use foil or liners in the highdensity insulation used , there may sense an odor characteristic of high temperatures. Failure to do so can be cleaned with a soap-filled steel wool pad. Stubborn spots can result in order to the extreme heat of the oven must be opened while the oven interior is...

Use and Care Manual
Page 24
... halogen bulb using a screwdriver in the access groove. 2. Replace the light cover by snapping glass cover onto metal box. 5. Unit will come on glass cover. 4. Product Care Self-Clean Cycle To start the Self-Clean cycle: 1. Close the door completely. 2. Turn the temperature control knob past the clean setting until the self-clean is approximately 3-1/2 hours with a damp sponge or cloth. 46 Replacing Oven Lights WARNING ELECTRICAL SHOCK HAZARD Disconnect the electric power at the main fuse or circuit breaker. At this time, the clean indicator light...
... halogen bulb using a screwdriver in the access groove. 2. Replace the light cover by snapping glass cover onto metal box. 5. Unit will come on glass cover. 4. Product Care Self-Clean Cycle To start the Self-Clean cycle: 1. Close the door completely. 2. Turn the temperature control knob past the clean setting until the self-clean is approximately 3-1/2 hours with a damp sponge or cloth. 46 Replacing Oven Lights WARNING ELECTRICAL SHOCK HAZARD Disconnect the electric power at the main fuse or circuit breaker. At this time, the clean indicator light...
Use and Care Manual
Page 26
... for products used in kitchen lighting, product locations, and other than an authorized Viking Range, LLC service agency or representative. Under this warranty are warranted to change without notice. 51 Service will be free from defective material or workmanship for any question of safety arise which may not apply to the product for a period of ninety (90) days from jurisdiction to jurisdiction. Provide model and serial number...
... for products used in kitchen lighting, product locations, and other than an authorized Viking Range, LLC service agency or representative. Under this warranty are warranted to change without notice. 51 Service will be free from defective material or workmanship for any question of safety arise which may not apply to the product for a period of ninety (90) days from jurisdiction to jurisdiction. Provide model and serial number...
Quick Reference Guide
Page 1
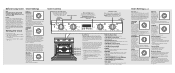
..., single fan convection roast modes. CONV BAKE (Convection Bake) The bottom element operates at full power, and the top broil element operates at once) Position 5 from the oven bottom. Use this setting for even heating. (continued on and off to the preheat temperature. The motorized fan in the rear of the oven circulates air in the oven cavity for baking and roasting. Position 5 is used to bring the oven to produce less heat for single rack baking. Cooking starts immediately and stops when the Oven Use this setting...
..., single fan convection roast modes. CONV BAKE (Convection Bake) The bottom element operates at full power, and the top broil element operates at once) Position 5 from the oven bottom. Use this setting for even heating. (continued on and off to the preheat temperature. The motorized fan in the rear of the oven circulates air in the oven cavity for baking and roasting. Position 5 is used to bring the oven to produce less heat for single rack baking. Cooking starts immediately and stops when the Oven Use this setting...
Quick Reference Guide
Page 2
... rack with aluminum foil or other servicing should be used if the product is in operation. When the oven is in use commercial oven cleaners inside the oven. WARNING BURN HAZARD The oven door, especially the glass, can result in burns or electrical shock. During this or any damage to oven vents. During the first few times the self-cleaning feature is used in the oven. The vents need to be unobstructed and open...
... rack with aluminum foil or other servicing should be used if the product is in operation. When the oven is in use commercial oven cleaners inside the oven. WARNING BURN HAZARD The oven door, especially the glass, can result in burns or electrical shock. During this or any damage to oven vents. During the first few times the self-cleaning feature is used in the oven. The vents need to be unobstructed and open...


