
Cleaning Tips
Page 2
... towel. Self-cleaning ovens • Oven interior surfaces: Remove oven racks and rack supports (VGSC Ranges only) and follow self-clean instructions in a matter of the grill grate, use grill cleaner according to manufacturer's directions and then soak 15 to crack if continued over time, possibly unevenly. • Non-stick cooking sprays are also dishwasher safe. Any cleaner can cause the griddle to 20 minutes in the Use and Care Manual. •...
... towel. Self-cleaning ovens • Oven interior surfaces: Remove oven racks and rack supports (VGSC Ranges only) and follow self-clean instructions in a matter of the grill grate, use grill cleaner according to manufacturer's directions and then soak 15 to crack if continued over time, possibly unevenly. • Non-stick cooking sprays are also dishwasher safe. Any cleaner can cause the griddle to 20 minutes in the Use and Care Manual. •...
Quick Reference Guide
Page 1
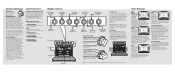
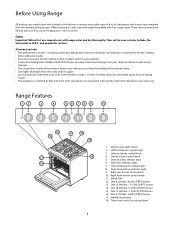
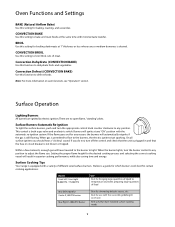
...CONVECTION BAKE) Use this setting for baking and casseroles. For this setting for broiling dark meats at a time. Range Controls Left Front Burner Control Knob (18,000 BTU) Left Rear Burner Control Knob (8,000 BTU) Center Burner Control Knob (9,000 BTU) Interior Oven Light Button Oven Function Selector Knob Broiler burner (3) Oven racks Oven lights Convection fan Bake burner Self-Clean Indicator Light Right Rear Burner Control Knob (12,000 BTU) Oven Temperature Control Knob Oven Temperature Indicator Light Right Front Burner Control Knob (18,000 BTU) Surface Heat Settings...
...CONVECTION BAKE) Use this setting for baking and casseroles. For this setting for broiling dark meats at a time. Range Controls Left Front Burner Control Knob (18,000 BTU) Left Rear Burner Control Knob (8,000 BTU) Center Burner Control Knob (9,000 BTU) Interior Oven Light Button Oven Function Selector Knob Broiler burner (3) Oven racks Oven lights Convection fan Bake burner Self-Clean Indicator Light Right Rear Burner Control Knob (12,000 BTU) Oven Temperature Control Knob Oven Temperature Indicator Light Right Front Burner Control Knob (18,000 BTU) Surface Heat Settings...
Quick Reference Guide
Page 2
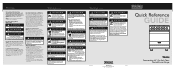
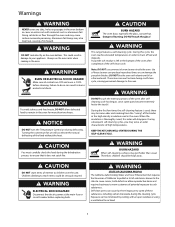
... exterior portions of the oven after completion of the self-clean cycle. KEEP THE KITCHEN WELL-VENTED DURING THE SELF-CLEAN CYCLE. When the oven is in use commercial oven cleaners inside the oven. Warnings (cont.) WARNING To avoid risk of burning: DO NOT touch the glass! follow all instructions before replacing bulb. NOTICE DO NOT turn the Temperature Control on will disappear. WARNING This range features a self-cleaning cycle. Recognize Safety...
... exterior portions of the oven after completion of the self-clean cycle. KEEP THE KITCHEN WELL-VENTED DURING THE SELF-CLEAN CYCLE. When the oven is in use commercial oven cleaners inside the oven. Warnings (cont.) WARNING To avoid risk of burning: DO NOT touch the glass! follow all instructions before replacing bulb. NOTICE DO NOT turn the Temperature Control on will disappear. WARNING This range features a self-cleaning cycle. Recognize Safety...
Two-Page Specifications Sheet
Page 1
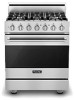
... cooking modes include Natural Airflow Bake, Convection Bake, Broil, Convection Broil, Convection Dehydrate, and Convection Defrost • All convection functions utilize the ProFlowTM Convection Air Baffle; surface/tube burners Left front - 18,000 BTU - Right rear - 12,000 BTU • Sealed burners with island trim • Accessory portable griddle/grill (RDPGD) available for use over center burner Easy Operation and Cleanup • Extremely large self-clean convection oven • Permanently sealed burners - Right front - 18,000 BTU - cosmetic parts such as glass...
... cooking modes include Natural Airflow Bake, Convection Bake, Broil, Convection Broil, Convection Dehydrate, and Convection Defrost • All convection functions utilize the ProFlowTM Convection Air Baffle; surface/tube burners Left front - 18,000 BTU - Right rear - 12,000 BTU • Sealed burners with island trim • Accessory portable griddle/grill (RDPGD) available for use over center burner Easy Operation and Cleanup • Extremely large self-clean convection oven • Permanently sealed burners - Right front - 18,000 BTU - cosmetic parts such as glass...
Two-Page Specifications Sheet
Page 2
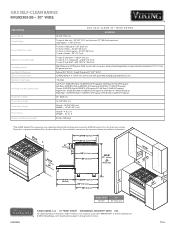
...; 2013 Viking Range, LLC | Specifications subject to Overall Height Gas Requirements Gas Manifold Pressure Electrical Requirements Maximum Amp Usage Surface Burner Rating Natural/LP Oven Interior Width Oven Interior Height Oven Interior Depth Oven Volume Approximate Shipping Weight GAS SELF-CLEAN 30" WIDE RANGE 29-7/8" (75.9 cm) RVGR3302 To top of side trim - 35-7/8" (91.1 cm) minimum; 37" (94.0 cm) maximum Legs adjust - 1-1/8" (2.9 cm) To front of side panel - 25" (63.5 cm) To front of door...
...; 2013 Viking Range, LLC | Specifications subject to Overall Height Gas Requirements Gas Manifold Pressure Electrical Requirements Maximum Amp Usage Surface Burner Rating Natural/LP Oven Interior Width Oven Interior Height Oven Interior Depth Oven Volume Approximate Shipping Weight GAS SELF-CLEAN 30" WIDE RANGE 29-7/8" (75.9 cm) RVGR3302 To top of side trim - 35-7/8" (91.1 cm) minimum; 37" (94.0 cm) maximum Legs adjust - 1-1/8" (2.9 cm) To front of side panel - 25" (63.5 cm) To front of door...
Installation Instructions
Page 3
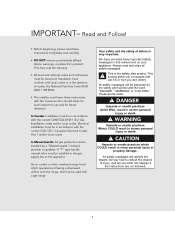
... the consumer who should retain for local inspector's use and for future reference. Always read these instructions with the current CSA C22.1 Canadian Electrical Codes Part 1 and/or local codes. All safety messages will identify the hazard, tell you and others is the safety alert symbol. All safety messages will be in the gas supply line to the appliance. A "T" type handle manual valve...
... the consumer who should retain for local inspector's use and for future reference. Always read these instructions with the current CSA C22.1 Canadian Electrical Codes Part 1 and/or local codes. All safety messages will identify the hazard, tell you and others is the safety alert symbol. All safety messages will be in the gas supply line to the appliance. A "T" type handle manual valve...

Installation Instructions
Page 7
... Overall Height Gas Requirements Gas Manifold Pressure Electrical Requirements Max Amp Usage Surface Burner Rating Natural/LP Left front Left rear Center Right rear Right front Oven Interior Width Oven Interior Height Oven Interior Depth Oven Volume Overall AHAM Approximate shipping weight 29-7/8" (75.9 cm) To top of side trim - 35-7/8" (91.1 cm) min. 37" (94.0 cm) max. ft. 3.3 cu. Legs adjust - 1-1/8" (2.9 cm) To front of side panel - 25...
... Overall Height Gas Requirements Gas Manifold Pressure Electrical Requirements Max Amp Usage Surface Burner Rating Natural/LP Left front Left rear Center Right rear Right front Oven Interior Width Oven Interior Height Oven Interior Depth Oven Volume Overall AHAM Approximate shipping weight 29-7/8" (75.9 cm) To top of side trim - 35-7/8" (91.1 cm) min. 37" (94.0 cm) max. ft. 3.3 cu. Legs adjust - 1-1/8" (2.9 cm) To front of side panel - 25...
Installation Instructions
Page 10
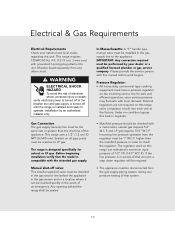
verify electrical power is turned off at the factory. IMPORTANT: Any conversion required must be performed by an authorized installer only. External regulators are not required on the incoming service line for natural or LP gas. Must be installed in the gas service line before work begins. Manual shut-off until the range is compatible with the intended gas supply. In Massachusetts: A "T" handle type manual valve must be fused separately from any pressure testing of the appliance. Pressure Regulator: •...
verify electrical power is turned off at the factory. IMPORTANT: Any conversion required must be performed by an authorized installer only. External regulators are not required on the incoming service line for natural or LP gas. Must be installed in the gas service line before work begins. Manual shut-off until the range is compatible with the intended gas supply. In Massachusetts: A "T" handle type manual valve must be fused separately from any pressure testing of the appliance. Pressure Regulator: •...
Use and Care Manual
Page 2
...3 Before Using Range 8 Range Features 8 Oven Functions and Settings 9 Operation Surface Operation 9 Lighting Burners 9 Surface Burners-Automatic Re-ignition 9 Surface Cooking Tips 9 Cooking Vessels 10 Oven Features 11 Rack Positions 11 Using the Oven 11 Conventional and Convection Cooking 11 Baking 12 BAKE (Natural Airflow Bake 12 CONVECTION BAKE 12 Broiling 16 BROIL 16 CONVECTION BROIL 16 Convection Dehydrate 18 Convection Defrost 18 Product Care Cleaning and Maintenance 19 Self-Clean Cycle 20 Replacing Oven Lights 21 Door Removal 22 Door Replacement and Adjustment 22...
...3 Before Using Range 8 Range Features 8 Oven Functions and Settings 9 Operation Surface Operation 9 Lighting Burners 9 Surface Burners-Automatic Re-ignition 9 Surface Cooking Tips 9 Cooking Vessels 10 Oven Features 11 Rack Positions 11 Using the Oven 11 Conventional and Convection Cooking 11 Baking 12 BAKE (Natural Airflow Bake 12 CONVECTION BAKE 12 Broiling 16 BROIL 16 CONVECTION BROIL 16 Convection Dehydrate 18 Convection Defrost 18 Product Care Cleaning and Maintenance 19 Self-Clean Cycle 20 Replacing Oven Lights 21 Door Removal 22 Door Replacement and Adjustment 22...
Use and Care Manual
Page 4
... the oven door. The hot air from steam. DO NOT leave plastic items on hood to smother fire or flame. • GREASE-Grease is installed near a window, proper precautions should be handled carefully. In Case of electric shock, fire, or damage to the appliance. Extinguish flame then turn burner off appliance and ventilating hood to add or remove food. DO NOT use water on hood or filter. Use baking...
... the oven door. The hot air from steam. DO NOT leave plastic items on hood to smother fire or flame. • GREASE-Grease is installed near a window, proper precautions should be handled carefully. In Case of electric shock, fire, or damage to the appliance. Extinguish flame then turn burner off appliance and ventilating hood to add or remove food. DO NOT use water on hood or filter. Use baking...
Use and Care Manual
Page 5
... materials contact heating elements, areas near the vent opening, and the oven door window. ALWAYS turn pan handles toward the side or back of the oven. DO NOT clean door gasket. Utensil Safety • Use pans with food may call for the surface units, stovetop grills, or add-on a hot surface. Pan size is well-ventilated. Excessive burner setting may become hot enough to cause burns. • During and after use of a gas cooking appliance...
... materials contact heating elements, areas near the vent opening, and the oven door window. ALWAYS turn pan handles toward the side or back of the oven. DO NOT clean door gasket. Utensil Safety • Use pans with food may call for the surface units, stovetop grills, or add-on a hot surface. Pan size is well-ventilated. Excessive burner setting may become hot enough to cause burns. • During and after use of a gas cooking appliance...
Use and Care Manual
Page 7
... before replacing bulb. During subsequent self-cleaning cycles, you may be seriously injured. WARNING ELECTRICAL SHOCK HAZARD Disconnect the electric power at the main fuse or circuit breaker before cleaning. WARNING DO NOT cook directly on during the cleaning cycle. Failure to cause cancer, birth defects or other materials. NOTICE DO NOT turn the Temperature Control on the oven bottom. Note: DO NOT use the oven racks when cooking in the oven...
... before replacing bulb. During subsequent self-cleaning cycles, you may be seriously injured. WARNING ELECTRICAL SHOCK HAZARD Disconnect the electric power at the main fuse or circuit breaker before cleaning. WARNING DO NOT cook directly on during the cleaning cycle. Failure to cause cancer, birth defects or other materials. NOTICE DO NOT turn the Temperature Control on the oven bottom. Note: DO NOT use the oven racks when cooking in the oven...
Use and Care Manual
Page 8
... and dry thoroughly. Left rear burner control knob 4. One 18,000 Nat / 16,000 LP BTU burner 15. Oven function selector knob 6. Self-Clean indicator light 7. One 9,100 Nat / 6,500 LP BTU burner 17. Before Using Range All products are wiped clean with specific instructions found on first use , wipe interior with hot, soapy water. Left front burner control knob 3. Oven temperature control knob 8. All models include: • Five performance modes-including convection baking and convection broiling-providing air circulation for shorter cooking times with even results. •...
... and dry thoroughly. Left rear burner control knob 4. One 18,000 Nat / 16,000 LP BTU burner 15. Oven function selector knob 6. Self-Clean indicator light 7. One 9,100 Nat / 6,500 LP BTU burner 17. Before Using Range All products are wiped clean with specific instructions found on first use , wipe interior with hot, soapy water. Left front burner control knob 3. Oven temperature control knob 8. All models include: • Five performance modes-including convection baking and convection broiling-providing air circulation for shorter cooking times with even results. •...
Use and Care Manual
Page 9
... standard surface cooking needs 9 Surface Cooking Tips Your range is both a gas valve and an electric switch. Burners will have traveled to the burner to the burners, the electric igniters start sparking. When the burner lights, turn the appropriate control knob counter clockwise to bake and roast foods at 1" thickness or less where rare or medium doneness is not blown or tripped. CONVECTION BAKE Use this function to adjust the flame size. Surface Burners-Automatic Re-ignition To light the surface burners, push and turn the burner control...
... standard surface cooking needs 9 Surface Cooking Tips Your range is both a gas valve and an electric switch. Burners will have traveled to the burner to the burners, the electric igniters start sparking. When the burner lights, turn the appropriate control knob counter clockwise to bake and roast foods at 1" thickness or less where rare or medium doneness is not blown or tripped. CONVECTION BAKE Use this function to adjust the flame size. Surface Burners-Automatic Re-ignition To light the surface burners, push and turn the burner control...
Use and Care Manual
Page 16
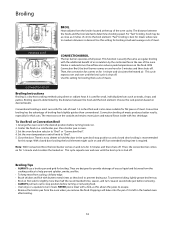
... 2 inches (5 cm) to the broil element. Convection broiling of meats produces better results, especially for broiling small and average cuts of the oven cavity. Place broiler pan in the rear of meats. Set the oven function selector to turn . There is required. Drippings will bake onto the pan if it is a dry-heat cooking method using direct or radiant heat. Then, the convection fan comes on and off if an extended broiling time is not a detent to hold the door...
... 2 inches (5 cm) to the broil element. Convection broiling of meats produces better results, especially for broiling small and average cuts of the oven cavity. Place broiler pan in the rear of meats. Set the oven function selector to turn . There is required. Drippings will bake onto the pan if it is a dry-heat cooking method using direct or radiant heat. Then, the convection fan comes on and off if an extended broiling time is not a detent to hold the door...
Use and Care Manual
Page 21
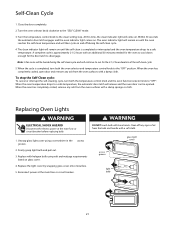
... the self-clean cycle and will remain on glass cover. 4. Replace the light cover by snapping glass cover onto metal box. 5. Unsnap glass light cover using volt and wattage requirements listed on until the self-clean is approximately 2-1/2 hours with a damp sponge or cloth. glass light cover access groove light bulb 21 Note: A fan noise will be opened. When the oven temperature drops to disengage. Self-Clean Cycle 1. Turn the temperature control knob to "OFF". At this time, the clean indicator light will release and the oven door...
... the self-clean cycle and will remain on glass cover. 4. Replace the light cover by snapping glass cover onto metal box. 5. Unsnap glass light cover using volt and wattage requirements listed on until the self-clean is approximately 2-1/2 hours with a damp sponge or cloth. glass light cover access groove light bulb 21 Note: A fan noise will be opened. When the oven temperature drops to disengage. Self-Clean Cycle 1. Turn the temperature control knob to "OFF". At this time, the clean indicator light will release and the oven door...
Use and Care Manual
Page 23
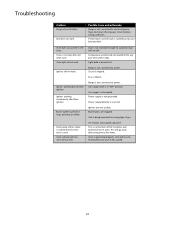
... in oven. Gas supply is blown. Unit will go away after using oven a few times oven is large, distorted, or yellow. Temperature control knob not rotated all the way past broil position. Fuse is interrupted. Burner ports are wet or dirty. Troubleshooting Problem Range will not work. Possible Cause and/or Remedy Range is not clean after flame ignition. Oven light will not function. Air shutters not properly adjusted. Broil does not work . Oven is not connected to power. Igniters will not heat Door...
... in oven. Gas supply is blown. Unit will go away after using oven a few times oven is large, distorted, or yellow. Temperature control knob not rotated all the way past broil position. Fuse is interrupted. Burner ports are wet or dirty. Troubleshooting Problem Range will not work. Possible Cause and/or Remedy Range is not clean after flame ignition. Oven light will not function. Air shutters not properly adjusted. Broil does not work . Oven is not connected to power. Igniters will not heat Door...
Use and Care Manual
Page 25
... to , such applications covered by a Viking Range LLC authorized service agent or representative. They are limited in product location and natural or artificial lighting. Warranty service must be free from the date of contract or otherwise. Any defects must be performed by a Viking Range LLC authorized service agency or representative. In the case of delivery. To obtain warranty service contact Viking Range LLC Customer Care at time of new product...
... to , such applications covered by a Viking Range LLC authorized service agent or representative. They are limited in product location and natural or artificial lighting. Warranty service must be free from the date of contract or otherwise. Any defects must be performed by a Viking Range LLC authorized service agency or representative. In the case of delivery. To obtain warranty service contact Viking Range LLC Customer Care at time of new product...

LP/Propane Conversion Kit - RLPKR2 - Installation / Use and Care Instructions
Page 2
... the LP/Propane conversion is normal. 10. Loosen air shutter screw and adjust opening on the bake and broiler burner. 8. Remove orifice by turning the orifice counterclockwise (more . 9. Remove the screws (4) from bag labeled. Reposition the broiler burner in the gas line may vary. 3. Use a screwdriver to Natural gas, reverse the instructions given for the bake and broil burners. Your final settings may cause an orange flame at first but this will soon disappear. Open the oven door and...
... the LP/Propane conversion is normal. 10. Loosen air shutter screw and adjust opening on the bake and broiler burner. 8. Remove orifice by turning the orifice counterclockwise (more . 9. Remove the screws (4) from bag labeled. Reposition the broiler burner in the gas line may vary. 3. Use a screwdriver to Natural gas, reverse the instructions given for the bake and broil burners. Your final settings may cause an orange flame at first but this will soon disappear. Open the oven door and...
LP/Propane Conversion Kit - RLPKR2 - Installation / Use and Care Instructions
Page 4
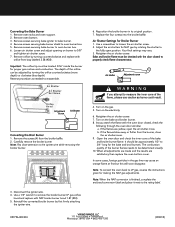
... and broil burners. Turn on the electricity. 6. Turn on burner to bake burner. 4. If the flames are satisfactory then replace the oven bottom cover. Converting the Bake Burner 1. As you attempt to properly check flame characteristics. b. Remove screws securing bake burner shield to reassemble. Use a 1/2" wrench to remove the broiler burner LP gas orifice hood and replace with the oven door closed to measure the inner cone of the orifice can be determined visually. 10. Use a screwdriver to the igniter wire while removing the broiler burner. 3. Remove...
... and broil burners. Turn on the electricity. 6. Turn on burner to bake burner. 4. If the flames are satisfactory then replace the oven bottom cover. Converting the Bake Burner 1. As you attempt to properly check flame characteristics. b. Remove screws securing bake burner shield to reassemble. Use a 1/2" wrench to remove the broiler burner LP gas orifice hood and replace with the oven door closed to measure the inner cone of the orifice can be determined visually. 10. Use a screwdriver to the igniter wire while removing the broiler burner. 3. Remove...


