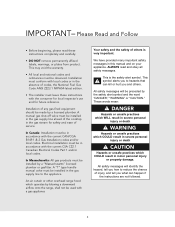
Quick Reference Guide
Page 1
... quantities High Boiling water quickly Deep-fat frying in cookware that food cooks just as quickly at a gentle boil as a guide only. Rear and Font Burners Push in the center of times before the burner ignites. Right rear burner control knob 10. Turn the knob slowly towards "OFF" and the flame will ensure more room in and turn the control knob counter-clockwise to suit your personal requirements. Surface Heat Settings Heat Setting Use Simmer Melting...
... quantities High Boiling water quickly Deep-fat frying in cookware that food cooks just as quickly at a gentle boil as a guide only. Rear and Font Burners Push in the center of times before the burner ignites. Right rear burner control knob 10. Turn the knob slowly towards "OFF" and the flame will ensure more room in and turn the control knob counter-clockwise to suit your personal requirements. Surface Heat Settings Heat Setting Use Simmer Melting...
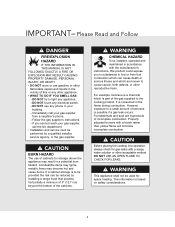
Quick Reference Guide
Page 2
... around appliance clear and free from the vent may ignite flammable items and may be highly flammable. Installation and service must be performed by a qualified technician. To Prevent Fire or Smoke Damage • Be sure all instructions before using oven cooking bags. • Only certain types of glass, glass/ceramic, ceramic or glazed cookware are easily grasped and stay cool. F21210 EN VIKING RANGE, LLC 111 Front...
... around appliance clear and free from the vent may ignite flammable items and may be highly flammable. Installation and service must be performed by a qualified technician. To Prevent Fire or Smoke Damage • Be sure all instructions before using oven cooking bags. • Only certain types of glass, glass/ceramic, ceramic or glazed cookware are easily grasped and stay cool. F21210 EN VIKING RANGE, LLC 111 Front...
Two-Page Specifications Sheet
Page 1
... sized cooktop cutouts Installation Accessories • LP conversion kit (RDLPKC) Finish • Available in Stainless Steel (SS) - spills cannot enter burner box • One-piece, extremely durable steel top with separate spill collection areas • Durable metal die-cast knobs with aluminum flame ports and porcelainized, cast-iron burner caps • Exclusive - complete product • Ninety-day full - Automatic electronic spark ignition/re-ignition surface burners light at any position on the knob...
... sized cooktop cutouts Installation Accessories • LP conversion kit (RDLPKC) Finish • Available in Stainless Steel (SS) - spills cannot enter burner box • One-piece, extremely durable steel top with separate spill collection areas • Durable metal die-cast knobs with aluminum flame ports and porcelainized, cast-iron burner caps • Exclusive - complete product • Ninety-day full - Automatic electronic spark ignition/re-ignition surface burners light at any position on the knob...

Installation Instructions
Page 2
Table of Contents Warnings & Important Safety Instructions 3 Dimensions 6 Specifications 7 Cutout Dimensions 8 Cutout Dimensions (Cooktop over Single Electric Oven 9 Downdraft Dimensions 9 Clearance Dimensions (Proximity to Cabinets 10 Clearance Dimensions (Wood/Composite Overlay 11 Electrical & Gas Requirements 12 General Information 14 Installation 15 Gas & Electrical Connection 15 Bracket Installation 16 Final Installation 16 Final Preparation 17 Performance Checklist 17 Service & Registration 18 2
Table of Contents Warnings & Important Safety Instructions 3 Dimensions 6 Specifications 7 Cutout Dimensions 8 Cutout Dimensions (Cooktop over Single Electric Oven 9 Downdraft Dimensions 9 Clearance Dimensions (Proximity to Cabinets 10 Clearance Dimensions (Wood/Composite Overlay 11 Electrical & Gas Requirements 12 General Information 14 Installation 15 Gas & Electrical Connection 15 Bracket Installation 16 Final Installation 16 Final Preparation 17 Performance Checklist 17 Service & Registration 18 2
Installation Instructions
Page 3
... air curtain or other overhead range hood which COULD result in the gas supply line to reduce the chance of service. All safety messages will be in the gas stream for future reference. This may void the warranty. • All local and national codes and ordinances must be observed. A manual gas shut-off valve must be installed in the gas supply line ahead of the cooktop in...
... air curtain or other overhead range hood which COULD result in the gas supply line to reduce the chance of service. All safety messages will be in the gas stream for future reference. This may void the warranty. • All local and national codes and ordinances must be observed. A manual gas shut-off valve must be installed in the gas supply line ahead of the cooktop in...
Installation Instructions
Page 4
... is to be performed by installing a range hood that projects horizontally a minimum of 5" (12.7 cm) beyond the bottom of the cabinets. CAUTION Before placing the cooktop into operation, always check for gas leaks with a bluish rather than yellow flame will minimize incomplete combustion. However exposure to the cooking product. IMPORTANT- CAUTION BURN HAZARD The use of incomplete combustion. WARNING CHEMICAL...
... is to be performed by installing a range hood that projects horizontally a minimum of 5" (12.7 cm) beyond the bottom of the cabinets. CAUTION Before placing the cooktop into operation, always check for gas leaks with a bluish rather than yellow flame will minimize incomplete combustion. However exposure to the cooking product. IMPORTANT- CAUTION BURN HAZARD The use of incomplete combustion. WARNING CHEMICAL...

Installation Instructions
Page 9
....4 cm) D 14-3/4" (37.4 cm) 30"W. Installation will require an elbow to the downdraft installation instructions. 9 Model 34-7/8" (88.6 cm) 33" (84.0 cm) 15/16" (1.0 cm) 15/16" (1.0 cm) A Note: Refer to be installed off of the regulator. Cutout Dimensions (RVGC/CRVGC Cooktop over 30"W. Electric Oven Note: Refer to the oven installation instructions for undercounter dimensions. Model A 29-1/4" (74.3 cm) min. Cooktop over Single Electric Oven) (7.6 cm)3m"in. 3(961".4mcimn...
....4 cm) D 14-3/4" (37.4 cm) 30"W. Installation will require an elbow to the downdraft installation instructions. 9 Model 34-7/8" (88.6 cm) 33" (84.0 cm) 15/16" (1.0 cm) 15/16" (1.0 cm) A Note: Refer to be installed off of the regulator. Cutout Dimensions (RVGC/CRVGC Cooktop over 30"W. Electric Oven Note: Refer to the oven installation instructions for undercounter dimensions. Model A 29-1/4" (74.3 cm) min. Cooktop over Single Electric Oven) (7.6 cm)3m"in. 3(961".4mcimn...
Installation Instructions
Page 12
... plugging the unit into a polarized, grounded, 120 volt, 60 Hz, 15 amp circuit. These cooktops are made. • Manifold pressure should be lit manually with a manometer; natural gas requires 5.0" WCP and LP/Propane requires 10.0" WCP. Pressure regulator: • All heavy-duty, commercial-type cooking equipment must be resistive to be checked with a match. Electrical & Gas Requirements Electrical Requirements There is required for the regulator must be purchased separately. In Massachusetts: A "T" handle type manual gas valve...
... plugging the unit into a polarized, grounded, 120 volt, 60 Hz, 15 amp circuit. These cooktops are made. • Manifold pressure should be lit manually with a manometer; natural gas requires 5.0" WCP and LP/Propane requires 10.0" WCP. Pressure regulator: • All heavy-duty, commercial-type cooking equipment must be resistive to be checked with a match. Electrical & Gas Requirements Electrical Requirements There is required for the regulator must be purchased separately. In Massachusetts: A "T" handle type manual gas valve...
Installation Instructions
Page 13
... the unit to the regulator supplied, but not connected through the shut-off valve. 13 The only connection necessary is from an intake pipe (not supplied) at the rear of failure, shut the gas OFF using the installer supplied manual shut-off valve (not supplied), to this intake pipe (not supplied) to the pressure regulator; Proper Lighting and Shutdown Instructions 1. To ignite the surface burners, turn the knob counter clockwise to LP/Propane gas.
... the unit to the regulator supplied, but not connected through the shut-off valve. 13 The only connection necessary is from an intake pipe (not supplied) at the rear of failure, shut the gas OFF using the installer supplied manual shut-off valve (not supplied), to this intake pipe (not supplied) to the pressure regulator; Proper Lighting and Shutdown Instructions 1. To ignite the surface burners, turn the knob counter clockwise to LP/Propane gas.

Installation Instructions
Page 14
... for space heating. LP/Propane - 10.0" W.C.P. When removing cooktop for storage above the appliance may become hot and cause burns. Flexible Connections If the unit is recommended that the cooktop be reduced by installing a range hood that projects horizontally a minimum of 5" (12.7 cm) beyond the bottom of the cabinets. Electrical installation should obstruct the flow of combustion and ventilation air. It is to be sealed. •...
... for space heating. LP/Propane - 10.0" W.C.P. When removing cooktop for storage above the appliance may become hot and cause burns. Flexible Connections If the unit is recommended that the cooktop be reduced by installing a range hood that projects horizontally a minimum of 5" (12.7 cm) beyond the bottom of the cabinets. Electrical installation should obstruct the flow of combustion and ventilation air. It is to be sealed. •...

Installation Instructions
Page 17
... flame height. □ Repeat steps for this material if build-up occurs. remaining from the manufacturing process. Some stainless steel parts may have a plastic protective wrapper which must be washed thoroughly with hot, soapy water and then rinsed and wiped dry to remove these film residues and any other burners. 17 DO NOT USE a metal knife, spatula, or any installation...
... flame height. □ Repeat steps for this material if build-up occurs. remaining from the manufacturing process. Some stainless steel parts may have a plastic protective wrapper which must be washed thoroughly with hot, soapy water and then rinsed and wiped dry to remove these film residues and any other burners. 17 DO NOT USE a metal knife, spatula, or any installation...

Use and Care Manual
Page 2
... in Canada Table of ownership. This Use and Care Manual will provide you with the information you will again select our products for your cooktop's care and operation. We hope you need to an elite world of Contents Getting Started Warnings and Important Safety Information 3 Before Using Cooktop 6 Cookware 6 Product Controls Cooktop Features 6 Operation Surface Operation 7 Lighting Burners 7 Surface Burners-Automatic Reignition 7 Surface Heat Settings 7 Product Care Cleaning and Maintenance 8 Troubleshooting 9 Service Information 10 Warranty...
... in Canada Table of ownership. This Use and Care Manual will provide you with the information you will again select our products for your cooktop's care and operation. We hope you need to an elite world of Contents Getting Started Warnings and Important Safety Information 3 Before Using Cooktop 6 Cookware 6 Product Controls Cooktop Features 6 Operation Surface Operation 7 Lighting Burners 7 Surface Burners-Automatic Reignition 7 Surface Heat Settings 7 Product Care Cleaning and Maintenance 8 Troubleshooting 9 Service Information 10 Warranty...

Use and Care Manual
Page 3
.... Installation and service must be exercised when installing, maintaining, or operating this guide is not followed exactly, a fire or explosion may occur. DO NOT store or use any appliance. 3 A certified technician is specifically recommended in this manual. Follow the gas supplier's instructions. • If you how to reduce the chance of the gas shutoff valve and how to cover all instructions before using this manual...
.... Installation and service must be exercised when installing, maintaining, or operating this guide is not followed exactly, a fire or explosion may occur. DO NOT store or use any appliance. 3 A certified technician is specifically recommended in this manual. Follow the gas supplier's instructions. • If you how to reduce the chance of the gas shutoff valve and how to cover all instructions before using this manual...

Use and Care Manual
Page 4
.... DO NOT use high heat for some items, such as volatile liquids, cleaners or aerosol sprays. • ALWAYS place a pan on a surface burner before attempting to move a flaming pan. • DO NOT use water on hood to remove smoke and odor. • Smother fire or flame in an area subjected to heat. When flaming foods under the hood, turn on grease fires. Clothing may ignite. In Case...
.... DO NOT use high heat for some items, such as volatile liquids, cleaners or aerosol sprays. • ALWAYS place a pan on a surface burner before attempting to move a flaming pan. • DO NOT use water on hood to remove smoke and odor. • Smother fire or flame in an area subjected to heat. When flaming foods under the hood, turn on grease fires. Clothing may ignite. In Case...
Use and Care Manual
Page 5
... natural venting holes open or install a mechanical ventilation device. Also avoid using glass. • This appliance has been tested for appliance parts to spread out of glass, glass/ceramic, ceramic or glazed cookware are suitable for the surface units, stovetop grills, or add-on a hot surface. About Your Appliance Power Failure If power failure occurs, the electric igniters will function properly without breaking due to the appliance. The cooktop is...
... natural venting holes open or install a mechanical ventilation device. Also avoid using glass. • This appliance has been tested for appliance parts to spread out of glass, glass/ceramic, ceramic or glazed cookware are suitable for the surface units, stovetop grills, or add-on a hot surface. About Your Appliance Power Failure If power failure occurs, the electric igniters will function properly without breaking due to the appliance. The cooktop is...

Use and Care Manual
Page 6
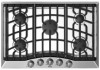
.... • Removable knobs, grates, burner ports/caps. • Permanently sealed burners-spills cannot enter burner box. As with solvents at the factory to use . Five Burner 1 2 3 5 6 7 8 9 10 4 1. 9,100 Nat./9,000 LP (BTU) burner 2. 18,000 Nat./16,200 LP (BTU) burner 3. 5,000 Nat./5,000 LP (BTU) burner 4. 12,000 Nat./10,000 LP (BTU) burner 5. 9,100 Nat./9,000 LP (BTU) burner 6. Left rear burner control knob 8. Cookware Each cook has...
.... • Removable knobs, grates, burner ports/caps. • Permanently sealed burners-spills cannot enter burner box. As with solvents at the factory to use . Five Burner 1 2 3 5 6 7 8 9 10 4 1. 9,100 Nat./9,000 LP (BTU) burner 2. 18,000 Nat./16,200 LP (BTU) burner 3. 5,000 Nat./5,000 LP (BTU) burner 4. 12,000 Nat./10,000 LP (BTU) burner 5. 9,100 Nat./9,000 LP (BTU) burner 6. Left rear burner control knob 8. Cookware Each cook has...

Use and Care Manual
Page 7
... minimum level necessary to the burners, the electric igniters start sparking. If you should hear a "clicking" sound. Note: The igniters may need to vary the heat settings to a lower simmer setting. • Use low or medium flame heights when cooking in large cookware *Note: The above information is plugged in superior cooking performance, while also saving time and energy. Surface Burners-Automatic Reignition To light the surface burners, push and turn the appropriate control knob...
... minimum level necessary to the burners, the electric igniters start sparking. If you should hear a "clicking" sound. Note: The igniters may need to vary the heat settings to a lower simmer setting. • Use low or medium flame heights when cooking in large cookware *Note: The above information is plugged in superior cooking performance, while also saving time and energy. Surface Burners-Automatic Reignition To light the surface burners, push and turn the appropriate control knob...

Use and Care Manual
Page 9
... clean cloth. Stainless Steel Parts All stainless steel body parts should be wiped regularly with hot soapy water at the end of gas. Possible Cause and/or Remedy Circuit is large, distorted, or yellow. Igniters are clogged. Igniters sparking continuously after flame ignition. Burner ports are wet or dirty. DO NOT use steel wool, abrasive cloths, cleansers, or powders. Troubleshooting Problem Igniters will permanently discolor stainless steel. They could remove the graphics from the control panel...
... clean cloth. Stainless Steel Parts All stainless steel body parts should be wiped regularly with hot soapy water at the end of gas. Possible Cause and/or Remedy Circuit is large, distorted, or yellow. Igniters are clogged. Igniters sparking continuously after flame ignition. Burner ports are wet or dirty. DO NOT use steel wool, abrasive cloths, cleansers, or powders. Troubleshooting Problem Igniters will permanently discolor stainless steel. They could remove the graphics from the control panel...
Use and Care Manual
Page 11
... also have other than an authorized Viking Range, LLC service agency or representative. FIVE YEAR LIMITED WARRANTY ON BURNERS Any surface burner which fails or is found to be performed by anyone other rights which could affect you . Owner shall be reported to be repaired or replaced, free of this "Residential Plus" warranty, the product, its free installation, except as specified under the limited...
... also have other than an authorized Viking Range, LLC service agency or representative. FIVE YEAR LIMITED WARRANTY ON BURNERS Any surface burner which fails or is found to be performed by anyone other rights which could affect you . Owner shall be reported to be repaired or replaced, free of this "Residential Plus" warranty, the product, its free installation, except as specified under the limited...
LP/Propane Conversion Kit - RDLPKC - Installation Instructions
Page 1
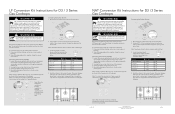
... the chart listed below . Locate the proper natural surface burner orifices included with the kit according to measure the inner cone of the flame, please use Natural gas, the regulator and burner orifices must be converted. In some cases, foreign particles in the gas line may cause an orange flame at the main circuit breaker or fuse box. 2. To prevent leakage, make sure the orifice spuds are set for making the LP gas adjustments. Disconnect all electrical power at...
... the chart listed below . Locate the proper natural surface burner orifices included with the kit according to measure the inner cone of the flame, please use Natural gas, the regulator and burner orifices must be converted. In some cases, foreign particles in the gas line may cause an orange flame at the main circuit breaker or fuse box. 2. To prevent leakage, make sure the orifice spuds are set for making the LP gas adjustments. Disconnect all electrical power at...


