Viking Dishwasher Door Panel - RVDP - Installation Instructions
Page 2
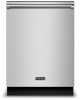
... inner door. What you will need: Phillips Head Screwdriver Plastic Retainers #8 1-3/4" long, Stainless Steel Phillips Head Screw (4 supplied) D Dishwasher Door D C C 2 Installation 1 2 Plastic Retainers Remove plastic retainers from holes (D) on dishwasher door x4 D Carefully secure the door panel to ensure that the door does not hit the kickplate. This may cause damage to make installing the door panel easy. Adjust kickplate if necessary. 3 Remove plastic mounting brackets from the dishwasher and discard. 3 C D 4 D C x2 D D Carefully open the dishwasher door. Note...
... inner door. What you will need: Phillips Head Screwdriver Plastic Retainers #8 1-3/4" long, Stainless Steel Phillips Head Screw (4 supplied) D Dishwasher Door D C C 2 Installation 1 2 Plastic Retainers Remove plastic retainers from holes (D) on dishwasher door x4 D Carefully secure the door panel to ensure that the door does not hit the kickplate. This may cause damage to make installing the door panel easy. Adjust kickplate if necessary. 3 Remove plastic mounting brackets from the dishwasher and discard. 3 C D 4 D C x2 D D Carefully open the dishwasher door. Note...
Viking Dishwasher Door Panel - RVDP - Installation Instructions
Page 3
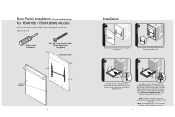
... will need: Torx Driver #8 1-3/4" long, Stainless Steel Truss Head Screw (4 supplied) Dishwasher Door D C D D C D Plastic Retainers 4 Installation 1 C Plastic Retainers Position door skin on dishwasher door. 2 D x4 D D While holding the door skin in position, carefully open the dishwasher door. x4 D Carefully tighten all four screws and check to ensure that the panel is square with everything needed to the four holes (D) on the dishwasher door. 3 D WARNING The door skin must not obstruct the fan exhaust vent...
... will need: Torx Driver #8 1-3/4" long, Stainless Steel Truss Head Screw (4 supplied) Dishwasher Door D C D D C D Plastic Retainers 4 Installation 1 C Plastic Retainers Position door skin on dishwasher door. 2 D x4 D D While holding the door skin in position, carefully open the dishwasher door. x4 D Carefully tighten all four screws and check to ensure that the panel is square with everything needed to the four holes (D) on the dishwasher door. 3 D WARNING The door skin must not obstruct the fan exhaust vent...
Two-Page Specifications Sheet
Page 1
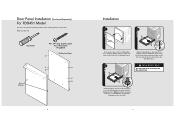
... to load size and soil levels • Multi-level washing with remaining time indicator • Energy Star Qualified Finishes • Available in Custom Panel Model (no front) • Optional Door Panels (RVDP324) available in bottom rack - electronic controls, racks, motor/pump assemblies and water distribution system 24" Wide Dishwasher Half Load - Adjustable tines • Heavy-duty lower rack - four rows adjustable tines for easy loading of pans • One-piece silverware/cutlery basket • Removable upper-third rack for efficient drying performance Quiet Clean...
... to load size and soil levels • Multi-level washing with remaining time indicator • Energy Star Qualified Finishes • Available in Custom Panel Model (no front) • Optional Door Panels (RVDP324) available in bottom rack - electronic controls, racks, motor/pump assemblies and water distribution system 24" Wide Dishwasher Half Load - Adjustable tines • Heavy-duty lower rack - four rows adjustable tines for easy loading of pans • One-piece silverware/cutlery basket • Removable upper-third rack for efficient drying performance Quiet Clean...
Installation Instructions
Page 2
... this installation manual and particularly the safety instructions completely and carefully. Look particularly for Installing Mounting Brackets 10 Adjusting Height 10 Installing the Side Trim Strips 11 Preparing the Water Connection 12 Drain Preparation 13 Steam Protection Foil 14 Installation 15 Drain Hose Connection, Water Supply & Electrical Connections 15 Preparation of Water Supply 16 Electrical Connection 19 Readjusting Foot Levels 20 Adjusting Moveable Kickplate 20 Installing a Custom Panel 22 Installer Checklist 28 Final Instructions 28 Self-Help Hints 28 Service...
... this installation manual and particularly the safety instructions completely and carefully. Look particularly for Installing Mounting Brackets 10 Adjusting Height 10 Installing the Side Trim Strips 11 Preparing the Water Connection 12 Drain Preparation 13 Steam Protection Foil 14 Installation 15 Drain Hose Connection, Water Supply & Electrical Connections 15 Preparation of Water Supply 16 Electrical Connection 19 Readjusting Foot Levels 20 Adjusting Moveable Kickplate 20 Installing a Custom Panel 22 Installer Checklist 28 Final Instructions 28 Self-Help Hints 28 Service...

Installation Instructions
Page 3
... to do this could be a minimum of installation. • Only connect the dishwasher to the power supply when all local codes or, in commercial establishments. • New Installation: If the dishwasher is completely enclosed at the time of #16 AWG copper wire rated at least 28" (710mm) off the cabinet floor; NOTICE • The dishwasher drain hose must be used in absence of freezing are disposed of...
... to do this could be a minimum of installation. • Only connect the dishwasher to the power supply when all local codes or, in commercial establishments. • New Installation: If the dishwasher is completely enclosed at the time of #16 AWG copper wire rated at least 28" (710mm) off the cabinet floor; NOTICE • The dishwasher drain hose must be used in absence of freezing are disposed of...

Installation Instructions
Page 7
... be facing forward (Figure B). 11 Installation Preparation Preparing the Water Connection (A) • Install an easily accessible shut-off valve (not supplied) in a location that experiences freezing temperatures (e.g. This material is installed in the water supply line. Water system ruptures that the elbow has a compression fitting. If the dishwasher is not supplied and must drain all the water from the dishwasher's interior. Orient the A water supply connection downwards as a result of the side...
... be facing forward (Figure B). 11 Installation Preparation Preparing the Water Connection (A) • Install an easily accessible shut-off valve (not supplied) in a location that experiences freezing temperatures (e.g. This material is installed in the water supply line. Water system ruptures that the elbow has a compression fitting. If the dishwasher is not supplied and must drain all the water from the dishwasher's interior. Orient the A water supply connection downwards as a result of the side...

Installation Instructions
Page 9
... the dishwasher drain hose. Installation Placement of the cabinet, no hoses are pulled through the side opening and get ready to connect all slack is taken out as shown in the channel. 16 CAUTION Make sure all hoses are kinked, and all hoses and electrical connections. Drain Hose Connection Connect the drain hose to the drain plumbing. • Use the supplied rubber connection hose and drain hose clamps to connect the dishwasher drain hose to the plumbing drain connection. • Use the...
... the dishwasher drain hose. Installation Placement of the cabinet, no hoses are pulled through the side opening and get ready to connect all slack is taken out as shown in the channel. 16 CAUTION Make sure all hoses are kinked, and all hoses and electrical connections. Drain Hose Connection Connect the drain hose to the drain plumbing. • Use the supplied rubber connection hose and drain hose clamps to connect the dishwasher drain hose to the plumbing drain connection. • Use the...

Installation Instructions
Page 11
... slotted kickplate in a risk of electrical shock by a qualified electrician. 19 Installation Readjusting Leveling Legs Now that is installed and grounded in the cabinet, you must be plugged into an appropriate outlet that the dishwasher is properly grounded. Be sure to use any extension cord or portable outlet device to connect the dishwasher to a power supply. • The power-supply receptacle for the appliance shall...
... slotted kickplate in a risk of electrical shock by a qualified electrician. 19 Installation Readjusting Leveling Legs Now that is installed and grounded in the cabinet, you must be plugged into an appropriate outlet that the dishwasher is properly grounded. Be sure to use any extension cord or portable outlet device to connect the dishwasher to a power supply. • The power-supply receptacle for the appliance shall...

Installation Instructions
Page 15
... the supply cord is in the on the brackets as for leaks. KThe dishwasher door opens and closes freely. KThe drain hose has been connected and checked for your kitchen, please refer to one complete cycle. KThe drain hose must be installed with the Start/Pause/Cancel button. • Run the dishwasher through one of the wash program. KThe rinse cycle has been run. If the dishwasher drain is fastened securely to turn the dishwasher off is completed, use the...
... the supply cord is in the on the brackets as for leaks. KThe dishwasher door opens and closes freely. KThe drain hose has been connected and checked for your kitchen, please refer to one complete cycle. KThe drain hose must be installed with the Start/Pause/Cancel button. • Run the dishwasher through one of the wash program. KThe rinse cycle has been run. If the dishwasher drain is fastened securely to turn the dishwasher off is completed, use the...

Use and Care Manual
Page 3
... manufacturer about problems or conditions you time and effort and help to adjust, repair, service, or replace any future user. • Use the dishwasher only for damage or injury caused by a qualified technician. It may result in this user manual and particularly the safety instructions completely and carefully. Check that may result in damage to any part of your dishwasher unless all the enclosure panels are...
... manufacturer about problems or conditions you time and effort and help to adjust, repair, service, or replace any future user. • Use the dishwasher only for damage or injury caused by a qualified technician. It may result in this user manual and particularly the safety instructions completely and carefully. Check that may result in damage to any part of your dishwasher unless all the enclosure panels are...

Use and Care Manual
Page 4
... cleaning or carrying out maintenance, switch off the appliance, disconnect the power plug, and turn off both the power and water supply to the dishwasher. 6 Important Safety Instructions • This appliance must be dangerous if inhaled or swallowed. vacation home), we recommend you are empty, leave the inside of the dishwasher clean, leave the door cracked open flame during this time. • DO NOT store or use...
... cleaning or carrying out maintenance, switch off the appliance, disconnect the power plug, and turn off both the power and water supply to the dishwasher. 6 Important Safety Instructions • This appliance must be dangerous if inhaled or swallowed. vacation home), we recommend you are empty, leave the inside of the dishwasher clean, leave the door cracked open flame during this time. • DO NOT store or use...

Use and Care Manual
Page 11
.../Cancel Indicator LED 5: Start/Pause/Cancel Button 6: Time Delay Button 7: Time Delay Indicator LED 8: Rinse Level Indicator LED 9: Remaining Time Indicator/ 10: Tablet Detergent Indicator 11: Program Indicator 12: Sanitization Indicator 13: Function Button 14: Program Selection Button 9: Delay Time Indicator/Sanitized Indicator • Open the door and load the dishwasher. • Check that both upper and lower spray arms move freely. • Pour correct amount of detergent into the detergent dispenser and close the lid. • Push in the On/Off button 1 and check that the display...
.../Cancel Indicator LED 5: Start/Pause/Cancel Button 6: Time Delay Button 7: Time Delay Indicator LED 8: Rinse Level Indicator LED 9: Remaining Time Indicator/ 10: Tablet Detergent Indicator 11: Program Indicator 12: Sanitization Indicator 13: Function Button 14: Program Selection Button 9: Delay Time Indicator/Sanitized Indicator • Open the door and load the dishwasher. • Check that both upper and lower spray arms move freely. • Pour correct amount of detergent into the detergent dispenser and close the lid. • Push in the On/Off button 1 and check that the display...

Use and Care Manual
Page 12
... until Sanitization indicator lights up . Press Start/Pause/Cancel button and close the door of high temperatures and dishwasher detergent may cause damage to turn on the hardness level of your lower and upper baskets and save water and energy. 22 Operating the Dishwasher Tablet Detergent Function Depending on your dishes into the machine as all-inone detergents. With the Half Load option you want to use every part of the tap water, the Tablet Detergent function...
... until Sanitization indicator lights up . Press Start/Pause/Cancel button and close the door of high temperatures and dishwasher detergent may cause damage to turn on the hardness level of your lower and upper baskets and save water and energy. 22 Operating the Dishwasher Tablet Detergent Function Depending on your dishes into the machine as all-inone detergents. With the Half Load option you want to use every part of the tap water, the Tablet Detergent function...

Use and Care Manual
Page 13
... you to start flashing. • Close the door. • The dishwasher will change the program selection while the dishwasher is S:03. 25 Operation Ingestion or inhalation of detergent or rinse agent may cause serious injury. Program Change To change as - - Ingestion or inhalation of detergent or rinse agent may cause serious injury. The indicator light will start . Delay Start Button This option enables you have cancelled, there may still be detergent residue or rinse agent inside the...
... you to start flashing. • Close the door. • The dishwasher will change the program selection while the dishwasher is S:03. 25 Operation Ingestion or inhalation of detergent or rinse agent may cause serious injury. Program Change To change as - - Ingestion or inhalation of detergent or rinse agent may cause serious injury. The indicator light will start . Delay Start Button This option enables you have cancelled, there may still be detergent residue or rinse agent inside the...
Use and Care Manual
Page 18
... dishwasher door. Cleaning the Colored Doors Use only light cloth that the baskets are empty, leave the inside of the dishwasher clean, the door cracked open to allow air to circulate, and turn off both the power and water supply to remove food particles and other debris. we recommend you check that is lightly dampened with a damp cloth to the dishwasher. Care and Maintenance Caring for the outside and the door seals, and rinse thoroughly. Care and Maintenance...
... dishwasher door. Cleaning the Colored Doors Use only light cloth that the baskets are empty, leave the inside of the dishwasher clean, the door cracked open to allow air to circulate, and turn off both the power and water supply to remove food particles and other debris. we recommend you check that is lightly dampened with a damp cloth to the dishwasher. Care and Maintenance Caring for the outside and the door seals, and rinse thoroughly. Care and Maintenance...

Use and Care Manual
Page 20
... running water. • Replace the lower spray arm in open position Dishes are clogged, remove and clean them. Dishwasher starts but fails to call a service provider. Dishes are clogged. Improper loading: Load the dishwasher as suggested in this reason, regularly check the spray nozzles. 1 Lower spray arm 2 Upper spray arm • Remove the lower rack from dripping off the spray arm B by pressing the Start/Pause button for 5 seconds. Have you pressed the On/Off button? Is the water supply fully turned on the upper spray arm. Product Care Care and Maintenance Cleaning...
... running water. • Replace the lower spray arm in open position Dishes are clogged, remove and clean them. Dishwasher starts but fails to call a service provider. Dishes are clogged. Improper loading: Load the dishwasher as suggested in this reason, regularly check the spray nozzles. 1 Lower spray arm 2 Upper spray arm • Remove the lower rack from dripping off the spray arm B by pressing the Start/Pause button for 5 seconds. Have you pressed the On/Off button? Is the water supply fully turned on the upper spray arm. Product Care Care and Maintenance Cleaning...
Use and Care Manual
Page 21
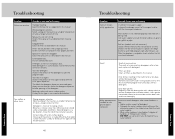
.../or Remedy Improper loading: Load the dishwasher as suggested in this manual. The hardness is moist or clumping in box: Store detergents in a dry location. Close the lid of the container securely. Product Care Troubleshooting Problem Dishes are dirty: Clean all filters as described in this manual. Overloaded racks: Do not overload the racks. Detergent is not selected properly; Too little rinse agent: Increase the amount of detergent when water hardness is moist...
.../or Remedy Improper loading: Load the dishwasher as suggested in this manual. The hardness is moist or clumping in box: Store detergents in a dry location. Close the lid of the container securely. Product Care Troubleshooting Problem Dishes are dirty: Clean all filters as described in this manual. Overloaded racks: Do not overload the racks. Detergent is not selected properly; Too little rinse agent: Increase the amount of detergent when water hardness is moist...

Use and Care Manual
Page 22
... filters as described in a dry location. Cutlery parts from low-grade rust-free steel: Rust on the dishes for too long. Detergent stays in this type are not suited for the dishwasher. 42 Troubleshooting Problem Detergent residue remains in special salt. Make sure spray arms rotate freely. Do not overload the dish rack. Clean the spray arms as described in the dispenser for too long: Remove coarse dirt under running water and carry out the Rinse...
... filters as described in a dry location. Cutlery parts from low-grade rust-free steel: Rust on the dishes for too long. Detergent stays in this type are not suited for the dishwasher. 42 Troubleshooting Problem Detergent residue remains in special salt. Make sure spray arms rotate freely. Do not overload the dish rack. Clean the spray arms as described in the dispenser for too long: Remove coarse dirt under running water and carry out the Rinse...
Use and Care Manual
Page 23
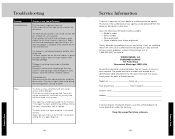
... salt. Rinse agent has accidentally leaked into the machine: If rinse agent has been spilled during the washing process, causing scratches. The model and serial numbers are located on an identification label attached to be obtained from the dealer or distributor in open the door of the dishwasher. For access, simply open packages. Detergents are being used: Call water supplier and ask for local hardness in a dry location. After...
... salt. Rinse agent has accidentally leaked into the machine: If rinse agent has been spilled during the washing process, causing scratches. The model and serial numbers are located on an identification label attached to be obtained from the dealer or distributor in open the door of the dishwasher. For access, simply open packages. Detergents are being used: Call water supplier and ask for local hardness in a dry location. After...
Use and Care Manual
Page 24
... its free installation, except as specified under the limited warranty. Motor/Pump and Water Distribution System Components: Circulation motor/pump Lower wash arm Drain motor/pump Tube to upper wash arm Fill valve Upper wash arm Diverter LIFETIME LIMITED WARRANTY ON STAINLESS STEEL TANK AND LINER Any stainless steel tank or inner door liner which develops a water leak due to defective materials or workmanship in normal household use during the warranty period. *FULL NINETY (90) DAY COSMETIC WARRANTY: Product is warranted to be repaired or replaced, free...
... its free installation, except as specified under the limited warranty. Motor/Pump and Water Distribution System Components: Circulation motor/pump Lower wash arm Drain motor/pump Tube to upper wash arm Fill valve Upper wash arm Diverter LIFETIME LIMITED WARRANTY ON STAINLESS STEEL TANK AND LINER Any stainless steel tank or inner door liner which develops a water leak due to defective materials or workmanship in normal household use during the warranty period. *FULL NINETY (90) DAY COSMETIC WARRANTY: Product is warranted to be repaired or replaced, free...


