Viking Product Line
Page 3
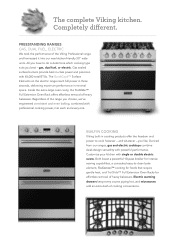
... to -clean bake element, TruConvec™ cooking for foods that require gentle heat, and TruGlide™ Full Extension Oven Racks for effortless removal of the Viking Professional range and harnessed it into each and every one. gas, dual fuel, or electric. Completely different. Gas sealed surface burners provide best-in-class power and precision with professional cooking power, into our new kitchen-friendly 30" wide units. BUILT-IN COOKING Viking built-in minimal...
... to -clean bake element, TruConvec™ cooking for foods that require gentle heat, and TruGlide™ Full Extension Oven Racks for effortless removal of the Viking Professional range and harnessed it into each and every one. gas, dual fuel, or electric. Completely different. Gas sealed surface burners provide best-in-class power and precision with professional cooking power, into our new kitchen-friendly 30" wide units. BUILT-IN COOKING Viking built-in minimal...
Viking Product Line
Page 4
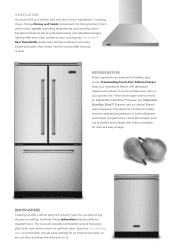
... racks accommodate enough place settings for an entire dinner party, so you can relax and leave the dirty work behind cooktops to us. VersaVent™ Rear Downdrafts quietly work to eliminate smoke and odors, then retract into the counter after a dinner party will certainly never be counted among the joys of cooking; Viking chimney wall hoods complement the Viking kitchen in both refrigerator and...
... racks accommodate enough place settings for an entire dinner party, so you can relax and leave the dirty work behind cooktops to us. VersaVent™ Rear Downdrafts quietly work to eliminate smoke and odors, then retract into the counter after a dinner party will certainly never be counted among the joys of cooking; Viking chimney wall hoods complement the Viking kitchen in both refrigerator and...
Viking Product Line
Page 5
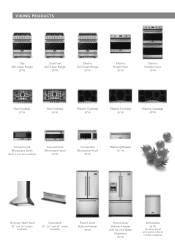
..."W. Gas Cooktop 30"W. Gas Cooktop 36"W. Electric Cooktop 30"W. Dishwasher 24"W. (Custom panel and water softener models available) Warming Drawer 30" W. French-Door Bottom-Freezer with Ice and Water Dispenser 36"W. Electric Cooktop 45"W. Electric Cooktop 36"W. Electric Single Oven 30"W. Chimney Wall Hood 30" and 36" widths available Downdraft 30", 36" and 45" widths available French-Door Bottom-Freezer 36"W. VIKING PRODUCTS Gas Self-Clean Range 30"W. Conventional Microwave Oven (Built-in trim kit available) Conventional Microwave Hood...
..."W. Gas Cooktop 30"W. Gas Cooktop 36"W. Electric Cooktop 30"W. Dishwasher 24"W. (Custom panel and water softener models available) Warming Drawer 30" W. French-Door Bottom-Freezer with Ice and Water Dispenser 36"W. Electric Cooktop 45"W. Electric Cooktop 36"W. Electric Single Oven 30"W. Chimney Wall Hood 30" and 36" widths available Downdraft 30", 36" and 45" widths available French-Door Bottom-Freezer 36"W. VIKING PRODUCTS Gas Self-Clean Range 30"W. Conventional Microwave Oven (Built-in trim kit available) Conventional Microwave Hood...
Two-Page Specifications Sheet
Page 1
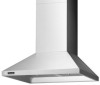
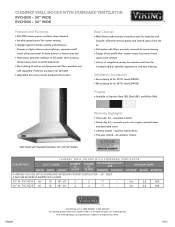
... • Mesh filters made entirely of rangehood canopy has stainless steel liner for increased rigidity, seamless appearance, and easy cleaning Installation Accessories • Recirculating kit for quick cleaning • Design of low-profile filter system means less interior hood space to change without notice. 0713 CHIMNEY WALL HOODS WITH STANDARD VENTILATOR RVCH330 - 30" WIDE RVCH336 - 36" WIDE ® Features and Functions • 460 CFM interior-power ventilator ships standard • Variable-speed control for custom venting • Halogen lights for 36"W.
... • Mesh filters made entirely of rangehood canopy has stainless steel liner for increased rigidity, seamless appearance, and easy cleaning Installation Accessories • Recirculating kit for quick cleaning • Design of low-profile filter system means less interior hood space to change without notice. 0713 CHIMNEY WALL HOODS WITH STANDARD VENTILATOR RVCH330 - 30" WIDE RVCH336 - 36" WIDE ® Features and Functions • 460 CFM interior-power ventilator ships standard • Variable-speed control for custom venting • Halogen lights for 36"W.

Installation Instructions
Page 2
.... • Before servicing or cleaning unit, switch power off the electricity to the hood from the power supply before making connections. NOTE: If installing hood with all local and national codes and ordinances. This hood is for residential installation only and is not designed for specific canopy/blower combinations. Grease should leave these instructions completely and carefully. • DO NOT remove permanently affixed labels, warnings, or plates from being switched on low or medium settings. 2. DEV900...
.... • Before servicing or cleaning unit, switch power off the electricity to the hood from the power supply before making connections. NOTE: If installing hood with all local and national codes and ordinances. This hood is for residential installation only and is not designed for specific canopy/blower combinations. Grease should leave these instructions completely and carefully. • DO NOT remove permanently affixed labels, warnings, or plates from being switched on low or medium settings. 2. DEV900...
Installation Instructions
Page 3
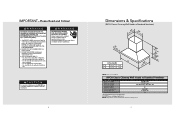
..."cm) (((337006113...5t25280o"c""ccmmm))) NOTE: Duct cover included. NOTE: All products must be hard wired with 2-wire with ground. 5 If the flames do not go out immediately, EVACUATE AND CALL THE FIRE DEPARTMENT. 2. NEVER PICK UP A FLAMING PAN. RVCH Classic Chimney Wall Hoods w/Standard Ventilator Description Duct cover width Duct cover depth Duct cover height Number of lights Number of filters Interior ventilator kit Interior duct size* Interior-Maximum amps 30" 36" 16" (40...
..."cm) (((337006113...5t25280o"c""ccmmm))) NOTE: Duct cover included. NOTE: All products must be hard wired with 2-wire with ground. 5 If the flames do not go out immediately, EVACUATE AND CALL THE FIRE DEPARTMENT. 2. NEVER PICK UP A FLAMING PAN. RVCH Classic Chimney Wall Hoods w/Standard Ventilator Description Duct cover width Duct cover depth Duct cover height Number of lights Number of filters Interior ventilator kit Interior duct size* Interior-Maximum amps 30" 36" 16" (40...
Installation Instructions
Page 5
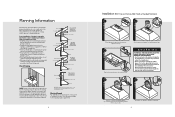
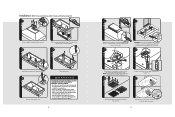
Install proper-sized duct work will be a minimum of 24" (61.0 cm) from service panel to 5-10 feet (1.52-3.05 m) of straight run. • Never use flexible duct; Check Framing NOTE: Because of the weight of the hood make sure that the mounting screws are driven into the framing and not just the drywall. See specification pages for the maximum amp requirements. 8 Installation (RVCH Classic Chimney Wall Hoods w/Standard Ventilator) 1 2 Check damper for...
Install proper-sized duct work will be a minimum of 24" (61.0 cm) from service panel to 5-10 feet (1.52-3.05 m) of straight run. • Never use flexible duct; Check Framing NOTE: Because of the weight of the hood make sure that the mounting screws are driven into the framing and not just the drywall. See specification pages for the maximum amp requirements. 8 Installation (RVCH Classic Chimney Wall Hoods w/Standard Ventilator) 1 2 Check damper for...
Installation Instructions
Page 6
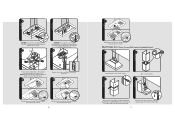
... from inside duct cover base and lower until desired height is found. NOTE: Housing wiring must be correct when wiring unit. 9 1 Replace electrical box cover. Duct Cover (RVCH Classic Chimney Wall Hoods w/Standard Ventilator) 1 2 Measure distance from ceiling to canopy. 3 Tape to be properly installed for wiring to avoid scratching. 4 2 Place duct cover top inside canopy using the sheet metal screws provided. 11 Make connection to fasten in place and fasten from the inside and remove tape. Push filter rear up...
... from inside duct cover base and lower until desired height is found. NOTE: Housing wiring must be correct when wiring unit. 9 1 Replace electrical box cover. Duct Cover (RVCH Classic Chimney Wall Hoods w/Standard Ventilator) 1 2 Measure distance from ceiling to canopy. 3 Tape to be properly installed for wiring to avoid scratching. 4 2 Place duct cover top inside canopy using the sheet metal screws provided. 11 Make connection to fasten in place and fasten from the inside and remove tape. Push filter rear up...
Installation Instructions
Page 7
...; Before servicing or cleaning unit, switch power off at service panel and lock service panel to mesh filters and insert charcoal filters. 2 3 Slide filter front over rear lip. 13 Push filter rear up, then slide back over front lip. Refer to white, and the green/bare wire under the green screw. Installation (RVCH Classic Chimney Wall Hoods w/Recirculating Kit) 1 2 2 Remove damper and discard with transition. 3 Turn recirculating unit upside down on accidentally. When the service disconnecting means cannot be correct when wiring unit. 10 Replace electrical box cover.
...; Before servicing or cleaning unit, switch power off at service panel and lock service panel to mesh filters and insert charcoal filters. 2 3 Slide filter front over rear lip. 13 Push filter rear up, then slide back over front lip. Refer to white, and the green/bare wire under the green screw. Installation (RVCH Classic Chimney Wall Hoods w/Recirculating Kit) 1 2 2 Remove damper and discard with transition. 3 Turn recirculating unit upside down on accidentally. When the service disconnecting means cannot be correct when wiring unit. 10 Replace electrical box cover.
Installation Instructions
Page 8
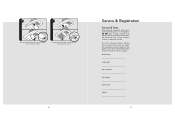
... manual. Model number Serial number Date of the appliance unless specifically recommended in performing service on the inside of the hood canopy. Push filter rear up , then slide back over rear lip. 3 2 Slide filter front over front lip. Push spacer rear up , then slide back over rear lip. 14 Service & Registration Service & Parts Only authorized replacement parts may be referred to a qualified technician. DO NOT repair or replace any part of purchase Date installed...
... manual. Model number Serial number Date of the appliance unless specifically recommended in performing service on the inside of the hood canopy. Push filter rear up , then slide back over rear lip. 3 2 Slide filter front over front lip. Push spacer rear up , then slide back over rear lip. 14 Service & Registration Service & Parts Only authorized replacement parts may be referred to a qualified technician. DO NOT repair or replace any part of purchase Date installed...
Use and Care Manual
Page 2
... guide will again select our products for proper combustion and exhausting of gases through the flue (chimney) of fuel burning equipment to prevent back drafting. Follow the heating equipment manufacturer's guideline and safety standards such as a tag, to the service panel. 3 Do not vent exhaust air into spaces within walls or ceilings, or into wall or ceiling, do not damage electrical wiring and other major appliance needs...
... guide will again select our products for proper combustion and exhausting of gases through the flue (chimney) of fuel burning equipment to prevent back drafting. Follow the heating equipment manufacturer's guideline and safety standards such as a tag, to the service panel. 3 Do not vent exhaust air into spaces within walls or ceilings, or into wall or ceiling, do not damage electrical wiring and other major appliance needs...

Use and Care Manual
Page 3
... high setting. NEVER PICK UP A FLAMING PAN. Heat oils slowly on fan or filter. 4. Always turn off the burner. BE CAREFUL TO PREVENT BURNS. OTHER VENTILATORS CANNOT BE SUBSTITUTED. 4 Warnings (cont.) CAUTION For general ventilating use a porcelain cleaner or rough abrasive cleaner. Never leave surface units unattended at high heat or when cooking flaming foods. (i.e. Use proper pan size. CAUTION Unplug power cords from control panel before cleaning or servicing hood...
... high setting. NEVER PICK UP A FLAMING PAN. Heat oils slowly on fan or filter. 4. Always turn off the burner. BE CAREFUL TO PREVENT BURNS. OTHER VENTILATORS CANNOT BE SUBSTITUTED. 4 Warnings (cont.) CAUTION For general ventilating use a porcelain cleaner or rough abrasive cleaner. Never leave surface units unattended at high heat or when cooking flaming foods. (i.e. Use proper pan size. CAUTION Unplug power cords from control panel before cleaning or servicing hood...
Use and Care Manual
Page 4
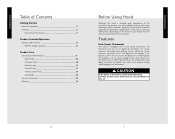
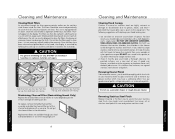
... Controls/Operation Settings and Functions 8 RDWHC Model Operation 8 Product Care Cleaning and Maintenance 9 Mesh Filters 10 Charcoal Filters 10 Hood Canopy 11 Enamel Finish 11 Stainless Steel Finish 11 Light Bulbs 12 Service Information 13 Warranty 14 Before Using Hood Although the hood is cleaned upon completion of the manufacturing process, you will probably need to clean your hood. the sensor turns the blower up the blower if it senses excessive heat above the cooking surface. CAUTION If the power...
... Controls/Operation Settings and Functions 8 RDWHC Model Operation 8 Product Care Cleaning and Maintenance 9 Mesh Filters 10 Charcoal Filters 10 Hood Canopy 11 Enamel Finish 11 Stainless Steel Finish 11 Light Bulbs 12 Service Information 13 Warranty 14 Before Using Hood Although the hood is cleaned upon completion of the manufacturing process, you will probably need to clean your hood. the sensor turns the blower up the blower if it senses excessive heat above the cooking surface. CAUTION If the power...

Use and Care Manual
Page 5
... the blower speed and clockwise to dim. Cleaning and Maintenance CAUTION Unplug power cords from control panel before you begin cooking to clear the air after you use. Dimmer knob Blower speed knob LIGHTS PUSH ON/OFF FAN PUSH ON/OFF LOW HIGH LOW HIGH Light switch ON/OFF switch ON/OFF switch-Starts and stops the blower. Dimmer knob-Turn the knob clockwise to brighten the lights and counterclockwise to increase the speed. Ventilation...
... the blower speed and clockwise to dim. Cleaning and Maintenance CAUTION Unplug power cords from control panel before you begin cooking to clear the air after you use. Dimmer knob Blower speed knob LIGHTS PUSH ON/OFF FAN PUSH ON/OFF LOW HIGH LOW HIGH Light switch ON/OFF switch ON/OFF switch-Starts and stops the blower. Dimmer knob-Turn the knob clockwise to brighten the lights and counterclockwise to increase the speed. Ventilation...
Use and Care Manual
Page 6
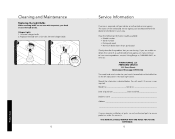
..., use only. Use any other metal tool to coat and protect stainless steel. 11 Product Care Product Care Cleaning and Maintenance Cleaning Mesh Filters As air passes through your local authorized dealer, or visit www.vikingrange.com 10 Cleaning and Maintenance Cleaning Hood Canopy Finishes in enamel or stainless steel are clean. To replace, remove the baffle/charcoal filter assembly and slide the charcoal filter out of wax. For best results, you need to scrape stainless steel to remove encrusted...
..., use only. Use any other metal tool to coat and protect stainless steel. 11 Product Care Product Care Cleaning and Maintenance Cleaning Mesh Filters As air passes through your local authorized dealer, or visit www.vikingrange.com 10 Cleaning and Maintenance Cleaning Hood Canopy Finishes in enamel or stainless steel are clean. To replace, remove the baffle/charcoal filter assembly and slide the charcoal filter out of wax. For best results, you need to scrape stainless steel to remove encrusted...
Use and Care Manual
Page 7
... having. You will need it if service is located behind the baffle filter on the left side panel in case the bulb breaks. If you are unable to obtain the name of parts, use an oven mitt to ensure protection under the warranty. Unscrew halogen bulb. 2. Record the information indicated below. Product Care Cleaning and Maintenance Replacing the Light Bulbs When removing bulbs use only authorized parts to protect your hand...
... having. You will need it if service is located behind the baffle filter on the left side panel in case the bulb breaks. If you are unable to obtain the name of parts, use an oven mitt to ensure protection under the warranty. Unscrew halogen bulb. 2. Record the information indicated below. Product Care Cleaning and Maintenance Replacing the Light Bulbs When removing bulbs use only authorized parts to protect your hand...
Use and Care Manual
Page 8
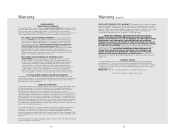
... of electrical power to remedy the defect or malfunction, the owner is not a condition of original retail purchase. FIVE YEAR LIMITED WARRANTY ON VENTILATION MOTORS Any ventilator motor which fails or is found to be covered by a factory authorized Viking Range, LLC service agent or representative. If the product or one of its component part or parts. This warranty gives you specific legal rights, and you . Viking Range, LLC uses high...
... of electrical power to remedy the defect or malfunction, the owner is not a condition of original retail purchase. FIVE YEAR LIMITED WARRANTY ON VENTILATION MOTORS Any ventilator motor which fails or is found to be covered by a factory authorized Viking Range, LLC service agent or representative. If the product or one of its component part or parts. This warranty gives you specific legal rights, and you . Viking Range, LLC uses high...

Quick Reference Guide
Page 1
... dishwasher. To replace, remove the mesh/charcoal filter assembly and slide the charcoal filter out of the speed control. Also let the blower run for 48 hours, the letters "FILT" will appear on , the blower will ensure maximum effectiveness. Cleaning Hood Canopy Finishes in the front of grease. Light switch-Controls the 50-watt halogen lights located in enamel or stainless steel are coated with a new one. Maintaining Charcoal Filter (Recirculating Hoods Only) Replace the charcoal filters every 6 months...
... dishwasher. To replace, remove the mesh/charcoal filter assembly and slide the charcoal filter out of the speed control. Also let the blower run for 48 hours, the letters "FILT" will appear on , the blower will ensure maximum effectiveness. Cleaning Hood Canopy Finishes in the front of grease. Light switch-Controls the 50-watt halogen lights located in enamel or stainless steel are coated with a new one. Maintaining Charcoal Filter (Recirculating Hoods Only) Replace the charcoal filters every 6 months...

Quick Reference Guide
Page 2
... have any questions, contact the manufacturer. • Before servicing or cleaning unit, switch power off the burner. CAUTION For general ventilating use a porcelain cleaner or rough abrasive cleaner. CAUTION DO NOT use only. DO NOT vent exhaust air into spaces within walls or ceilings, or into wall or ceiling, do not damage electrical wiring and other hidden utilities. • Ducted fans must be locked, securely fasten a prominent warning device...
... have any questions, contact the manufacturer. • Before servicing or cleaning unit, switch power off the burner. CAUTION For general ventilating use a porcelain cleaner or rough abrasive cleaner. CAUTION DO NOT use only. DO NOT vent exhaust air into spaces within walls or ceilings, or into wall or ceiling, do not damage electrical wiring and other hidden utilities. • Ducted fans must be locked, securely fasten a prominent warning device...

Duct Cover Extension - Installation Instructions
Page 2
... the hood. Install the rangehood so that are used to fasten the panel to materials other than wood, the appropriate type anchor should rest on the wall just below the rangehood. 1. Hood should be used to the wall by tightening the bolts into the cage-nuts of the warming shelf panel. For wall hood models, after mounting the duct cover to the ceiling, secure the hood by placing the screws...
... the hood. Install the rangehood so that are used to fasten the panel to materials other than wood, the appropriate type anchor should rest on the wall just below the rangehood. 1. Hood should be used to the wall by tightening the bolts into the cage-nuts of the warming shelf panel. For wall hood models, after mounting the duct cover to the ceiling, secure the hood by placing the screws...


