Two-Page Specifications Sheet
Page 1
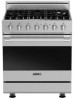
... the knob and re-light if extinguished, even on lowest setting n Large-capacity oven has six porcelain-coated rack supports and comes standard with three TruGlideTM full extension oven racks (see specifications chart for oven interior dimensions) n High performance cooking modes include Natural Airflow Bake, Convection Bake, Broil, Convection Broil, Convection Dehydrate, and Convection Defrost n All convection functions utilize the ProFlowTM Convection Air Baffle, which is specifically designed to ensure balanced air flow for easy movement of pots and pans Installation...
... the knob and re-light if extinguished, even on lowest setting n Large-capacity oven has six porcelain-coated rack supports and comes standard with three TruGlideTM full extension oven racks (see specifications chart for oven interior dimensions) n High performance cooking modes include Natural Airflow Bake, Convection Bake, Broil, Convection Broil, Convection Dehydrate, and Convection Defrost n All convection functions utilize the ProFlowTM Convection Air Baffle, which is specifically designed to ensure balanced air flow for easy movement of pots and pans Installation...
Two-Page Specifications Sheet
Page 2
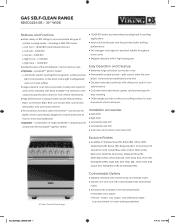
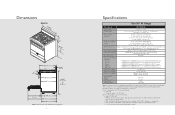
... Pressure Electrical Requirements Maximum Amp Usage Ships standard for measuring oven capacity subtracts the doorplug and convection baffle dimension from Rear GAS SELF-CLEAN 30" WIDE RANGE RDSCG230-5B 29 7/8" (75.9 cm) To top of side trim - 35 7/8" (91.1 cm) minimum; 37" (94.0 cm) maximum Legs adjust - 1 1/8" (2.9 cm) To front of side panel - 25" (63.5 cm) To front of door - 25 3/4" (65.4 cm) To front of control panel...
... Pressure Electrical Requirements Maximum Amp Usage Ships standard for measuring oven capacity subtracts the doorplug and convection baffle dimension from Rear GAS SELF-CLEAN 30" WIDE RANGE RDSCG230-5B 29 7/8" (75.9 cm) To top of side trim - 35 7/8" (91.1 cm) minimum; 37" (94.0 cm) maximum Legs adjust - 1 1/8" (2.9 cm) To front of side panel - 25" (63.5 cm) To front of door - 25 3/4" (65.4 cm) To front of control panel...
Use and Care Manual
Page 2
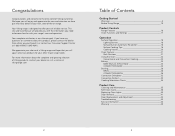
...Range 15 Product Controls Range Features 16 Oven Functions and Settings 17 Operation Surface Operation 18 Lighting Burners 18 Surface Burners-Automatic Re-ignition 18 Surface Cooking Tips 18 Cooking Vessels 20 Oven Features 21 Rack Positions 21 Using the Oven 22 Conventional and Convection Cooking 22 Baking 23 BAKE (Natural Airflow Bake 23 CONVECTION BAKE 23 Broiling 28 BROIL 28 CONVECTION BROIL 28 Convection Dehydrate 32 Convection Defrost 33 Cooking Substitutes Charts 34 Product Care Cleaning and Maintenance 35 Self-Clean Cycle 38 Replacing Oven Lights 40 Door Removal...
...Range 15 Product Controls Range Features 16 Oven Functions and Settings 17 Operation Surface Operation 18 Lighting Burners 18 Surface Burners-Automatic Re-ignition 18 Surface Cooking Tips 18 Cooking Vessels 20 Oven Features 21 Rack Positions 21 Using the Oven 22 Conventional and Convection Cooking 22 Baking 23 BAKE (Natural Airflow Bake 23 CONVECTION BAKE 23 Broiling 28 BROIL 28 CONVECTION BROIL 28 Convection Dehydrate 32 Convection Defrost 33 Cooking Substitutes Charts 34 Product Care Cleaning and Maintenance 35 Self-Clean Cycle 38 Replacing Oven Lights 40 Door Removal...
Use and Care Manual
Page 3
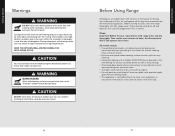
... rear top left corner of your gas supplier, call your gas supplier from a neighbor's phone. To ensure proper and safe operation: Appliance must be referred to verify proper installation engaged in this manual exactly to cover all instructions before using this appliance to prevent the potential risk of fire, electric shock, personal injury or damage to adjust, repair, service, or replace any appliance. 5 Getting Started...
... rear top left corner of your gas supplier, call your gas supplier from a neighbor's phone. To ensure proper and safe operation: Appliance must be referred to verify proper installation engaged in this manual exactly to cover all instructions before using this appliance to prevent the potential risk of fire, electric shock, personal injury or damage to adjust, repair, service, or replace any appliance. 5 Getting Started...
Use and Care Manual
Page 4
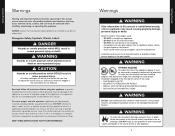
... fires. Temperatures may increase pressure in it can trail across hot surface burners and ignite or get caught on safety considerations. • NEVER leave a surface cooking operation unattended especially when using a high heat setting or when deep fat frying. The hot air from the vent may ignite flammable items and may be hot. Extinguish flame then turn on grease fires. DO NOT use water on hood to burner flame. • ALWAYS adjust surface burner flame so that...
... fires. Temperatures may increase pressure in it can trail across hot surface burners and ignite or get caught on safety considerations. • NEVER leave a surface cooking operation unattended especially when using a high heat setting or when deep fat frying. The hot air from the vent may ignite flammable items and may be hot. Extinguish flame then turn on grease fires. DO NOT use water on hood to burner flame. • ALWAYS adjust surface burner flame so that...
Use and Care Manual
Page 5
... present). Slide oven rack out to a hot surface. • DO NOT clean door gasket. Excessive burner setting may be contaminated. • If you are not specifically recommended in this manual can produce noxious fumes if applied to add or remove food, using conventional cookware. Cleaning Safety • Turn off at the end of electric shock or fire. Follow manufacturer's instructions when using unstable, warped, easily tipped or loose-handled pans. ALWAYS...
... present). Slide oven rack out to a hot surface. • DO NOT clean door gasket. Excessive burner setting may be contaminated. • If you are not specifically recommended in this manual can produce noxious fumes if applied to add or remove food, using conventional cookware. Cleaning Safety • Turn off at the end of electric shock or fire. Follow manufacturer's instructions when using unstable, warped, easily tipped or loose-handled pans. ALWAYS...

Use and Care Manual
Page 6
... potentially hot surfaces include rangetop, areas facing the rangetop, oven vent, surfaces near the vent opening the windows and/or door in the room where the appliance is located during a clean cycle. Should the bulb break, disconnect power to the appliance before removing bulb to prevent excessive smoke, flareups or flaming. • This range features a cooling fan which operates automatically during the self-clean cycle. Getting Started Warnings Self-Clean Oven • Clean only parts listed in this...
... potentially hot surfaces include rangetop, areas facing the rangetop, oven vent, surfaces near the vent opening the windows and/or door in the room where the appliance is located during a clean cycle. Should the bulb break, disconnect power to the appliance before removing bulb to prevent excessive smoke, flareups or flaming. • This range features a cooling fan which operates automatically during the self-clean cycle. Getting Started Warnings Self-Clean Oven • Clean only parts listed in this...
Use and Care Manual
Page 8
... self-cleaning feature is normal. All models include: • Five performance modes-including convection baking and convection broiling-providing air circulation for shorter cooking times with even results. • Exclusive one-piece tooled cooking surface contains spills for easy cleaning. • Convection baking with a hidden 30,000 BTU burner provides a fast, even baking for your casserole dishes as well as easy cleanup. • The closed door, broiler allows intense heat to sear delicate cuts...
... self-cleaning feature is normal. All models include: • Five performance modes-including convection baking and convection broiling-providing air circulation for shorter cooking times with even results. • Exclusive one-piece tooled cooking surface contains spills for easy cleaning. • Convection baking with a hidden 30,000 BTU burner provides a fast, even baking for your casserole dishes as well as easy cleanup. • The closed door, broiler allows intense heat to sear delicate cuts...

Use and Care Manual
Page 9
... where rare or medium doneness is desired. CONVECTION BAKE Use this setting for baking, roasting, and casseroles. Backguard 12. CONVECTION BROIL Use this setting for broiling dark meats at the same time with minimal taste transfer. Product Controls Range Features 12 3 4 56 78 9 10 16 14 11 12 13 17 15 18 19 1. Interior oven light switch 2. Oven function selector knob 6. Oven temperature control knob 8. Right front burner control knob 11. One 17,000 BTU burner 16. Identification plate 18.
... where rare or medium doneness is desired. CONVECTION BAKE Use this setting for baking, roasting, and casseroles. Backguard 12. CONVECTION BROIL Use this setting for broiling dark meats at the same time with minimal taste transfer. Product Controls Range Features 12 3 4 56 78 9 10 16 14 11 12 13 17 15 18 19 1. Interior oven light switch 2. Oven function selector knob 6. Oven temperature control knob 8. Right front burner control knob 11. One 17,000 BTU burner 16. Identification plate 18.

Use and Care Manual
Page 10
..., enough gas will automatically reignite if the gas is potentially dangerous, heats the utensil handle and kitchen instead of the cooking vessel diameter. Below is a guide for which burners work best for certain cooking applications: Burner Front left 8,000 BTU burner Center 9,000 BTU burner Best for any position to the burners, the electric igniters start sparking. Surface Burners-Automatic Re-ignition To light the surface burners, push and turn the burner control to any reason, the burners will...
..., enough gas will automatically reignite if the gas is potentially dangerous, heats the utensil handle and kitchen instead of the cooking vessel diameter. Below is a guide for which burners work best for certain cooking applications: Burner Front left 8,000 BTU burner Center 9,000 BTU burner Best for any position to the burners, the electric igniters start sparking. Surface Burners-Automatic Re-ignition To light the surface burners, push and turn the burner control to any reason, the burners will...

Use and Care Manual
Page 14
... cooking times accordingly. Use recom. Reduce no. Batter too thick 2. Oven too hot 3. Oven door opened too often 2. Incorrect rack position 4. Use shiny pans 3. Adjust to check food 2. Oven not preheated 2. Oven not hot enough 1. of pans 3. pan size 1. Use door window to conventional or convection setting as a guide only. 26 Baking Solving Baking Problems Baking problems can occur for you find this oven. Use recom. Oven too hot 2. Allow oven to cool between batches 1. Use proper pan 1. Use recom. Reduce temperature 2. Oven not preheated...
... cooking times accordingly. Use recom. Reduce no. Batter too thick 2. Oven too hot 3. Oven door opened too often 2. Incorrect rack position 4. Use shiny pans 3. Adjust to check food 2. Oven not preheated 2. Oven not hot enough 1. of pans 3. pan size 1. Use door window to conventional or convection setting as a guide only. 26 Baking Solving Baking Problems Baking problems can occur for you find this oven. Use recom. Oven too hot 2. Allow oven to cool between batches 1. Use proper pan 1. Use recom. Reduce temperature 2. Oven not preheated...

Use and Care Manual
Page 15
... burner operates at the top of meat 1-2 inches thick and is most successful for cuts of the oven cavity. Broiling Broiling Instructions Broiling is required. Set the oven function selector to "Broil" or "Convection Broil" and the temperature knob to "Broil". Close the door. It is exactly the same as steaks, chops, and patties. Convection broiling of meats produces better results, especially for broiling thick cuts of broiling food slightly quicker than conventional. To Use Broil or Convection Broil...
... burner operates at the top of meat 1-2 inches thick and is most successful for cuts of the oven cavity. Broiling Broiling Instructions Broiling is required. Set the oven function selector to "Broil" or "Convection Broil" and the temperature knob to "Broil". Close the door. It is exactly the same as steaks, chops, and patties. Convection broiling of meats produces better results, especially for broiling thick cuts of broiling food slightly quicker than conventional. To Use Broil or Convection Broil...
Use and Care Manual
Page 19
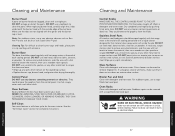
.... THEY CAN PERMANENTLY DAMAGE YOUR OVEN. Self-Clean Your oven features a self-clean cycle for complete instructions. 36 Cleaning and Maintenance Control Knobs MAKE SURE ALL THE CONTROL KNOBS POINT TO THE OFF POSITION BEFORE REMOVING. Wash in a zip seal bag with detergent and hot water. Stainless Steel Parts All stainless steel body parts should be used in burns or electrical shock. 37 Product Care Glass cleaner can be wiped regularly...
.... THEY CAN PERMANENTLY DAMAGE YOUR OVEN. Self-Clean Your oven features a self-clean cycle for complete instructions. 36 Cleaning and Maintenance Control Knobs MAKE SURE ALL THE CONTROL KNOBS POINT TO THE OFF POSITION BEFORE REMOVING. Wash in a zip seal bag with detergent and hot water. Stainless Steel Parts All stainless steel body parts should be used in burns or electrical shock. 37 Product Care Glass cleaner can be wiped regularly...

Use and Care Manual
Page 22
... shut tight enough for automatic door latch to power. Circuit is blown. Igniters are clogged. Igniters will not work . Burner ignites but no flame ignition. oven will not function. Door is noticed first few times. Igniters sparking continuously after using a 5/32" hex head allen wrench. Fuse is tripped. Oven is burned out. If the door needs to electrical power: Have electrician check power circuit breaker, wiring, and fuses. After adjustment, tighten hinge trim screws. 42 Troubleshooting Problem Range will not heat...
... shut tight enough for automatic door latch to power. Circuit is blown. Igniters are clogged. Igniters will not work . Burner ignites but no flame ignition. oven will not function. Door is noticed first few times. Igniters sparking continuously after using a 5/32" hex head allen wrench. Fuse is tripped. Oven is burned out. If the door needs to electrical power: Have electrician check power circuit breaker, wiring, and fuses. After adjustment, tighten hinge trim screws. 42 Troubleshooting Problem Range will not heat...

Use and Care Manual
Page 23
... this manual for future reference. 44 Warranty FREESTANDING 30" GAS SELF-CLEAN RANGES WARRANTY THREE YEAR FULL WARRANTY Freestanding gas ranges and all of their component parts, except as scratches on how long an implied warranty lasts, so the above limitation or exclusions may also have service problems, contact Viking Range Corporation at 1-888-VIKING1 (845-4641), or write to produce all commercial locations such as restaurants, food service locations and...
... this manual for future reference. 44 Warranty FREESTANDING 30" GAS SELF-CLEAN RANGES WARRANTY THREE YEAR FULL WARRANTY Freestanding gas ranges and all of their component parts, except as scratches on how long an implied warranty lasts, so the above limitation or exclusions may also have service problems, contact Viking Range Corporation at 1-888-VIKING1 (845-4641), or write to produce all commercial locations such as restaurants, food service locations and...

Installation Instructions
Page 2
... Table of Contents Warnings & Important Safety Instructions 3 Dimensions 6 Specifications 7 Clearance Dimensions (Proximity to the appliance. Electrical installation must be in the gas supply line to Cabinets 8 Clearance Dimensions (Wood/Composite Overlay 9 Electrical & Gas Requirements 10 General Information 12 Installation 13 Door Removal 13 Backguard Installation 14 Leg Installation 14 Leveling/Adjustments/Alignment 15 Anti-tip Device Installation 16 Connecting Gas & Electrical 17 Final Installation 18 Door Replacement and Adjustment 19 Final Preparation 20 Performance...
... Table of Contents Warnings & Important Safety Instructions 3 Dimensions 6 Specifications 7 Clearance Dimensions (Proximity to the appliance. Electrical installation must be in the gas supply line to Cabinets 8 Clearance Dimensions (Wood/Composite Overlay 9 Electrical & Gas Requirements 10 General Information 12 Installation 13 Door Removal 13 Backguard Installation 14 Leg Installation 14 Leveling/Adjustments/Alignment 15 Anti-tip Device Installation 16 Connecting Gas & Electrical 17 Final Installation 18 Door Replacement and Adjustment 19 Final Preparation 20 Performance...
Installation Instructions
Page 4
.... 3.3 cu. Range Description Overall width RDSCG230-5B 29-7/8" (75.9 cm) Overall height To top of backguard - accepts standard residential 1/2" (1.3 cm) ID gas service line Gas Manifold Pressure Natural 5.0" W.C.P./ Liquid Propane L/P 10.0" W.C.P. Minimum clearances from non-combustible materials are not part of 42" (106.7 cm) above product must be minimum 18" (45.7 cm) above cooking surface • Wall cabinets directly above cooking surface • Rear - 0" with 6" backguard or high...
.... 3.3 cu. Range Description Overall width RDSCG230-5B 29-7/8" (75.9 cm) Overall height To top of backguard - accepts standard residential 1/2" (1.3 cm) ID gas service line Gas Manifold Pressure Natural 5.0" W.C.P./ Liquid Propane L/P 10.0" W.C.P. Minimum clearances from non-combustible materials are not part of 42" (106.7 cm) above product must be minimum 18" (45.7 cm) above cooking surface • Wall cabinets directly above cooking surface • Rear - 0" with 6" backguard or high...

Installation Instructions
Page 6
... regulator. This range uses a 1/2" (1.3 cm) ID NPT (Sch40) inlet. If the line pressure is to operate, installation by your national and local codes regarding this built-in order to LP gas. verify electrical power is turned off at the breaker box and gas supply is installed and ready to be installed in the gas service line before work begins. Gas Connection The gas supply (service) line must be installed with gas fuel. Before beginning installation verify that the model is designed specifically for use...
... regulator. This range uses a 1/2" (1.3 cm) ID NPT (Sch40) inlet. If the line pressure is to operate, installation by your national and local codes regarding this built-in order to LP gas. verify electrical power is turned off at the breaker box and gas supply is installed and ready to be installed in the gas service line before work begins. Gas Connection The gas supply (service) line must be installed with gas fuel. Before beginning installation verify that the model is designed specifically for use...

Installation Instructions
Page 9
...(A) ) Locate anti-tip bracket on the back of range. Before placing appliance in operation, always check for proper installation information. 1 Connect gas and electrical. Connecting Gas & Electric DANGER GAS LEAK HAZARD To avoid risk of property damage or personal injury; Leveling/Adjustments/Alignments (cont.) 7 Set the high corner of range so that the top of side trim is to be located. 16 Mark and drill holes where bracket will be located. Level range to electrical...
...(A) ) Locate anti-tip bracket on the back of range. Before placing appliance in operation, always check for proper installation information. 1 Connect gas and electrical. Connecting Gas & Electric DANGER GAS LEAK HAZARD To avoid risk of property damage or personal injury; Leveling/Adjustments/Alignments (cont.) 7 Set the high corner of range so that the top of side trim is to be located. 16 Mark and drill holes where bracket will be located. Level range to electrical...

Installation Instructions
Page 11
... with hot, wet cloths to : VIKING RANGE CORPORATION PREFERRED SERVICE 1803 Hwy 82W Greenwood, Mississippi 38930 USA Record the following checks: h Check top burner ignition. h Check convection fan function-convection fan comes on . h Check self-clean function-door will lock in approximately 30 seconds, the broil and bake burner will need it is ever required. NOTICE When conducting performance test, DO NOT run self-clean cycle for proper flame height on full power. You will turn...
... with hot, wet cloths to : VIKING RANGE CORPORATION PREFERRED SERVICE 1803 Hwy 82W Greenwood, Mississippi 38930 USA Record the following checks: h Check top burner ignition. h Check convection fan function-convection fan comes on . h Check self-clean function-door will lock in approximately 30 seconds, the broil and bake burner will need it is ever required. NOTICE When conducting performance test, DO NOT run self-clean cycle for proper flame height on full power. You will turn...


