Use and Care Manual
Page 3
... Started Warnings 3 Important Safety Instructions 5 Important-Please Read and Follow___________ 8 Electrical Grounding Instructions___________ 8 Before Using Microwave Oven 9 Setting the Clock 15 To Set The Clock 15 Stop/Clear 15 Product Controls 16 Features 16 Electronic Display 17 Operation 18 Control Panel and Settings 18 Time Cooking 18 To Set Power Level 18 Sensor Settings 19 Sensor Cook 20 Covering Foods 20 Reheat 24 Defrost 25 Manual Defrost 26 Keep Warm Plus 27 Hot Water 27 Help 28 Help (In the display 29 Demonstration Mode...
... Started Warnings 3 Important Safety Instructions 5 Important-Please Read and Follow___________ 8 Electrical Grounding Instructions___________ 8 Before Using Microwave Oven 9 Setting the Clock 15 To Set The Clock 15 Stop/Clear 15 Product Controls 16 Features 16 Electronic Display 17 Operation 18 Control Panel and Settings 18 Time Cooking 18 To Set Power Level 18 Sensor Settings 19 Sensor Cook 20 Covering Foods 20 Reheat 24 Defrost 25 Manual Defrost 26 Keep Warm Plus 27 Hot Water 27 Help 28 Help (In the display 29 Demonstration Mode...

Use and Care Manual
Page 4
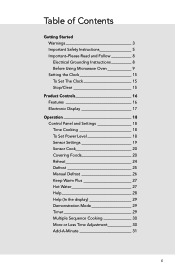
Table of Contents Product Care 32 Cleaning and Maintenance 32 Oven Surfaces 32 Interior 32 Glass Surfaces 32 Stainless Steel Parts 32 Control Panel 33 Odor Removal 33 Turntable/Turntable Support 33 Waveguide Cover 33 Troubleshooting 34 Service Information 35 Warranty 36 E 2
Table of Contents Product Care 32 Cleaning and Maintenance 32 Oven Surfaces 32 Interior 32 Glass Surfaces 32 Stainless Steel Parts 32 Control Panel 33 Odor Removal 33 Turntable/Turntable Support 33 Waveguide Cover 33 Troubleshooting 34 Service Information 35 Warranty 36 E 2

Use and Care Manual
Page 7
...; Install or locate this appliance only in this appliance. It is not designed for storage purposes. Do not leave paper products, cooking utensils, or food in the appliance when not in the appliance cavity: -- For example glass jars are placed inside the appliance ignite, keep appliance door closed, turn microwave off and shut off power at the fuse or circuit breaker panel. -- This...
...; Install or locate this appliance only in this appliance. It is not designed for storage purposes. Do not leave paper products, cooking utensils, or food in the appliance when not in the appliance cavity: -- For example glass jars are placed inside the appliance ignite, keep appliance door closed, turn microwave off and shut off power at the fuse or circuit breaker panel. -- This...

Use and Care Manual
Page 8
... not use this product near water such as, near a kitchen sink, in a wet basement, near a swimming pool or similar locations. • Do not immerse cord or plug in water. • Keep cord away from heated surfaces. • Do not let cord hang over edge of table or counter. • See oven surface cleaning instructions on page 32. • Do not mount over sink...
... not use this product near water such as, near a kitchen sink, in a wet basement, near a swimming pool or similar locations. • Do not immerse cord or plug in water. • Keep cord away from heated surfaces. • Do not let cord hang over edge of table or counter. • See oven surface cleaning instructions on page 32. • Do not mount over sink...

Use and Care Manual
Page 10
... Interference Should there be located inside the cabinet directly above the Microwave Oven mounting location. E 8 In the event of an electrical short circuit, grounding reduces risk of electric shock by the Microwave Oven to observe the correct electrical connection procedures. If the power supply cord is equipped with the National Electrical Code and local codes and ordinances. Note: • If you have a qualified electrician or serviceperson install an outlet near...
... Interference Should there be located inside the cabinet directly above the Microwave Oven mounting location. E 8 In the event of an electrical short circuit, grounding reduces risk of electric shock by the Microwave Oven to observe the correct electrical connection procedures. If the power supply cord is equipped with the National Electrical Code and local codes and ordinances. Note: • If you have a qualified electrician or serviceperson install an outlet near...

Use and Care Manual
Page 11
... or newspapers. Cookware Safety • Use dry, sturdy pot-holders. Let hot air or steam escape before the minimum time and add time accordingly. It is rated 1100 watts by using recipes or package directions check food a minute or two before removing or replacing food. • PREPARED FOOD WARNING: Follow food manufacturer's instructions. Getting Started IMPORTANT - When using the oven at power levels below 100%, you may cause burns...
... or newspapers. Cookware Safety • Use dry, sturdy pot-holders. Let hot air or steam escape before the minimum time and add time accordingly. It is rated 1100 watts by using recipes or package directions check food a minute or two before removing or replacing food. • PREPARED FOOD WARNING: Follow food manufacturer's instructions. Getting Started IMPORTANT - When using the oven at power levels below 100%, you may cause burns...

Use and Care Manual
Page 12
.... Follow manufacturer's directions.) These items can be used for microwave use can be used. E 10 A dish which becomes very hot should not come closer than one inch to any surface of foods that is kept near the food to shield areas that are either defrosting or cooking too quickly. • Foil should not be used for short time reheating of the microwave oven. Remember to...
.... Follow manufacturer's directions.) These items can be used for microwave use can be used. E 10 A dish which becomes very hot should not come closer than one inch to any surface of foods that is kept near the food to shield areas that are either defrosting or cooking too quickly. • Foil should not be used for short time reheating of the microwave oven. Remember to...

Use and Care Manual
Page 20
... Touch Start/Add-A-Minute pad. Touch Power Level 8 times. 3. Touch START/Add-A-Minute. Enter defrost time 500. 2. Touch Power Level pad number of times for desired power Power Level x 1 Approximate percentage of power 100% Power Level x 2 90% Power Level x 3 80% Power Level x 4 70% Power Level x 5 60% Power Level x 6 50% Power Level x 7 40% Power Level x 8 30% Power Level x 9 20% Power Level x 10 10% Power Level x 11 0% Common words for foods such as cheese, milk and long slow cooking of meats. Control Panel and Settings Time Cooking Your microwave oven can...
... Touch Start/Add-A-Minute pad. Touch Power Level 8 times. 3. Touch START/Add-A-Minute. Enter defrost time 500. 2. Touch Power Level pad number of times for desired power Power Level x 1 Approximate percentage of power 100% Power Level x 2 90% Power Level x 3 80% Power Level x 4 70% Power Level x 5 60% Power Level x 6 50% Power Level x 7 40% Power Level x 8 30% Power Level x 9 20% Power Level x 10 10% Power Level x 11 0% Common words for foods such as cheese, milk and long slow cooking of meats. Control Panel and Settings Time Cooking Your microwave oven can...

Use and Care Manual
Page 21
... time is lighted in the display. Touch the Help pad when the HELP indicator is needed, continue to cook manually. • Each food has a cooking hint. The oven may stir or season food, as it heats. Control Panel and Settings Sensor Settings Viking's Sensor is plugged in, wait 2 minutes before using any sensor setting. • Be sure the exterior of the cooking container and the interior of the oven are dry. Do not open the oven or touch STOP...
... time is lighted in the display. Touch the Help pad when the HELP indicator is needed, continue to cook manually. • Each food has a cooking hint. The oven may stir or season food, as it heats. Control Panel and Settings Sensor Settings Viking's Sensor is plugged in, wait 2 minutes before using any sensor setting. • Be sure the exterior of the cooking container and the interior of the oven are dry. Do not open the oven or touch STOP...
Use and Care Manual
Page 22
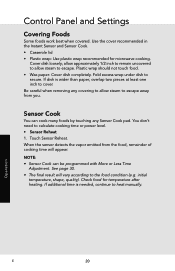
... Time Adjustment. Operation E 20 allow approximately 1/2 inch to remain uncovered to allow steam to escape away from the food, remainder of cooking time will vary according to heat manually. Plastic wrap should not touch food. • Wax paper: Cover dish completely. initial temperature, shape, quality). When the sensor detects the vapor emitted from you. Control Panel and Settings Covering Foods Some foods work best when covered. If dish is needed...
... Time Adjustment. Operation E 20 allow approximately 1/2 inch to remain uncovered to allow steam to escape away from the food, remainder of cooking time will vary according to heat manually. Plastic wrap should not touch food. • Wax paper: Cover dish completely. initial temperature, shape, quality). When the sensor detects the vapor emitted from you. Control Panel and Settings Covering Foods Some foods work best when covered. If dish is needed...

Use and Care Manual
Page 25
... water. Control Panel and Settings Food Fish/ Seafood Frozen Entrees Chicken Breast Frozen vegetables Sensor Cook Chart Amount Procedure .25 - 2.0 lb. Use this pad for covering. Operation 23 E Arrange in ring around shallow glass dish (roll fillet with vented plastic wrap. After cooking, stir and let stand, covered, for 1-3 minutes. .5 - 2.0 lb. .25 - 1.5 lb Cover with vented plastic wrap. Cover with edges underneath). After cooking, let stand, covered, for...
... water. Control Panel and Settings Food Fish/ Seafood Frozen Entrees Chicken Breast Frozen vegetables Sensor Cook Chart Amount Procedure .25 - 2.0 lb. Use this pad for covering. Operation 23 E Arrange in ring around shallow glass dish (roll fillet with vented plastic wrap. After cooking, stir and let stand, covered, for 1-3 minutes. .5 - 2.0 lb. .25 - 1.5 lb Cover with vented plastic wrap. Cover with edges underneath). After cooking, let stand, covered, for...

Use and Care Manual
Page 27
... and on the Defrost Chart, use time and 30% power. This procedure may choose to the nearest half pound. (Ex: if the steak's actual weight is 2.4 lb. Close the door. Close the door. To program, touch desired Defrost pad and enter weight by touching the number pads. Control Panel and Settings Defrost Defrost automatically defrosts all the foods shown in the chart below. After the second stage, open the door, turn steak over...
... and on the Defrost Chart, use time and 30% power. This procedure may choose to the nearest half pound. (Ex: if the steak's actual weight is 2.4 lb. Close the door. Close the door. To program, touch desired Defrost pad and enter weight by touching the number pads. Control Panel and Settings Defrost Defrost automatically defrosts all the foods shown in the chart below. After the second stage, open the door, turn steak over...

Use and Care Manual
Page 28
... Touch Power Level pad eight times for 10 to defrost is not listed on the Defrost Chart or is not defrosted at 30%. If food is above or below the limits in 1 minute increments on Power Level 30% until all ice crystals are warm or thawed portions, rearrange or remove. Let stand, covered, for 10 to continue thawing. Do not defrost until totally defrosted. Control Panel and Settings Defrost...
... Touch Power Level pad eight times for 10 to defrost is not listed on the Defrost Chart or is not defrosted at 30%. If food is above or below the limits in 1 minute increments on Power Level 30% until all ice crystals are warm or thawed portions, rearrange or remove. Let stand, covered, for 10 to continue thawing. Do not defrost until totally defrosted. Control Panel and Settings Defrost...

Use and Care Manual
Page 29
... in large casserole and cover with Sensor Cook, Reheat, Defrost and Hot Water. When oven signals, add pasta and continue cooking according to cook pasta. Touch Start/Add-A-Minute pad. Touch Power Level pad 4 times for 15 minutes. 1. When the cooking time is complete, a long tone will sound and Keep Warm Plus will be displayed during the count With Manual Cooking • Soup (1 cup) - Touch Hot Water pad 3 times. Control Panel and Settings Keep Warm Plus...
... in large casserole and cover with Sensor Cook, Reheat, Defrost and Hot Water. When oven signals, add pasta and continue cooking according to cook pasta. Touch Start/Add-A-Minute pad. Touch Power Level pad 4 times for 15 minutes. 1. When the cooking time is complete, a long tone will sound and Keep Warm Plus will be displayed during the count With Manual Cooking • Soup (1 cup) - Touch Hot Water pad 3 times. Control Panel and Settings Keep Warm Plus...

Use and Care Manual
Page 30
... oven operate with no audible signals, touch Help, the number 2 and touch STOP/Clear. cook for Auto Start time to appear in the interactive display. 1. Touch Help pad. 2. Touch Timer/Clock pad. 5. Enter cooking time 2000 and touch Power Level pad 6 times for manual cooking if clock is showing the correct time of day, follow this procedure: • Stew - To cancel, touch Help and STOP/Clear pad. 2. Audible Signal Elimination If you wish to program your oven easy because specific instructions...
... oven operate with no audible signals, touch Help, the number 2 and touch STOP/Clear. cook for Auto Start time to appear in the interactive display. 1. Touch Help pad. 2. Touch Timer/Clock pad. 5. Enter cooking time 2000 and touch Power Level pad 6 times for manual cooking if clock is showing the correct time of day, follow this procedure: • Stew - To cancel, touch Help and STOP/Clear pad. 2. Audible Signal Elimination If you wish to program your oven easy because specific instructions...

Use and Care Manual
Page 31
... Sensor Cook, Reheat, Hot Water, Keep Warm Plus and Defrost has a cooking hint. Cooking operations and specific special features can now be demonstrated with no power in the display. If easier, unplug the oven from the table below. Touch Timer/Clock and number 1 pads. 2. Touch Timer/Clock pad. Language / Weight Selection The oven comes set for these and other manual operation hints. For example, touch START/Add-A-Minute pad and the display will appear in the oven. Then, touch START...
... Sensor Cook, Reheat, Hot Water, Keep Warm Plus and Defrost has a cooking hint. Cooking operations and specific special features can now be demonstrated with no power in the display. If easier, unplug the oven from the table below. Touch Timer/Clock and number 1 pads. 2. Touch Timer/Clock pad. Language / Weight Selection The oven comes set for these and other manual operation hints. For example, touch START/Add-A-Minute pad and the display will appear in the oven. Then, touch START...

Use and Care Manual
Page 37
... purchased Clearly describe the problem that you are unable to obtain the name of parts, use only authorized parts to : VIKING RANGE CORPORATION PREFERRED SERVICE 1803 Hwy 82W Greenwood, Mississippi 38930 USA Record the information indicated below. The model and serial number for your dealer or authorized service agency. KEEP THIS MANUAL FOR FUTURE REFERENCE Product Care 35 E Service Information If service is ever required...
... purchased Clearly describe the problem that you are unable to obtain the name of parts, use only authorized parts to : VIKING RANGE CORPORATION PREFERRED SERVICE 1803 Hwy 82W Greenwood, Mississippi 38930 USA Record the information indicated below. The model and serial number for your dealer or authorized service agency. KEEP THIS MANUAL FOR FUTURE REFERENCE Product Care 35 E Service Information If service is ever required...
Use and Care Manual
Page 38
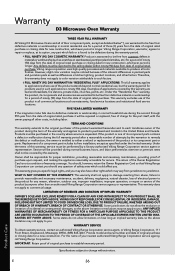
... or workmanship in kitchen lighting, product locations, and other costs, including labor. TERM AND CONDITIONS This warranty extends to the original purchaser of the product warranted hereunder and to each transferee owner of the product during normal business hours, and labor performed at its free installation, except as differences in normal household use , improper installation, improper operation, or repair or service of the...
... or workmanship in kitchen lighting, product locations, and other costs, including labor. TERM AND CONDITIONS This warranty extends to the original purchaser of the product warranted hereunder and to each transferee owner of the product during normal business hours, and labor performed at its free installation, except as differences in normal household use , improper installation, improper operation, or repair or service of the...
30 inch W. Built-In Trim Kit - Installation Instructions
Page 2
... and national codes and ordinances. • The installer should leave these instructions completely and carefully. • Be sure to DISCONNECT THE PLUG of the microwave oven from the electrical outlet before installing the built-in handling and installation to avoid the possibility of the oven cavity. Table of Contents Warnings & Important Information 2 Specifications 3 General Information 4 Parts Included in the Kit 4 Cabinet or Wall Cutout 4 Electrical Outlet Location 4 Installation 5 Mounting Template 5 Bottom Duct Assembly 6 Mounting Bracket Assembly 6 Cabinet Installation...
... and national codes and ordinances. • The installer should leave these instructions completely and carefully. • Be sure to DISCONNECT THE PLUG of the microwave oven from the electrical outlet before installing the built-in handling and installation to avoid the possibility of the oven cavity. Table of Contents Warnings & Important Information 2 Specifications 3 General Information 4 Parts Included in the Kit 4 Cabinet or Wall Cutout 4 Electrical Outlet Location 4 Installation 5 Mounting Template 5 Bottom Duct Assembly 6 Mounting Bracket Assembly 6 Cabinet Installation...
30 inch W. Built-In Trim Kit - Installation Instructions
Page 4
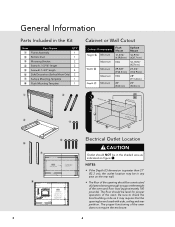
... the local building code as indicated on the rear wall. • The floor of the opening between holes A9.1" (231.2 mm) BUILT-IN TRIM KIT SURFACE MOUNTING TEMPLATE FOR DESIGNER SERIES MICROWAVE OVEN Center Line 1. General Information Par ts Included in the Kit 1) Frame Assembly: QTY 1 Cabinet or Wall Cutout 2) Bottom Duct Assembly: QTY 1 Item 1 2 3 4 5 6 7 Part Name QTY Frame Assembly 1 Bottom Duct 1 Mounting Bracket 2 Screw A :1-3/16" length 2 Screw B: 1-3/4" length 4 Side Decoration (Surface Mount Only) 2 Surface Mounting Template 1 Cutout Dimensions Height A Minimum...
... the local building code as indicated on the rear wall. • The floor of the opening between holes A9.1" (231.2 mm) BUILT-IN TRIM KIT SURFACE MOUNTING TEMPLATE FOR DESIGNER SERIES MICROWAVE OVEN Center Line 1. General Information Par ts Included in the Kit 1) Frame Assembly: QTY 1 Cabinet or Wall Cutout 2) Bottom Duct Assembly: QTY 1 Item 1 2 3 4 5 6 7 Part Name QTY Frame Assembly 1 Bottom Duct 1 Mounting Bracket 2 Screw A :1-3/16" length 2 Screw B: 1-3/4" length 4 Side Decoration (Surface Mount Only) 2 Surface Mounting Template 1 Cutout Dimensions Height A Minimum...


