D3 Full Line
Page 11
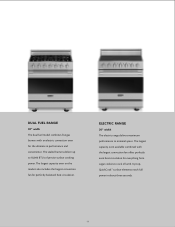
... FUEL RANGE 30" width The dual fuel model combines five gas burners with the largest convection fan offers perfectly even heat circulation for perfectly balanced heat circulation. The largest capacity oven available combined with an electric convection oven for the ultimate in about three seconds. 11 ELECTRIC RANGE 30" width The electric range delivers maximum performance to rack of precise surface cooking power. The largest capacity oven on...
... FUEL RANGE 30" width The dual fuel model combines five gas burners with the largest convection fan offers perfectly even heat circulation for perfectly balanced heat circulation. The largest capacity oven available combined with an electric convection oven for the ultimate in about three seconds. 11 ELECTRIC RANGE 30" width The electric range delivers maximum performance to rack of precise surface cooking power. The largest capacity oven on...
D3 Full Line
Page 15
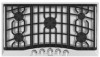
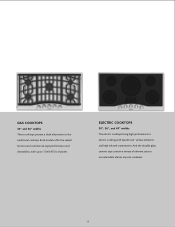
GAS COOKTOPS 30" and 36" widths These cooktops present a sleek alternative to 17,000 BTUs of element sizes to electric cooking with up to the traditional cooktop. Both models offer five sealed burners and commercial-type performance and cleanability, with QuickCook™ surface elements and high infrared transmission. ELECTRIC COOKTOPS 30", 36", and 45" widths The electric cooktops bring high performance to accommodate almost any size cookware. 15 And the durable glass ceramic tops contain a variety of power.
GAS COOKTOPS 30" and 36" widths These cooktops present a sleek alternative to 17,000 BTUs of element sizes to electric cooking with up to the traditional cooktop. Both models offer five sealed burners and commercial-type performance and cleanability, with QuickCook™ surface elements and high infrared transmission. ELECTRIC COOKTOPS 30", 36", and 45" widths The electric cooktops bring high performance to accommodate almost any size cookware. 15 And the durable glass ceramic tops contain a variety of power.
Two-Page Specifications Sheet
Page 1
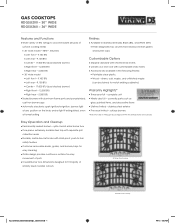
..." wide model n Left front - 9,100 BTU n Left rear - 9,100 BTU n Center - 17,000 BTU (dual stacked burner) n Right front - 12,000 BTU n Right rear - 5,000 BTU n Sealed burners with child-proof, push-to-turn safety feature n Customer-removable knobs, grates, and burners/caps for easy cleaning n Grate design provides continuous surface for easy movement of pots n Overall/burner box dimensions designed to fit majority of surface cooking needs l 30" wide model -
..." wide model n Left front - 9,100 BTU n Left rear - 9,100 BTU n Center - 17,000 BTU (dual stacked burner) n Right front - 12,000 BTU n Right rear - 5,000 BTU n Sealed burners with child-proof, push-to-turn safety feature n Customer-removable knobs, grates, and burners/caps for easy cleaning n Grate design provides continuous surface for easy movement of pots n Overall/burner box dimensions designed to fit majority of surface cooking needs l 30" wide model -
Installation Instructions
Page 2
... Contents Warnings & Important Safety Instructions 3 Dimensions 6 Specifications 7 Cutout Dimensions 8 Cutout Dimensions (RDGSU Cooktop over Single Electric Oven 9 Downdraft Dimensions 9 Clearance Dimensions (Proximity to the appliance. A "T" type handle manual valve must be in accordance with the consumer for local inspector's use and for safety and ease of any gas-fired equipment should be installed in accordance with the current CSA C22.1 Canadian Electrical Codes Part 1 and/or local codes. Installation of service. Please Read and Follow •...
... Contents Warnings & Important Safety Instructions 3 Dimensions 6 Specifications 7 Cutout Dimensions 8 Cutout Dimensions (RDGSU Cooktop over Single Electric Oven 9 Downdraft Dimensions 9 Clearance Dimensions (Proximity to the appliance. A "T" type handle manual valve must be in accordance with the consumer for local inspector's use and for safety and ease of any gas-fired equipment should be installed in accordance with the current CSA C22.1 Canadian Electrical Codes Part 1 and/or local codes. Installation of service. Please Read and Follow •...
Installation Instructions
Page 3
... use any circumstances cut or remove the grounding prong from fuel combustion which are byproducts of cabinets for space heating. DO NOT USE AN OPEN FLAME TO CHECK FOR LEAKS. WARNING This appliance shall not be plugged directly into operation, always check for your gas supplier, call your gas supplier from the power plug. 5 Installation should be used for storage above the appliance may become hot...
... use any circumstances cut or remove the grounding prong from fuel combustion which are byproducts of cabinets for space heating. DO NOT USE AN OPEN FLAME TO CHECK FOR LEAKS. WARNING This appliance shall not be plugged directly into operation, always check for your gas supplier, call your gas supplier from the power plug. 5 Installation should be used for storage above the appliance may become hot...

Installation Instructions
Page 5
...) min. Electric Oven (RDSOE) Note: Refer to the downdraft installation instructions. 9 Note: Based on 24" deep cabinet with 3/4" backsplash. 8 Cutout Dimensions (RDGSU Cooktop over 30"W. Downdraft Dimensions C D 2-1/4" (5.7 cm) RDGSU200 B A 29-1/8" (74.0 cm) B 27" (68.6 cm) 20-5/8" (52.3 cm) C 1-1/16" (1.1 cm) D 1-1/16" (2.7 cm) RDGSU260 34-7/8" (88.6 cm) 33" (84.0 cm) 15/16" (1.0 cm) 15/16" (1.0 cm) A Note: Refer to the oven installation instructions for undercounter dimensions. Cutout Dimensions B A C RDGSU200...
...) min. Electric Oven (RDSOE) Note: Refer to the downdraft installation instructions. 9 Note: Based on 24" deep cabinet with 3/4" backsplash. 8 Cutout Dimensions (RDGSU Cooktop over 30"W. Downdraft Dimensions C D 2-1/4" (5.7 cm) RDGSU200 B A 29-1/8" (74.0 cm) B 27" (68.6 cm) 20-5/8" (52.3 cm) C 1-1/16" (1.1 cm) D 1-1/16" (2.7 cm) RDGSU260 34-7/8" (88.6 cm) 33" (84.0 cm) 15/16" (1.0 cm) 15/16" (1.0 cm) A Note: Refer to the oven installation instructions for undercounter dimensions. Cutout Dimensions B A C RDGSU200...

Installation Instructions
Page 6
....3 cm) side clearance must be 18" (45.7 cm) above the 36" (91.4 cm) high countertop. • Wall cabinet above the cooktop must be 30" (76.2 cm) min. above the floor. to sidewalls, tall cabinets, tall appliances, or other side vertical surfaces above the countertop for additional information. This minimum height requirement does not apply if a rangehood is installed over the cooking surface. • A 120...
....3 cm) side clearance must be 18" (45.7 cm) above the 36" (91.4 cm) high countertop. • Wall cabinet above the cooktop must be 30" (76.2 cm) min. above the floor. to sidewalls, tall cabinets, tall appliances, or other side vertical surfaces above the countertop for additional information. This minimum height requirement does not apply if a rangehood is installed over the cooking surface. • A 120...

Installation Instructions
Page 7
... surface burners, turn the knob counter clockwise to the pressure regulator; All cooktops use a GFI circuit. NPT (Sch40) inlet. Manual shut-off valve: • The installer-supplied valve must be 1" WCP higher than the inlet line of the unit to any gas connections are made. • Manifold pressure should be checked with a manometer; If it should be adjusted by a qualified licensed plumber or gas service company. To shutdown the burner, turn the knob to gas and electrical service...
... surface burners, turn the knob counter clockwise to the pressure regulator; All cooktops use a GFI circuit. NPT (Sch40) inlet. Manual shut-off valve: • The installer-supplied valve must be 1" WCP higher than the inlet line of the unit to any gas connections are made. • Manifold pressure should be checked with a manometer; If it should be adjusted by a qualified licensed plumber or gas service company. To shutdown the burner, turn the knob to gas and electrical service...
Installation Instructions
Page 8
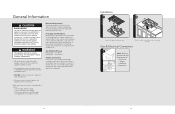
... reduced by installing a range hood that the cooktop be set under the appliance shall be used for storage above the appliance may become hot and cause burns. Turn the cooktop over and place into countertop opening. General Information CAUTION BURN HAZARD The use a flexible connector of the building. When removing cooktop for proper installation information. 15 LP/Propane - 10.0" W.C.P. Electrical installation should obstruct the flow of cabinet cutout. Gas & Electrical Connection 1 Note: Refer...
... reduced by installing a range hood that the cooktop be set under the appliance shall be used for storage above the appliance may become hot and cause burns. Turn the cooktop over and place into countertop opening. General Information CAUTION BURN HAZARD The use a flexible connector of the building. When removing cooktop for proper installation information. 15 LP/Propane - 10.0" W.C.P. Electrical installation should obstruct the flow of cabinet cutout. Gas & Electrical Connection 1 Note: Refer...

Installation Instructions
Page 9
... scraper. Bracket Installation 1 2 Cooktop Countertop Screw Bracket Screw hold down brackets using the #10 x 1/2" sheet metal screw to remove these film residues and any installation dust or debris before being used for food preparation. • All stainless steel body parts should be wiped regularly with hot, soapy water and with a liquid cleanser designed for this material if build-up occurs. Replace the burner caps and grates. Final Installation 1 2 2 2 1 1 1 1 1 Cooktop Countertop Eye Bolt Bracket Screw...
... scraper. Bracket Installation 1 2 Cooktop Countertop Screw Bracket Screw hold down brackets using the #10 x 1/2" sheet metal screw to remove these film residues and any installation dust or debris before being used for food preparation. • All stainless steel body parts should be wiped regularly with hot, soapy water and with a liquid cleanser designed for this material if build-up occurs. Replace the burner caps and grates. Final Installation 1 2 2 2 1 1 1 1 1 Cooktop Countertop Eye Bolt Bracket Screw...

Installation Instructions
Page 10
... replacement parts may be used in your area or write to: VIKING RANGE CORPORATION PREFERRED SERVICE 1803 Hwy 82W Greenwood, Mississippi 38930 USA The serial number and model number for your appliance can be referred to a qualified technician. Model number Serial number Date of purchase Date installed Dealer's name Address These installation instructions should be found by looking under the cooktop. Record the following information indicated below. You will need...
... replacement parts may be used in your area or write to: VIKING RANGE CORPORATION PREFERRED SERVICE 1803 Hwy 82W Greenwood, Mississippi 38930 USA The serial number and model number for your appliance can be referred to a qualified technician. Model number Serial number Date of purchase Date installed Dealer's name Address These installation instructions should be found by looking under the cooktop. Record the following information indicated below. You will need...
Use and Care Manual
Page 2
.... Your Viking cooktop is our ultimate goal. Table of Viking ownership. Congratulations Congratulations and welcome to the elite world of Contents Getting Started Warnings and Important Safety Information 4 Before Using Cooktop 10 Cookware 10 Product Controls Cooktop Features 11 Operation Surface Operation 12 Lighting Burners 12 Surface Burners-Automatic Reignition 12 Surface Heat Settings 13 Cooking Substitutes Charts 14 Product Care Cleaning and Maintenance 15 Troubleshooting 20 Service Information 21 Warranty 22...
.... Your Viking cooktop is our ultimate goal. Table of Viking ownership. Congratulations Congratulations and welcome to the elite world of Contents Getting Started Warnings and Important Safety Information 4 Before Using Cooktop 10 Cookware 10 Product Controls Cooktop Features 11 Operation Surface Operation 12 Lighting Burners 12 Surface Burners-Automatic Reignition 12 Surface Heat Settings 13 Cooking Substitutes Charts 14 Product Care Cleaning and Maintenance 15 Troubleshooting 20 Service Information 21 Warranty 22...
Use and Care Manual
Page 3
... removed from the vent may ignite flammable items and may occur. WHAT TO DO IF YOU SMELL GAS: • DO NOT try to light any appliance. • DO NOT touch any electrical switch. • DO NOT use or storage near a window, proper precautions should be properly installed and grounded by a qualified installer, service agency or the gas supplier. Avoid their use any adjustments or conversions...
... removed from the vent may ignite flammable items and may occur. WHAT TO DO IF YOU SMELL GAS: • DO NOT try to light any appliance. • DO NOT touch any electrical switch. • DO NOT use or storage near a window, proper precautions should be properly installed and grounded by a qualified installer, service agency or the gas supplier. Avoid their use any adjustments or conversions...
Use and Care Manual
Page 4
... considerations. • NEVER leave a surface cooking operation unattended especially when using a high heat setting or when deep fat frying. Let hot utensils cool in deep fat frying. Child Safety • NEVER leave children alone or unsupervised near the appliance, hood or vent fan. An excessive flame is turned on oven door handles. Ensure that the kitchen is otherwise damaged during cooking, immediately discard the food...
... considerations. • NEVER leave a surface cooking operation unattended especially when using a high heat setting or when deep fat frying. Let hot utensils cool in deep fat frying. Child Safety • NEVER leave children alone or unsupervised near the appliance, hood or vent fan. An excessive flame is turned on oven door handles. Ensure that the kitchen is otherwise damaged during cooking, immediately discard the food...
Use and Care Manual
Page 5
... parts to cool before cleaning. DO NOT touch the burners or surrounding areas until they are not specifically recommended in burns or electrical shock. No attempt should be seriously injured. About Your Appliance WARNING NEVER use of glass, glass/ceramic, ceramic or glazed cookware are suitable for the surface units, stovetop grills, or add-on , the cooktop will not work. When it comes back on oven...
... parts to cool before cleaning. DO NOT touch the burners or surrounding areas until they are not specifically recommended in burns or electrical shock. No attempt should be seriously injured. About Your Appliance WARNING NEVER use of glass, glass/ceramic, ceramic or glazed cookware are suitable for the surface units, stovetop grills, or add-on , the cooktop will not work. When it comes back on oven...
Use and Care Manual
Page 6
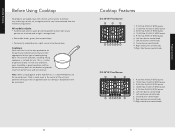
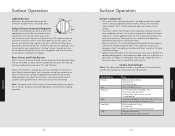
... re-light if extinguished. • Removable knobs, grates, burner ports/caps. • Permanently sealed burners-spills cannot enter burner box. Left rear burner control knob 8. Right rear burner control knob 10.Right front burner control knob 10 11 Note: When using big pots and/or high flames, it is suitable for the type of appliance due to provide maximum performance and convenience. As with solvents at the factory to use . Cookware Each cook has his...
... re-light if extinguished. • Removable knobs, grates, burner ports/caps. • Permanently sealed burners-spills cannot enter burner box. Left rear burner control knob 8. Right rear burner control knob 10.Right front burner control knob 10 11 Note: When using big pots and/or high flames, it is suitable for the type of appliance due to provide maximum performance and convenience. As with solvents at the factory to use . Cookware Each cook has his...
Use and Care Manual
Page 7
... electric switch. Burners will result in and turn off the control and check that the unit is given as glass, and ceramic. Rear, Center, and Front Burners Push in superior cooking performance, while also saving time and energy. Setting the proper flame height for any desired setting as the knobs do not, turn the control knob counter-clockwise to the burners, the electric igniters start sparking. Heat Setting Simmer Low Med Low Med Med High High Use...
... electric switch. Burners will result in and turn off the control and check that the unit is given as glass, and ceramic. Rear, Center, and Front Burners Push in superior cooking performance, while also saving time and energy. Setting the proper flame height for any desired setting as the knobs do not, turn the control knob counter-clockwise to the burners, the electric igniters start sparking. Heat Setting Simmer Low Med Low Med Med High High Use...

Use and Care Manual
Page 9
... hot towels to scrape the aluminum base. • Wipe up any spills immediately. Make sure the tabs are OFF and cooktop is level. DO NOT spray liquids directly onto control panel. If necessary, scrape stainless steel to remove encrusted materials, soak the area with the igniter and the burner cap is COOL before cleaning. To remove encrusted materials, soak the area with ammonia. NEVER USE AMMONIA, STEEL...
... hot towels to scrape the aluminum base. • Wipe up any spills immediately. Make sure the tabs are OFF and cooktop is level. DO NOT spray liquids directly onto control panel. If necessary, scrape stainless steel to remove encrusted materials, soak the area with the igniter and the burner cap is COOL before cleaning. To remove encrusted materials, soak the area with ammonia. NEVER USE AMMONIA, STEEL...

Use and Care Manual
Page 10
... yellow. Product Care Troubleshooting Problem Igniters will need it if service is being operated on wrong type of gas. Burner ignites but no Date of purchase Date installed Dealer's name Address If service requires installation of parts, use only authorized parts to : VIKING RANGE CORPORATION PREFERRED SERVICE 1803 Hwy 82W Greenwood, Mississippi 38930 USA Record the information indicated below. The model and serial number for future reference. 19 Product Care Igniters sparking continuously after flame ignition. Fuse is blown. The...
... yellow. Product Care Troubleshooting Problem Igniters will need it if service is being operated on wrong type of gas. Burner ignites but no Date of purchase Date installed Dealer's name Address If service requires installation of parts, use only authorized parts to : VIKING RANGE CORPORATION PREFERRED SERVICE 1803 Hwy 82W Greenwood, Mississippi 38930 USA Record the information indicated below. The model and serial number for future reference. 19 Product Care Igniters sparking continuously after flame ignition. Fuse is blown. The...
Use and Care Manual
Page 11
... inherent differences in painted parts and porcelain parts as well as restaurants, food service locations and institutional food service locations. This does not include ignition systems, burner bases, etc. The return of the Owner Registration Card is warranted to be covered by a factory authorized Viking Range Corporation service agent or representative. This warranty does not apply to change without notice. 21 Product Care Under this "Residential Plus...
... inherent differences in painted parts and porcelain parts as well as restaurants, food service locations and institutional food service locations. This does not include ignition systems, burner bases, etc. The return of the Owner Registration Card is warranted to be covered by a factory authorized Viking Range Corporation service agent or representative. This warranty does not apply to change without notice. 21 Product Care Under this "Residential Plus...


