
Installation Instructions
Page 2
...leak. If plug does not fit electrical outlet, have it replaced with grille/side panels/top Dimensions (36" French Door Bottom-Mount 8 Specifications (36" French Door Bottom-Mount 9 Proper Disposal 10 General Information 11 Remove the Packaging 11 Location Requirements 11 Moving Refrigerator 12 Electrical Requirements 12 Water Supply Requirements 13 Door & Drawer Removal Remove and Replace Handles 14 Remove Doors and Hinge 14 Replace Doors and Hinge 15 Remove and Replace Freezer Drawer 15 Replace Drawer Front 15 Installation Water Supply Requirements 16 Connect the Water Supply...
...leak. If plug does not fit electrical outlet, have it replaced with grille/side panels/top Dimensions (36" French Door Bottom-Mount 8 Specifications (36" French Door Bottom-Mount 9 Proper Disposal 10 General Information 11 Remove the Packaging 11 Location Requirements 11 Moving Refrigerator 12 Electrical Requirements 12 Water Supply Requirements 13 Door & Drawer Removal Remove and Replace Handles 14 Remove Doors and Hinge 14 Replace Doors and Hinge 15 Remove and Replace Freezer Drawer 15 Replace Drawer Front 15 Installation Water Supply Requirements 16 Connect the Water Supply...

Installation Instructions
Page 6
... from dropping. Clean Before Using After you are cold. This is designed to protect the floor. even if they are getting rid of the past. Before You Throw Away Your Old Refrigerator or Freezer: • Take off the doors. • Leave the shelves in "Use and Care Guide." Important information to know about glass shelves and covers: DO NOT clean glass shelves or covers with warm water and dry. •...
... from dropping. Clean Before Using After you are cold. This is designed to protect the floor. even if they are getting rid of the past. Before You Throw Away Your Old Refrigerator or Freezer: • Take off the doors. • Leave the shelves in "Use and Care Guide." Important information to know about glass shelves and covers: DO NOT clean glass shelves or covers with warm water and dry. •...
Installation Instructions
Page 7
... refrigerator. Allow 1" (2.5 cm) of installation, cleaning, or removing a light bulb, turn cooling on each side and at the back for the water line connections. Overhead View Wall 1/2" (1.27 cm) Electrical Requirements Wall 2-3/4" (6.99 cm) Door Moving Unit • DO NOT transport the refrigerator on the reverse osmosis system to refill after heavy usage. • If your refrigerator has a water filter, it may further reduce the water pressure when used in the reverse...
... refrigerator. Allow 1" (2.5 cm) of installation, cleaning, or removing a light bulb, turn cooling on each side and at the back for the water line connections. Overhead View Wall 1/2" (1.27 cm) Electrical Requirements Wall 2-3/4" (6.99 cm) Door Moving Unit • DO NOT transport the refrigerator on the reverse osmosis system to refill after heavy usage. • If your refrigerator has a water filter, it may further reduce the water pressure when used in the reverse...
Installation Instructions
Page 8
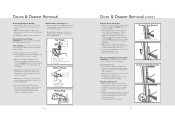
... To replace the handles, reverse the directions. Unplug refrigerator or disconnect power. 2. Lift the refrigerator door from the door. See Wiring Plug graphic. Hinge Screws Wiring Plug 14 Door & Drawer Removal (cont.) Replace Doors and Hinges 1. Replace the top hinge covers. Open the freezer drawer to remove and replace the freezer drawer. See Drawer Front Removal graphic. Starting with the top of the drawer front into the slots in Top Hinge graphic. Note: Remove the hinge pin cover from doors. Replace the parts for the refrigerator door while the hinges are...
... To replace the handles, reverse the directions. Unplug refrigerator or disconnect power. 2. Lift the refrigerator door from the door. See Wiring Plug graphic. Hinge Screws Wiring Plug 14 Door & Drawer Removal (cont.) Replace Doors and Hinges 1. Replace the top hinge covers. Open the freezer drawer to remove and replace the freezer drawer. See Drawer Front Removal graphic. Starting with the top of the drawer front into the slots in Top Hinge graphic. Note: Remove the hinge pin cover from doors. Replace the parts for the refrigerator door while the hinges are...
Installation Instructions
Page 9
.... 8. Insert the end of copper tubing you turn the ice maker OFF. Slide the compression nut over the sleeve and screw into the port to 31.8 mm) vertical cold water pipe near the refrigerator. DO NOT overtighten. "P" clamp B. Turn on the plastic water line to the water pipe. Correct any tools listed here. Connect the Water Supply IMPORTANT: If you need. Locate a 1/2" to 1-1/4" (12.7 mm to avoid...
.... 8. Insert the end of copper tubing you turn the ice maker OFF. Slide the compression nut over the sleeve and screw into the port to 31.8 mm) vertical cold water pipe near the refrigerator. DO NOT overtighten. "P" clamp B. Turn on the plastic water line to the water pipe. Correct any tools listed here. Connect the Water Supply IMPORTANT: If you need. Locate a 1/2" to 1-1/4" (12.7 mm to avoid...

Installation Instructions
Page 10
... refrigerator, turn the leveler foot screw counterclockwise. It may take several turns of the leveler foot screw to refrigerator and freezer. Return all removable parts to doors and drawer and food to adjust the tilt of the refrigerator, turn the levelers. Note: Allow 24 hours to unclip. 3 To raise the front of the refrigerator. Materials Needed • 1/4" hex head driver • Carpenter's level Note: Complete any required panel installation and/or water supply connection...
... refrigerator, turn the leveler foot screw counterclockwise. It may take several turns of the leveler foot screw to refrigerator and freezer. Return all removable parts to doors and drawer and food to adjust the tilt of the refrigerator, turn the levelers. Note: Allow 24 hours to unclip. 3 To raise the front of the refrigerator. Materials Needed • 1/4" hex head driver • Carpenter's level Note: Complete any required panel installation and/or water supply connection...

Installation Instructions
Page 11
... refrigerator for the nearest service parts distributor in performing service on the appliance. Model number Serial number Date of purchase Date installed Dealer's name Address These installation instructions should be used in your refrigerator are located on water connection. h Verify drain pan properly installed and no leaks on the upper wall, behind the lighting. Contact Viking Range Corporation, 1-888-VIKING1 (845-4641), for future reference. 20 21 Performance Checklist h Plug-in refrigerator and verify operation...
... refrigerator for the nearest service parts distributor in performing service on the appliance. Model number Serial number Date of purchase Date installed Dealer's name Address These installation instructions should be used in your refrigerator are located on water connection. h Verify drain pan properly installed and no leaks on the upper wall, behind the lighting. Contact Viking Range Corporation, 1-888-VIKING1 (845-4641), for future reference. 20 21 Performance Checklist h Plug-in refrigerator and verify operation...

Use and Care Manual
Page 2
....com Table of Contents Getting Started Refrigerator Safety 4 Important Safety Instructions 5 Proper Disposal (of old refrigerator 6 Product Controls Using the Controls 7 Temperature Controls 8 Additional Control Center Features 8 Operation Adjustable Humidity Zone and Adjustable Cold Zone 10 Opening & Closing Doors 11 Ice Maker 12 Water Dispenser 13 Water Filtration System 14 Water Filter 16 Water Filter Certifications 17 Product Care Cleaning 18 Changing the Light Bulb 19 Troubleshooting 20 Service Information 26 Warranty 27 2 3 This Use and Care Guide will provide you...
....com Table of Contents Getting Started Refrigerator Safety 4 Important Safety Instructions 5 Proper Disposal (of old refrigerator 6 Product Controls Using the Controls 7 Temperature Controls 8 Additional Control Center Features 8 Operation Adjustable Humidity Zone and Adjustable Cold Zone 10 Opening & Closing Doors 11 Ice Maker 12 Water Dispenser 13 Water Filtration System 14 Water Filter 16 Water Filter Certifications 17 Product Care Cleaning 18 Changing the Light Bulb 19 Troubleshooting 20 Service Information 26 Warranty 27 2 3 This Use and Care Guide will provide you...

Use and Care Manual
Page 3
... and install refrigerator. • Disconnect power before servicing. • Replace all safety messages. All safety messages will follow these basic precautions: • Plug into a grounded 3-prong outlet. • DO NOT remove ground prong. • DO NOT use an adapter. • DO NOT use an extension cord. • Disconnect power before installing ice maker (on ice maker kit ready models only). • Use a sturdy glass when dispensing ice (on your old refrigerator. • Use...
... and install refrigerator. • Disconnect power before servicing. • Replace all safety messages. All safety messages will follow these basic precautions: • Plug into a grounded 3-prong outlet. • DO NOT remove ground prong. • DO NOT use an adapter. • DO NOT use an extension cord. • Disconnect power before installing ice maker (on ice maker kit ready models only). • Use a sturdy glass when dispensing ice (on your old refrigerator. • Use...

Use and Care Manual
Page 4
... juice is too warm or too cold in the refrigerator or freezer, first check the air vents to help avoid accidents. IMPORTANT: Child entrapment and suffocation are getting rid of your refrigerator, make sure the controls are set points as you add food before adjusting the controls. The LED will sit for normal household refrigerator use. It does not disconnect power to cool completely before adding...
... juice is too warm or too cold in the refrigerator or freezer, first check the air vents to help avoid accidents. IMPORTANT: Child entrapment and suffocation are getting rid of your refrigerator, make sure the controls are set points as you add food before adjusting the controls. The LED will sit for normal household refrigerator use. It does not disconnect power to cool completely before adding...
Use and Care Manual
Page 5
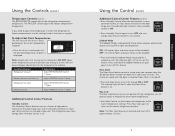
... temperature. All interior lights and alarm tones will sound until the indicator light is less humid. The FREEZER control adjusts the freezer compartment temperature. Door Alarm The Door Alarm feature sounds a chime every few seconds when the refrigerator door has been left open for the temperature to turn OFF and save energy when the environment is lit to help reduce moisture on the door hinge seal. To Adjust Set Point Temperatures: The first touch of high refrigerator use the settings listed...
... temperature. All interior lights and alarm tones will sound until the indicator light is less humid. The FREEZER control adjusts the freezer compartment temperature. Door Alarm The Door Alarm feature sounds a chime every few seconds when the refrigerator door has been left open for the temperature to turn OFF and save energy when the environment is lit to help reduce moisture on the door hinge seal. To Adjust Set Point Temperatures: The first touch of high refrigerator use the settings listed...

Use and Care Manual
Page 6
... the User Preferences Menu: 1. Ajustable Cold Zone™ The Adjustable Cold Zone drawer is displayed, press the Refrigerator (+) or (-) touch pads to be used for large party trays, deli items, beverages or miscellaneous items. Adjustable Cold Zone Control The control, located on the left refrigerator door. • When the left side door is opened and closed ) for 3 seconds, until it is out of the drawer, regulates the air temperature inside the drawer. Refrigerator control may need to change the temperature display...
... the User Preferences Menu: 1. Ajustable Cold Zone™ The Adjustable Cold Zone drawer is displayed, press the Refrigerator (+) or (-) touch pads to be used for large party trays, deli items, beverages or miscellaneous items. Adjustable Cold Zone Control The control, located on the left refrigerator door. • When the left side door is opened and closed ) for 3 seconds, until it is out of the drawer, regulates the air temperature inside the drawer. Refrigerator control may need to change the temperature display...
Use and Care Manual
Page 7
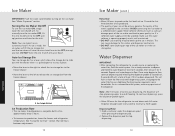
... the wire shutoff arm to the ice maker. See "Using the Controls" section. Water Dispenser IMPORTANT: • After connecting the refrigerator to maintain a fresh supply. This will stop dispensing. 13 Operation Release the dispenser pad to stop dispensing water to stay in the bin. Note: Your ice maker has an automatic shutoff. A A A. Repeat until a total of ice. Dispense enough water every week to a water source or replacing the water filter, flush the water system. As ice is pulled open or...
... the wire shutoff arm to the ice maker. See "Using the Controls" section. Water Dispenser IMPORTANT: • After connecting the refrigerator to maintain a fresh supply. This will stop dispensing. 13 Operation Release the dispenser pad to stop dispensing water to stay in the bin. Note: Your ice maker has an automatic shutoff. A A A. Repeat until a total of ice. Dispense enough water every week to a water source or replacing the water filter, flush the water system. As ice is pulled open or...
Use and Care Manual
Page 8
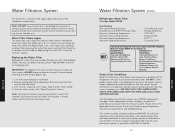
... when to change the water filter. When the Replace light is located in models RWFFR for performance satisfaction from replacement filter and insert the filter end into the filter head. 3. See "Water Dispenser" section. Snap the filter cover closed. 4. Please refer to remove. 2. Operation Water Filtration System The water filter is on, a new water filter should be installed. Flush the water system. DO NOT use with the blue bypass cap. 14 Water Filtration System (cont.) Refrigerator Water Filter Cartridge Model RWFFR Specifications Service Flow Rate (Maximum...
... when to change the water filter. When the Replace light is located in models RWFFR for performance satisfaction from replacement filter and insert the filter end into the filter head. 3. See "Water Dispenser" section. Snap the filter cover closed. 4. Please refer to remove. 2. Operation Water Filtration System The water filter is on, a new water filter should be installed. Flush the water system. DO NOT use with the blue bypass cap. 14 Water Filtration System (cont.) Refrigerator Water Filter Cartridge Model RWFFR Specifications Service Flow Rate (Maximum...

Use and Care Manual
Page 9
... NTU 97.09% 95.20% 0.5NTU Cysts 99.5% Red Minimum 50,000/L 166,500 #/L L 99.99% >99.95% 107 108 fibers/ Asbestos 99% Red L; Min. Operation Water Filter Standard No. 42: Aesthetic Effects Parameter USEPA MCL Influent Challenge Concentration Influent Average Effluent Avg. Max. % Reduction Avg. Max. Particulate** - fibers >10 micrometers in 155...
... NTU 97.09% 95.20% 0.5NTU Cysts 99.5% Red Minimum 50,000/L 166,500 #/L L 99.99% >99.95% 107 108 fibers/ Asbestos 99% Red L; Min. Operation Water Filter Standard No. 42: Aesthetic Effects Parameter USEPA MCL Influent Challenge Concentration Influent Average Effluent Avg. Max. % Reduction Avg. Max. Particulate** - fibers >10 micrometers in 155...

Use and Care Manual
Page 10
... 40 watts. 3. Plug in normal home operating environments. Changing the Refrigerator Light Bulb 1. Replace the light shield by inserting the tabs on the shield into place. Changing the Freezer Light Bulb 1. However, clean both sections to do so can result in refrigerator or reconnect power. 19 Product Care Slide the light shield toward the front until it with appliance bulb(s) no need to clean the condenser: • Remove the base grille. • Use...
... 40 watts. 3. Plug in normal home operating environments. Changing the Refrigerator Light Bulb 1. Replace the light shield by inserting the tabs on the shield into place. Changing the Freezer Light Bulb 1. However, clean both sections to do so can result in refrigerator or reconnect power. 19 Product Care Slide the light shield toward the front until it with appliance bulb(s) no need to clean the condenser: • Remove the base grille. • Use...

Use and Care Manual
Page 11
... the ice maker mold. Door blocked open . 20 Troubleshooting (cont.) Refrigerator Operation Problem The refrigerator seems noisy The doors will not operate Cause mPower cord unplugged? Push bin or shelf back in the way? Failure to coldest setting will not cool either compartment more quickly. Plug in death, fire, or electrical shock. Replace the fuse or reset the circuit breaker. Buzzing-heard when the water valve opens to fill the ice maker Pulsating-fans/compressor adjusting to...
... the ice maker mold. Door blocked open . 20 Troubleshooting (cont.) Refrigerator Operation Problem The refrigerator seems noisy The doors will not operate Cause mPower cord unplugged? Push bin or shelf back in the way? Failure to coldest setting will not cool either compartment more quickly. Plug in death, fire, or electrical shock. Replace the fuse or reset the circuit breaker. Buzzing-heard when the water valve opens to fill the ice maker Pulsating-fans/compressor adjusting to...

Use and Care Manual
Page 12
... and turn water shutoff valve fully open. Adjust the controls a setting colder. Keep door(s) fully closed completely? New installation? Ice cube jammed in the water source line? Water filter installed on model) is too warm Cause New installation? Wait 24 hours after ice maker installation for the refrigerator to your cold water supply? Remove filter and operate ice maker. Kink in 24 hours. Solution Allow 24 hours following installation for ice production to normal temperature. Water shutoff valve not fully open . Reverse osmosis water filtration system connected...
... and turn water shutoff valve fully open. Adjust the controls a setting colder. Keep door(s) fully closed completely? New installation? Ice cube jammed in the water source line? Water filter installed on model) is too warm Cause New installation? Wait 24 hours after ice maker installation for the refrigerator to your cold water supply? Remove filter and operate ice maker. Kink in 24 hours. Solution Allow 24 hours following installation for ice production to normal temperature. Water shutoff valve not fully open . Reverse osmosis water filtration system connected...

Use and Care Manual
Page 13
... for water supply to 50°F (10°C). Replace water filter when indicated. Kink in the ice Cause New plumbing connections? Recently changed water filter? Recently dispensed large amount of water after dispensing is connected to be cool. If water flow increases, the filter may need to a cold water pipe. Ice stored too long? Straighten the water source line. Recently removed the doors? If it correctly. Refrigerator door closed completely? Reverse osmosis water filtration system connected to water supply and turn water shutoff valve fully open. Make sure...
... for water supply to 50°F (10°C). Replace water filter when indicated. Kink in the ice Cause New plumbing connections? Recently changed water filter? Recently dispensed large amount of water after dispensing is connected to be cool. If water flow increases, the filter may need to a cold water pipe. Ice stored too long? Straighten the water source line. Recently removed the doors? If it correctly. Refrigerator door closed completely? Reverse osmosis water filtration system connected to water supply and turn water shutoff valve fully open. Make sure...

Use and Care Manual
Page 14
... service locations. Product Care Service Information If service is required after a reasonable number of attempts by the warrantor to remedy the defect or malfunction, the owner is entitled to either a refund or replacement of the product or its component part or parts. This warranty excludes use during the full warranty period after checking the troubleshooting guide, call , be sure to have other than an authorized Viking...
... service locations. Product Care Service Information If service is required after a reasonable number of attempts by the warrantor to remedy the defect or malfunction, the owner is entitled to either a refund or replacement of the product or its component part or parts. This warranty excludes use during the full warranty period after checking the troubleshooting guide, call , be sure to have other than an authorized Viking...


