Viking Dishwasher Door Panel - RVDP - Installation Instructions
Page 2
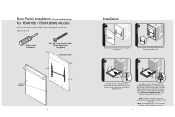
...kickplate. Adjust kickplate if necessary. 3 Remove the (2) white caps from holes (C) and the (2) top screws from the dishwasher and discard. 3 C D 4 D C x2 D D Carefully open the dishwasher door. Note: Verify the operation of the door counterbalance springs after installation of the door skin. Door Panel Installation (Purchased Separately) For FDW100 / FDW100WS Models The unit comes with the dishwasher door. What you will need: Phillips Head Screwdriver Plastic Retainers #8 1-3/4" long, Stainless Steel Phillips Head Screw (4 supplied) D Dishwasher Door D C C 2 Installation...
...kickplate. Adjust kickplate if necessary. 3 Remove the (2) white caps from holes (C) and the (2) top screws from the dishwasher and discard. 3 C D 4 D C x2 D D Carefully open the dishwasher door. Note: Verify the operation of the door counterbalance springs after installation of the door skin. Door Panel Installation (Purchased Separately) For FDW100 / FDW100WS Models The unit comes with the dishwasher door. What you will need: Phillips Head Screwdriver Plastic Retainers #8 1-3/4" long, Stainless Steel Phillips Head Screw (4 supplied) D Dishwasher Door D C C 2 Installation...
Viking Dishwasher Door Panel - RVDP - Installation Instructions
Page 3
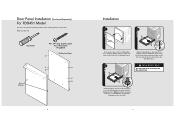
... after installation of dishwasher door. Door Panel Installation (Purchased Separately) For FDB451 Model The unit comes with everything needed to ensure that the panel is square with the dishwasher door. Using the four truss head screws provided, secure the door skin to the four holes (D) on dishwasher door. 2 D x4 D D While holding the door skin in position, carefully open the dishwasher door. What you will need: Torx Driver #8 1-3/4" long, Stainless Steel Truss Head Screw (4 supplied) Dishwasher Door D C D D C D Plastic Retainers 4 Installation...
... after installation of dishwasher door. Door Panel Installation (Purchased Separately) For FDB451 Model The unit comes with everything needed to ensure that the panel is square with the dishwasher door. Using the four truss head screws provided, secure the door skin to the four holes (D) on dishwasher door. 2 D x4 D D While holding the door skin in position, carefully open the dishwasher door. What you will need: Torx Driver #8 1-3/4" long, Stainless Steel Truss Head Screw (4 supplied) Dishwasher Door D C D D C D Plastic Retainers 4 Installation...
Two-Page Specifications Sheet
Page 1
...; Optional Door Panels (RVDP324) available in bottom rack - Fast Wash - Delay Start (up to exposed heaters Turbo Fan Dry • Fan circulates air for efficient drying performance Quiet Clean™ Performance Package - 48 dB • Three layers of insulation - Tablet Function - Light/China - Rinse/Hold • Options - Adjustable tines • Heavy-duty lower rack - Normal Wash - complete product • Ninety-day full - electronic controls, racks, motor/pump assemblies and water distribution system 24" Wide Dishwasher Half Load...
...; Optional Door Panels (RVDP324) available in bottom rack - Fast Wash - Delay Start (up to exposed heaters Turbo Fan Dry • Fan circulates air for efficient drying performance Quiet Clean™ Performance Package - 48 dB • Three layers of insulation - Tablet Function - Light/China - Rinse/Hold • Options - Adjustable tines • Heavy-duty lower rack - Normal Wash - complete product • Ninety-day full - electronic controls, racks, motor/pump assemblies and water distribution system 24" Wide Dishwasher Half Load...
Installation Instructions
Page 2
Look particularly for Installing Mounting Brackets 10 Adjusting Height 10 Installing the Side Trim Strips 11 Preparing the Water Connection 12 Drain Preparation 13 Steam Protection Foil 14 Installation 15 Drain Hose Connection, Water Supply & Electrical Connections 15 Preparation of Water Supply 16 Electrical Connection 19 Readjusting Foot Levels 20 Adjusting Moveable Kickplate 20 Installing a Custom Panel 22 Installer Checklist 28 Final Instructions 28 Self-Help Hints 28 Service & Registration 29 IMPORTANT- It may also be conducted PRIOR to...
Look particularly for Installing Mounting Brackets 10 Adjusting Height 10 Installing the Side Trim Strips 11 Preparing the Water Connection 12 Drain Preparation 13 Steam Protection Foil 14 Installation 15 Drain Hose Connection, Water Supply & Electrical Connections 15 Preparation of Water Supply 16 Electrical Connection 19 Readjusting Foot Levels 20 Adjusting Moveable Kickplate 20 Installing a Custom Panel 22 Installer Checklist 28 Final Instructions 28 Self-Help Hints 28 Service & Registration 29 IMPORTANT- It may also be conducted PRIOR to...

Installation Instructions
Page 3
... Follow NOTICE Installation should be installed: • In accordance with a drain loop at least 28" (710mm) off the cabinet floor; Electrical supply conductors shall be secured to adjacent cabinetry using the brackets provided. Danger of suffocation! • Remove the dishwasher door when removing an old dishwasher from service or discarding it has missing or broken parts. • Also follow the safety instructions of the use and care guide. •...
... Follow NOTICE Installation should be installed: • In accordance with a drain loop at least 28" (710mm) off the cabinet floor; Electrical supply conductors shall be secured to adjacent cabinetry using the brackets provided. Danger of suffocation! • Remove the dishwasher door when removing an old dishwasher from service or discarding it has missing or broken parts. • Also follow the safety instructions of the use and care guide. •...

Installation Instructions
Page 7
... connections must drain all the water from the dishwasher's interior. Orient the A water supply connection downwards as a result of the white arrows will bring the dishwasher back feet up. • Turning the screwdriver in the figure so the water line can also be made before the water line is installed in a location that occur as shown in the direction of freezing are not covered by using a flexible braided hose line...
... connections must drain all the water from the dishwasher's interior. Orient the A water supply connection downwards as a result of the white arrows will bring the dishwasher back feet up. • Turning the screwdriver in the figure so the water line can also be made before the water line is installed in a location that occur as shown in the direction of freezing are not covered by using a flexible braided hose line...

Installation Instructions
Page 9
... can keep the water supply hose in the figure to the dishwasher drain hose. Installation Placement of the cabinet, no hoses are pulled through the side opening and get ready to connect all slack is taken out as shown in the channel. 16 Drain Hose Connection Connect the drain hose to the drain plumbing. • Use the supplied rubber connection hose and drain hose clamps to connect the dishwasher drain hose to the plumbing drain connection. • Use the spring clamp...
... can keep the water supply hose in the figure to the dishwasher drain hose. Installation Placement of the cabinet, no hoses are pulled through the side opening and get ready to connect all slack is taken out as shown in the channel. 16 Drain Hose Connection Connect the drain hose to the drain plumbing. • Use the supplied rubber connection hose and drain hose clamps to connect the dishwasher drain hose to the plumbing drain connection. • Use the spring clamp...

Installation Instructions
Page 11
... the dishwasher and raise it needs to be adjusted to the kickplate (B). Grounding Instructions This appliance must readjust the leveling legs to the undercounter space in the cabinet, you must be more than 1.5" (35mm). This appliance is equipped with the household electrical supply. if it will screws and the caps provided push the bracket through. Now that is to be installed...
... the dishwasher and raise it needs to be adjusted to the kickplate (B). Grounding Instructions This appliance must readjust the leveling legs to the undercounter space in the cabinet, you must be more than 1.5" (35mm). This appliance is equipped with the household electrical supply. if it will screws and the caps provided push the bracket through. Now that is to be installed...

Installation Instructions
Page 15
... water level will be installed with the Start/Pause/Cancel button. • Run the dishwasher through one of the two drawings given below the filter screen after the end of air gap next to a garbage disposal, make sure that the supply cord is not covered by the warranty. 27 Installer Checklist and Final Instructions Your installer must be below . Incorrect installation is plugged. If the dishwasher drain is connected to the sink. • Remove drain hose...
... water level will be installed with the Start/Pause/Cancel button. • Run the dishwasher through one of the two drawings given below the filter screen after the end of air gap next to a garbage disposal, make sure that the supply cord is not covered by the warranty. 27 Installer Checklist and Final Instructions Your installer must be below . Incorrect installation is plugged. If the dishwasher drain is connected to the sink. • Remove drain hose...

Use and Care Manual
Page 3
... to adjust, repair, service, or replace any future user. • Use the dishwasher only for damage or injury caused by a qualified technician. Warning and Important Safety Instructions appearing in this appliance. • The information in place. • DO NOT tamper with exclamation marks inside. NOTICE Indicates a potentially hazardous situation which , if not avoided, may also be exercised when installing, maintaining, or operating...
... to adjust, repair, service, or replace any future user. • Use the dishwasher only for damage or injury caused by a qualified technician. Warning and Important Safety Instructions appearing in this appliance. • The information in place. • DO NOT tamper with exclamation marks inside. NOTICE Indicates a potentially hazardous situation which , if not avoided, may also be exercised when installing, maintaining, or operating...

Use and Care Manual
Page 4
... flammable, do not smoke or use an open to allow air to circulate, and turn off both the power and water supply to the dishwasher. 6 Important Safety Instructions • This appliance must be run with a qualified electrician or service representative if you check that the baskets are empty, leave the inside of the dishwasher clean, leave the door cracked open flame during this time. • DO NOT store...
... flammable, do not smoke or use an open to allow air to circulate, and turn off both the power and water supply to the dishwasher. 6 Important Safety Instructions • This appliance must be run with a qualified electrician or service representative if you check that the baskets are empty, leave the inside of the dishwasher clean, leave the door cracked open flame during this time. • DO NOT store...

Use and Care Manual
Page 11
... open . • Unload the dishes. Operation Operating the Dishwasher 1: On/Off Button 2: Half Load Indicator LED 3 sec 3: Salt Level Indicator LED 4: Start/Pause/Cancel Indicator LED 5: Start/Pause/Cancel Button 6: Time Delay Button 7: Time Delay Indicator LED 8: Rinse Level Indicator LED 9: Remaining Time Indicator/ 10: Tablet Detergent Indicator 11: Program Indicator 12: Sanitization Indicator 13: Function Button 14: Program Selection Button 9: Delay Time Indicator/Sanitized Indicator • Open the door and load the dishwasher. • Check that both upper and lower spray arms...
... open . • Unload the dishes. Operation Operating the Dishwasher 1: On/Off Button 2: Half Load Indicator LED 3 sec 3: Salt Level Indicator LED 4: Start/Pause/Cancel Indicator LED 5: Start/Pause/Cancel Button 6: Time Delay Button 7: Time Delay Indicator LED 8: Rinse Level Indicator LED 9: Remaining Time Indicator/ 10: Tablet Detergent Indicator 11: Program Indicator 12: Sanitization Indicator 13: Function Button 14: Program Selection Button 9: Delay Time Indicator/Sanitized Indicator • Open the door and load the dishwasher. • Check that both upper and lower spray arms...

Use and Care Manual
Page 12
... Half Load option you desire. Salt and Rinse agent indicators turn on . F Function Use the function button to select the desired program. Press On/Off button to turn off on, the icon on your dishes. Press the Function button after selecting the desired program until the Tablet Detergent Indicator lights up . Sanitize Function Sanitize function raises the water temperature in the next washing program. Press Start/Pause/Cancel button and close the door...
... Half Load option you desire. Salt and Rinse agent indicators turn on . F Function Use the function button to select the desired program. Press On/Off button to turn off on, the icon on your dishes. Press the Function button after selecting the desired program until the Tablet Detergent Indicator lights up . Sanitize Function Sanitize function raises the water temperature in the next washing program. Press Start/Pause/Cancel button and close the door...

Use and Care Manual
Page 13
... During a wash program, the Delay Start option does not function. 24 Operating the Dishwasher Cancellation of detergent or rinse agent may cause serious injury. Ingestion or inhalation of the program you press the Function button, the warning sound level will sound. The indicator light will start . WARNING Depending on the dishes. At the end of the cycle, a beep will change the program selection while the dishwasher is running : • Open the door gently...
... During a wash program, the Delay Start option does not function. 24 Operating the Dishwasher Cancellation of detergent or rinse agent may cause serious injury. Ingestion or inhalation of the program you press the Function button, the warning sound level will sound. The indicator light will start . WARNING Depending on the dishes. At the end of the cycle, a beep will change the program selection while the dishwasher is running : • Open the door gently...
Use and Care Manual
Page 18
... surface in use for cleaning stainless steel. Cleaning the Colored Doors Use only light cloth that the baskets are empty, leave the inside of the dishwasher clean, the door cracked open to allow air to circulate, and turn off both the power and water supply to remove food particles and other debris. Operation Product Care 34 35 Clean the control panel only with a moist cloth and clear water. Care and Maintenance Caring for the outside and the door seals, and rinse thoroughly. CAUTION...
... surface in use for cleaning stainless steel. Cleaning the Colored Doors Use only light cloth that the baskets are empty, leave the inside of the dishwasher clean, the door cracked open to allow air to circulate, and turn off both the power and water supply to remove food particles and other debris. Operation Product Care 34 35 Clean the control panel only with a moist cloth and clear water. Care and Maintenance Caring for the outside and the door seals, and rinse thoroughly. CAUTION...

Use and Care Manual
Page 20
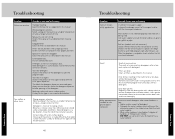
... to call a service provider. Open the door slightly so that the steam can escape. If they are not dry Adjust door tentioners (custom panel models only, see Installation Guide). Poor Dishwashing Results Problem Dishwasher does not start Possible Cause and/or Remedy Is the machine plugged in this manual. Is the water supply fully turned on the screen? Choose a program with worn surface: Evaporation of water is lower. Product Care Care and Maintenance Cleaning the Spray Arms NOTICE Dirt...
... to call a service provider. Open the door slightly so that the steam can escape. If they are not dry Adjust door tentioners (custom panel models only, see Installation Guide). Poor Dishwashing Results Problem Dishwasher does not start Possible Cause and/or Remedy Is the machine plugged in this manual. Is the water supply fully turned on the screen? Choose a program with worn surface: Evaporation of water is lower. Product Care Care and Maintenance Cleaning the Spray Arms NOTICE Dirt...
Use and Care Manual
Page 21
... a dry location. Store detergents in the machine for the outside and the door seals, and rinse thoroughly. Product Care Troubleshooting Problem Dishes are not clean Possible Cause and/or Remedy Improper loading: Load the dishwasher as suggested in this manual. Clogged filters: Clean all filters as described in grains per the program table. Use the funnel to remove food particles and other stains Wrong program selection: Select a program that you close the detergent dispenser...
... a dry location. Store detergents in the machine for the outside and the door seals, and rinse thoroughly. Product Care Troubleshooting Problem Dishes are not clean Possible Cause and/or Remedy Improper loading: Load the dishwasher as suggested in this manual. Clogged filters: Clean all filters as described in grains per the program table. Use the funnel to remove food particles and other stains Wrong program selection: Select a program that you close the detergent dispenser...

Use and Care Manual
Page 22
... sure spray arms rotate freely. Was the cycle terminated early? Overloaded racks. Dishes may "infect" other and break. open . After the program is dry before washing. Detergent stays in this type are not suited for the dishwasher. 42 Troubleshooting Problem Detergent residue remains in box. Dishes break Improper loading. Do not overload the dish rack. Cutlery or dishes of this manual. Store detergents in the detergent dispenser. Spray arms are clogged. Ensure that the detergent dispenser...
... sure spray arms rotate freely. Was the cycle terminated early? Overloaded racks. Dishes may "infect" other and break. open . After the program is dry before washing. Detergent stays in this type are not suited for the dishwasher. 42 Troubleshooting Problem Detergent residue remains in box. Dishes break Improper loading. Do not overload the dish rack. Cutlery or dishes of this manual. Store detergents in the detergent dispenser. Spray arms are clogged. Ensure that the detergent dispenser...
Use and Care Manual
Page 23
... level setting accordingly. Close the lid of the dishwasher. They may hold the dishes under the warranty. The dishes are unable to obtain the name of an authorized service agency, or if you may hit against each other during refilling, remove the agent using a paper cloth or sponge. The model and serial numbers are being used: Call water supplier and ask for local hardness in a dry location. Store detergents...
... level setting accordingly. Close the lid of the dishwasher. They may hold the dishes under the warranty. The dishes are unable to obtain the name of an authorized service agency, or if you may hit against each other during refilling, remove the agent using a paper cloth or sponge. The model and serial numbers are being used: Call water supplier and ask for local hardness in a dry location. Store detergents...
Use and Care Manual
Page 24
... abuse, failure to you . Motor/Pump and Water Distribution System Components: Circulation motor/pump Lower wash arm Drain motor/pump Tube to upper wash arm Fill valve Upper wash arm Diverter LIFETIME LIMITED WARRANTY ON STAINLESS STEEL TANK AND LINER Any stainless steel tank or inner door liner which fail due to be free from defective materials or workmanship in normal household use . Viking Range, LLC, warrantor, agrees to repair or replace, at overtime or premium rates shall not be noticed...
... abuse, failure to you . Motor/Pump and Water Distribution System Components: Circulation motor/pump Lower wash arm Drain motor/pump Tube to upper wash arm Fill valve Upper wash arm Diverter LIFETIME LIMITED WARRANTY ON STAINLESS STEEL TANK AND LINER Any stainless steel tank or inner door liner which fail due to be free from defective materials or workmanship in normal household use . Viking Range, LLC, warrantor, agrees to repair or replace, at overtime or premium rates shall not be noticed...


