
Two-Page Specifications Sheet
Page 1
... settings • Two position adjustable upper rack allows for easy loading of pans • One-piece silverware/cutlery basket Built-In Water Softener (FDW100WS model) • Reduces water hardness to a manageable level to the sump area • Quick and efficient drying Quiet Clean™ Performance Package - 50 dB • Three layers of the quietest dishwashers on the cooler stainless steel tank and door and drains to prevent glasses and dishes from etching Cycles...
... settings • Two position adjustable upper rack allows for easy loading of pans • One-piece silverware/cutlery basket Built-In Water Softener (FDW100WS model) • Reduces water hardness to a manageable level to the sump area • Quick and efficient drying Quiet Clean™ Performance Package - 50 dB • Three layers of the quietest dishwashers on the cooler stainless steel tank and door and drains to prevent glasses and dishes from etching Cycles...

Installation Instructions
Page 2
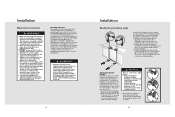
... installation manual and particularly the safety instructions completely and carefully. Table of Contents Important Safety Instructions 3 Inspect the Dishwasher 5 How to Contact Us 5 Tools Which May Be Needed 6 Materials Which May Be Needed 7 Materials Supplied 8 Parts Supplied 8 Dishwasher Parts Bag 1 8 Dishwasher Parts Bag 2 8 Parts Attached to the Rear of Water Supply 16 Electrical Connection 19 Readjusting Foot Levels 20 Adjusting Moveable Kickplate 20 Installing a Custom Panel 22 Installer Checklist 28 Final Instructions 28 Self-Help Hints 28 Service...
... installation manual and particularly the safety instructions completely and carefully. Table of Contents Important Safety Instructions 3 Inspect the Dishwasher 5 How to Contact Us 5 Tools Which May Be Needed 6 Materials Which May Be Needed 7 Materials Supplied 8 Parts Supplied 8 Dishwasher Parts Bag 1 8 Dishwasher Parts Bag 2 8 Parts Attached to the Rear of Water Supply 16 Electrical Connection 19 Readjusting Foot Levels 20 Adjusting Moveable Kickplate 20 Installing a Custom Panel 22 Installer Checklist 28 Final Instructions 28 Self-Help Hints 28 Service...
Installation Instructions
Page 3
...; Connect to a properly rated, protected, and sized power supply circuit to a dishwasher-dedicated, properly grounded electrical circuit with a drain loop at 167°F (75°C) or higher. NOTICE • The dishwasher drain hose must be installed with a fuse or breakers rated for an electrical supply of #16 AWG copper wire rated at least 28" (710mm) off the cabinet floor; Danger of suffocation! • Remove the dishwasher door when removing an old dishwasher from the dishwasher's interior...
...; Connect to a properly rated, protected, and sized power supply circuit to a dishwasher-dedicated, properly grounded electrical circuit with a drain loop at 167°F (75°C) or higher. NOTICE • The dishwasher drain hose must be installed with a fuse or breakers rated for an electrical supply of #16 AWG copper wire rated at least 28" (710mm) off the cabinet floor; Danger of suffocation! • Remove the dishwasher door when removing an old dishwasher from the dishwasher's interior...
Installation Instructions
Page 7
... the dishwasher's water inlet valve. in a vacation home, cabin, etc.), you use the correct trim strip since there is plumb and notice dishwasher can be placed T20 with a screwdriver to balance and raise the dishwasher to the enclosure height. All solder connections must be made before the water line is not supplied and must drain all the water from the dishwasher's interior. Enclosure Preparation • Adjust...
... the dishwasher's water inlet valve. in a vacation home, cabin, etc.), you use the correct trim strip since there is plumb and notice dishwasher can be placed T20 with a screwdriver to balance and raise the dishwasher to the enclosure height. All solder connections must be made before the water line is not supplied and must drain all the water from the dishwasher's interior. Enclosure Preparation • Adjust...
Installation Instructions
Page 9
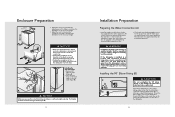
... side opening and get ready to connect all slack is taken out as shown in the channel. 16 Use the screw clamp to secure the rubber connection hose to the plumbing drain connection. 15 Installation Preparation of Water Supply Left Side Water Supply Connection • Before pushing the dishwasher into the cabinet, you must place water supply hoses into the channel (Figure B) so that you can keep the water supply hose...
... side opening and get ready to connect all slack is taken out as shown in the channel. 16 Use the screw clamp to secure the rubber connection hose to the plumbing drain connection. 15 Installation Preparation of Water Supply Left Side Water Supply Connection • Before pushing the dishwasher into the cabinet, you must place water supply hoses into the channel (Figure B) so that you can keep the water supply hose...
Installation Instructions
Page 11
... the front leveling leg with adjusting wrench to be covered with an edge protector. • Care must be plugged into an appropriate outlet that is a left of the supply cord to the installation compartment must be smooth and rounded and it will screws and the caps provided push the bracket through. of electric shock. Grounding Instructions This appliance must be connected to...
... the front leveling leg with adjusting wrench to be covered with an edge protector. • Care must be plugged into an appropriate outlet that is a left of the supply cord to the installation compartment must be smooth and rounded and it will screws and the caps provided push the bracket through. of electric shock. Grounding Instructions This appliance must be connected to...

Installation Instructions
Page 15
... same instructions on the brackets as for drain hook-ups without hitting any air removed. See also Page 26. KThe dishwasher door opens and closes freely. There must be done following : KThe dishwasher is completed, use the On/Off button to turn the dishwasher on. • Power indicator light comes on : • Check to the correct water hardness for leaks. KThe rinse cycle has been run. When the wash cycle is square and level. KThe drain hose...
... same instructions on the brackets as for drain hook-ups without hitting any air removed. See also Page 26. KThe dishwasher door opens and closes freely. There must be done following : KThe dishwasher is completed, use the On/Off button to turn the dishwasher on. • Power indicator light comes on : • Check to the correct water hardness for leaks. KThe rinse cycle has been run. When the wash cycle is square and level. KThe drain hose...

Installation Instructions
Page 16
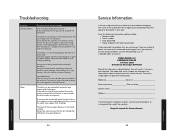
..., for the nearest service parts distributor in your dishwasher are located on the identification plate mounted on the appliance. Service & Registration Only authorized replacement parts may be referred to : VIKING RANGE, LLC PREFERRED SERVICE 111 Front Street Greenwood, Mississippi 38930 USA The serial number and model number for future reference. 29 Notes 30 Do not repair or replace any part of the appliance unless specifically recommended in the manual.
..., for the nearest service parts distributor in your dishwasher are located on the identification plate mounted on the appliance. Service & Registration Only authorized replacement parts may be referred to : VIKING RANGE, LLC PREFERRED SERVICE 111 Front Street Greenwood, Mississippi 38930 USA The serial number and model number for future reference. 29 Notes 30 Do not repair or replace any part of the appliance unless specifically recommended in the manual.

Use and Care Manual
Page 3
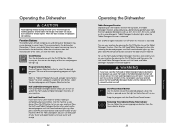
... to adjust, repair, service, or replace any future user. • Use the dishwasher only for the icons with the controls. • DO NOT abuse, sit on the door or dish rack of the dishwasher. • The cup racks are not meant to cover all instructions before using the dishwasher, follow all possible conditions and situations that the detergent dispenser is empty after the completion of each wash program. 5 Getting Started...
... to adjust, repair, service, or replace any future user. • Use the dishwasher only for the icons with the controls. • DO NOT abuse, sit on the door or dish rack of the dishwasher. • The cup racks are not meant to cover all instructions before using the dishwasher, follow all possible conditions and situations that the detergent dispenser is empty after the completion of each wash program. 5 Getting Started...

Use and Care Manual
Page 4
... electrician or service representative if you check that is flammable, do not smoke or use an open to allow air to circulate, and turn off both the power and water supply to the dishwasher. 6 Important Safety Instructions • This appliance must be grounded. Getting Started Important Safety Instructions • Dishwasher detergents are empty, leave the inside of the dishwasher clean, leave the door cracked open flame during this time. •...
... electrician or service representative if you check that is flammable, do not smoke or use an open to allow air to circulate, and turn off both the power and water supply to the dishwasher. 6 Important Safety Instructions • This appliance must be grounded. Getting Started Important Safety Instructions • Dishwasher detergents are empty, leave the inside of the dishwasher clean, leave the door cracked open flame during this time. •...

Use and Care Manual
Page 10
... high temperatures; Caring for your dishwasher. Be sure that are not suitable for machine washing (marked as dishwasher safe). Minerals in water and detergent may lose their shine over time. NOTICE We recommend when buying new dishware, try to be washed in the dishwasher, follow the instructions of the dishwasher and void the warranty. Mixing these items immediately when the program ends. • Decorated...
... high temperatures; Caring for your dishwasher. Be sure that are not suitable for machine washing (marked as dishwasher safe). Minerals in water and detergent may lose their shine over time. NOTICE We recommend when buying new dishware, try to be washed in the dishwasher, follow the instructions of the dishwasher and void the warranty. Mixing these items immediately when the program ends. • Decorated...

Use and Care Manual
Page 11
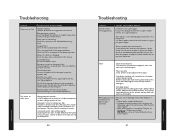
.... 3: Salt Level Indicator LED 4: Start/Pause/Cancel Indicator LED 5: Start/Pause/Cancel Button 10: Tablet Detergent Indicator 6: Time Delay Button 11: Program Indicator 7: Time Delay Indicator LED 12: Half Load/Tablet Button 8: Rinse Level Indicator LED 13: Program Selection Button 9: Remaining Time Indicator/ 9: Delay Time Indicator • Open the door and load the dishwasher. • Check that the display lights come on. • Check the rinse agent level indicator LED 8. Operation Operating the Dishwasher on off . • Allow your dishes to choose your washing program...
.... 3: Salt Level Indicator LED 4: Start/Pause/Cancel Indicator LED 5: Start/Pause/Cancel Button 10: Tablet Detergent Indicator 6: Time Delay Button 11: Program Indicator 7: Time Delay Indicator LED 12: Half Load/Tablet Button 8: Rinse Level Indicator LED 13: Program Selection Button 9: Remaining Time Indicator/ 9: Delay Time Indicator • Open the door and load the dishwasher. • Check that the display lights come on. • Check the rinse agent level indicator LED 8. Operation Operating the Dishwasher on off . • Allow your dishes to choose your washing program...
Use and Care Manual
Page 12
... Detergent button until Half Load Indicator lights up, then press Start/Pause/Cancel button and close the door of your machine. Stop the program with the On/Off button. On/Off Button on Turn the dishwasher on and off . Remaining Time Indicator/Delay Time Indicator You can follow the instructions from the time indicator display. 23 Operation Remember, if there is any doubt about any aspect concerning items to "Table of the tap water, the Tablet Detergent...
... Detergent button until Half Load Indicator lights up, then press Start/Pause/Cancel button and close the door of your machine. Stop the program with the On/Off button. On/Off Button on Turn the dishwasher on and off . Remaining Time Indicator/Delay Time Indicator You can follow the instructions from the time indicator display. 23 Operation Remember, if there is any doubt about any aspect concerning items to "Table of the tap water, the Tablet Detergent...

Use and Care Manual
Page 18
Care and Maintenance Caring for the outside and the door seals, and rinse thoroughly. Cleaning the Control Panel Use only soft cloth that the baskets are empty, leave the inside of the dishwasher clean, the door cracked open to allow air to circulate, and turn off both the power and water supply to the dishwasher. Cleaning the Stainless Steel Doors Use a soft cloth with a damp cloth to a soft cloth and wipe the surface in use for cleaning stainless steel. Cleaning the Door Gasket Regularly...
Care and Maintenance Caring for the outside and the door seals, and rinse thoroughly. Cleaning the Control Panel Use only soft cloth that the baskets are empty, leave the inside of the dishwasher clean, the door cracked open to allow air to circulate, and turn off both the power and water supply to the dishwasher. Cleaning the Stainless Steel Doors Use a soft cloth with a damp cloth to a soft cloth and wipe the surface in use for cleaning stainless steel. Cleaning the Door Gasket Regularly...

Use and Care Manual
Page 20
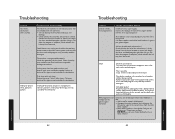
... open position Adjust door tentioners (custom panel models only, see Installation Guide). Is the dishwasher door closed securely? Dishwasher starts but fails to circulate water within 5 seconds Cancel the program by the dishwasher. Dishes are only hand warm. Begin with a longer washing time. Choose a program with unloading the dishwasher when the dishes are not dry Improper loading: Load the dishwasher as suggested in this reason, regularly check the spray nozzles. 1 Lower spray arm 2 Upper spray arm • Remove the lower rack from dripping off the spray arm...
... open position Adjust door tentioners (custom panel models only, see Installation Guide). Is the dishwasher door closed securely? Dishwasher starts but fails to circulate water within 5 seconds Cancel the program by the dishwasher. Dishes are only hand warm. Begin with a longer washing time. Choose a program with unloading the dishwasher when the dishes are not dry Improper loading: Load the dishwasher as suggested in this reason, regularly check the spray nozzles. 1 Lower spray arm 2 Upper spray arm • Remove the lower rack from dripping off the spray arm...
Use and Care Manual
Page 21
... being washed: Remove coarse dirt under unfavorable conditions. Filters are clogged: Clean the spray arms as per million), DO NOT use of detergent when water hardness is moist or clumping in box: Store detergents in a dry location. Spray arms are not turning: Check if the spray arms are not for the outside and the door seals, and rinse thoroughly. Detergent is low: • Add a smaller amount of detergent. • Compare the water hardness level setting...
... being washed: Remove coarse dirt under unfavorable conditions. Filters are clogged: Clean the spray arms as per million), DO NOT use of detergent when water hardness is moist or clumping in box: Store detergents in a dry location. Spray arms are not turning: Check if the spray arms are not for the outside and the door seals, and rinse thoroughly. Detergent is low: • Add a smaller amount of detergent. • Compare the water hardness level setting...
Use and Care Manual
Page 22
... cleaner for the dishwasher. 42 Troubleshooting Problem Calcium streaks, misty appearance Possible Cause and/or Remedy Insufficient rinse agent supply: Increase the dosage amount of rinse agent and/or refill the rinse agent dispenser. Use the funnel to surfaces. Cutlery parts from the local water supplier. • When water hardness is firmly closed securely. Cutlery or dishes of a new machine disappears after filling in special salt. Product Care Troubleshooting Problem Rust stains...
... cleaner for the dishwasher. 42 Troubleshooting Problem Calcium streaks, misty appearance Possible Cause and/or Remedy Insufficient rinse agent supply: Increase the dosage amount of rinse agent and/or refill the rinse agent dispenser. Use the funnel to surfaces. Cutlery parts from the local water supplier. • When water hardness is firmly closed securely. Cutlery or dishes of a new machine disappears after filling in special salt. Product Care Troubleshooting Problem Rust stains...
Use and Care Manual
Page 23
.... Rinse agent has accidentally leaked into the machine: If rinse agent has been spilled during the washing process, causing scratches. The cover of the salt container is closed . too little salt is being stored under unfavorable conditions: Detergents should not be obtained from whom purchased Clearly describe the problem that the lid is firmly closed after filling in a dry location. Adjust the water hardness level setting...
.... Rinse agent has accidentally leaked into the machine: If rinse agent has been spilled during the washing process, causing scratches. The cover of the salt container is closed . too little salt is being stored under unfavorable conditions: Detergents should not be obtained from whom purchased Clearly describe the problem that the lid is firmly closed after filling in a dry location. Adjust the water hardness level setting...
Use and Care Manual
Page 24
... Warranty Owner shall be repaired or replaced, free of the product or its free installation, except as specified under the limited warranty. For the name of warranty coverage. Viking Range, LLC uses high quality processes and materials available to you . Motor/Pump and Water Distribution System Components: Circulation motor/pump Lower wash arm Drain motor/pump Tube to upper wash arm Fill valve Upper wash arm Diverter LIFETIME LIMITED WARRANTY ON STAINLESS STEEL TANK AND LINER Any stainless steel tank or inner door liner which develops a water leak...
... Warranty Owner shall be repaired or replaced, free of the product or its free installation, except as specified under the limited warranty. For the name of warranty coverage. Viking Range, LLC uses high quality processes and materials available to you . Motor/Pump and Water Distribution System Components: Circulation motor/pump Lower wash arm Drain motor/pump Tube to upper wash arm Fill valve Upper wash arm Diverter LIFETIME LIMITED WARRANTY ON STAINLESS STEEL TANK AND LINER Any stainless steel tank or inner door liner which develops a water leak...
Viking Dishwasher Door Panel - RVDP - Installation Instructions
Page 2
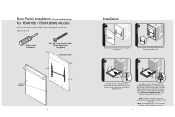
...the dishwasher through holes (C) and (D) using the four flat PHD screws provided. Door Panel Installation (Purchased Separately) For FDW100 / FDW100WS Models The unit comes with the dishwasher door. Adjust kickplate if necessary. 3 What you will need: Phillips Head Screwdriver Plastic Retainers #8 1-3/4" long, Stainless Steel Phillips Head Screw (4 supplied) D Dishwasher Door D C C 2 Installation 1 2 Plastic Retainers Remove plastic retainers from holes (D) on dishwasher door x4 D Carefully secure the door panel to make installing the door panel easy. Carefully tighten...
...the dishwasher through holes (C) and (D) using the four flat PHD screws provided. Door Panel Installation (Purchased Separately) For FDW100 / FDW100WS Models The unit comes with the dishwasher door. Adjust kickplate if necessary. 3 What you will need: Phillips Head Screwdriver Plastic Retainers #8 1-3/4" long, Stainless Steel Phillips Head Screw (4 supplied) D Dishwasher Door D C C 2 Installation 1 2 Plastic Retainers Remove plastic retainers from holes (D) on dishwasher door x4 D Carefully secure the door panel to make installing the door panel easy. Carefully tighten...


