

Viking Product Line
Page 2
Born from the Professional line, the new Viking line delivers genuine Viking performance with products to complement your chance to refrigerators and dishwashers, the Viking line offers outstanding power and features, with sleek styling and standard sizes. Whether you're just starting out or redesigning your entire kitchen, here's your ...
Born from the Professional line, the new Viking line delivers genuine Viking performance with products to complement your chance to refrigerators and dishwashers, the Viking line offers outstanding power and features, with sleek styling and standard sizes. Whether you're just starting out or redesigning your entire kitchen, here's your ...

Viking Product Line
Page 4
...odors. The bottom freezer pulls out at perfect-reach height with dedicated drawers and shelves to us. thankfully Viking dishwashers silently tackle the dreaded chore. Freestanding french-door bottom-freezers keep your ingredients fresher with slide-out baskets for healthy, tasty ...meals. Viking chimney wall hoods complement the Viking kitchen in both refrigerator and freezer compartments. French doors open wide to reveal an Adjustable Cold Zone™ Drawer...
...odors. The bottom freezer pulls out at perfect-reach height with dedicated drawers and shelves to us. thankfully Viking dishwashers silently tackle the dreaded chore. Freestanding french-door bottom-freezers keep your ingredients fresher with slide-out baskets for healthy, tasty ...meals. Viking chimney wall hoods complement the Viking kitchen in both refrigerator and freezer compartments. French doors open wide to reveal an Adjustable Cold Zone™ Drawer...
Viking Product Line
Page 5
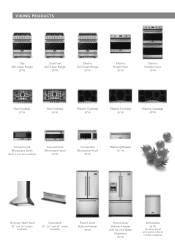
... trim kit available) Conventional Microwave Hood 30"W. Electric Self-Clean Range 30"W. Electric Cooktop 45"W. Dishwasher 24"W. (Custom panel and water softener models available) Dual Fuel Self-Clean Range 30"W. Electric Single Oven 30"W. Gas Cooktop 36"W. VIKING PRODUCTS Gas Self-Clean Range 30"W. Electric Double Oven 30"W. Warming Drawer 30" W. Electric...
... trim kit available) Conventional Microwave Hood 30"W. Electric Self-Clean Range 30"W. Electric Cooktop 45"W. Dishwasher 24"W. (Custom panel and water softener models available) Dual Fuel Self-Clean Range 30"W. Electric Single Oven 30"W. Gas Cooktop 36"W. VIKING PRODUCTS Gas Self-Clean Range 30"W. Electric Double Oven 30"W. Warming Drawer 30" W. Electric...
Two-Page Specifications Sheet
Page 1
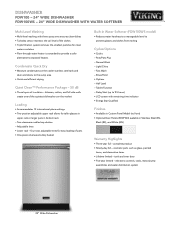
...Load - complete product • Ninety-day full - electronic controls, racks, motor/pump assemblies and water distribution system 24" Wide Dishwasher Adjustable tines • Lower rack - Pots/Pans Plus - Light/China - Rinse/Hold • Options - cosmetic parts such as... glass, painted items, and decorative items • Lifetime limited - DISHWASHER FDW100 - 24" WIDE DISHWASHER FDW100WS - 24" WIDE DISHWASHER WITH WATER SOFTENER ® Multi-Level Washing • Multi-level washing with three spray arms ensures clean dishes...
...Load - complete product • Ninety-day full - electronic controls, racks, motor/pump assemblies and water distribution system 24" Wide Dishwasher Adjustable tines • Lower rack - Pots/Pans Plus - Light/China - Rinse/Hold • Options - cosmetic parts such as... glass, painted items, and decorative items • Lifetime limited - DISHWASHER FDW100 - 24" WIDE DISHWASHER FDW100WS - 24" WIDE DISHWASHER WITH WATER SOFTENER ® Multi-Level Washing • Multi-level washing with three spray arms ensures clean dishes...
Two-Page Specifications Sheet
Page 2
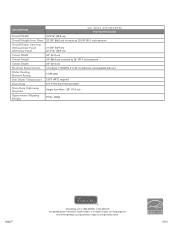
... Cutout Height Cutout Depth Electrical Requirements Water Heating Element Rating Inlet Water Temperature Drain Hose Drain Hose High Loop Required Approximate Shipping Weight 24" WIDE DISHWASHER FDW100/FDW100WS 23 9/16" (59.8 cm) 33 7/8" (86.0 cm) minimum to 35 7/8" (91.1 cm) maximum 21 5/8" (54.9 cm) 22 3/16" (56.4 ...176;F (49°C) required 6.4' (1.9m) drain hose provided Height from floor - 28" (71.0 cm) 97 lbs. (44kg) F60277 ® | Viking Range, LLC 1-888-845-4641 or 662-455-1200 For detailed product information, model numbers, or to request a quote visit vikingrange.com | © 2013...
... Cutout Height Cutout Depth Electrical Requirements Water Heating Element Rating Inlet Water Temperature Drain Hose Drain Hose High Loop Required Approximate Shipping Weight 24" WIDE DISHWASHER FDW100/FDW100WS 23 9/16" (59.8 cm) 33 7/8" (86.0 cm) minimum to 35 7/8" (91.1 cm) maximum 21 5/8" (54.9 cm) 22 3/16" (56.4 ...176;F (49°C) required 6.4' (1.9m) drain hose provided Height from floor - 28" (71.0 cm) 97 lbs. (44kg) F60277 ® | Viking Range, LLC 1-888-845-4641 or 662-455-1200 For detailed product information, model numbers, or to request a quote visit vikingrange.com | © 2013...
Installation Instructions
Page 1
F21043 EN (041513) 100 Series Built-In Dishwasher Installation Guide Viking Range, LLC 111 Front Street Greenwood, Mississippi 38930 USA (662) 455-1200 For product information, call 1-888-845-4641 or visit our web site in the US (www.vikingrange.com) or in Canada (www.brigade.ca).
F21043 EN (041513) 100 Series Built-In Dishwasher Installation Guide Viking Range, LLC 111 Front Street Greenwood, Mississippi 38930 USA (662) 455-1200 For product information, call 1-888-845-4641 or visit our web site in the US (www.vikingrange.com) or in Canada (www.brigade.ca).

Installation Instructions
Page 2
... references. WARNING Indicates a potentially hazardous situation which, if not avoided, could result in damage to the dishwasher, the tableware, the equipment, or the environment. Look particularly for Installing Mounting Brackets 10 Adjusting Height 10...Drain Preparation 13 Steam Protection Foil 14 Installation 15 Drain Hose Connection, Water Supply & Electrical Connections 15 Preparation of the Dishwasher 8 Dishwasher Specifications 9 Technical Features 9 Enclosure Preparation 10 Electrical Preparation 10 Preparation for the icons with exclamation marks inside. Site ...
... references. WARNING Indicates a potentially hazardous situation which, if not avoided, could result in damage to the dishwasher, the tableware, the equipment, or the environment. Look particularly for Installing Mounting Brackets 10 Adjusting Height 10...Drain Preparation 13 Steam Protection Foil 14 Installation 15 Drain Hose Connection, Water Supply & Electrical Connections 15 Preparation of the Dishwasher 8 Dishwasher Specifications 9 Technical Features 9 Enclosure Preparation 10 Electrical Preparation 10 Preparation for the icons with exclamation marks inside. Site ...
Installation Instructions
Page 3
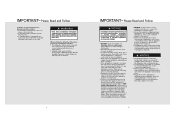
...local recycling authority about the possibility of children. Failure to do this could be dangerous and may not drain properly. • This dishwasher is intended for disposal. • Old appliances may cause damage to property or bodily injury. • Connect to a properly rated..., protected, and sized power supply circuit to a dishwasher-dedicated, properly grounded electrical circuit with the Canadian Electric Code C22.1-latest edition/Provincial and Municipal codes and/or local codes. IMPORTANT- ...
...local recycling authority about the possibility of children. Failure to do this could be dangerous and may not drain properly. • This dishwasher is intended for disposal. • Old appliances may cause damage to property or bodily injury. • Connect to a properly rated..., protected, and sized power supply circuit to a dishwasher-dedicated, properly grounded electrical circuit with the Canadian Electric Code C22.1-latest edition/Provincial and Municipal codes and/or local codes. IMPORTANT- ...
Installation Instructions
Page 4
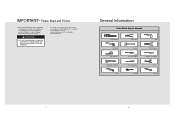
... (T20) Torx Screwdriver Slot Screwdriver Brush Drill Wire Stripper Phillips Screwdriver Scissors Pencil 5 6 Please Read and Follow • Inspect the Dishwasher: After unpacking the dishwasher and prior to installation, thoroughly inspect the dishwasher for possible freight or cosmetic damage. Report any bags or items that come with the original package until after the...
... (T20) Torx Screwdriver Slot Screwdriver Brush Drill Wire Stripper Phillips Screwdriver Scissors Pencil 5 6 Please Read and Follow • Inspect the Dishwasher: After unpacking the dishwasher and prior to installation, thoroughly inspect the dishwasher for possible freight or cosmetic damage. Report any bags or items that come with the original package until after the...
Installation Instructions
Page 5
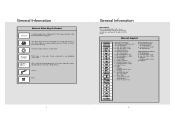
.... Teflon tape or other leg. Glue. 7 General Information Parts Supplied Parts for hot water supply line (copper tubing/compression fitting, or braided hose). x1 This dishwasher bag comes with 3/8" N.P.T. x1 the following parts: (Ø 3.5mmx14mm) a. Screws Ø 3/16"x1-3/4" c. x1 (Ø 3.5mmx14mm) e. Side Trim Strips - x1 f. Right g. Spring Clamp o. Screw Clamp...
.... Teflon tape or other leg. Glue. 7 General Information Parts Supplied Parts for hot water supply line (copper tubing/compression fitting, or braided hose). x1 This dishwasher bag comes with 3/8" N.P.T. x1 the following parts: (Ø 3.5mmx14mm) a. Screws Ø 3/16"x1-3/4" c. x1 (Ø 3.5mmx14mm) e. Side Trim Strips - x1 f. Right g. Spring Clamp o. Screw Clamp...
Installation Instructions
Page 6
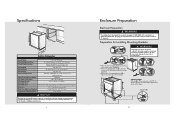
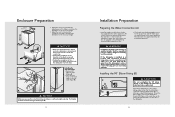
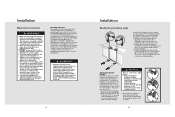
... 23-9/16" (59.8 cm) 33-7/8 (86.0 cm) min. Adjusting Height If the height of the enclosure is designed for Installing Mounting Brackets WARNING Dishwasher must be secured to 35-7/8" (91.1 cm) max. Failure to do this may change our specifications and design without door panel - 21 5/8" (54....9 cm) with the screws supplied. • Bend sides of the dishwasher, with door panel - 22 3/16" (156.4 cm) 24" (61.0 cm) 34" (86.4 cm) min. without prior notice. to adjacent cabinetry using ...
... 23-9/16" (59.8 cm) 33-7/8 (86.0 cm) min. Adjusting Height If the height of the enclosure is designed for Installing Mounting Brackets WARNING Dishwasher must be secured to 35-7/8" (91.1 cm) max. Failure to do this may change our specifications and design without door panel - 21 5/8" (54....9 cm) with the screws supplied. • Bend sides of the dishwasher, with door panel - 22 3/16" (156.4 cm) 24" (61.0 cm) 34" (86.4 cm) min. without prior notice. to adjacent cabinetry using ...
Installation Instructions
Page 7
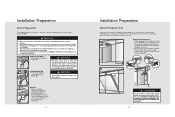
...Doing so may void the warranty. Orient the A water supply connection downwards as a result of the white arrows will bring the dishwasher back feet up. • Turning the screwdriver in the direction of freezing are not covered by unqualified persons could be facing forward ... be supplied to the enclosure height. The flexible material should be purchased separately. NOTICE • Make sure the dishwasher is plumb and notice dishwasher can also be copper tubing, make certain that experiences freezing temperatures (e.g. Work by warranty. Apply Teflon tape or ...
...Doing so may void the warranty. Orient the A water supply connection downwards as a result of the white arrows will bring the dishwasher back feet up. • Turning the screwdriver in the direction of freezing are not covered by unqualified persons could be facing forward ... be supplied to the enclosure height. The flexible material should be purchased separately. NOTICE • Make sure the dishwasher is plumb and notice dishwasher can also be copper tubing, make certain that experiences freezing temperatures (e.g. Work by warranty. Apply Teflon tape or ...
Installation Instructions
Page 8
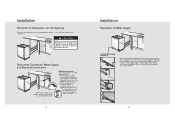
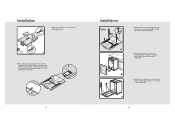
...Drain • Install a Y-branch tail pipe (Figure A). NOTICE Check with a damp cloth (as shown in Figure B). If your disposer manual for a dishwasher; A Installing an Air Gap • If the local ordinance requires an air gap (Figure B). Once the area dries, apply the steam protection foil. ...• The steam protection foil will form inside the dishwasher during installation can burst if it is installed on the underside of the counter top. Otherwise, the cleaning process is negatively influenced....
...Drain • Install a Y-branch tail pipe (Figure A). NOTICE Check with a damp cloth (as shown in Figure B). If your disposer manual for a dishwasher; A Installing an Air Gap • If the local ordinance requires an air gap (Figure B). Once the area dries, apply the steam protection foil. ...• The steam protection foil will form inside the dishwasher during installation can burst if it is installed on the underside of the counter top. Otherwise, the cleaning process is negatively influenced....
Installation Instructions
Page 9
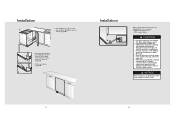
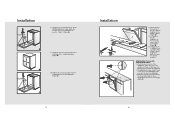
...Hose Connection Connect the drain hose to the drain plumbing. • Use the supplied rubber connection hose and drain hose clamps to connect the dishwasher drain hose to the plumbing drain connection. • Use the spring clamp to secure the rubber connection hose to the left. CAUTION Make...and get ready to the plumbing drain connection. 15 Installation Preparation of Water Supply Left Side Water Supply Connection • Before pushing the dishwasher into the cabinet, you must place water supply hoses into the channel of the cabinet, no hoses are pulled through the side opening of...
...Hose Connection Connect the drain hose to the drain plumbing. • Use the supplied rubber connection hose and drain hose clamps to connect the dishwasher drain hose to the plumbing drain connection. • Use the spring clamp to secure the rubber connection hose to the left. CAUTION Make...and get ready to the plumbing drain connection. 15 Installation Preparation of Water Supply Left Side Water Supply Connection • Before pushing the dishwasher into the cabinet, you must place water supply hoses into the channel of the cabinet, no hoses are pulled through the side opening of...
Installation Instructions
Page 10
... if any such operation is needed, keep the heat source min. 7-7/8" (20.0cm) away from the dishwasher's water inlet valve. • There should not be connected to the dishwasher in the channel to clear any sharp bends in the water line that may be any foreign material. Installation... flow. • Teflon tape or pipe thread compound must move in one clip for each side, push the dishwasher into the cabinet (Figure E). • Note that while pushing the dishwasher into the cabinet, water supply hose must be used for sealing the connection. Installation • After installing one...
... if any such operation is needed, keep the heat source min. 7-7/8" (20.0cm) away from the dishwasher's water inlet valve. • There should not be connected to the dishwasher in the channel to clear any sharp bends in the water line that may be any foreign material. Installation... flow. • Teflon tape or pipe thread compound must move in one clip for each side, push the dishwasher into the cabinet (Figure E). • Note that while pushing the dishwasher into the cabinet, water supply hose must be used for sealing the connection. Installation • After installing one...
Installation Instructions
Page 11
...shock. of the supply cord to the installation compartment must be taken when the appliance is installed or removed, to balance the dishwasher and raise it underneath the countertop. • Readjust the front leveling leg with the kitchen kickplate can result in a cabinet ...; 1/8"x1/8"-Ø 3.5mmx14mm). B 1. The longest dimension of the "L" opening shall not be smooth and rounded and it will A the dishwasher. This appliance must be large enough for • Lock the kickplate your kitchen. WARNING • Improper connection of the equipment-grounding conductor can...
...shock. of the supply cord to the installation compartment must be taken when the appliance is installed or removed, to balance the dishwasher and raise it underneath the countertop. • Readjust the front leveling leg with the kitchen kickplate can result in a cabinet ...; 1/8"x1/8"-Ø 3.5mmx14mm). B 1. The longest dimension of the "L" opening shall not be smooth and rounded and it will A the dishwasher. This appliance must be large enough for • Lock the kickplate your kitchen. WARNING • Improper connection of the equipment-grounding conductor can...
Installation Instructions
Page 13
... v 5. Attach the two mounting brackets to the wooden door with the plastic mounting brackets which you have attached (Figure B). Mount the wooden door onto the dishwasher with 4 screws (Ø 1/8"x5/8" (Ø 3.55mmx14mm) (Figure A). B 7. C 24 Place the plastic mounting brackets over the marked holes. Align the middle of the bracket with the...
... v 5. Attach the two mounting brackets to the wooden door with the plastic mounting brackets which you have attached (Figure B). Mount the wooden door onto the dishwasher with 4 screws (Ø 1/8"x5/8" (Ø 3.55mmx14mm) (Figure A). B 7. C 24 Place the plastic mounting brackets over the marked holes. Align the middle of the bracket with the...
Installation Instructions
Page 14
...) y 8. Using the four screws Ø 3/16"x1-11/16" (Ø 4mmx43mm) provided, attach the wooden door to the left for more weight and to the dishwasher at position 1 and 4 (Figure A). Check the position of the kitchen cabinet (Figure A). 11. 1. C 25 Installation 11. Tighten the screws in position 1 and 4 ... hits the kickplate, cut the necessary section out of the kickplate (Figure B). 11. 2 Apply silicon or sealant to the cut edge of the dishwasher; if the door closes too quickly or if the door falls open, the spring tension needs to be adjusted. • The adjustment screws can ...
...) y 8. Using the four screws Ø 3/16"x1-11/16" (Ø 4mmx43mm) provided, attach the wooden door to the left for more weight and to the dishwasher at position 1 and 4 (Figure A). Check the position of the kitchen cabinet (Figure A). 11. 1. C 25 Installation 11. Tighten the screws in position 1 and 4 ... hits the kickplate, cut the necessary section out of the kickplate (Figure B). 11. 2 Apply silicon or sealant to the cut edge of the dishwasher; if the door closes too quickly or if the door falls open, the spring tension needs to be adjusted. • The adjustment screws can ...

Installation Instructions
Page 15
...is plugged. KThe drain hose must be below . KThe water level will be installed with the Start/Pause/Cancel button. • Run the dishwasher through one of the two drawings given below the filter screen after the end of air gap next to the sink. • Remove drain ... is removed. 28 Self-Help Hints The screen does not come on: • Check to the cabinetry. KThe dishwasher door opens and closes freely. If the dishwasher drain is responsible for drain hook-ups without hitting any air removed. Incorrect installation is turned on the brackets as for leaks. There ...
...is plugged. KThe drain hose must be below . KThe water level will be installed with the Start/Pause/Cancel button. • Run the dishwasher through one of the two drawings given below the filter screen after the end of air gap next to the sink. • Remove drain ... is removed. 28 Self-Help Hints The screen does not come on: • Check to the cabinetry. KThe dishwasher door opens and closes freely. If the dishwasher drain is responsible for drain hook-ups without hitting any air removed. Incorrect installation is turned on the brackets as for leaks. There ...

Installation Instructions
Page 16
All servicing should remain with the dishwasher for your dishwasher are located on the identification plate mounted on the appliance. Contact Viking Range, LLC, 1-888-845-4641, for the nearest service parts distributor in your area or write to a qualified technician. Model number...in the manual. You will need it if service is ever required. Service & Registration Only authorized replacement parts may be referred to : VIKING RANGE, LLC PREFERRED SERVICE 111 Front Street Greenwood, Mississippi 38930 USA The serial number and model number for future reference. 29 Notes 30 Record...
All servicing should remain with the dishwasher for your dishwasher are located on the identification plate mounted on the appliance. Contact Viking Range, LLC, 1-888-845-4641, for the nearest service parts distributor in your area or write to a qualified technician. Model number...in the manual. You will need it if service is ever required. Service & Registration Only authorized replacement parts may be referred to : VIKING RANGE, LLC PREFERRED SERVICE 111 Front Street Greenwood, Mississippi 38930 USA The serial number and model number for future reference. 29 Notes 30 Record...


