
Performance Tips
Page 1
... so that water will drain off the dishes prior to the rinse agent dispenser • The dispenser is properly cared for and cleaned. adjust the setting higher for hard water or lower for maximizing cleaning performance • For hard water or heavily soiled dishes, use maximum amount of detergent • For soft water or lightly soiled dishes, use a detergent with chlorine bleach For detailed information on loading, washing, drying and maintenance please see the Viking Use and Care Manual shipped with...
... so that water will drain off the dishes prior to the rinse agent dispenser • The dispenser is properly cared for and cleaned. adjust the setting higher for hard water or lower for maximizing cleaning performance • For hard water or heavily soiled dishes, use maximum amount of detergent • For soft water or lightly soiled dishes, use a detergent with chlorine bleach For detailed information on loading, washing, drying and maintenance please see the Viking Use and Care Manual shipped with...
Specs
Page 1
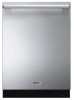
...; filtration with self-cleaning jets • Exclusive Sure-Temp™ Water Heating o 1400 watt HydroFlo™ water heater o Operable with "cold" ground water • Condensate Quick Dry • Quiet Clean™ Performance Package o Separate motor/pump assemblies for DDB model • Stainless Steel (SS), Black (BK), White (WH) PLANNING AND DESIGN GUIDE VIKINGRANGE.COM • 1-888-VIKING1 REVISED 4/29/11 © 2 0 1 1 V R C - Pots/Pans, Normal Wash, Econo Wash, Light/China, Rinse/Hold •...
...; filtration with self-cleaning jets • Exclusive Sure-Temp™ Water Heating o 1400 watt HydroFlo™ water heater o Operable with "cold" ground water • Condensate Quick Dry • Quiet Clean™ Performance Package o Separate motor/pump assemblies for DDB model • Stainless Steel (SS), Black (BK), White (WH) PLANNING AND DESIGN GUIDE VIKINGRANGE.COM • 1-888-VIKING1 REVISED 4/29/11 © 2 0 1 1 V R C - Pots/Pans, Normal Wash, Econo Wash, Light/China, Rinse/Hold •...

Specs
Page 4
... TO CHANGE connections provided for 5/8" (1.5 cm), 3/4" (1.9 cm), or 1" (2.5 cm) cut -out is required for drain air gap requirement *Cycle times will , however, perform properly with cold water* • Inlet water pressure operating range- 10 - 125 psi (0.69 - 8.62 bar) • Five foot (1.5 m) braided stainless steel water line with 3/8" (0.95 cm) compression fitting supplied with dishwasher • Seven-foot (2.13 m) 1/2" (1.3 cm) ID "crimp-proof" flexible drain hose with 90 degree 3-prong plug...
... TO CHANGE connections provided for 5/8" (1.5 cm), 3/4" (1.9 cm), or 1" (2.5 cm) cut -out is required for drain air gap requirement *Cycle times will , however, perform properly with cold water* • Inlet water pressure operating range- 10 - 125 psi (0.69 - 8.62 bar) • Five foot (1.5 m) braided stainless steel water line with 3/8" (0.95 cm) compression fitting supplied with dishwasher • Seven-foot (2.13 m) 1/2" (1.3 cm) ID "crimp-proof" flexible drain hose with 90 degree 3-prong plug...
Quick Reference Guide
Page 1
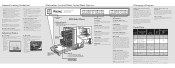
... water from the dishwasher before closing the door and the cycle will light, indicating a two hour delay. Dishwasher Controls/Wash Cycles/Wash Options Start/Cancel Switch 450E Model Shown Roller Bearing™ upper rack • Hold-Tight™ dividers (3) • One-piece stemware Cradle/cup shelf (1 row) (450E model) • One-piece cup shelf (1 row) Stainless steel wash arms DishGuard™ protector Removable coarse strainer Fine filter Top of lower wash arm by models. Energy usage label is running the dishwasher. Press the "Delay Start...
... water from the dishwasher before closing the door and the cycle will light, indicating a two hour delay. Dishwasher Controls/Wash Cycles/Wash Options Start/Cancel Switch 450E Model Shown Roller Bearing™ upper rack • Hold-Tight™ dividers (3) • One-piece stemware Cradle/cup shelf (1 row) (450E model) • One-piece cup shelf (1 row) Stainless steel wash arms DishGuard™ protector Removable coarse strainer Fine filter Top of lower wash arm by models. Energy usage label is running the dishwasher. Press the "Delay Start...
Quick Reference Guide
Page 2
... while it should be referred to push racks in the manual. Rinse stainless steel items if they will receive, free of charge, a complete set of personal injury due to steam burns, open . • When discarding an old dishwasher, ALWAYS remove the door to prevent accidental entrapment. • To prevent electrical shock, disconnect electrical power supply to dishwasher before opening unit or handling dishes. All safety messages will allow children...
... while it should be referred to push racks in the manual. Rinse stainless steel items if they will receive, free of charge, a complete set of personal injury due to steam burns, open . • When discarding an old dishwasher, ALWAYS remove the door to prevent accidental entrapment. • To prevent electrical shock, disconnect electrical power supply to dishwasher before opening unit or handling dishes. All safety messages will allow children...

Installation Instructions
Page 2
... breaker or fuse box before making electrical connections. WARNING Make sure that this appliance. 2 3 Wiring the dishwasher with the consumer who should leave these instructions completely and carefully. • Do not remove permanently affixed labels, warnings, or rating plates from base. Table of Contents Warnings & Important Information 3 Dimensions & Cutout Dimensions 6 Specifications 7 Custom Door Panel Specifications 8 Custom Door Panel Installation Option 9 General Information 10 Site Preparation 10 Water Supply 10 Drain 10 Electrical Connections 11 Hardwire...
... breaker or fuse box before making electrical connections. WARNING Make sure that this appliance. 2 3 Wiring the dishwasher with the consumer who should leave these instructions completely and carefully. • Do not remove permanently affixed labels, warnings, or rating plates from base. Table of Contents Warnings & Important Information 3 Dimensions & Cutout Dimensions 6 Specifications 7 Custom Door Panel Specifications 8 Custom Door Panel Installation Option 9 General Information 10 Site Preparation 10 Water Supply 10 Drain 10 Electrical Connections 11 Hardwire...

Installation Instructions
Page 4
... 15.0 amps, 120VAC/60 Hz; Power cord must be purchased separately. 15.0 amps, 120VAC/60 Hz; 3'9" (1.1 m) electrical cord 3 prong plug supplied with 3/8" (0.95 cm) compression fitting connected to dishwasher Drain hose Drain hose high loop required Approximate shipping weight 7' (2.13 m) 1/2" (1.3 cm) ID "crimp-proof" flexible drain hose attached to 8.62 bar) Inlet water hose 5' (1.5 m) braided stainless steel water line with unit. Water-heating element rating 200/325E/450E models - 1200 watts Inlet water temperature 120°F (49°...
... 15.0 amps, 120VAC/60 Hz; Power cord must be purchased separately. 15.0 amps, 120VAC/60 Hz; 3'9" (1.1 m) electrical cord 3 prong plug supplied with 3/8" (0.95 cm) compression fitting connected to dishwasher Drain hose Drain hose high loop required Approximate shipping weight 7' (2.13 m) 1/2" (1.3 cm) ID "crimp-proof" flexible drain hose attached to 8.62 bar) Inlet water hose 5' (1.5 m) braided stainless steel water line with unit. Water-heating element rating 200/325E/450E models - 1200 watts Inlet water temperature 120°F (49°...

Installation Instructions
Page 6
... the drain hose is 1" (2.5 cm), but is turned off at the disconnect switch indicating that the water supply line and the shut-off valve (not supplied) should be purchased separately. NOTE: The end of 10 to a grounded metal, permanent wiring system; The plug must be 2" square (5.1 cm) with a 3'9" (1.1 m) electrical cord for the drain line should be connected to 125 psi. WARNING Be sure electrical power is adjustable to the power supply cord. • The dishwasher...
... the drain hose is 1" (2.5 cm), but is turned off at the disconnect switch indicating that the water supply line and the shut-off valve (not supplied) should be purchased separately. NOTE: The end of 10 to a grounded metal, permanent wiring system; The plug must be 2" square (5.1 cm) with a 3'9" (1.1 m) electrical cord for the drain line should be connected to 125 psi. WARNING Be sure electrical power is adjustable to the power supply cord. • The dishwasher...
Installation Instructions
Page 9
... custom panel installation, the door may require adjustment to pinch hoses or power cord beneath dishwasher. 2 To adjust the depth of the counterbalance springs. NOTE: Be careful not to the preload of the kick plate, loosen screws on its back and attach the kick plate brackets. be in appropriate location. c Reconnect cable to back. (Select models only) 17 Up Down Using a level, adjust to feed water, electrical and discharge lines into opening; Set counter...
... custom panel installation, the door may require adjustment to pinch hoses or power cord beneath dishwasher. 2 To adjust the depth of the counterbalance springs. NOTE: Be careful not to the preload of the kick plate, loosen screws on its back and attach the kick plate brackets. be in appropriate location. c Reconnect cable to back. (Select models only) 17 Up Down Using a level, adjust to feed water, electrical and discharge lines into opening; Set counter...

Installation Instructions
Page 10
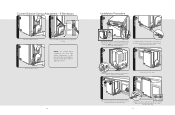
... 20" (50.8 cm) from the top. Front Panel Removed 18 Installation Procedure (cont'd.) 7 7b Attach screws through bracket into cabinets (select models). 9 1.0" (2.5 cm) Cut here for 5/8" (1.6 cm) Cut here for 3/4" (1.9 cm) Identify discharge connection size; Installation Procedure (cont'd.) 5b Front Panel Attached Front Panel Removed Remove front panel to correct size and connect. cut line to access the front leveling legs. 5c 6 Leveling legs will be raised during shipping. Clamp if necessary...
... 20" (50.8 cm) from the top. Front Panel Removed 18 Installation Procedure (cont'd.) 7 7b Attach screws through bracket into cabinets (select models). 9 1.0" (2.5 cm) Cut here for 5/8" (1.6 cm) Cut here for 3/4" (1.9 cm) Identify discharge connection size; Installation Procedure (cont'd.) 5b Front Panel Attached Front Panel Removed Remove front panel to correct size and connect. cut line to access the front leveling legs. 5c 6 Leveling legs will be raised during shipping. Clamp if necessary...
Use and Care Manual
Page 3
... Product Controls Cycle Data 11 General Features: Cycles 12 Using the Delay Start Option 13 Operation Preparing Dishes 14 Washing Recommendations 16 Rack Adjustments 18 Silverware Basket 19 Loading Dishwasher 20 Loading Silverware Basket 21 Loading Racks 23 Dishwasher Detergent 25 Rinse Agent 26 Wash Temperature 27 Energy Saving Tips 27 Water Hardness 28 Product Care Maintenance 29 Troubleshooting 31 Troubleshooting Fault Codes 36 Service Information 38 Warranty 39 4 Important Safety Instructions Read all instructions before opening completely. • Use only detergents...
... Product Controls Cycle Data 11 General Features: Cycles 12 Using the Delay Start Option 13 Operation Preparing Dishes 14 Washing Recommendations 16 Rack Adjustments 18 Silverware Basket 19 Loading Dishwasher 20 Loading Silverware Basket 21 Loading Racks 23 Dishwasher Detergent 25 Rinse Agent 26 Wash Temperature 27 Energy Saving Tips 27 Water Hardness 28 Product Care Maintenance 29 Troubleshooting 31 Troubleshooting Fault Codes 36 Service Information 38 Warranty 39 4 Important Safety Instructions Read all instructions before opening completely. • Use only detergents...
Use and Care Manual
Page 4
... unless specifically recommended in . Getting Started Getting Started Important Safety Instructions • When loading items to be referred to a qualified authorized technician. • When discarding an old dishwasher, always remove the door to run for several minutes before using your dishwasher, turn on all enclosure panels are properly in place. • DO NOT abuse, sit on or stand on the door or dish rack of the dishwasher...
... unless specifically recommended in . Getting Started Getting Started Important Safety Instructions • When loading items to be referred to a qualified authorized technician. • When discarding an old dishwasher, always remove the door to run for several minutes before using your dishwasher, turn on all enclosure panels are properly in place. • DO NOT abuse, sit on or stand on the door or dish rack of the dishwasher...

Use and Care Manual
Page 5
...; Water Heating HydroFlo™ water heater automatically heats water to appropriate/selected temperature, assuring excellent washing performance. • AirFlo™ Gentle Drying (450E model) Gentle, effective and safe fan-driven system delivers warm, gentle air over, under and around dishes. • Condensate Quick Dry (325E model) Moisture at the end of the cycle condenses on the stainless interior and drains into the sump area providing quick and efficient drying. • Quiet Clean...
...; Water Heating HydroFlo™ water heater automatically heats water to appropriate/selected temperature, assuring excellent washing performance. • AirFlo™ Gentle Drying (450E model) Gentle, effective and safe fan-driven system delivers warm, gentle air over, under and around dishes. • Condensate Quick Dry (325E model) Moisture at the end of the cycle condenses on the stainless interior and drains into the sump area providing quick and efficient drying. • Quiet Clean...

Use and Care Manual
Page 7
... "Delay Start" key once and the number "2" will only illuminate after they are selected. 13 The end-of-cycle signal consists of pressing the "START" button, 3 short beeps will occur when you delay running the dishwasher. Lowers last wash temperature and increases cycle time for optimum performance. Short, non-heated rinse with Pots/Pans and Normal cycles. Options TOP WASH (450E model only) Washes dishes on this cycle. "Delay Start" is based on top rack only. NORMAL WASH Normally soiled...
... "Delay Start" key once and the number "2" will only illuminate after they are selected. 13 The end-of-cycle signal consists of pressing the "START" button, 3 short beeps will occur when you delay running the dishwasher. Lowers last wash temperature and increases cycle time for optimum performance. Short, non-heated rinse with Pots/Pans and Normal cycles. Options TOP WASH (450E model only) Washes dishes on this cycle. "Delay Start" is based on top rack only. NORMAL WASH Normally soiled...

Use and Care Manual
Page 14
... of Rinse Agent The rinse agent dosage is set on dishes, and helps glasses dry spot free. The dispenser will illuminate from the hot water heater to the required temperature. If necessary, the rinse agent dosage can be longer to heat the water to the dishwasher, the running . 27 Operation NOTE: For soft water conditions, it may be adjusted by the manufacturer and is recommended. Energy Saving Tips • Only start a wash when...
... of Rinse Agent The rinse agent dosage is set on dishes, and helps glasses dry spot free. The dispenser will illuminate from the hot water heater to the required temperature. If necessary, the rinse agent dosage can be longer to heat the water to the dishwasher, the running . 27 Operation NOTE: For soft water conditions, it may be adjusted by the manufacturer and is recommended. Energy Saving Tips • Only start a wash when...
Use and Care Manual
Page 16
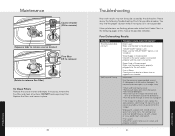
... the "DELAY START" option is not turned on . Power Cord is Disconnected: Make sure the power cord is properly plugged into a bowl and set it is turned on . Please review the following pages of the dishwasher. • Run the dishes through an entire wash program. Water Supply is Disconnected: Check that the water supply is connected properly and the water is clean and properly installed. 31 Product Care Fuse is closed securely. Product Care Maintenance 1 1 Coarse strainer (lift to remove) 2 (Squeeze...
... the "DELAY START" option is not turned on . Power Cord is Disconnected: Make sure the power cord is properly plugged into a bowl and set it is turned on . Please review the following pages of the dishwasher. • Run the dishes through an entire wash program. Water Supply is Disconnected: Check that the water supply is connected properly and the water is clean and properly installed. 31 Product Care Fuse is closed securely. Product Care Maintenance 1 1 Coarse strainer (lift to remove) 2 (Squeeze...

Use and Care Manual
Page 17
Product Care Troubleshooting PROBLEM Spotting and filming POSSIBLE CAUSE AND/OR REMEDY No rinse agent: Does the rinse agent dispenser need to start the dishwasher. Items not loaded properly: Check that you have a low heat tolerance: Plastics vary in their turning. Be sure a utensil or handle has not prevented their ability to spoons so that is still unsatisfactory. Clean if necessary. Refer to the instructions on pages in or...
Product Care Troubleshooting PROBLEM Spotting and filming POSSIBLE CAUSE AND/OR REMEDY No rinse agent: Does the rinse agent dispenser need to start the dishwasher. Items not loaded properly: Check that you have a low heat tolerance: Plastics vary in their turning. Be sure a utensil or handle has not prevented their ability to spoons so that is still unsatisfactory. Clean if necessary. Refer to the instructions on pages in or...

Use and Care Manual
Page 18
... dry. Do not use heated dry. 35 Product Care Run the dishwasher through the filtration system of glass Too much water as normal. Old detergent: If detergent is permanent. Use high quality dishwashing detergent and rinse aid. Cycle and Option buttons will create an unpleasant odor. If large chunks of at sink for delicate items. Use the light/china cycle. Water may need towel drying. Water feed line: Check to see that the cone-shaped connection line has been cut...
... dry. Do not use heated dry. 35 Product Care Run the dishwasher through the filtration system of glass Too much water as normal. Old detergent: If detergent is permanent. Use high quality dishwashing detergent and rinse aid. Cycle and Option buttons will create an unpleasant odor. If large chunks of at sink for delicate items. Use the light/china cycle. Water may need towel drying. Water feed line: Check to see that the cone-shaped connection line has been cut...
Use and Care Manual
Page 19
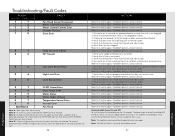
... try again. Verify that drain hose has high loop, per installation guide. 5. Reset Unit and try again. If problem persists, contact service. To turn over and are not clogged. Numbers listed indicate the times the lights will flash when a specific error is detected (example: For a drain error, the POTS/PANS light will flash once and the NORMAL WASH light will flash 2 times. If problem persists, contact service. Turn water on . If draining into disposal, verify that dishwasher drain hose is on at sink...
... try again. Verify that drain hose has high loop, per installation guide. 5. Reset Unit and try again. If problem persists, contact service. To turn over and are not clogged. Numbers listed indicate the times the lights will flash when a specific error is detected (example: For a drain error, the POTS/PANS light will flash once and the NORMAL WASH light will flash 2 times. If problem persists, contact service. Turn water on . If draining into disposal, verify that dishwasher drain hose is on at sink...
Use and Care Manual
Page 20
... valve Upper wash arm Diverter LIFETIME LIMITED WARRANTY ON STAINLESS STEEL TANK AND LINER Any stainless steel tank or inner door liner which could affect you continue to have service problems, contact Viking Range Corporation at its component part or parts. Replacement of a component part includes its components and accessories are located on stainless steel, paint/porcelain blemishes, etc.) for future reference. 38 Warranty BUILT-IN DISHWASHERS WARRANTY ONE YEAR FULL WARRANTY Built-in dishwashers and all specifications...
... valve Upper wash arm Diverter LIFETIME LIMITED WARRANTY ON STAINLESS STEEL TANK AND LINER Any stainless steel tank or inner door liner which could affect you continue to have service problems, contact Viking Range Corporation at its component part or parts. Replacement of a component part includes its components and accessories are located on stainless steel, paint/porcelain blemishes, etc.) for future reference. 38 Warranty BUILT-IN DISHWASHERS WARRANTY ONE YEAR FULL WARRANTY Built-in dishwashers and all specifications...


