Countertop Rear Trim - Installation Instructions
Page 1
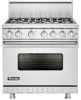
Viking Installation Guide Viking Range Corporation 111 Front Street Greenwood, Mississippi 38930 USA (662) 455-1200 For product information call 1-888-VIKING1 (845-4641) or visit the Viking Web site at vikingrange.com F1448K EN Range/Rangetop Rear Trim Accessories & Range Curb Base Fronts (020211)
Viking Installation Guide Viking Range Corporation 111 Front Street Greenwood, Mississippi 38930 USA (662) 455-1200 For product information call 1-888-VIKING1 (845-4641) or visit the Viking Web site at vikingrange.com F1448K EN Range/Rangetop Rear Trim Accessories & Range Curb Base Fronts (020211)
Countertop Rear Trim - Installation Instructions
Page 2
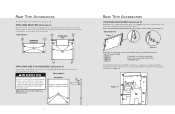
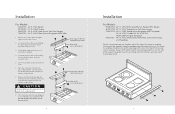
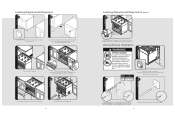
... the 4 enclosed screws. (Illustration I ) Grasp the trim on Designer models. Rear Trim Accessories All rear trim devices are needed to space the range off a combustible wall a prescribed safe distance. WARNING (Illustration II) To reduce the risk of fire or injury to HIGH SHELF persons, check to... the high-shelf back trim and secure with the holes (A) in the same basic way. ATTACHING REAR TRIM (Illustration I ) B RANGETOP REAR VIEW B RANGE REAR B VIEW B A A ATTACHING SHELF ON HIGH-SHELF (Illustration II) Place the top rolled edge (X) over the front lip of the rear trim ...
... the 4 enclosed screws. (Illustration I ) Grasp the trim on Designer models. Rear Trim Accessories All rear trim devices are needed to space the range off a combustible wall a prescribed safe distance. WARNING (Illustration II) To reduce the risk of fire or injury to HIGH SHELF persons, check to... the high-shelf back trim and secure with the holes (A) in the same basic way. ATTACHING REAR TRIM (Illustration I ) B RANGETOP REAR VIEW B RANGE REAR B VIEW B A A ATTACHING SHELF ON HIGH-SHELF (Illustration II) Place the top rolled edge (X) over the front lip of the rear trim ...
Countertop Rear Trim - Installation Instructions
Page 3
...Figure 4) Figure 4 Once you determine whether or not your product needs the provided spacers, the backguard is non-combustible. Loosen brackets on either a range or rangetop is in those cases where the island trim is installed with 6" (15.2 cm) of minimum clearance to a rear wall, or ...when a truly non-combustible material is used, will Viking Range Corporation accept responsibility for ensuring that the rear wall is possible. However, agency authorization has been received for proper airflow when using the (4) ...
...Figure 4) Figure 4 Once you determine whether or not your product needs the provided spacers, the backguard is non-combustible. Loosen brackets on either a range or rangetop is in those cases where the island trim is installed with 6" (15.2 cm) of minimum clearance to a rear wall, or ...when a truly non-combustible material is used, will Viking Range Corporation accept responsibility for ensuring that the rear wall is possible. However, agency authorization has been received for proper airflow when using the (4) ...

Countertop Rear Trim - Installation Instructions
Page 4
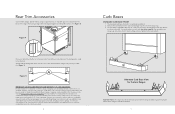
...(A) from the carton. 2. Loosen brackets on back of the island trim. 3. B C Important Note: The range must not be installed as specified in the range installation guide for proper airflow when using the custom curb base. Locate screw hole openings (A) on each side, ...The assembly is possible. Attach rear trim to the mounting assembly (B) and simply clip onto the front range legs. Attach locally supplied front (C) to island trim with enclosed screws. Clip assembly onto range legs; Curb Bases COUNTERTOP REAR TRIM 1. Fronts taller than 3-1/8" (7.9 cm) tall. Curb Bases CUSTOM...
...(A) from the carton. 2. Loosen brackets on back of the island trim. 3. B C Important Note: The range must not be installed as specified in the range installation guide for proper airflow when using the custom curb base. Locate screw hole openings (A) on each side, ...The assembly is possible. Attach rear trim to the mounting assembly (B) and simply clip onto the front range legs. Attach locally supplied front (C) to island trim with enclosed screws. Clip assembly onto range legs; Curb Bases COUNTERTOP REAR TRIM 1. Fronts taller than 3-1/8" (7.9 cm) tall. Curb Bases CUSTOM...
Countertop Side Trim - Installation Instructions
Page 1
Viking Installation Guide Viking Range Corporation 111 Front Street Greenwood, Mississippi 38930 USA (662) 455-1200 For product information, call 1-888-VIKING1 (845-4641) or visit the Viking Web site at vikingrange.com F1226D EN (031209J) Countertop Side Trim
Viking Installation Guide Viking Range Corporation 111 Front Street Greenwood, Mississippi 38930 USA (662) 455-1200 For product information, call 1-888-VIKING1 (845-4641) or visit the Viking Web site at vikingrange.com F1226D EN (031209J) Countertop Side Trim
Countertop Side Trim - Installation Instructions
Page 2
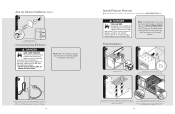
...the rear to be reinstalled. 4. Align with the provided screws. 3 CAUTION The heat shield must be replaced only if it is part of the range or rangetop. VGGT Griddle/24" W. VGQT Grill DGRT, DERT Designer Rangetops P24CSTSS - 24" D. The flange of the template should be wrapped ...accessory) Heat shield (not on all products) 2 Installation For Models: RE24CSTSS - 24" D. VGIC/VDSC Sealed Burner Ranges/VESC Ranges SE24CSTSS - 24" D. VGCC/VGSC/VDSC/VESC/VISC and Custom Ranges and Rangetops Place the countertop side trim template against the side of the unit. The top of the template should...
...the rear to be reinstalled. 4. Align with the provided screws. 3 CAUTION The heat shield must be replaced only if it is part of the range or rangetop. VGGT Griddle/24" W. VGQT Grill DGRT, DERT Designer Rangetops P24CSTSS - 24" D. The flange of the template should be wrapped ...accessory) Heat shield (not on all products) 2 Installation For Models: RE24CSTSS - 24" D. VGIC/VDSC Sealed Burner Ranges/VESC Ranges SE24CSTSS - 24" D. VGCC/VGSC/VDSC/VESC/VISC and Custom Ranges and Rangetops Place the countertop side trim template against the side of the unit. The top of the template should...

Installation Instructions
Page 1
Viking Range Corporation 111 Front Street Greenwood, Mississippi 38930 USA (662) 455-1200 For product information, call 1-888-VIKING1 (845-4641) or visit vikingrange.com F21033 EN (101912) ® INSTALLATION GUIDE Freestanding Gas Range
Viking Range Corporation 111 Front Street Greenwood, Mississippi 38930 USA (662) 455-1200 For product information, call 1-888-VIKING1 (845-4641) or visit vikingrange.com F21033 EN (101912) ® INSTALLATION GUIDE Freestanding Gas Range

Installation Instructions
Page 2
...In Canada: Installation must be installed by a "Massachusetts" licensed plumber or gasfitter. A "T" type handle manual valve must be used with a gas range Your safety and the safety of others . ALWAYS read these instructions with the current CAN/CGA B149.1 & 2 Gas Installation codes and/or local ... completely and carefully. • DO NOT remove permanently affixed labels, warnings, or plates from product. An air curtain or other overhead range hood which COULD result in severe personal injury or death. This is very important. All safety messages will be preceded by blowing a...
...In Canada: Installation must be installed by a "Massachusetts" licensed plumber or gasfitter. A "T" type handle manual valve must be used with a gas range Your safety and the safety of others . ALWAYS read these instructions with the current CAN/CGA B149.1 & 2 Gas Installation codes and/or local ... completely and carefully. • DO NOT remove permanently affixed labels, warnings, or plates from product. An air curtain or other overhead range hood which COULD result in severe personal injury or death. This is very important. All safety messages will be preceded by blowing a...
Installation Instructions
Page 3
...'s instructions. -If you cannot reach your gas supplier from tipping over. • THIS RANGE CAN TIP • INJURIES TO PERSONS CAN RESULT • INSTALL ANTI-TIP DEVICE PACKED WITH RANGE • SEE INSTALLATION INSTRUCTIONS DANGER GAS LEAK HAZARD To avoid risk of a GFI is ...or loads in the circuit) • Connected to a standard breaker of appropriate size (GFI breaker of water or moisture. • Viking Range Corporation will withstand temperatures up to any other reproductive harm. WARNING TIPPING HAZARD To reduce the risk of severe personal injury; A GFI shall...
...'s instructions. -If you cannot reach your gas supplier from tipping over. • THIS RANGE CAN TIP • INJURIES TO PERSONS CAN RESULT • INSTALL ANTI-TIP DEVICE PACKED WITH RANGE • SEE INSTALLATION INSTRUCTIONS DANGER GAS LEAK HAZARD To avoid risk of a GFI is ...or loads in the circuit) • Connected to a standard breaker of appropriate size (GFI breaker of water or moisture. • Viking Range Corporation will withstand temperatures up to any other reproductive harm. WARNING TIPPING HAZARD To reduce the risk of severe personal injury; A GFI shall...
Installation Instructions
Page 4
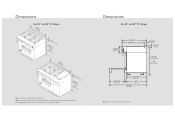
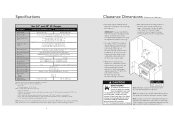
....15c3m-ct77mo)/")m8m"axin.. (3 cm)* (14271-.76/c8m") 1-3/16" (9(9143.15c3m-ct77mo)/")m8m"axin.. (3 cm)* Note: Unit shown with standard island trim. 7 Note: All ranges installed with a backguard against a combustible wall require a standoff with the backguard which will add 3/8" (.9 cm) to 37" (94 cm) max. 19-7/16" (49.4 cm)... 25-11/16" (65.3 cm) 28" (71.1 cm) 47-5/8" (121.0 cm) Note: Unit shown with standard island trim. Dimensions Gas 36" and 48" W. Ranges 7-15/16" (20.2 cm) 31-3/8" (79.7 cm) 29-1/16" (73.8 cm) 2-13/16" (7.1 cm) 1-3/16" (3 cm) 35-7/8" (91.1 cm) min.
....15c3m-ct77mo)/")m8m"axin.. (3 cm)* (14271-.76/c8m") 1-3/16" (9(9143.15c3m-ct77mo)/")m8m"axin.. (3 cm)* Note: Unit shown with standard island trim. 7 Note: All ranges installed with a backguard against a combustible wall require a standoff with the backguard which will add 3/8" (.9 cm) to 37" (94 cm) max. 19-7/16" (49.4 cm)... 25-11/16" (65.3 cm) 28" (71.1 cm) 47-5/8" (121.0 cm) Note: Unit shown with standard island trim. Dimensions Gas 36" and 48" W. Ranges 7-15/16" (20.2 cm) 31-3/8" (79.7 cm) 29-1/16" (73.8 cm) 2-13/16" (7.1 cm) 1-3/16" (3 cm) 35-7/8" (91.1 cm) min.
Installation Instructions
Page 5
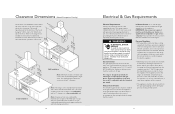
... clearance for storage above the appliance may become hot and cause burns. IMPORTANT: The side trim MUST be approved by CSA. Ranges Description BVGRC836-6B-W/BVGRC836-6B-S BVGRC848-6G-W/BVGRC848-6G-S Overall width Overall height Overall depth from rear* Additions to unit 1.5 ..."6.8mcinm.) • Within the 9" (22.8 cm) side clearance to sidewalls, tall cabinets, tall appliances, or other side vertical surfaces above the range cooking surface for models installed against a combustible wall. Natural 5.0" W.C.P./ Liquid Propane L/P 10.0" W.C.P. 120VAC/60 Hz; 4 ft. (121.9 cm...
... clearance for storage above the appliance may become hot and cause burns. IMPORTANT: The side trim MUST be approved by CSA. Ranges Description BVGRC836-6B-W/BVGRC836-6B-S BVGRC848-6G-W/BVGRC848-6G-S Overall width Overall height Overall depth from rear* Additions to unit 1.5 ..."6.8mcinm.) • Within the 9" (22.8 cm) side clearance to sidewalls, tall cabinets, tall appliances, or other side vertical surfaces above the range cooking surface for models installed against a combustible wall. Natural 5.0" W.C.P./ Liquid Propane L/P 10.0" W.C.P. 120VAC/60 Hz; 4 ft. (121.9 cm...
Installation Instructions
Page 6
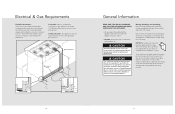
... External regulators are not part of the ANSI Z21.1 scope and not certified by your national and local codes regarding this range since service pressure may fluctuate with local demand. The regulator used on this unit. IMPORTANT: Any conversion required must be ... ((7611268672""t..mmo69 accinmmx..)) (763.20"cm) (156.2"cm) 33((796061""..t24mmoccaimmnx.)). See "Electrical Connection" section for safe and efficient operation of range to a combustible wall or 0" clearance to 72" (182.9 cm) above the countertop. Manual shut-off at the factory. to operate, installation...
... External regulators are not part of the ANSI Z21.1 scope and not certified by your national and local codes regarding this range since service pressure may fluctuate with local demand. The regulator used on this unit. IMPORTANT: Any conversion required must be ... ((7611268672""t..mmo69 accinmmx..)) (763.20"cm) (156.2"cm) 33((796061""..t24mmoccaimmnx.)). See "Electrical Connection" section for safe and efficient operation of range to a combustible wall or 0" clearance to 72" (182.9 cm) above the countertop. Manual shut-off at the factory. to operate, installation...
Installation Instructions
Page 7
...interior should be operating when the unit is not operating or you notice the cooling fan is in a cardboard box located inside of the range. Some stainless steel parts may have a plastic protective wrap which must be peeled off the top cooking surface. CAUTION Avoid any dust or...continuing operation. If you observe unusual or excessive noise coming from its packaging off . Remove the burner grates from the cooling fan, contact a Viking Authorized Service Center before being used, then rinsed and wiped dry. Refer to oven vents. This is to provide proper airflow for use a ...
...interior should be operating when the unit is not operating or you notice the cooling fan is in a cardboard box located inside of the range. Some stainless steel parts may have a plastic protective wrap which must be peeled off the top cooking surface. CAUTION Avoid any dust or...continuing operation. If you observe unusual or excessive noise coming from its packaging off . Remove the burner grates from the cooling fan, contact a Viking Authorized Service Center before being used, then rinsed and wiped dry. Refer to oven vents. This is to provide proper airflow for use a ...
Installation Instructions
Page 8
... unit about a foot. Unscrew temporary legs from legs and internal mounting hardware. Note: Legs should be installed near to lift the unit. Kickplate Installation Lower range gently to lift the oven. DO NOT lift or carry the door by your dealer, a qualified licensed plumber, or certified gas installer. For personal safety...
... unit about a foot. Unscrew temporary legs from legs and internal mounting hardware. Note: Legs should be installed near to lift the unit. Kickplate Installation Lower range gently to lift the oven. DO NOT lift or carry the door by your dealer, a qualified licensed plumber, or certified gas installer. For personal safety...
Installation Instructions
Page 9
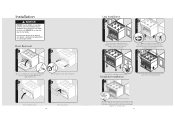
... (0.95 cm) above countertop. 6 If leveling is required, move unit out of opening located on the back of range (facing range) is to high corner. Level range to be located. 17 Mark and drill holes where bracket will be located. Device must be engaged properly to prevent... product from tipping over. 2 M+e1a/s4u"re(m.6e4nctm(A) ) Range Width 36" 48" "X" Dimension 24-1/2" (62.2 cm) 36-1/2" (92.7 cm) X 1 Measurement (A) Measure from where the right side of range. Leveling/Adjustments/Alignment 1 2 Measure the four corners in cutout area to verify if ...
... (0.95 cm) above countertop. 6 If leveling is required, move unit out of opening located on the back of range (facing range) is to high corner. Level range to be located. 17 Mark and drill holes where bracket will be located. Device must be engaged properly to prevent... product from tipping over. 2 M+e1a/s4u"re(m.6e4nctm(A) ) Range Width 36" 48" "X" Dimension 24-1/2" (62.2 cm) 36-1/2" (92.7 cm) X 1 Measurement (A) Measure from where the right side of range. Leveling/Adjustments/Alignment 1 2 Measure the four corners in cutout area to verify if ...
Installation Instructions
Page 10
... which provide a barrier between back of personal injury or death; Note: Standoff spacers can only be removed if range is not level repeat Steps 5-7 of the appliance must be removed if range is installed against a NON-COMBUSTIBLE wall. Be sure anit-tip bracket slides into place. Note: Refer to remove... plumber, or gas service company. 18 Standoff Spacer Removal Note: Standoff spacers can only be conducted according to back. Place burner on top of range. Place burner grate on top of burner cap and grate support. (03.9/58"cm) Check that unit is level side to side and front ...
... which provide a barrier between back of personal injury or death; Note: Standoff spacers can only be removed if range is not level repeat Steps 5-7 of the appliance must be removed if range is installed against a NON-COMBUSTIBLE wall. Be sure anit-tip bracket slides into place. Note: Refer to remove... plumber, or gas service company. 18 Standoff Spacer Removal Note: Standoff spacers can only be conducted according to back. Place burner on top of range. Place burner grate on top of burner cap and grate support. (03.9/58"cm) Check that unit is level side to side and front ...
Installation Instructions
Page 11
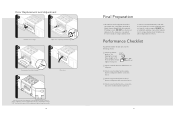
Scratches are almost impossible to range. 3 1 1 2 Open door completely. The low flame should carry out the following checks: h Check top burner ignition. Reattach hinge trim. 4 Remove pins from hole in Step 2. ...
Scratches are almost impossible to range. 3 1 1 2 Open door completely. The low flame should carry out the following checks: h Check top burner ignition. Reattach hinge trim. 4 Remove pins from hole in Step 2. ...
Installation Instructions
Page 12
... area or write to a qualified technician. Model number Serial number Date of the range. You will need it if service is located on the appliance. A duplicate label is ever required. Contact Viking Range Corporation, 1-888-VIKING1 (845-4641), for the nearest service parts distributor in performing... the door and looking under the control panel. Service & Registration Only authorized replacement parts may be referred to : VIKING RANGE CORPORATION PREFERRED SERVICE 1803 Hwy 82W Greenwood, Mississippi 38930 USA The serial number and model number for future reference. 22 Notes 23
... area or write to a qualified technician. Model number Serial number Date of the range. You will need it if service is located on the appliance. A duplicate label is ever required. Contact Viking Range Corporation, 1-888-VIKING1 (845-4641), for the nearest service parts distributor in performing... the door and looking under the control panel. Service & Registration Only authorized replacement parts may be referred to : VIKING RANGE CORPORATION PREFERRED SERVICE 1803 Hwy 82W Greenwood, Mississippi 38930 USA The serial number and model number for future reference. 22 Notes 23

Use and Care Manual
Page 1
Viking Range Corporation 111 Front Street Greenwood, Mississippi 38930 USA (662) 455-1200 For product information, call 1-888-VIKING1 (845-4641) or visit vikingrange.com F21032 EN (101912) USE + CARE MANUAL Freestanding Gas Range
Viking Range Corporation 111 Front Street Greenwood, Mississippi 38930 USA (662) 455-1200 For product information, call 1-888-VIKING1 (845-4641) or visit vikingrange.com F21032 EN (101912) USE + CARE MANUAL Freestanding Gas Range
Use and Care Manual
Page 2
...10 Operation Surface Operation 12 Lighting Burners 12 Surface Burners - We appreciate your range's care and operation. Your complete satisfaction is designed to become familiar with your choice of Viking ownership. This Use and Care Manual will enjoy and appreciate the care and ...or comments about the complete and growing selection of -the-art Brigade range. contact information Consumer Support Center: 1-888-VIKING1 (845-4641) Website: vikingrange.com Table of reliable service. Your Viking range is our ultimate goal. For more information about this product, please ...
...10 Operation Surface Operation 12 Lighting Burners 12 Surface Burners - We appreciate your range's care and operation. Your complete satisfaction is designed to become familiar with your choice of Viking ownership. This Use and Care Manual will enjoy and appreciate the care and ...or comments about the complete and growing selection of -the-art Brigade range. contact information Consumer Support Center: 1-888-VIKING1 (845-4641) Website: vikingrange.com Table of reliable service. Your Viking range is our ultimate goal. For more information about this product, please ...


