Viking RVIR330 Support and Manuals
Get Help and Manuals for this Viking item
View All Support Options Below
Free Viking RVIR330 manuals!
Problems with Viking RVIR330?
Ask a Question
Free Viking RVIR330 manuals!
Problems with Viking RVIR330?
Ask a Question
Popular Viking RVIR330 Manual Pages
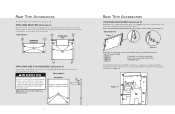
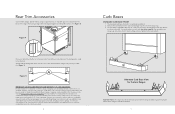
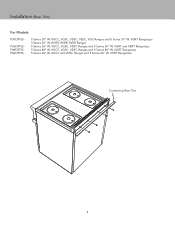
Countertop Rear Trim - Installation Instructions - Page 2
...removed from the outside and
inside parts of the product.
MAKE SURE ALL CORRUGATED
MATERIAL IS REMOVED FROM INSIDE
THE HIGH SHELF. NOTE: High shelf is already installed on each end and carefully ... holes (A) in each rear corner of these models, the spacers are not required, even if with Nylon Spacers (See Figure 1), which are installed in the channels (B) located at each rear channel...
Countertop Rear Trim - Installation Instructions - Page 3
...and simply clip onto the front range legs. 3. Normal installation for island trim on each side, but is possible. ... material utilized in the range installation guide for Custom Ranges
Important Note: The range must be installed as the wall is adjustable about....
5 The responsibility for island trim installations where a range or rangetop can be installed at the rear of the unit. ...
Countertop Rear Trim - Installation Instructions - Page 4

....
4. B C
Important Note: The range must not be installed as specified in the range installation guide for proper airflow when using the custom curb base. Align screw... hole openings on countertop rear trim with the ones on the back of island trim near the top. 2. Attach locally supplied front (C) to back setting...
36 inchW. Countertop Rear Trim - P36CRT - Installation Instructions - Page 2

... support side trim (standard with the original screws. Keep the screws for reuse.
3. It will not be replaced only if it is part of the original product.
8. Replace the heat shield and align the slotted screw holes with the screw holes in place. CAUTION
The heat shield must be reinstalled. 4. Installation (Side Trim)
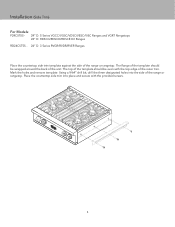
For Models:
R24CSTSS...
36 inchW. Countertop Rear Trim - P36CRT - Installation Instructions - Page 3
... - 24" D. 3 Series RVGR/RVDR/RVER Ranges Place the countertop side trim template against the side of the template should be even with the provided screws.
3 Installation (Side Trim)
For Models:
P24CSTSS - 24" D. 5 Series VGCC/VGSC/VDSC/VESC/VISC Ranges and VGRT Rangetops 24" D.
36 inchW. Countertop Rear Trim - P36CRT - Installation Instructions - Page 4
VGRT Rangetops 5 Series 60" W. Installation (Rear Trim)
For Models:
P30CRTSS - P36CRTSS P48CRTSS P60CRTSS -
5 Series 30" W. VGCC, VGSC, VDSC Ranges and 5 Series 36" W. VGRT Rangetops 3 Series 30" W. VGRT and VERT Rangetops 5 Series 48" W. VGRT Rangetops
...
Two-Page Specifications Sheet - Page 1

...directionally for easy cleaning
MODEL NUMBER
§ RVIR3304B - 30"W. countertop rear trim for 30" range § RD24CSTSS - overall § 4.1 cu. cosmetic parts such as glass,
... preheating § Oven has six porcelain-coated rack supports and comes standard with one TruGlide full extension oven ...Simmer and ultra-simmer settings are perfect for 30" range
COLOR FINISHES
§ Stainless Steel (SS...
Two-Page Specifications Sheet - Page 2

...Specifications subject to 37" (94 cm) max.
(913.64"cm)
(611"5(.332m3"ci.mn0m.)camx).4((2172905"6-.97.7m/c8mcin"m).)
(03.9/58c"m)
1(485".7mcmin). See installation instructions for important clearance/installation...Depth from brochure data only. Model
A
29-7/8"
VIKING RANGE, LLC 111 FRONT STREET GREENWOOD, MISSISSIPPI 38930 USA
For detailed product information, model numbers, or to Overall ...
English - Page 2

...
Hazards or unsafe practices which COULD result in this manual and on your appliance.
ALWAYS read these instructions completely and carefully. This symbol alerts you and others...16 Anti-tip Device Installation 17 Wall Mount Anti-tip Installation 18 Floor Mount Anti-tip Installation 19 Final Installation 20 Door Replacement 21 Final Preparation 22 Service & Registration 23
•...
English - Page 7

...Installation
Island Installation
Note: Minimum clearance for back wall is 0" with island trim and non-combustible rear wall. This would typically result in the bottom of the ANSI Z21.1 scope and are not part....20"cm) (15.62 "cm)
3((3796061".."4t2mmoccaimmnx.)).
to the range hood installation instructions for safe and efficient operation of a standard hood should be approved by CSA....
English - Page 8

...problems resulting from moisture (water, steam, high humidity) as much as reasonably possible
Electric access area
3-1/2" (8.9 cm)
3" (7.6 cm)
SIDE VIEW
6" (15.2 cm)
8
6" (15.2 cm)
33" (7.6 cm)
REAR VIEW Refer to Page 12-15 for instructions on the model...Requirements
Electrical Requirements Electrical installation should be performed by NFPA-70 (National Electric Code), federal/state/local ...
English - Page 9

... and ventilation air.
Some stainless steel parts may have a plastic protective wrap which can be peeled off. The interior should be installed with the range. Moving, Handling, and...Authorized Service Center before being used, then rinsed and wiped dry. Important -
If you notice the cooling fan is a floor mount device which must be used for all installation applications....
English - Page 10

... lift or carry the door by your dealer, or a qualified licensed plumber.
2
Open door completely. Remove door before installation to ensure that it is not used to lift the oven. Installation
Door Removal
1
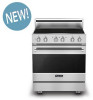
Viking Range | 3 Series Induction Range | RVIR330
CAUTION
To avoid risk of personal injury or product damages, DO...
English - Page 17

.../Adjustment/Alignment
7
Set the high corner of range so that the top of the range or under the range to verify that a floor hook and bracket have been installed.
17 Anti-tip Device Installation
WARNING
TIPPING HAZARD ...THEN THE ANTI-TIP DEVICE MUST BE REENGAGED.
Level range to verify proper installation engaged in the rear top left corner of side trim is 3/8" (0.95 cm) above countertop...
English - Page 23

...-4641), for future reference
23 Model number Serial number Date of purchase Date installed Dealer's name Address
These installation instructions should be referred to :
VIKING RANGE, LLC PREFERRED SERVICE
111 Front Street Greenwood, Mississippi 38930 USA Rangetop - Viking Range | 3 Series Induction Range | RVIR330
Service & Registration
Only authorized replacement parts may be found by...
Viking RVIR330 Reviews
We have not received any reviews for Viking yet.