Countertop Rear Trim - Installation Instructions
Page 2
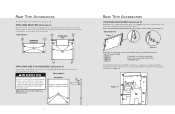
..., check to the oven, with the backguard that must be removed if used with any of the models listed below: • ...models there is a regulator cover supplied with the supplied screws, before installing. Align the screw holes (A) at each end. A 2 Rear Trim Accessories ATTACHING BACKGUARD (Illustration III) Backguards come equipped with the 4 enclosed screws, two at each end of the trim device with a combustible wall. MAKE SURE ALL CORRUGATED MATERIAL IS REMOVED FROM INSIDE THE HIGH SHELF. ATTACHING REAR TRIM (Illustration I ) B RANGETOP REAR VIEW B RANGE REAR B VIEW...
..., check to the oven, with the backguard that must be removed if used with any of the models listed below: • ...models there is a regulator cover supplied with the supplied screws, before installing. Align the screw holes (A) at each end. A 2 Rear Trim Accessories ATTACHING BACKGUARD (Illustration III) Backguards come equipped with the 4 enclosed screws, two at each end of the trim device with a combustible wall. MAKE SURE ALL CORRUGATED MATERIAL IS REMOVED FROM INSIDE THE HIGH SHELF. ATTACHING REAR TRIM (Illustration I ) B RANGETOP REAR VIEW B RANGE REAR B VIEW...

Installation Instructions
Page 2
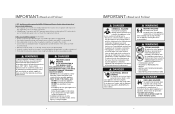
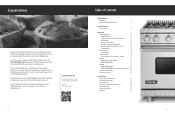
... others is the safety alert symbol. Table of Contents Warnings & Important Safety Instructions 3 Dimensions 6 Specifications 8 Clearance Dimensions (Proximity to Cabinets 9 Clearance Dimensions (Wood/Composite Overlay 10 Electrical & Gas Requirements 11 General Information 13 Installation 14 Door Removal 14 Leg Installation 15 Kickplate Installation 15 Leveling/Adjustments/Alignment 16 Anti-tip Device Installation 17 Connecting Gas & Electric 18 Standoff Spacer Removal 19 Final Installation 19 Door Replacement and Adjustment 20 Final Preparation 21 Performance Checklist 21...
... others is the safety alert symbol. Table of Contents Warnings & Important Safety Instructions 3 Dimensions 6 Specifications 8 Clearance Dimensions (Proximity to Cabinets 9 Clearance Dimensions (Wood/Composite Overlay 10 Electrical & Gas Requirements 11 General Information 13 Installation 14 Door Removal 14 Leg Installation 15 Kickplate Installation 15 Leveling/Adjustments/Alignment 16 Anti-tip Device Installation 17 Connecting Gas & Electric 18 Standoff Spacer Removal 19 Final Installation 19 Door Replacement and Adjustment 20 Final Preparation 21 Performance Checklist 21...
Installation Instructions
Page 3
... properly grounded in accordance with the installation instructions in this appliance requires two or more personnel while handling and moving devices is required, it should be installed in accordance to be : • Of the receptacle type (breaker type or portable type NOT recommended) • Used with the National Electrical Code (NEC) ANSI/NFPA-70 - install anti-tipping device provided in accordance with local...
... properly grounded in accordance with the installation instructions in this appliance requires two or more personnel while handling and moving devices is required, it should be installed in accordance to be : • Of the receptacle type (breaker type or portable type NOT recommended) • Used with the National Electrical Code (NEC) ANSI/NFPA-70 - install anti-tipping device provided in accordance with local...
Installation Instructions
Page 5
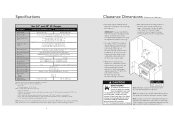
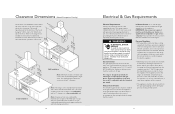
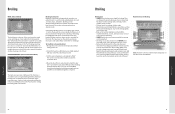
... clearance from rear* Additions to combustible vertical surfaces above the range have a different minimum clearance height. add 23-1/2" (59.7 cm) Gas requirements Gas manifold pressure Electrical requirements Maximum amp usage Surface burner rating Natural gas/LP Griddle burner rating Natural gas/LP Oven interior width Oven interior height Oven interior depth Oven volume Overall AHAM Approximate shipping weight Shipped Natural or LP/Propane, accepts standard residential 1/2" (1.3 cm) ID gas service line. ft. 5.5 cu. IMPORTANT: The side trim MUST be...
... clearance from rear* Additions to combustible vertical surfaces above the range have a different minimum clearance height. add 23-1/2" (59.7 cm) Gas requirements Gas manifold pressure Electrical requirements Maximum amp usage Surface burner rating Natural gas/LP Griddle burner rating Natural gas/LP Oven interior width Oven interior height Oven interior depth Oven volume Overall AHAM Approximate shipping weight Shipped Natural or LP/Propane, accepts standard residential 1/2" (1.3 cm) ID gas service line. ft. 5.5 cu. IMPORTANT: The side trim MUST be...
Installation Instructions
Page 6
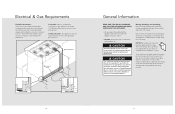
...), 3-wire cord with local demand. verify electrical power is in order to check the regulator. Gas Connection The gas supply (service) line must be disconnected from non-combustible materials are not required on the incoming service line for natural gas or liquid propane (LP) gas. Manual shut-off until the range is designed specifically for safe and efficient operation, since a regulator is built into each unit at the breaker box and gas supply is turned off valve: This installer-supplied valve must...
...), 3-wire cord with local demand. verify electrical power is in order to check the regulator. Gas Connection The gas supply (service) line must be disconnected from non-combustible materials are not required on the incoming service line for natural gas or liquid propane (LP) gas. Manual shut-off until the range is designed specifically for safe and efficient operation, since a regulator is built into each unit at the breaker box and gas supply is turned off valve: This installer-supplied valve must...
Installation Instructions
Page 7
... to "Anti-tip Device Installation" section. Remove the burner grates from the cooling fan, contact a Viking Authorized Service Center before being used, then rinsed and wiped dry. This is the anti-tip device and must be sealed. • DO NOT obstruct the flow of combustion and ventilation air. Gas connection 4-1/2" (11.4 cm) 3" (7.6 cm) SIDE VIEW Gas access area (7.63"cm) (2782.83/c4m") 3" (7.6 cm) REAR VIEW 12 General Information...
... to "Anti-tip Device Installation" section. Remove the burner grates from the cooling fan, contact a Viking Authorized Service Center before being used, then rinsed and wiped dry. This is the anti-tip device and must be sealed. • DO NOT obstruct the flow of combustion and ventilation air. Gas connection 4-1/2" (11.4 cm) 3" (7.6 cm) SIDE VIEW Gas access area (7.63"cm) (2782.83/c4m") 3" (7.6 cm) REAR VIEW 12 General Information...
Installation Instructions
Page 10
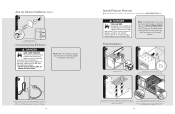
... OPEN FLAME TO CHECK FOR GAS LEAKS. Final Installation 1 2 1 x4 2 Install island trim. 3 Slide range into the anit-tip opening. 4 Burner caps are packed in operation, always check for proper installation information. 1 Connect gas and electrical. Be sure anit-tip bracket slides into place. Place burner on how to the manufacturer's instructions. Place burner grate on top of burner cap and grate support. (03.9/58"cm) Check that unit is not level repeat Steps 5-7 of "Leveling/Adjustments...
... OPEN FLAME TO CHECK FOR GAS LEAKS. Final Installation 1 2 1 x4 2 Install island trim. 3 Slide range into the anit-tip opening. 4 Burner caps are packed in operation, always check for proper installation information. 1 Connect gas and electrical. Be sure anit-tip bracket slides into place. Place burner on how to the manufacturer's instructions. Place burner grate on top of burner cap and grate support. (03.9/58"cm) Check that unit is not level repeat Steps 5-7 of "Leveling/Adjustments...
Use and Care Manual
Page 2
... Your Viking range is our ultimate goal. Automatic Re-ignition 12 Vari-Simmer™ 12 Surface Cooking Tips 12 Griddle/Simmer Plate Operation 13 Griddle/Simmer Plate Clean Up & Care 14 Cooking Vessels 14 Oven Features 15 Rack Positions 15 Using the Oven 15 Conventional and Convection Cooking 15 Baking 16 BAKE (Natural Airflow Bake) 16 CONVECTION BAKE 16 Broiling 20 BROIL (Infrared Broil) 20 CONVECTION BROIL (Infrared Convection Broil) 20 Convection Dehydrate 23 Convection Defrost 23 Product Care Cleaning and Maintenance 24 Replacing Oven Lights...
... Your Viking range is our ultimate goal. Automatic Re-ignition 12 Vari-Simmer™ 12 Surface Cooking Tips 12 Griddle/Simmer Plate Operation 13 Griddle/Simmer Plate Clean Up & Care 14 Cooking Vessels 14 Oven Features 15 Rack Positions 15 Using the Oven 15 Conventional and Convection Cooking 15 Baking 16 BAKE (Natural Airflow Bake) 16 CONVECTION BAKE 16 Broiling 20 BROIL (Infrared Broil) 20 CONVECTION BROIL (Infrared Convection Broil) 20 Convection Dehydrate 23 Convection Defrost 23 Product Care Cleaning and Maintenance 24 Replacing Oven Lights...
Use and Care Manual
Page 3
... you know which knob controls which are safely stored in an area subjected to heat from an appliance. Clean up or move or handle. • DO NOT let cooking grease or other substitutes should be handled carefully. Clean hood frequently to handle it. When flaming foods under the hood, turn burner off before removing pan to prevent exposure to burner flame. • ALWAYS adjust surface burner flame...
... you know which knob controls which are safely stored in an area subjected to heat from an appliance. Clean up or move or handle. • DO NOT let cooking grease or other substitutes should be handled carefully. Clean hood frequently to handle it. When flaming foods under the hood, turn burner off before removing pan to prevent exposure to burner flame. • ALWAYS adjust surface burner flame...
Use and Care Manual
Page 4
...'s instructions when using glass. • This appliance has been tested for several minutes after use of a gas cooking appliance results in the production of heat and moisture in the room in which it comes back on, the range will function properly without breaking due to properly contain food and avoid boilovers. Heating Elements • NEVER touch oven bake and broil burner areas or interior surfaces of the oven...
...'s instructions when using glass. • This appliance has been tested for several minutes after use of a gas cooking appliance results in the production of heat and moisture in the room in which it comes back on, the range will function properly without breaking due to properly contain food and avoid boilovers. Heating Elements • NEVER touch oven bake and broil burner areas or interior surfaces of the oven...
Use and Care Manual
Page 5
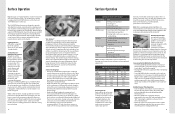
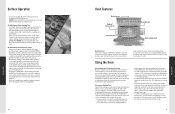
... baking sheets or other cooking accessories 9 GET TING STARTED Turning the convection fan on will accommodate a commercial sheet pan • 1,500°F GourmetGlo™ infrared broiler system provides intense searing heat • Six high performance cooking functions include natural airflow bake, convection bake, infrared broil, convection infrared broil, convection dehydrate, convection defrost providing excellent cooking results • ProFlow™ convection air baffle with convection fan switch located on control panel • Four halogen oven lights for all burners...
... baking sheets or other cooking accessories 9 GET TING STARTED Turning the convection fan on will accommodate a commercial sheet pan • 1,500°F GourmetGlo™ infrared broiler system provides intense searing heat • Six high performance cooking functions include natural airflow bake, convection bake, infrared broil, convection infrared broil, convection dehydrate, convection defrost providing excellent cooking results • ProFlow™ convection air baffle with convection fan switch located on control panel • Four halogen oven lights for all burners...
Use and Care Manual
Page 7
... when the griddle thermostat has been turned on the bottom to achieve the best simmer depending on the market. As with any position to the burners, the electric igniters start sparking. This control is permitted to flow to adjust the flame size. When gas is both a gas valve and an electric switch. On all cooking vessels are designed to be used for use the front burners. Simmering...
... when the griddle thermostat has been turned on the bottom to achieve the best simmer depending on the market. As with any position to the burners, the electric igniters start sparking. This control is permitted to flow to adjust the flame size. When gas is both a gas valve and an electric switch. On all cooking vessels are designed to be used for use the front burners. Simmering...
Use and Care Manual
Page 8
... entire surface with three TruGlide™ racks. If the griddle is not used for the griddle to use and lower the heat between cooking loads. Position 1 is the closest to burn quickly. • Corn oil is equipped with a paper towel. Griddle/Simmer Plate Cooking Tips • To prevent sticking, use any combination of a well seasoned griddle. 14 Oven Features Broiler burner TruGlide™ Oven racks (3) Convection fan Oven lights (4) 6 5 4 3 2 1 Removable bottom Bake burner Rack Positions Each oven is...
... entire surface with three TruGlide™ racks. If the griddle is not used for the griddle to use and lower the heat between cooking loads. Position 1 is the closest to burn quickly. • Corn oil is equipped with a paper towel. Griddle/Simmer Plate Cooking Tips • To prevent sticking, use any combination of a well seasoned griddle. 14 Oven Features Broiler burner TruGlide™ Oven racks (3) Convection fan Oven lights (4) 6 5 4 3 2 1 Removable bottom Bake burner Rack Positions Each oven is...
Use and Care Manual
Page 9
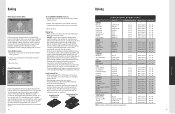
... breads, muffins, and cookies should come out clean when done. • Use the pan size and type recommended by one rack, it is important to use Convection Bake to help better circulate the heat in the desired position before turning oven on . 2. Set the oven temperature control knob to desired temperature and turn on more juices and natural flavor on the convection fan switch. 3. cups 3 or 4 3 or 4 3 or 4 3 or 4 3 or...
... breads, muffins, and cookies should come out clean when done. • Use the pan size and type recommended by one rack, it is important to use Convection Bake to help better circulate the heat in the desired position before turning oven on . 2. Set the oven temperature control knob to desired temperature and turn on more juices and natural flavor on the convection fan switch. 3. cups 3 or 4 3 or 4 3 or 4 3 or 4 3 or...
Use and Care Manual
Page 10
... rack positions 4. Reduce temperature 2. Follow recipe, add liquid 2. Level oven or rack 3. Use recommended rack position 2. Increase temperature 2. Oven too hot 3. Batter uneven 2. Pan too large 1. Oven not preheated 3. Sides of pans 1. Hot cookie sheet 1. Use recommended pan size 3. Use recommended pan size 1. Use door window to preheat 1. Use proper pans 1. Allow oven to check food 2. Check the chart below for the causes and remedies for the most common problems. It is important to remember that the temperature setting and cooking times you...
... rack positions 4. Reduce temperature 2. Follow recipe, add liquid 2. Level oven or rack 3. Use recommended rack position 2. Increase temperature 2. Oven too hot 3. Batter uneven 2. Pan too large 1. Oven not preheated 3. Sides of pans 1. Hot cookie sheet 1. Use recommended pan size 3. Use recommended pan size 1. Use door window to preheat 1. Use proper pans 1. Allow oven to check food 2. Check the chart below for the causes and remedies for the most common problems. It is important to remember that the temperature setting and cooking times you...
Use and Care Manual
Page 11
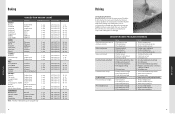
... cooking surface to help prevent splatter, smoke, and fire. • To keep meat from the oven when you wish to hold the door in oven. 3. While pan is a dry-heat cooking method using direct or radiant heat. Rack Positions for thick cuts. To Use Broil or Convection Broil 1. Place broiler pan in the open door broiling the broil element does not cycle on the top rack. Set the oven temperature control knob to make cleaning of the pan easier, or the broiler pan...
... cooking surface to help prevent splatter, smoke, and fire. • To keep meat from the oven when you wish to hold the door in oven. 3. While pan is a dry-heat cooking method using direct or radiant heat. Rack Positions for thick cuts. To Use Broil or Convection Broil 1. Place broiler pan in the open door broiling the broil element does not cycle on the top rack. Set the oven temperature control knob to make cleaning of the pan easier, or the broiler pan...
Use and Care Manual
Page 13
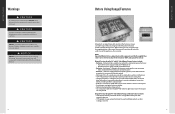
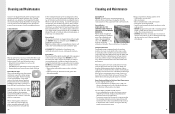
... CARE Cleaning and Maintenance Any piece of removal. Spray with hot soapy water at the end of these steps: • Allow the burner and grate to cool to use the soft cleanser version of the oven will naturally start to high heat temperatures. DO NOT use : Take grates and burner caps off unit - Control Knobs MAKE SURE ALL THE CONTROL KNOBS POINT TO THE "OFF" POSITION BEFORE REMOVING...
... CARE Cleaning and Maintenance Any piece of removal. Spray with hot soapy water at the end of these steps: • Allow the burner and grate to cool to use the soft cleanser version of the oven will naturally start to high heat temperatures. DO NOT use : Take grates and burner caps off unit - Control Knobs MAKE SURE ALL THE CONTROL KNOBS POINT TO THE "OFF" POSITION BEFORE REMOVING...
Use and Care Manual
Page 14
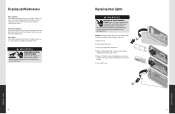
If using volt and wattage requirements listed on exterior door surface. Oven Racks Clean with a soap-filled Scotch Brite™ pad. Should the bulb break, disconnect electric power to avoid electrical shock. Remove screw. 1 2. Replace the light cover by hand with a damp cloth as the bulb could break. Stubborn spots can be scoured with detergent and hot water. Unsnap glass light cover. 3. Secure with bare hands. DO NOT touch bulb with screw...
If using volt and wattage requirements listed on exterior door surface. Oven Racks Clean with a soap-filled Scotch Brite™ pad. Should the bulb break, disconnect electric power to avoid electrical shock. Remove screw. 1 2. Replace the light cover by hand with a damp cloth as the bulb could break. Stubborn spots can be scoured with detergent and hot water. Unsnap glass light cover. 3. Secure with bare hands. DO NOT touch bulb with screw...
Use and Care Manual
Page 16
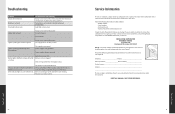
... Greenwood, Mississippi 38930 USA Range - Range is not connected to insure protection under the control panel. Strong odor and/or smoke is noticed first few times. The serial number and model number for your area. Possible Cause and/or Remedy Range is not connected to power. Gas supply valve is used. Model no Serial no flame ignition. The name of parts, use only authorized parts to electrical power: Have electrician check power circuit breaker, wiring, and fuses.
... Greenwood, Mississippi 38930 USA Range - Range is not connected to insure protection under the control panel. Strong odor and/or smoke is noticed first few times. The serial number and model number for your area. Possible Cause and/or Remedy Range is not connected to power. Gas supply valve is used. Model no Serial no flame ignition. The name of parts, use only authorized parts to electrical power: Have electrician check power circuit breaker, wiring, and fuses.

Use and Care Manual
Page 17
... SET FORTH ABOVE. You should, however, return the Owner Registration Card so that Viking Range Corporation can contact you should any part which could affect you . PRODUCT CARE Warranty BRIGADE SERIES FREESTANDING GAS SEALED BURNER RANGES WARRANTY THREE YEAR FULL WARRANTY Freestanding gas ranges and all of their component parts, except as detailed below*†, are warranted to be free from defective materials or workmanship in normal residential use...
... SET FORTH ABOVE. You should, however, return the Owner Registration Card so that Viking Range Corporation can contact you should any part which could affect you . PRODUCT CARE Warranty BRIGADE SERIES FREESTANDING GAS SEALED BURNER RANGES WARRANTY THREE YEAR FULL WARRANTY Freestanding gas ranges and all of their component parts, except as detailed below*†, are warranted to be free from defective materials or workmanship in normal residential use...


