
User Guide English
Page 52
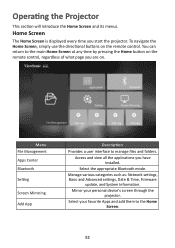
... the appropriate Bluetooth mode. Select your personal device's screen through the projector. Manage various categories such as: Network settings, Basic and Advanced settings, Date & Time, Firmware update, and System Information. You can return to the main Home Screen at any time by pressing the Home button on the remote control, regardless...
... the appropriate Bluetooth mode. Select your personal device's screen through the projector. Manage various categories such as: Network settings, Basic and Advanced settings, Date & Time, Firmware update, and System Information. You can return to the main Home Screen at any time by pressing the Home button on the remote control, regardless...

User Guide English
Page 55
Main Menu Sub-menu Basic Settings Date & Time Settings Firmware Upgrade Advanced Settings Warping Zoom Focus Test Pattern Automatic Date & Time Date Time Time Zone Time Format Software Update Online Software Update by USB OTA Reminder Software Version Power On Source Power On/Off Ring Tone Auto Power On Menu Option Warping Disable Enable Warping Adjustment OK 0.8x 0.9x 1.0x Manual OK Auto Focus Disable Enable OK Disable Enable 12 hours 24 hours Disable Enable Home HDMI 1 HDMI 2 USB-C Disable Enable CEC Disable HDMI 1 HDMI 2 55
Main Menu Sub-menu Basic Settings Date & Time Settings Firmware Upgrade Advanced Settings Warping Zoom Focus Test Pattern Automatic Date & Time Date Time Time Zone Time Format Software Update Online Software Update by USB OTA Reminder Software Version Power On Source Power On/Off Ring Tone Auto Power On Menu Option Warping Disable Enable Warping Adjustment OK 0.8x 0.9x 1.0x Manual OK Auto Focus Disable Enable OK Disable Enable 12 hours 24 hours Disable Enable Home HDMI 1 HDMI 2 USB-C Disable Enable CEC Disable HDMI 1 HDMI 2 55

User Guide English
Page 62
Supported Photo formats: Format Type .jpg/.jpeg .bmp .png Progressive JPEG Baseline JPEG Maximum Resolution 7680 x 4320 7680 x 4320 9600 x 6400 7680 x 4320 Supported External Connected Device formats: Device Support Size (Max. Size) USB Memory Stick USB HDD 256 GB 2 TB NTFS Format Read Write V N/A V N/A FAT32 Format Read Write V V V V exFAT Read Write N/A N/A N/A N/A NOTE: • Windows 10 built-in format tool only supports FAT32 format up to 32 GB. • Firmware upgrade only supports FAT32 format. 62
Supported Photo formats: Format Type .jpg/.jpeg .bmp .png Progressive JPEG Baseline JPEG Maximum Resolution 7680 x 4320 7680 x 4320 9600 x 6400 7680 x 4320 Supported External Connected Device formats: Device Support Size (Max. Size) USB Memory Stick USB HDD 256 GB 2 TB NTFS Format Read Write V N/A V N/A FAT32 Format Read Write V V V V exFAT Read Write N/A N/A N/A N/A NOTE: • Windows 10 built-in format tool only supports FAT32 format up to 32 GB. • Firmware upgrade only supports FAT32 format. 62
User Guide English
Page 67
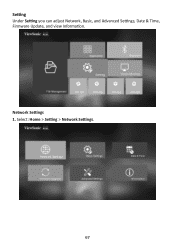
Select: Home > Setting > Network Settings. 67 Network Settings 1. Setting Under Setting you can adjust Network, Basic, and Advanced Settings, Date & Time, Firmware Update, and view Information.
Select: Home > Setting > Network Settings. 67 Network Settings 1. Setting Under Setting you can adjust Network, Basic, and Advanced Settings, Date & Time, Firmware Update, and view Information.
User Guide English
Page 73
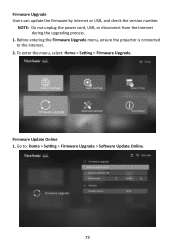
Firmware Upgrade Users can update the firmware by internet or USB, and check the version number. Firmware Update Online 1. NOTE: Do not unplug the power cord, USB, or disconnect from the Internet during the upgrading process. 1. Before entering the Firmware Upgrade menu, ensure the projector is connected to : Home > Setting > Firmware Upgrade > Software Update Online. 73 To enter the menu, select: Home > Setting > Firmware Upgrade. Go to the Internet. 2.
Firmware Upgrade Users can update the firmware by internet or USB, and check the version number. Firmware Update Online 1. NOTE: Do not unplug the power cord, USB, or disconnect from the Internet during the upgrading process. 1. Before entering the Firmware Upgrade menu, ensure the projector is connected to : Home > Setting > Firmware Upgrade > Software Update Online. 73 To enter the menu, select: Home > Setting > Firmware Upgrade. Go to the Internet. 2.
User Guide English
Page 74
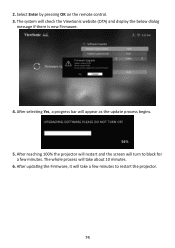
The system will turn to black for a few minutes to restart the projector. 74 After reaching 100% the projector will restart and the screen will check the ViewSonic website (OTA) and display the below dialog message if there is new Firmware. 4. After selecting Yes, a progress bar will take about 10 minutes. 6. The whole process will take a few minutes. Select Enter by pressing OK on the remote control. 3. After updating the Firmware, it will appear as the update process begins. 5. 2.
The system will turn to black for a few minutes to restart the projector. 74 After reaching 100% the projector will restart and the screen will check the ViewSonic website (OTA) and display the below dialog message if there is new Firmware. 4. After selecting Yes, a progress bar will take about 10 minutes. 6. The whole process will take a few minutes. Select Enter by pressing OK on the remote control. 3. After updating the Firmware, it will appear as the update process begins. 5. 2.
User Guide English
Page 75
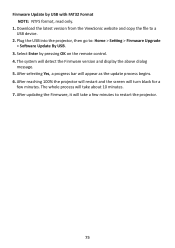
Download the latest version from the ViewSonic website and copy the file to : Home > Setting > Firmware Upgrade > Software Update By USB. 3. Plug the USB into the projector, then go to a USB device. 2. Select Enter by USB with FAT32 Format NOTE: NTFS ... restart the projector. 75 After reaching 100% the projector will restart and the screen will appear as the update process begins. 6. Firmware Update by pressing OK on the remote control. 4. After updating the Firmware, it will take a few minutes. The whole process will take about 10 minutes. 7. The system will detect the...
Download the latest version from the ViewSonic website and copy the file to : Home > Setting > Firmware Upgrade > Software Update By USB. 3. Plug the USB into the projector, then go to a USB device. 2. Select Enter by USB with FAT32 Format NOTE: NTFS ... restart the projector. 75 After reaching 100% the projector will restart and the screen will appear as the update process begins. 6. Firmware Update by pressing OK on the remote control. 4. After updating the Firmware, it will take a few minutes. The whole process will take about 10 minutes. 7. The system will detect the...
